***You can purchase an INEXPENSIVE AD-FREE PDF of this pattern on Etsy HERE! This beautifully formatted PDF includes the step-by-step pictures and is a total of 12 pages including the cover page! You can also check out my Chinese New Year Zodiac Amigurumi Bundle HERE as it includes ALL my special zodiac designs to date at a discounted price!
***I have created two step-by-step blog posts that show the detailed process photos!
- Part 1 covers the making of the body and splitting into four legs HERE.
- Part 2 covers the making of the snout, hair, hooves, belly, horns, ears and tail body HERE.
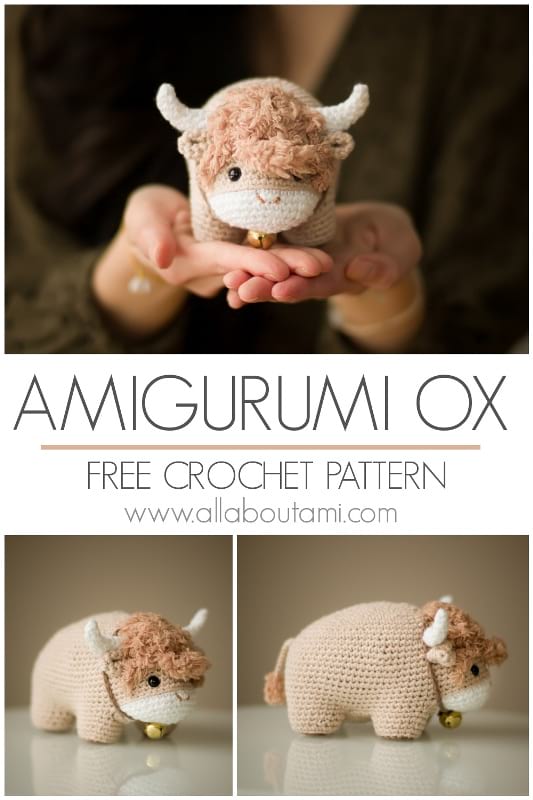
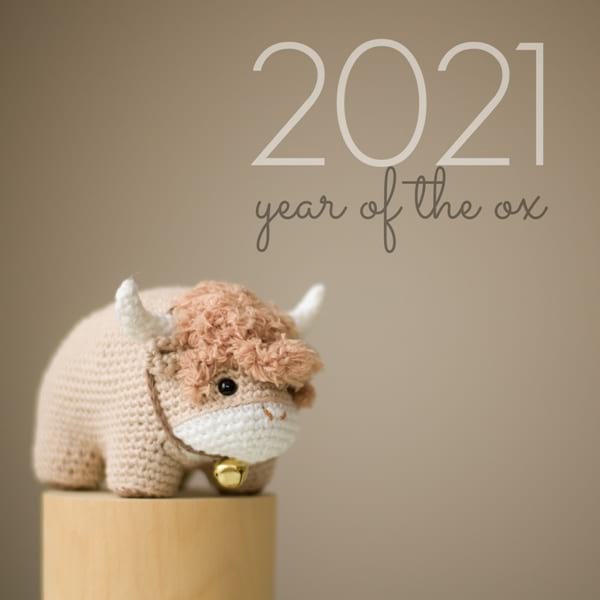
Crochet your own adorable ox with floppy hair, sweet little horns , ears, hooves and a bell! This amigurumi ox is fun to work up with a unique construction method and is the perfect gift for your loved ones born in the Year of the Ox!
Materials:
- Coboo Yarn (lightweight level 3) in “Tan” (~45 g}, “White” (~5 g) and “Taupe” (~3 g)
- Super bulky Fluffy/eyelash tan yarn (~3 g) for the hair and tail; I used “Moco Cafe Soft and Fluffy Knitting Yarn” in “Mocha latte” from Daiso
- 2.75 mm Clover Amour Hook and 5.5 mm Clover Amour hook (for fluffy yarn)
- Yarn needle (bent tip helpful for attaching amigurumi parts- see HERE)
- Fiberfill
- 7.5 mm safety eyes
- Tan embroidery floss
- Gold jingle bell (optional – ours was 0.5″/1.3 cm in height and width)
Notes:
- Please check out my blog posts entitled “Amigurumi for Beginners“, “How to Read Amigurumi Patterns“, “The Magic Circle“, “The Invisible Decrease“, “How to Crochet Around a Foundation Chain” and “The Right Side of Amigurumi” for helpful tips and techniques that you can use when crocheting this amigurumi! It is very important that you know the difference between the right and wrong side of crochet when making this amigurumi, so please reference that blog post.
- Work in continuous rounds so there is no visible seam (do not slip stitch after each round).
- The stitch count is very important for this design, so be sure to count your stitches after each round to ensure you have the correct number. Use a stitch marker to help you keep track of your rounds!
- We will be crocheting the body and head as one piece as we begin by crocheting around a foundation chain.
- Once a certain number of rounds has been worked, we will be splitting the piece into two sections by working some chain stitches across: the two sections are the body (where the legs and belly will be worked later on) and the snout.
- The body is divided into four leg chains so that four holes are created. Each leg will be worked separately by picking up stitches around the hole for a seamless body to leg transition. This technique is the same one used in the amigurumi Elephant pattern HERE.
- The snout is picked up around the other section using white yarn.
- To give the face more definition and to help define the snout, we will be using a technique called eye indentation as described in more detail later on. This technique pulls the safety eyes back to give them more depth.
- Five strands of hair are crocheted using fluffy yarn and attached onto the head of the ox.
- Four brown hooves (circles) are crocheted and then whip stitched to the bottom of the legs.
- The belly is crocheted and then attached to the bottom of the ox (between all the legs) to close up the body.
- Then, two white horns and two tan ears are crocheted and attached on either side of the head.
- The tail is crocheted using both the regular and fluffy yarn and then seamed to the rear of the ox.
- An optional jingle bell with strap is then attached around the ox for a cute final detail!
- Inc (increase) = Work 2 sc in the next stitch. [1 stitch becomes 2 stitches.]
- Dec (I use the invisible decrease): Insert hook into front loops of the next two stitches. Yarn over and draw through first two loops. Yarn over and draw through remaining two loops. You can check out my detailed step-by-step blog post about this very helpful technique HERE.
Finished Dimensions: 3.5”/9 cm tall, 3”/7.6 cm wide, 5.5”/14 cm long
PATTERN
HEAD/BODY
Using tan yarn and 2.75 mm hook,
Ch 9 (this is the foundation chain),
R1: Starting from second chain from hook, Sc 7 in back loops of foundation chain. Work 3 sc in last stitch. Turn the chain, Sc 6 in front loops of foundation chain, then work 1 inc in next front loop [we are making an oval by crocheting around the chain]. (18 sts)
R2: Inc, Sc 6, Inc x 3, Sc 6, Inc x 2. (24)
R3: Sc 8, Inc, Sc 1, Inc, Sc 1, Inc, Sc 11. (27)
R4: Inc, Sc 9, Inc, Sc 2, Inc, Sc 2, Inc, Sc 6, Inc, Sc 1, Inc, Sc 1. (33)
R5: Sc 2, Inc, Sc 6, Inc, Sc 3, Inc, Sc 3, Inc, Sc 11, Inc, Sc 2, Inc. (39)
R6: Inc, Sc 11, Inc, Sc 4, Inc, Sc 4, Inc, Sc 8, Inc, Sc 3, Inc, Sc 3. (45)
R7: Sc 15, Inc, Sc 5, Inc, Sc 5, Inc, Sc 17. (48)
R8: Sc 2, Inc, Sc 14, Inc, Sc 6, Inc, Sc 6, Inc, Sc 8, Inc, Sc 4, Inc, Sc 2. (54)
R9: Sc 4, Inc, Sc 7, Inc, Sc 7, Inc, Sc 7, Inc, Sc 17, Inc, Sc 5, Inc, Sc 1. (60)
R10: Sc 6, Inc, Sc 8, Inc, Sc 8, Inc, Sc 8, Inc, Sc 18, Inc, Sc 6, Inc. (66)
R11: Sc around. (66)
R12: Inc, Sc 17, Inc, Sc 9, Inc, Sc 9, Inc, Sc 11, Inc, Sc 7, Inc, Sc 7. (72)
R13: Sc around. (72)
R14: Sc 2, Inc, Sc 18, Inc, Sc 10, Inc, Sc 10, Inc, Sc 12, Inc, Sc 8, Inc, Sc 6. (78)
R15: Sc around. (78)
R16: Sc 4, Inc, Sc 19, Inc, Sc 11, Inc, Sc 11, Inc, Sc 13, Inc, Sc 9, Inc, Sc 5. (84)
R17: Sc around. (84)
R18-22: Repeat R17.
Place stitch marker in last stitch of Round 22.
Place two stitch markers at Y (14th stitch around) and Z (75th stitch around).
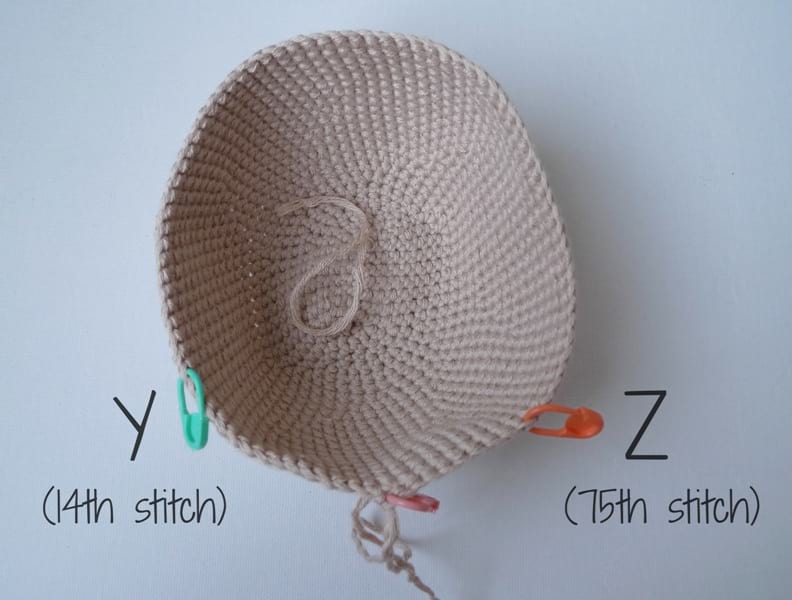
In the next round, we will create a series of chain stitches across the piece to separate it into two sections: the body and the snout.
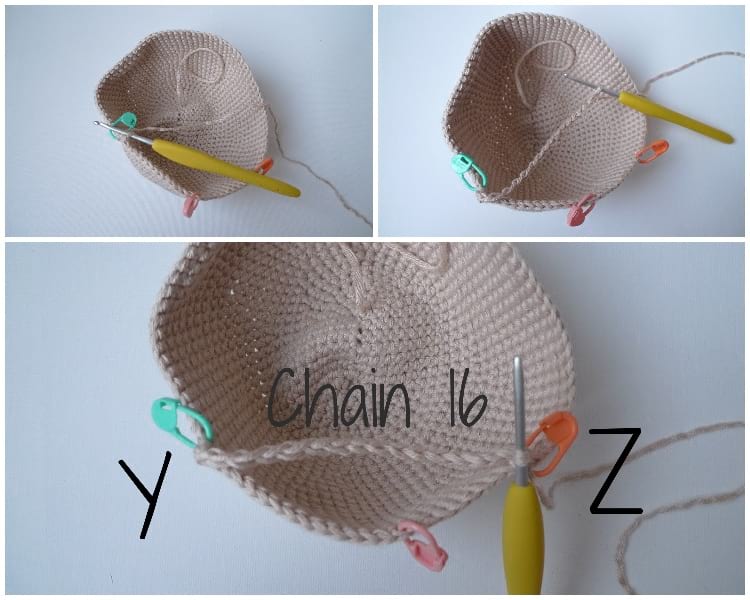
R23: Sc 14 to point Y. Chain 16 across and slip stitch to point Z.
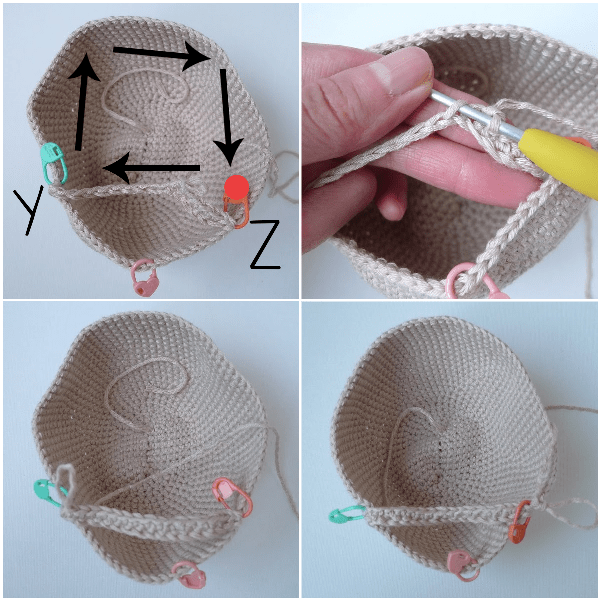
R24: Starting at Z, chain 1 and turn (we will be crocheting towards Y back down the 16 chain stitches). Sc 16 across chain stitches in the back loops only (leave the front loops for when we will be working the snout later on) towards Y. Once you have reached Y, Sc 62 around the body (going from Y back around to Z). Note that Y and Z count as sts. (78 sts).
R25: *Sc 11, Dec*, rep 6 times. (72 sts)
Place marker in last stitch. DO NOT CUT THE YARN. You can remove all the other stitch markers (remove Y and Z but leave marker indicating last st of round).
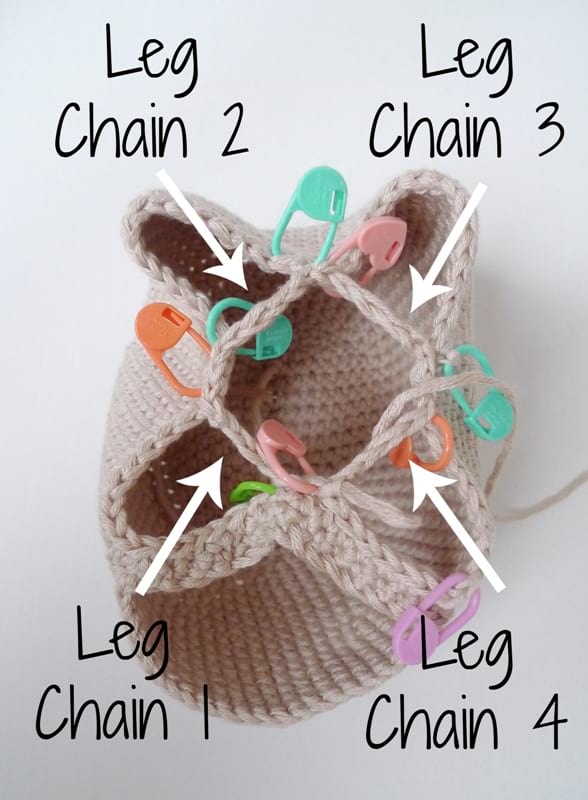
We will now divide up the body into four leg chains: Leg Chains 1, 2, 3 and 4.
Place stitch markers in the following stitches: H (8th stitch), A (9th stitch), B (25th stitch), C (28th stitch), D (44th stitch), E (45th stitch), F (61st stitch), and G (64th stitch) .
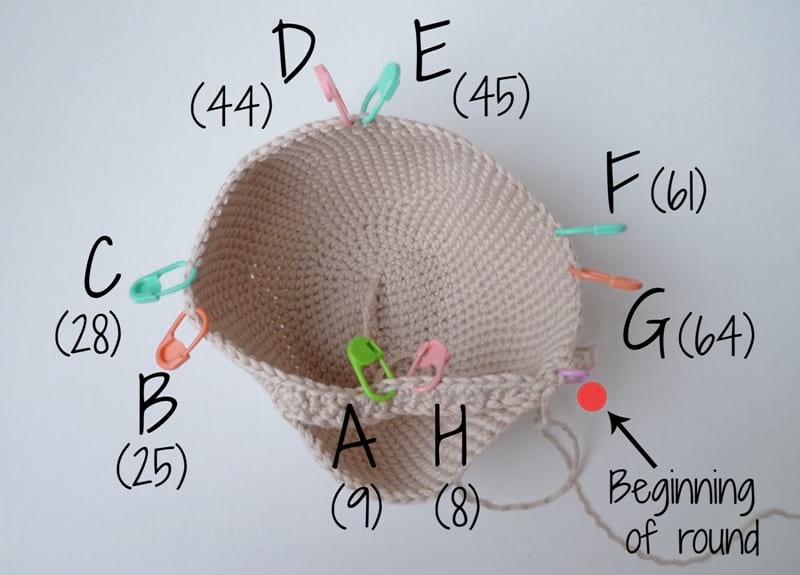
Starting from where yarn currently is:
- Slip stitch 9 to A (replace marker H at 8th stitch when you pass it). Chain 4, slip stitch to B. Leg Chain 1 has been created.
- Slip stitch 3 to C. Chain 4, slip stitch to D. Leg Chain 2 has been created.
- Slip stitch 1 to E. Chain 4, slip stitch to F. Leg Chain 3 has been created.
- Slip stitch 3 to G. Chain 4, slip stitch to H. Leg Chain 4 has been created. DO NOT CUT THE YARN.
We will now begin crocheting the legs of the ox. Note that the stitches where the stitch markers were placed (e.g. H and G) count as stitches and that we will always be working clockwise. Each leg will consist of 21 stitches. You can technically remove the stitch markers but leave H, A, C and E so you know where to begin each leg. Please reference the step-by-step blog post HERE to see detailed pictures of where to work each leg and in what direction.
Leg 4:
R1: Starting at H (where yarn currently is), chain 1, turn. Sc 4 (across the chain stitches), Sc 17 (around body). (21 sts)
R2: Sc 21. (21)
R3: *Sc 5, Dec*, rep 3 times. (18 sts)
R4: Sc 18. (18 sts).
Fasten off (you do not need to leave a long end for seaming).
Leg 1:
R1: Rejoin yarn at A: Sc 17 (around body), Sc 4 (across chain stitches). (21 sts)
Repeat instructions for R2-4of Leg 4. Fasten off (you do not need to leave a long end for seaming).
Leg 2:
R1: Rejoin yarn at C: Sc 17 (around body), Sc 4 (across chain stitches). (21 sts)
Repeat instructions for R2-4of Leg 4. Fasten off (you do not need to leave a long end for seaming).
Leg 3:
R1: Rejoin yarn at E: Sc 17 (around body), Sc 4 (across chain stitches). (21 sts)
Repeat instructions for R2-4of Leg 4. Fasten off (you do not need to leave a long end for seaming).
SNOUT:
Using white yarn and 2.75 mm hook,
Hold ox upside down so legs and open belly are towards the top. Rejoin yarn at first stitch next to Leg 4 (indicated by pink stitch marker and red circle in images below).
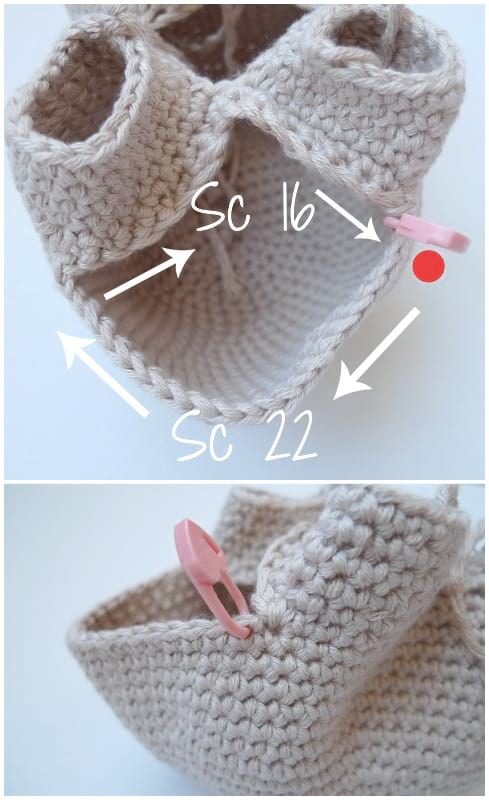
R1: Sc 22 in back loops only around face (this helps leave a defined ridge between the upper face and the snout), then Sc 16 along the chain length in the loops that are left-over (the back loops were worked during R24 of body). Note that the original Y and Z from when we created the chain length DO NOT count as stitches – ignore the slip stitch that was worked at Y. (38 sts)
R2: Sc around. (38 sts)
R3: *Sc 4, Dec*, rep 6 times. Sc 2. (32 sts).
R4: *Sc 6, Dec*, rep 4 times. (28 sts)
R5: *Sc 2, Dec*, rep 7 times. (21 sts)
R6: *Sc 1, Dec*, rep 7 times. (14 sts)
R7: *Dec*, rep 7 times. (7 sts)
Fasten off and weave yarn tail through front loops of remaining stitches. Pull tight to close the hole.
Eye Indentation:
Place safety eyes in desired position. There is a junction between the white snout and tan face: We placed our safety eyes around the 2nd to 3rd row of the tan section above the junction, about 7 stitches apart. Do NOT snap in washers yet.
Using tan embroidery floss, embroider nostrils onto snout. Embroider two lines centered between eyes, starting from second round below junction of white snout and tan face (line spans across the second round).
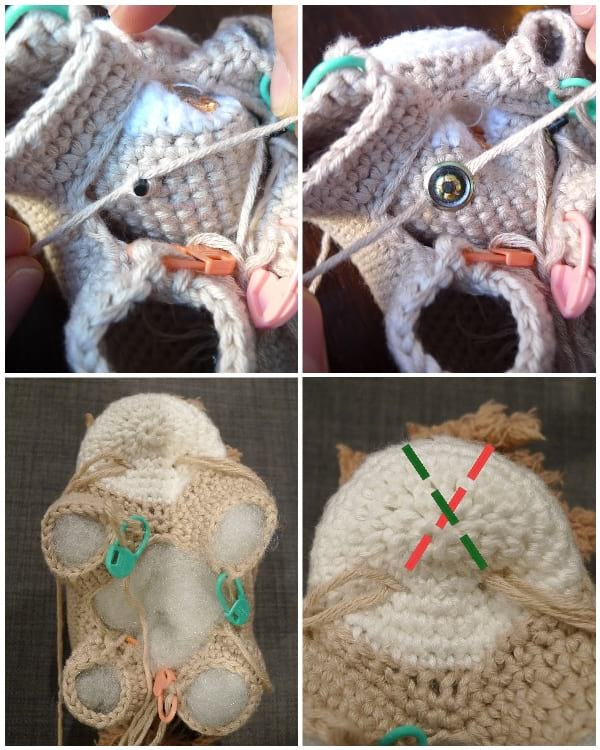
To give the face more definition, we will be using a technique called eye indentation.After inserting the safety eyes (without attaching washer yet), use two white yarn strands (each 12” long) and tie knots around post of each safety eye. Add the washers. Pull each yarn strand downwards diagonally (ensure the strands cross each other to form an X inside the head behind the snout). Using your crochet hook, pick up the strands and have them exit the snout between Rounds 4 and 5 of snout, about 5 stitches apart. Stuff only the front of the snout gently (the area in front of the X created by the eye indentation strands).
HAIR:
Using 5.5 mm hook with fuzzy yarn,
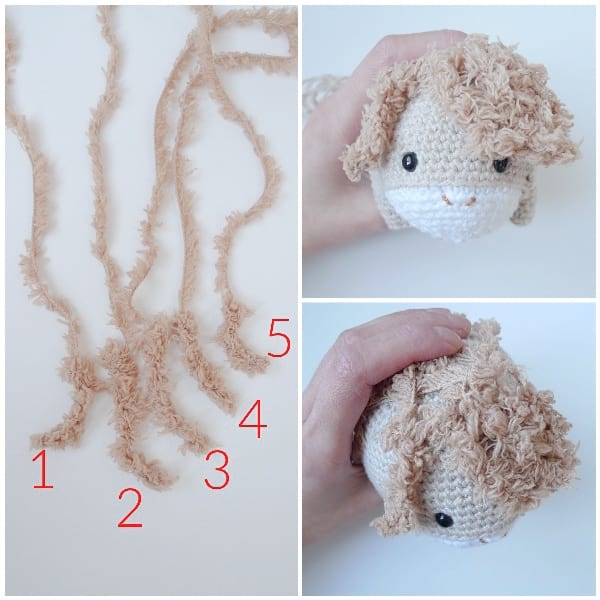
We will be creating five strands of hair that we will attach on top of the head. Always leave a long initial end for seaming and leave a short final end (snip the yarn pretty close to where you fasten off).
Here are the 5 strands created:
Strand #1: Chain 6, fasten off.
Strand #2: Chain 10, fasten off.
Strand #3: Chain 8, fasten off.
Strand #4: Chain 6, fasten off.
Strand #5: Chain 5, fasten off.
The chain 10 is approximately 3.75”/9.5 cm long and the chain 5 strand is approximately 2”/5 cm long.
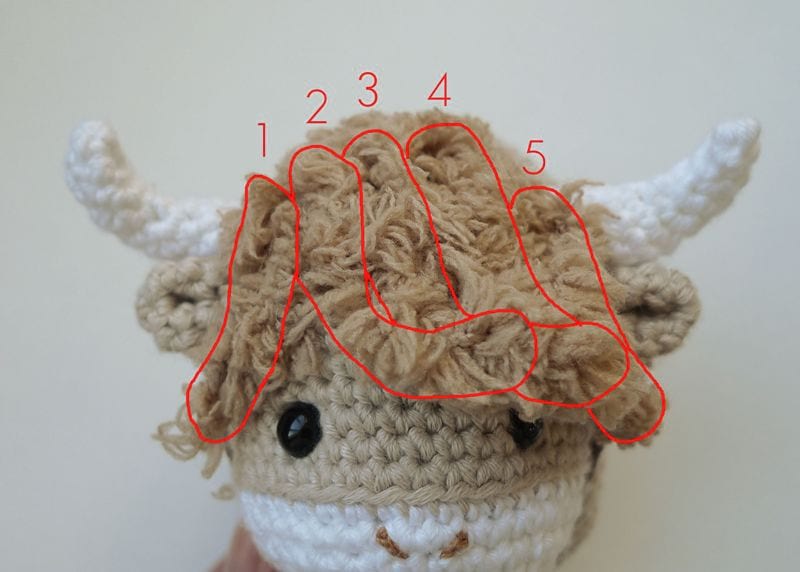
Place the strands of hair on top of head as pictured below. Use long initial end to attach top of strand to the top of the head. Then, have yarn end exit the head approximately half way down the hair strand, tag down the strand into place, and reinsert yarn end back into head at same location. Methodically place yarn strands on head and keep attaching in this method.
Stuffing the Piece:
Stuff the head and body with fiberfill. Take two eye indentation strands (from the same eye), pull (not too tightly) and tie a knot. Check to see if you like how the eye and snout look – then secure with another knot. Repeat with other eye. This eye indentation technique serves two purposes: to indent the eyes AND further define the snout. Weave in ends.
HOOVES (make 4)
Using taupe yarn and 2.75 mm hook,
R1: 6 Sc in Magic Ring.
R2: *Inc*, rep 6 times. (12 sts)
Fasten off and leave long end for sewing. Stuff each leg. Place hoof on top of open end of leg. Whip stitch outermost loop of hoof to open end of leg. For extra security, you can tie knots with strands from opposite leg (e.g., tie knots with yarn ends from two front legs and tie knots with strands from two back legs).
BELLY:
Using tan yarn and 2.75 mm hook,
R1: 6 Sc in Magic Ring.
R2: *Inc*, rep 6 times. (12 sts)
R3: *Sc 1, Inc*, rep 6 times. (18 sts)
R4: *Sc 2, Inc*, rep 6 times. (24 sts)
R5: *Sc 3, Inc*, rep 6 times. (30 sts)
Fasten off and leave long end for sewing. Finish stuffing body of ox. Place belly on top of hole with yarn tail at bottom. Whip stitch belly to body.
HORNS (make 2):
Using white yarn and 2.75 mm hook,
R1: 4 sc in Magic Ring. (4 sts)
R2: Sc around. (4 sts)
R3: Inc x 2, Sc 2. (6 sts)
R4: Sc 1, Inc x 2, Sc 1, Dec. (7 sts)
R5: Dec, Sc 1, Inc x 2, Dec. (7 sts)
R6: Dec, Inc x 3, Dec. (8 sts)
R7: Sc 3, Inc x 2, Sc 3. (10 sts)
R8: Dec, Sc 2, Inc x 2, Sc 2, Dec. (10 sts)
R9: Dec, Sc 3, Inc x 2, Sc 1, Dec. (10 sts)
Fasten off and leave long end for sewing.
Place horns on sides of head just behind the hair. Attach so that the horn is curving upwards.
EARS (make 2):
Using tan yarn and 2.75 mm hook,
R1: 6 Sc in Magic Ring.
R2: *Inc*, rep 6 times. (12 sts)
R3: Sc around. (12 sts)
R4: Sc around. (12 sts)
Fasten off and leave long end for sewing.
Pinch ears and whip stitch the edges together to keep this shape. Attach to sides of head right underneath the horns.
TAIL:
Using 2.75 mm hook and fuzzy yarn,
Leaving long initial end, chain 3, turn. Starting in second st from hook, slip stitch 2 back down. Fasten off. Leave long end. You should have two long ends for tying into a knot later on.
Using 2.75 mm hook and regular tan yarn,
Leaving long initial end, chain 10. Starting in second st from hook, slip stitch 9 back down. Fasten off.
Tie fuzzy part onto tan part using long fuzzy ends. Attach tail to backside of ox using the tan yarn strands, approximately at Round 14 of body.
Bell with Strap:
Using 2.75 mm hook, chain 40 with taupe yarn and wrap around ox to check if this is an appropriate length. Attach jingle bell onto chain and tie around ox.
**************************
We LOVE how our amigurumi ox turned out as he is so adorable with his round body, sweet face and shaggy hair! Many of you commented that he looks like he could belong in a boy band with his stylish hairstyle and side-swept bangs!
The construction of this ox is very different compared to our other zodiac amigurumi, and I love the technique of using leg chains to help give that seamless body to leg transition!
Our daughters Myla and Brielle watched us bring our amigurumi ox to life and they both declared that they thought the ox was the cutest animal of our series so far! We have been lovingly referring to our ox as “Oxie”! All the details from the dainty bell to the adorable pinched ears, fuzzy hair and curved horns help give this ox so much personality!

We hope you enjoy creating your own amigurumi oxen too! I know many of you are born in the Year of the Ox or want to crochet them for some special babies coming into your lives this year. It has been such a joy continuing this series as we first began this tradition of designing a new amigurumi to help celebrate the Chinese New Year back in January 2011!
Here is the group so far! Doesn’t the newest addition look so adorable among his zodiac friends? I love how they all have a similar style but are so unique in their own ways. We have: Lamb, Dragon, Rooster, Monkey, Pony, Snake, Rat, Dog, Chinese New Year Doll, and Pig! All of these patterns can be found in my Chinese New Year Zodiac Amigurumi Bundle HERE that contains all 11 patterns so far (65 pages) at a discounted price! You can also check out the All About Ami Amigurumi Pattern Bundle HERE that contains ALL the amigurumi patterns we’ve designed so far (over 30 patterns). Subscribe to my e-mail newsletter HERE to keep up to date with all my newest crochet and knit designs!
Thank you for your support, everyone! Happy crocheting and amigurumi making!