***You can purchase an INEXPENSIVE AD-FREE PDF of this pattern on Etsy HERE and on LoveCrafts HERE! This beautifully formatted PDF includes the step-by-step pictures and is a total of 10 pages including the cover page! You can also check out my Chinese New Year Zodiac Amigurumi Bundle HERE as it includes ALL my special zodiac designs at a discounted price (the collection is now complete)!
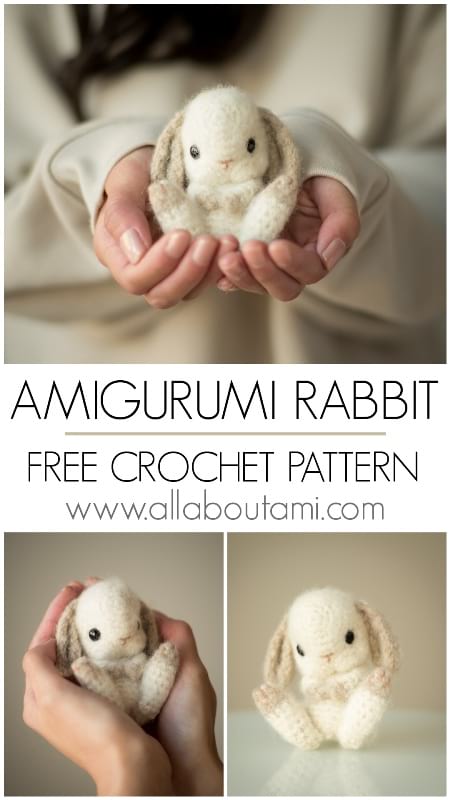
Crochet your own baby bunny with adorable cheeks and floppy ears in a sweet and cuddly pose! This amigurumi rabbit is the perfect gift for bunny lovers and those born in the Year of the Rabbit!
- Chainette Yarn (worsted weight level 4) in “Ecru” (~22 g/51 yds) and “Beige” (~5 g/11.5 yds); this yarn is 80% Baby Alpaca, 18% Virgin Wool and 12% Polyamide. Choose a yarn that can be fuzzed up with a dog slicker brush (has some natural fibers in it or acrylic yarn that has a halo to it).
- 2.00 mm Clover Amour Hook
- Yarn needle (bent tip helpful for attaching amigurumi parts- see HERE)
- Lock ring stitch markers
- Fiberfill
- 9 mm safety eyes
- Pink embroidery floss for nose/mouth & leg paws
- Dog slicker brush
Notes:
- Please check out my blog posts entitled “Amigurumi for Beginners“, “How to Read Amigurumi Patterns“, “The Magic Circle“, “The Invisible Decrease“, “How to Crochet Around a Foundation Chain” and “The Right Side of Amigurumi” for helpful tips and techniques that you can use when crocheting this amigurumi.
- Work in continuous rounds so there is no visible seam (do not slip stitch after each round).
- Please note which yarn color you are working with for each body part and when you need to switch colors.
- For a cleaner color change when switching yarn colors, work last stitch in old color: work as if typical single crochet until two loops are left on the hook (i.e. insert hook into stitch, yarn over, pull up a loop). Use new color to yarn over and pull through both loops. Work slip stitch in next stitch using new color. Then continue crocheting single crochets as normal with new color.
- The head is shaped uniquely to create a protruding forehead and puffy cheeks. One forehead and two cheek pieces are seamed together. Stitches are worked around this joined piece to become the rest of the head.
- Eye indentation is used which involves pulling the safety eyes back to give more depth.
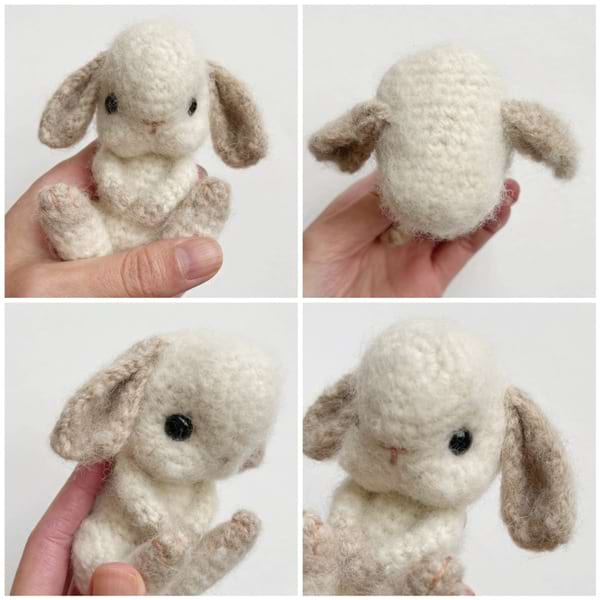
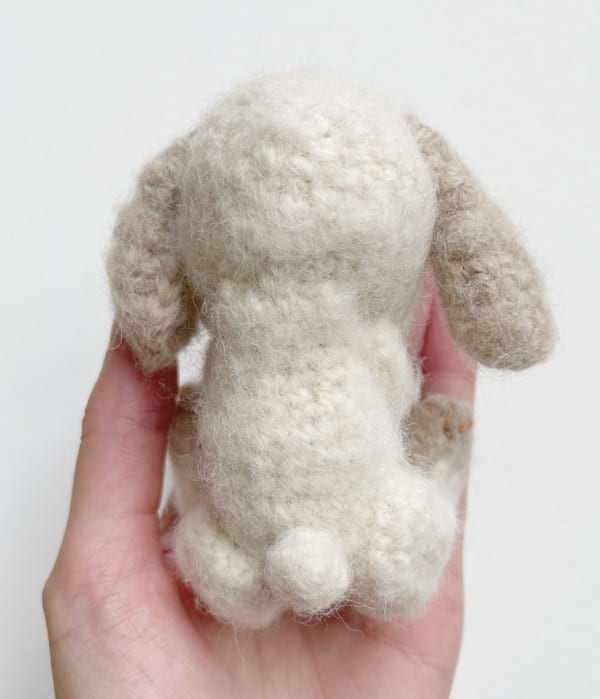
- Using a dog slicker brush gives a beautifully soft brushed effect to this amigurumi bunny! It is recommended to fuzz up each body part individually before seaming them together. The body parts are positioned and seamed together in a special cuddly pose so that the bunny can rest in your hands.
- When stuffing any narrow tubes, such as the legs, you can use a chopstick or bottom of the crochet hook to push the fiberfill in.
- Inc (increase) = Work 2 sc in the next stitch. [1 stitch becomes 2 stitches.]
- Dec (I use the invisible decrease): Insert hook into front loops of the next two stitches. Yarn over and draw through first two loops. Yarn over and draw through remaining two loops.
Finished Dimensions: 4”/10 cm tall, 3”/7.6 cm wide (at head with ears)
PATTERN:
The head is formed by crocheting one forehead and two cheeks. These three pieces are seamed together, and then stitches are picked up around this joined piece to continue building the head. Set aside two 14”/36 cm strands of ecru yarn for eye indentation.
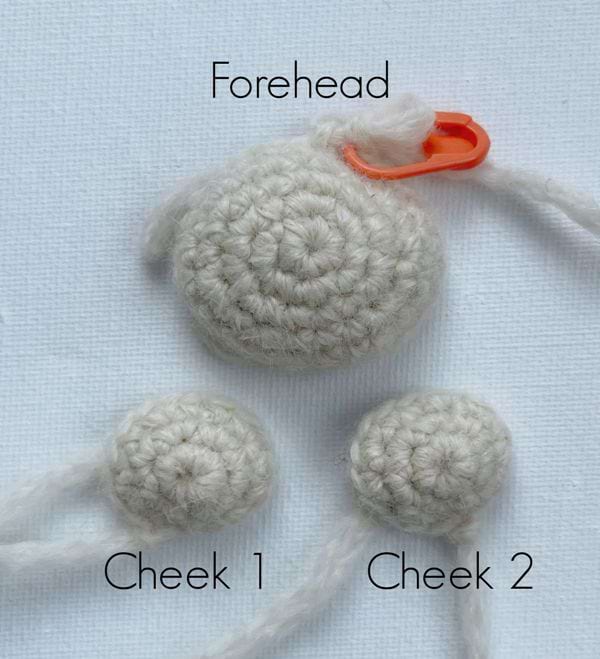
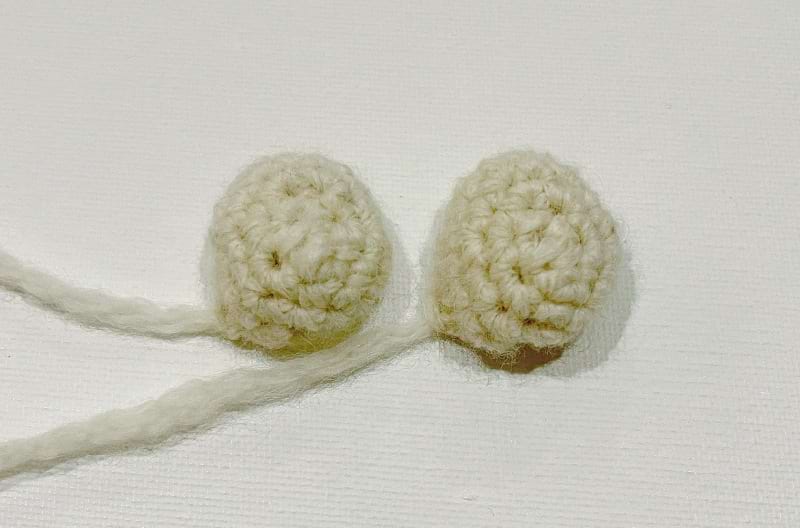
Cheeks (make 2):
Using ecru yarn,
R1: 6 sc in Magic Ring. (6 sts)
R2: Inc around. (12 sts)
R3: Sc 1, Inc, Sc 2, Inc, Sc 2, Inc, Sc 2, Inc, Sc 1. (16 sts)
Sl st to next st. Fasten off and leave long end for seaming. Note that each cheek has 16 stitches.
Forehead:
Using ecru yarn,
R1: 6 sc in Magic Ring. (6 sts)
R2: Inc around. (12 sts)
R3: Sc 1, Inc x 3, Sc 3, Inc x 3, Sc 2. (18 sts)
R4: Sc 2, Inc, Sc 1, Inc, Sc 1, Inc, Sc 3, Inc, Sc 1, Inc, Sc 1, Inc, Sc 3. (24 sts)
R5-6: Sc 24. (24 sts)
DO NOT fasten off. Place stitch marker in last stitch. We will use the working yarn to continue crocheting the head later on. Note that the forehead has 24 stitches.
It is now time to join the forehead to the two cheeks. You will join these pieces together in three steps as shown in the diagram:
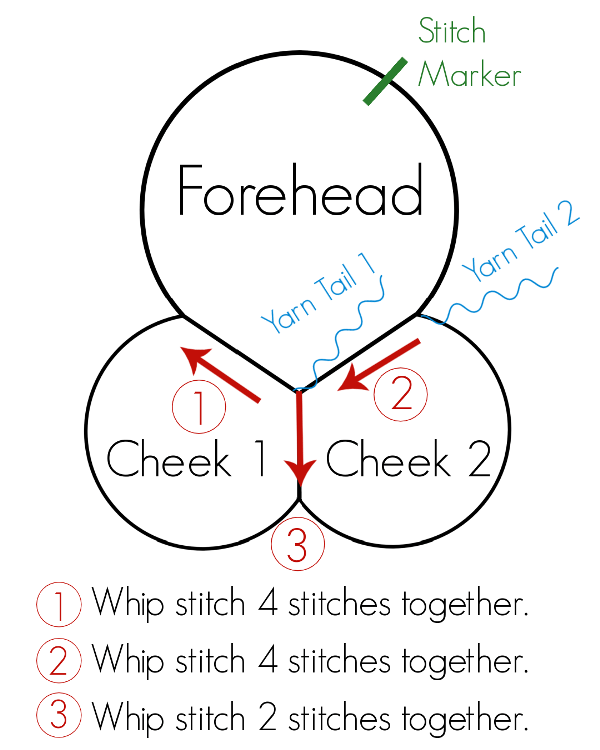
Step 1: Place Cheek 1 below the forehead so Yarn Tail 1 is in the correct position. Use the yarn tail to seam 4 stitches of the cheek to 4 stitches of the forehead (go from right to left in the direction of the arrow). Use the whip stitch to seam the two outer loops of the stitches together. Note that stitches #10, 11, 12 and 13 of the forehead (when counting from the stitch marker, moving counter-clockwise) will be attached to the four stitches of Cheek 1.
Step 2: Place Cheek 2 below the forehead and to the right of Cheek 1. In the same manner, use Yarn Tail 2 to seam 4 stitches of the cheek to 4 stitches of the forehead (go from right to left in the direction of the arrow). Note that stitches #14, 15, 16 and 17 of the forehead will be attached to the four stitches of Cheek 2. You will continue using this yarn tail for Step 3.
(The picture below shows what the piece looks like after Steps 1 & 2 have been completed.)
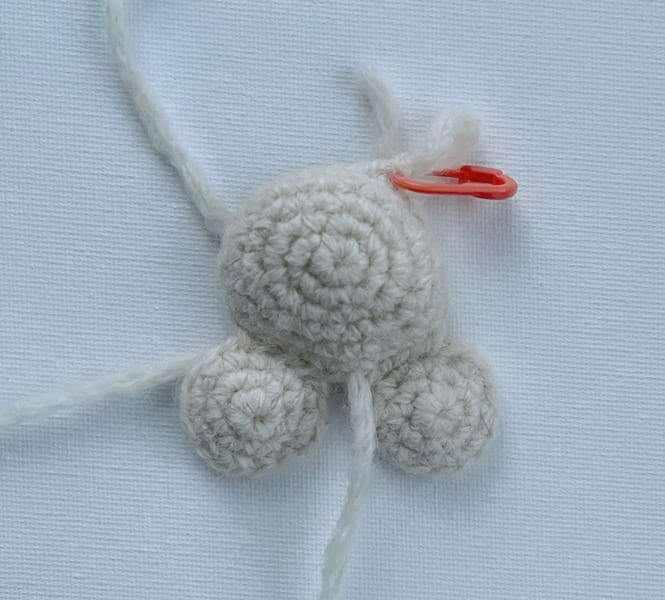
Step 3: Using the same Yarn Tail 2 from Step 2, seam 2 stitches of the cheeks together, going downwards (from top to bottom as shown in the direction of the arrow).
In total, 6 stitches of each cheek have been used for attaching (4 stitches to the forehead and 2 stitches to other cheek). This leaves 10 stitches of each cheek that have not been attached (16 – 6 = 10).
(The picture below shows what the piece looks like after all three steps have been completed.)
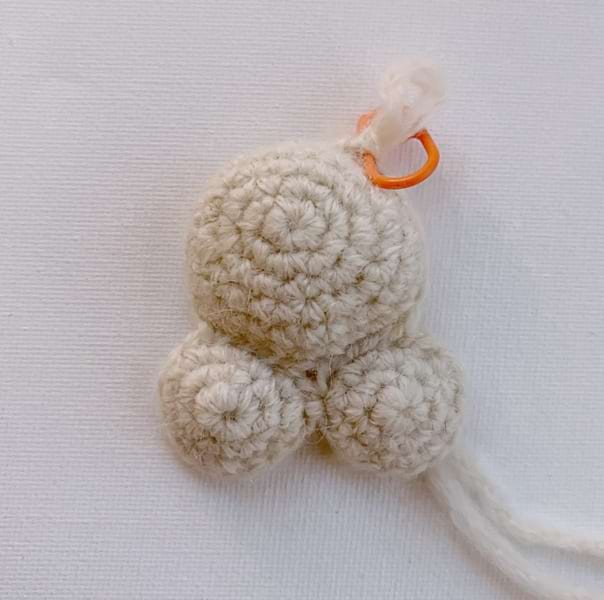
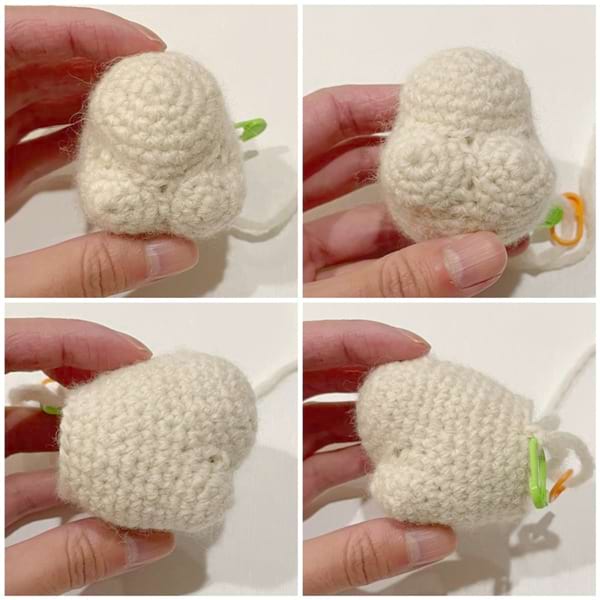
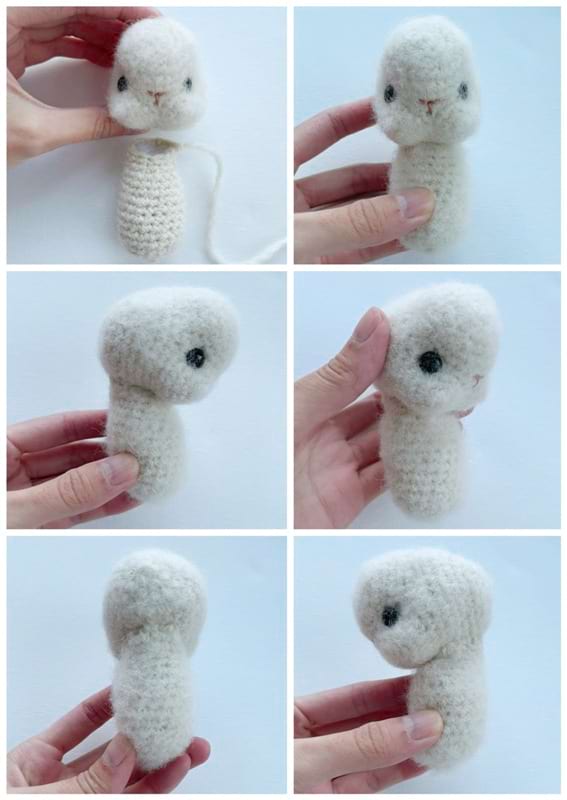
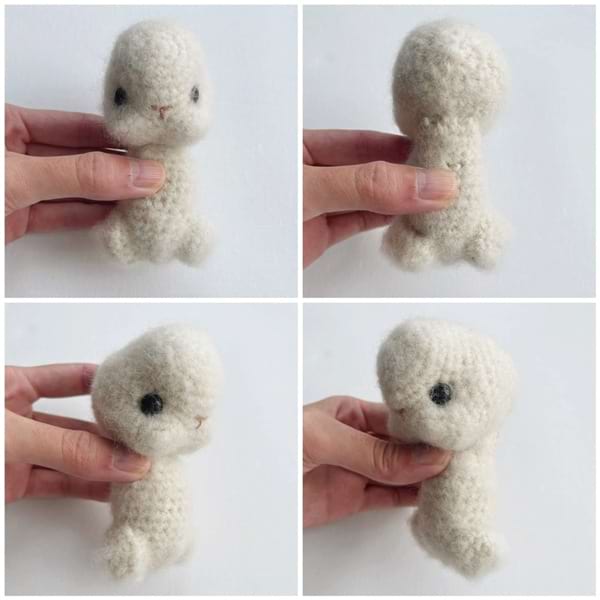
You can tie the initial/final ends together to secure them in place (they will be hidden within the head). The three pieces have been joined together. Now we will continue building up the head using the working yarn from the forehead (where stitch marker is located).
Head:
Continuing from the joined pieces and using the working yarn from the forehead,
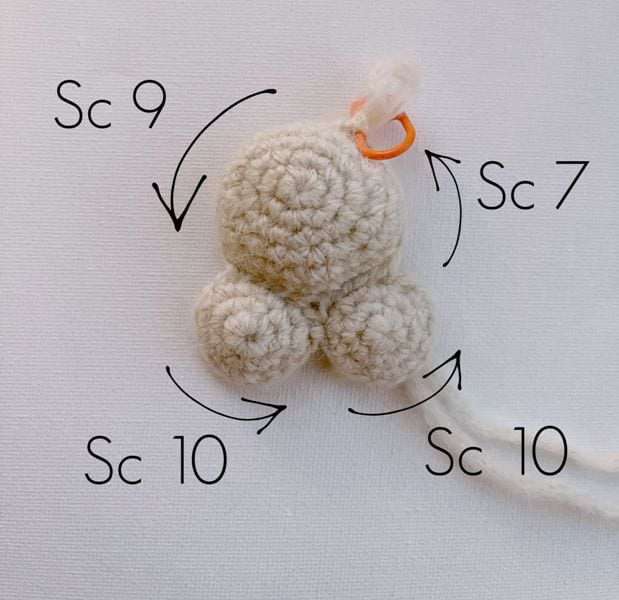
R1: Sc 9 around forehead, Sc 10 around Cheek 1, Sc 10 around Cheek 2, and Sc 7 around rest of forehead. (36 sts)
R2: *Sc 7, Dec*, rep 4 times. (32 sts)
R3-6: Sc 32. (32 sts)
R7: *Sc 6, Dec*, rep 4 times. (28 sts)
R8: Sc 28. (28 sts)
R9: *Sc 5, Dec*, rep 4 times. (24 sts)
R10: Sc 24. (24 sts)
Begin fuzzing up head with dog slicker brush.
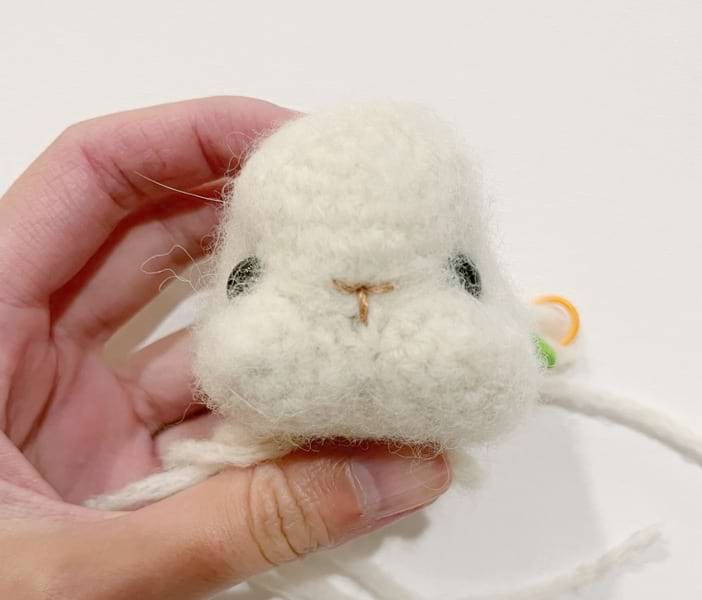
Place eyes at junction of forehead with cheeks, about 7 stitches apart. Do not snap in the washers yet.
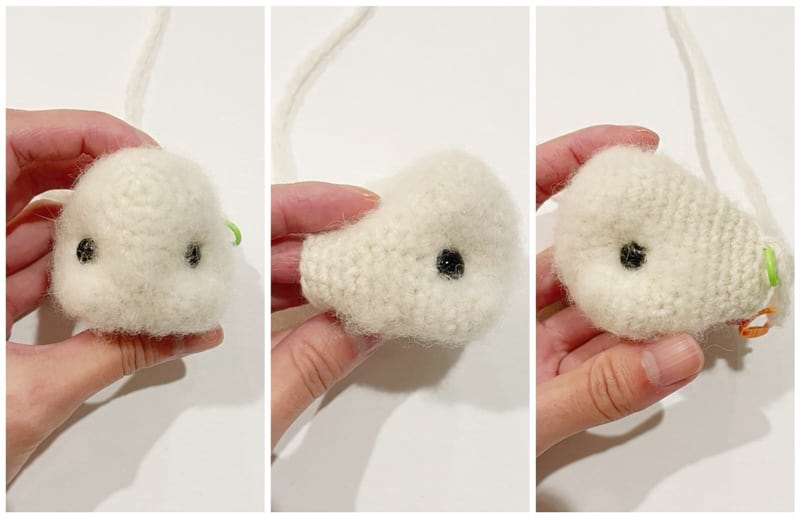
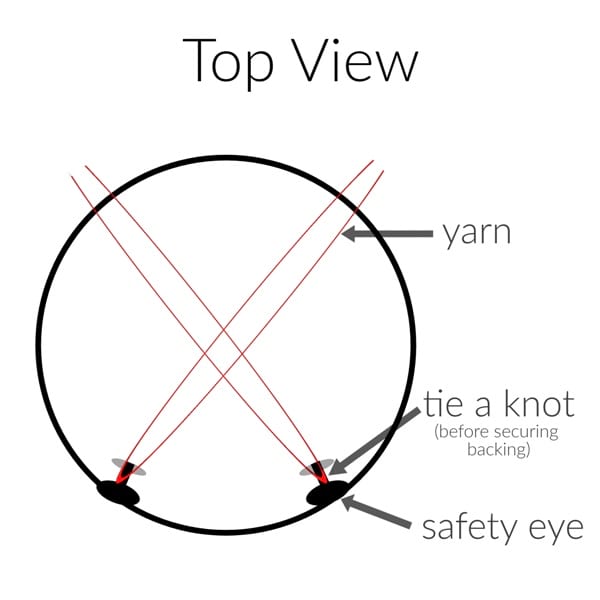
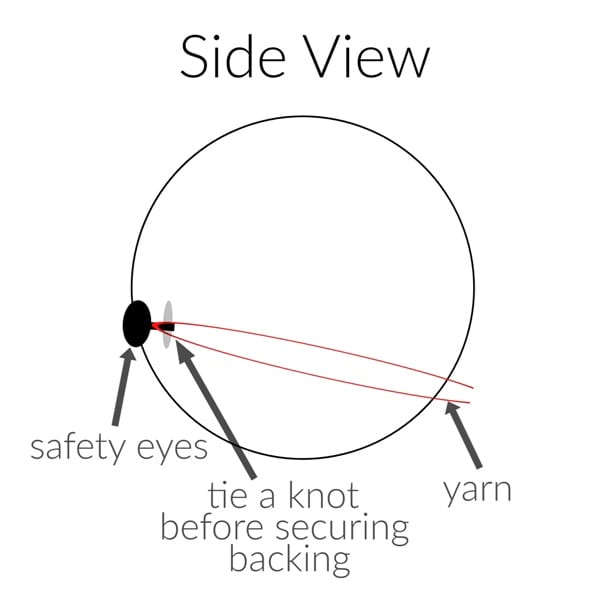
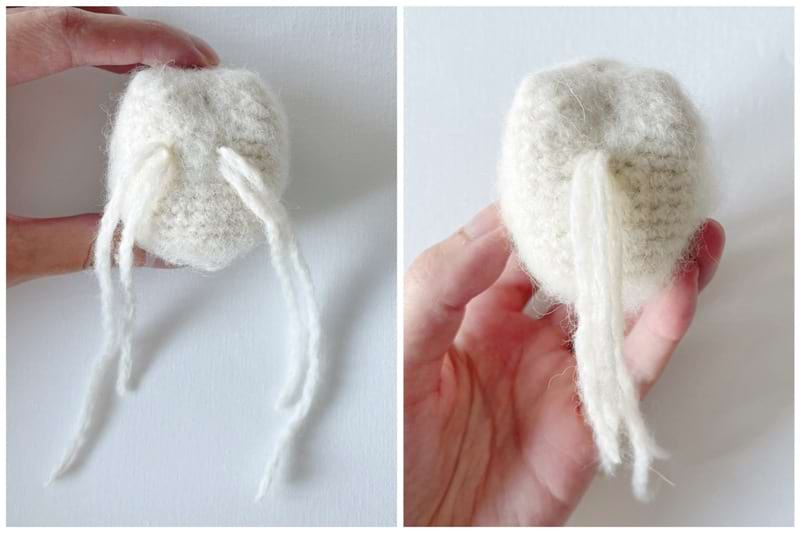
It is now time to do the eye indentation. Use the ecru yarn strands you set aside at the beginning and tie knots around the post of each safety eye (as shown in Number 1 in collage below). Snap in the washers (Number 2). Number 3 shows how there are 4 strands exiting the head for now.
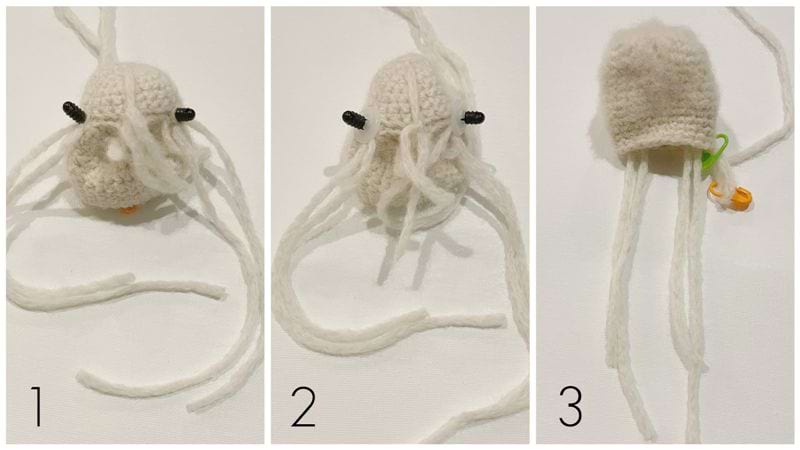
Have the strands cross each other inside the head and have them exit out towards the bottom of the head (our strands exited between Rounds 3 and 4 of the head, about 4 stitches apart). Ensure that both strands from the SAME safety eye are in close proximity to each other when they exit the bottom of the head to make it easier to tie a knot (but they should not come out of the same hole). After this is done, you should have 4 strands of yarn coming out the bottom of the head, each exiting from their own hole.
Stuff head densely, making sure there is stuffing above and below the crisscrossed eye indentation strands. Ensure there is enough stuffing in both cheeks and the forehead. Pull the yarn strands back to check that you like the look of the eye indentation. You can adjust as needed by stuffing the head more/less or by repositioning the yarn strands higher or lower. It is important to check this before continuing on and finishing off the head as this cannot be corrected after the head has been closed off in the next rounds.
Use pink embroidery floss to embroider a “T” for the nose/mouth. We positioned the nose around the last round of the forehead where it joins with the cheeks.
R11: *Dec*, rep 12 times. (12 sts)
Finish stuffing.
R12: *Dec*, rep 6 times. (6 sts)
Fasten off working yarn, then thread yarn tail through front loops of last remaining 6 stitches. Pull tight and hide end. Finish fuzzing up the rest of the head with a dog slicker brush.
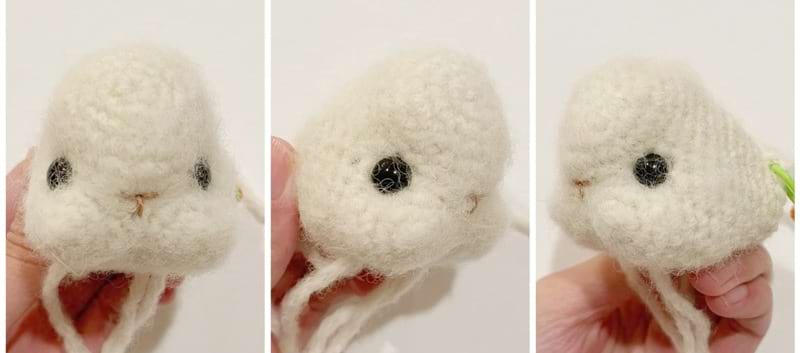
Finish off the eye indentation: grab the two strands of yarn that correlate with one safety eye. Pull back to desired indentation and tie a double knot to secure. Repeat with other eye. At the end, you can tie all the ends together (as shown in right picture of collage below). Weave in ends.
Body
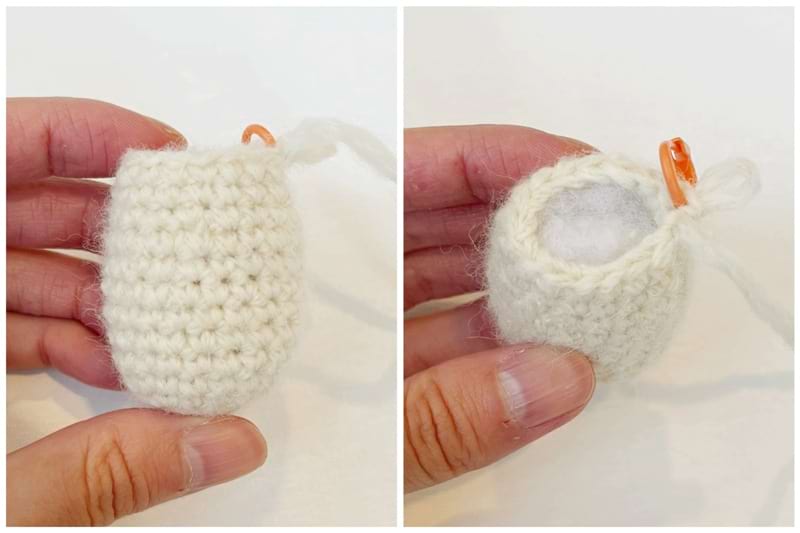
Using ecru yarn,
Ch 3 (this is the foundation chain),
R1: Starting from second chain from hook, Sc 1 in back loop of foundation chain. Work 2 sc in last stitch. Turn the chain, Sc 1 in front loop of foundation chain [we are making an oval by crocheting around the chain]. (4 sts)
R2:* Inc*, rep 4 times. (8 sts)
R3: *Inc*, rep 8 times. (16 sts)
R4: *Sc 3, Inc*, rep 4 times. (20 sts)
R5-11: Sc 20. (20 sts)
R12: *Sc 3, Dec*, rep 4 times. (16 sts)
R13-14: Sc 16. (16 sts)
We will now begin shaping the neck and back by stacking increases and decreases on certain sides.
R15: Dec x 3. Sc 3, Inc, Sc 1, Inc, Sc 1, Inc, Sc 2. (16 sts)
R16: Dec x 2, Sc 4, Inc, Sc 2, Inc, Sc 4. (16 sts)
Fasten off and leave long end. Fuzz up body with dog slicker brush. Stuff body and seam body to head so that the head is tilting down.
Thighs (make 2):
Using ecru yarn,
Ch 4 (this is the foundation chain),
R1: Starting from second chain from hook, Sc 2 in back loops of foundation chain. Work 2 sc in last stitch. Turn the chain then Sc 2 in front loops of foundation chain [we are making an oval by crocheting around the chain]. (6 sts)
R2: *Inc*, rep 6 times. (12 sts)
R3: *Sc 1, Inc*, rep 6 times. (18 sts)
R4: Sc 18. (18 sts)
R5: *Sc 1, Dec*, rep 6 times. (12 sts)
Fasten off and leave long end. Fuzz up thighs using dog slicker brush. You do not need to stuff the thighs.
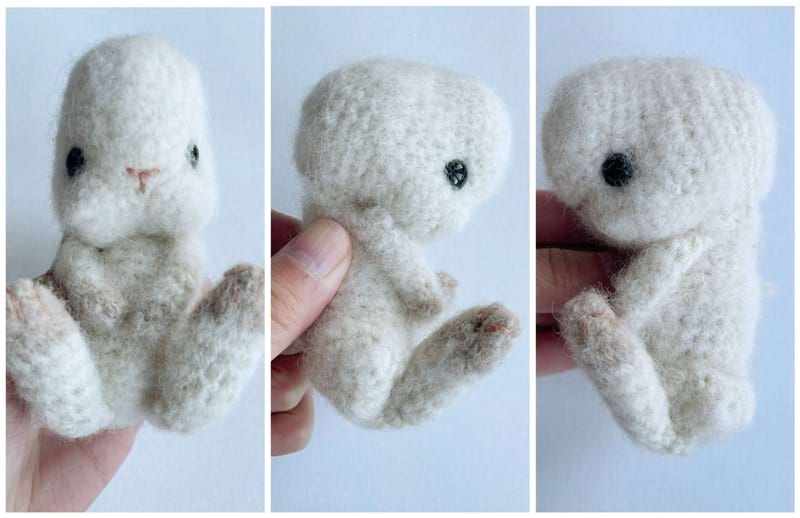
Seam thighs to either side of the body so they are tilted at an angle as shown in collage.
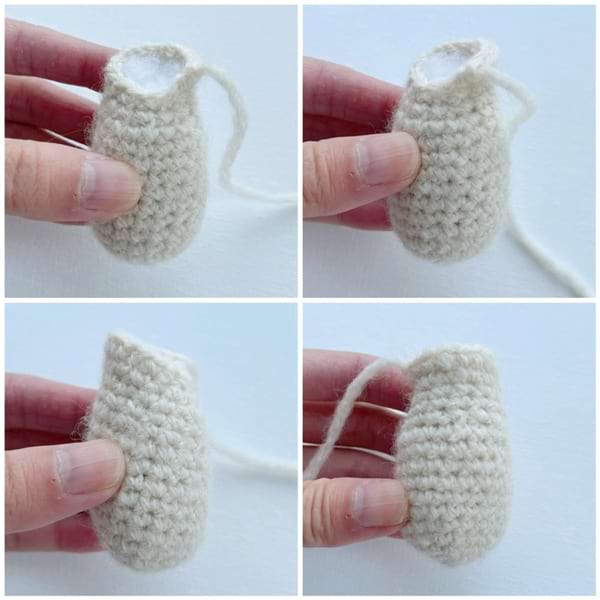
Legs (make 2):
Using beige yarn,
R1: 6 sc in Magic Ring. (6 sts)
R2: Sc 6. (6 sts)
R3: *Sc 1, Inc*, rep 3 times. (9 sts)
R4: Sc 9. (9 sts)
Switch to ecru yarn,
R5-8: Sc 9. (9 sts)
R9: *Sc 1, Dec*, rep 3 times. (6 sts)
R10-11: Sc 6. (6 sts)
Fasten off and leave long end. Fuzz up legs using dog slicker brush. Stuff lightly.
Using pink embroidery floss, embroider three lines onto the paws of the legs.
Seam legs in front of thighs at the front of the body so that the legs stick up as shown in the collage later on.
Arms (make 2):
Using beige yarn,
R1: 5 sc in Magic Ring. (6 sts)
R2: Sc 5. (5 sts)
Switch to ecru yarn,
R3-9: Sc 5. (5 sts)
Fasten off and leave long end. Fuzz up arms using dog slicker brush. Do not stuff.
Seam arms on either side of body. Position the arms so that the paws come together towards the centre of the body.
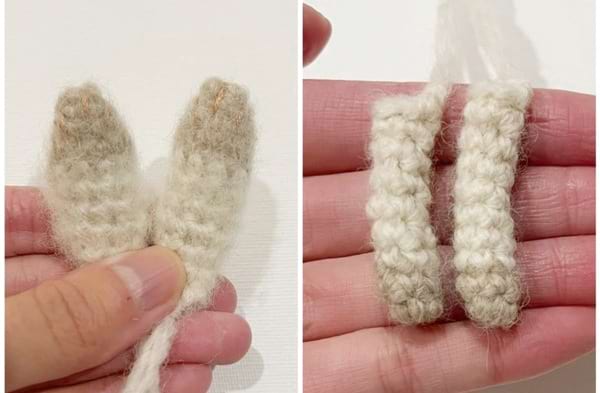
Ears (make 2):
Note that the ears are worked in turned rows, not rounds.
Using beige yarn,
Ch 5
Row 1: Starting from second chain from hook, Sc 4. (4 sts)
Row 2: Chain 1, turn. Starting in second st from hook, Sc 1, Inc x 2, Sc 1. (6 sts)
R3-5: Ch 1, turn. Starting in second st from hook, Sc 6. (6 sts)
R6: Ch 1, turn. Starting in second st from hook, Sc 1, Dec, Dec, Sc 1. (4 sts)
R7-8: Ch 1, turn. Starting in second st from hook, Sc 4. (4 sts)
R9: Ch 1, turn. Starting in second st from hook, Dec x 2. (2 sts)
R10: Ch 1, turn. Starting in second st from hook, Sc 2. (2 sts)
R11: Ch 1, turn. Starting in second st from hook, Dec. (1 st)
We will now crochet around the ear to provide a smooth edge.
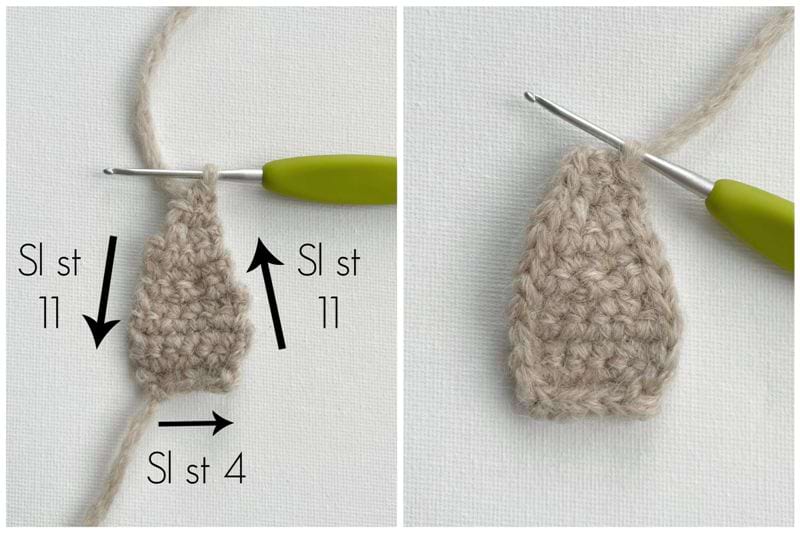
Chain 1, slip stitch 11 down one side of ear, slip stitch 4 across bottom of ear, slip stitch 11 back up the other side of the ear.
Fasten off and leave long end. Fuzz up ears using dog slicker brush. Fold in half and seam onto either side of head. We positioned our ears so the tops were between Rounds 5 and 6 of the head, about 7 stitches apart.
Tail:
Using ecru yarn,
R1: 4 sc in Magic Ring. (4 sts)
R2: *Sc 1, Inc*, rep 2 times. (6 sts)
R3: Sc 6. (6 sts)
R4: *Sc 1, Dec*, rep 2 times. (4 sts)
Fasten off and leave long end. Fuzz up tail using dog slicker brush. You do not need to stuff the tail. Seam tail to bottom back of body.
We have designed numerous bunnies throughout the years, including our Spring Bunnies (from 2011 when we first started blogging), Sweetheart Bunny, Boucle Bunny and Fleece Bunny! I’m glad we could design a unique and cuddly bunny in a special pose to add to our Chinese New Year zodiac collection. How darling and cozy does this baby bunny look when cradled in my hands?
The puffy cheeks, larger forehead, big feet and adorable pose all help make this baby bunny unique! It was neat designing this bunny with Ryan as we used several techniques and elements from our previous Chinese New Year designs. We used the dog slicker brush technique to fuzz up the yarn as we did with the Dogs, ovular thighs like with the Rat, and uneven increasing/decreasing for neck shaping like with the Pony. I think the cheek and forehead construction makes this bunny very special and different from our other bunny designs too!
This rabbit design is actually the FINAL design that now completes our zodiac collection! We started this tradition of designing the zodiac animal of the year in January 2011. The Chinese New Year Doll started off the series, and from there, we designed each subsequent animal. It is surreal that the collection is now complete, and that it spans from January 2011 to January 2023, 12 years later! Thank you for following along for all these years and crocheting the zodiac animals along with us. Now you can crochet special amigurumi for each and every member of your family and friends!

All of the zodiac animal amigurumi patterns can be found on my blog: Ox, Lamb, Dragon, Rooster, Monkey, Pony, Snake, Rat, Dog, Chinese New Year Doll, Tiger and Pig ! You can also find them all within my Chinese New Year Zodiac Amigurumi Bundle HERE which now contains all 13 patterns (89 pages and has all the process photos) at a discounted price. You can also check out the All About Ami Amigurumi Pattern Bundle HERE that contains ALL the amigurumi patterns we’ve ever designed (over 30 patterns). Subscribe to my e-mail newsletter HERE to keep up to date with all my newest crochet and knit designs!
Enjoy all these amigurumi patterns, everyone! It has been such a joy to design them year by year, and I am thankful we managed to keep up the tradition and complete the series!
Thank you to Lion Brand Yarn for providing the yarn for this design! This pattern is an original pattern by Stephanie Lau of All About Ami. Please do not claim this pattern as your own. If you wish to share this pattern, you may link to this pattern but please do not reprint it on your site. You may keep a copy for your own personal use but please DO NOT sell the pattern or distribute it.
You may sell products made from this pattern but please clearly credit the design to me, Stephanie Lau of All About Ami, and provide a link to my blog www.AllAboutAmi.com. Permission is NOT granted for mass production or factory manufacturing of any kind. Thank you for being respectful and for your understanding!