***You can purchase an INEXPENSIVE AD-FREE PDF of this pattern on Etsy HERE! This beautifully formatted PDF includes the step-by-step pictures and is a total of 12 pages including the cover page! You can also check out my Chinese New Year Zodiac Amigurumi Bundle HERE as it includes ALL my special zodiac designs to date at a discounted price!
- Note that this is Part 1 of the step-by-step blog post covering the body and creation of the 4 legs.
- Part 2 detailing how to crochet the snout, hair, hooves, belly, horns, ears and tail can be found HERE.
- The free crochet pattern with all the written numbers can be found HERE!
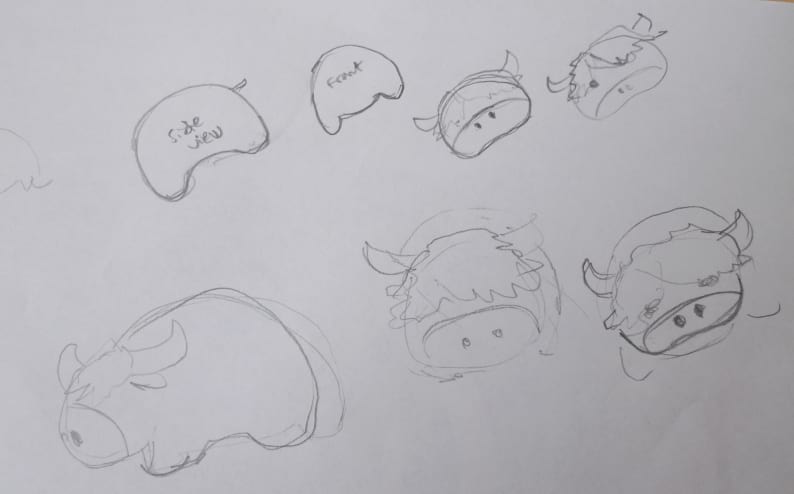
2021 is the Year of the Ox, and we thought this would be a challenging amigurumi to design with the unique shape of an ox’s body! Since January 2011, we started a tradition where we have been designing that year’s zodiac animal for Chinese New Year. It has been fun putting our own special touches and style to each animal and as usual, Ryan did an initial sketch so we could get an idea of what look we were going for! After google searching what oxen looked like, certain images stood out where the animals had shaggy and floppy bangs that covered their eyes (we were later informed that those animals are Highland Cattle). Thus, the defining characteristics of our amigurumi were the round and plump shape and the shaggy hair!
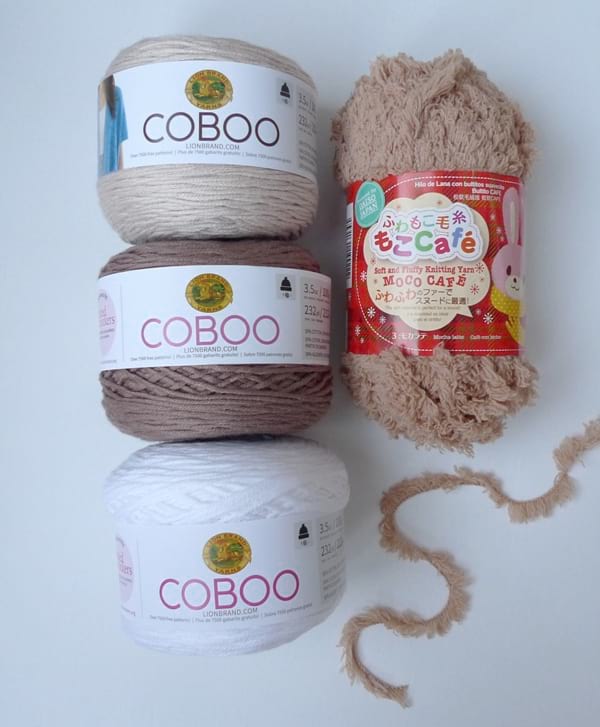
I used these yarns below to crochet our amigurumi ox: Coboo (lightweight level 3 yarn) in Tan, Taupe and White and this super bulky fuzzy eyelash yarn called ““Moco Cafe Soft and Fluffy Knitting Yarn” in “Mocha latte”” that I got from Daiso a while ago.
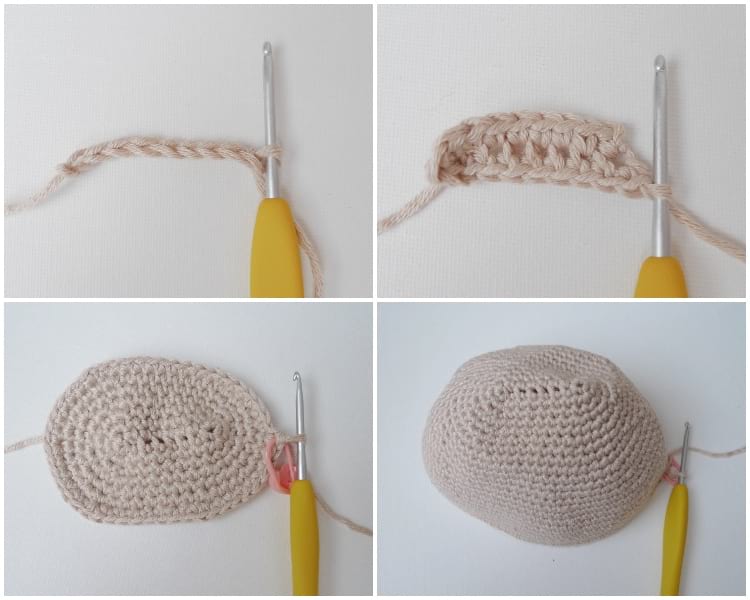
Let’s dive into how to crochet our amigurumi ox! To begin, crochet around a foundation chain first by working in the back loops, turning, and then working in the front loops (see how to do this with my detailed tutorial HERE). It is very important that you have the correct number of stitches in this design, so be sure to count after the end of each round. Using a stitch marker is very helpful in case you lose your place or count, or if you need to put down your work! The initial part of the ox is worked the same as the amigurumi elephant HERE.
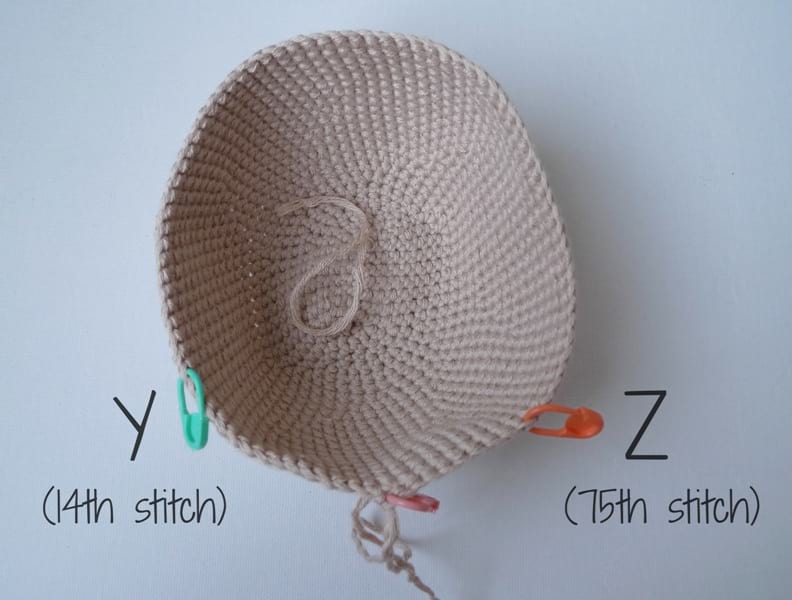
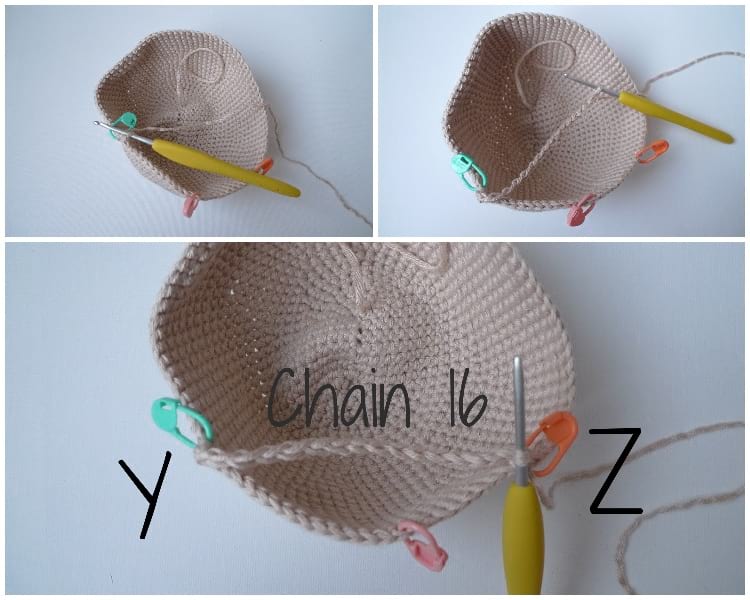
After completing Round 22, you will place a stitch marker in the last stitch (the pink one in the picture below). Starting from where the yarn currently is, you will count around and place a stitch marker at the 14th stitch (Y as indicated by the green stitch marker below) and at the 75th stitch (Z as indicated by the peach stitch marker below).
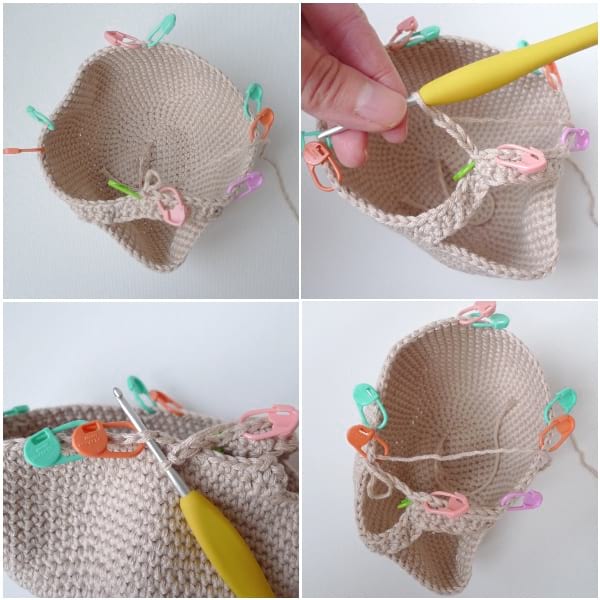
Next, we will be creating a series of chain stitches across the piece to separate it into two sections: the body and the snout. You will slip stitch around to Y, Chain 16 across, and then slip stitch to Z. This Chain 16 helps to divide the piece into two different sections.
We will be building up the body of the ox in the next section. Starting at Z, you will crochet across the chain 16 towards Y in the back loops only (we will be leaving the front loops for the snout later on). Once you have reached Y, you will single crochet around the body going back towards Z. Note that Y and Z count as stitches, so you will have 16 stitches going across the chains and 62 stitches around the body (16 + 62 = 78).
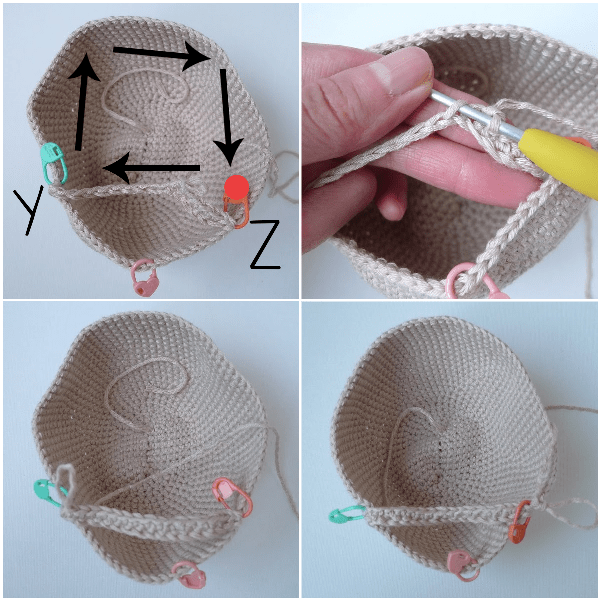
After working a decrease round at Round 25, you can place a stitch marker in the last stitch but DO NOT CUT THE YARN (you can remove stitch marker Y and Z).
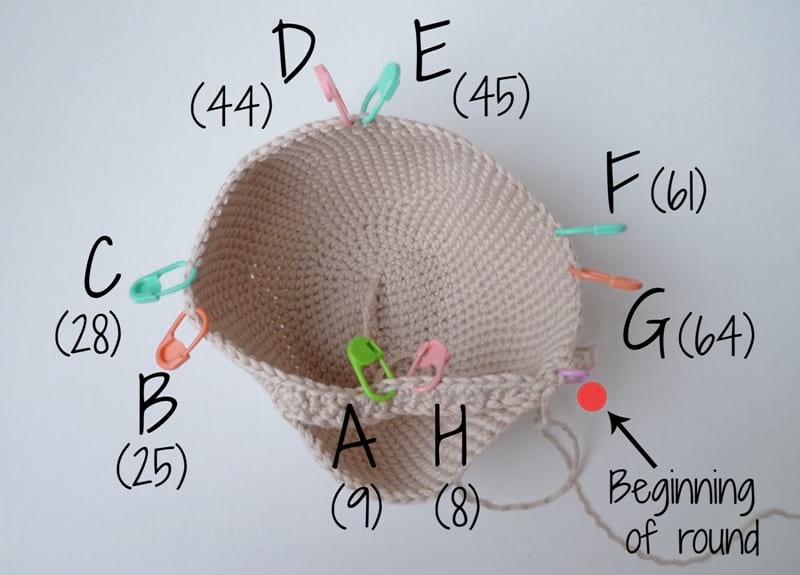
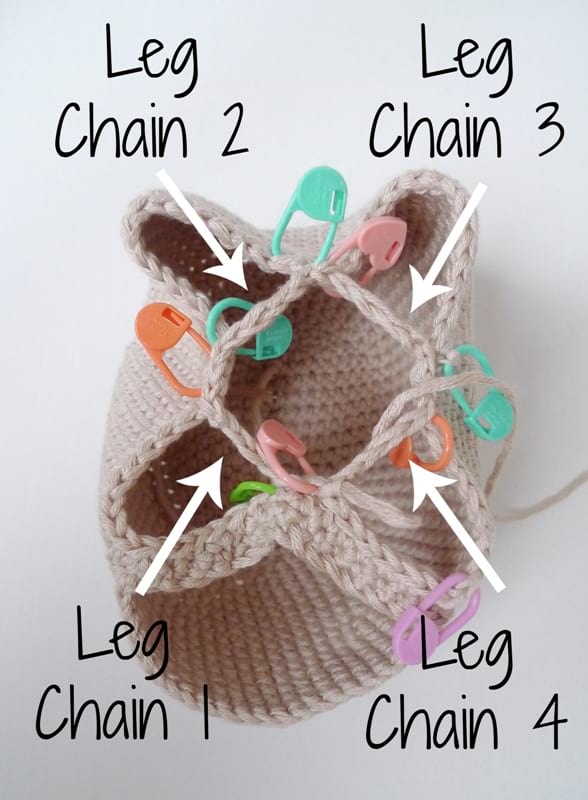
Now, we will be dividing the body into four leg chains: Leg Chains 1, 2, 3 and 4. Starting from the beginning of the round, you will carefully place stitch markers at the following stitches: H (8th stitch), A (9th stitch), B (25th stitch), C (28th stitch), D (44th stitch), E (45th stitch), F (61st stitch), and G (64th stitch) . We learned how to do this technique of using leg chains with the amigurumi elephant HERE and it is a neat way to divide up the body and create a seamless body to leg transition!
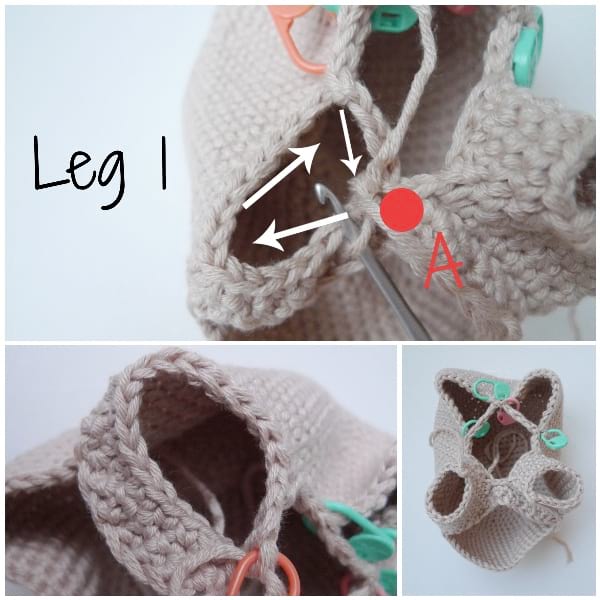
Starting from where your yarn currently is, you will follow the pattern instructions to create the four leg chains. The images below show the creation of Leg Chain 1 and where to insert your hook when you are slip stitching to a particular stitch.
The body is carefully and evenly divided into four separate sections that will become the four legs. The collage below shows the creation of the four leg chains.
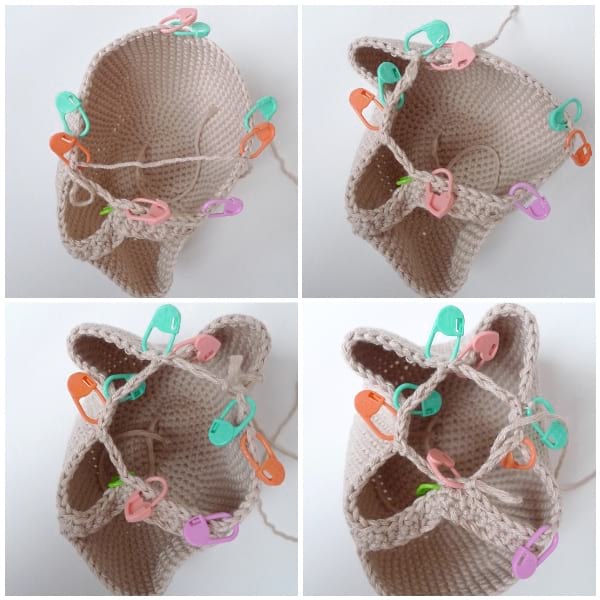
Leg Chains 1, 2, 3 and 4 have been created! Note that Leg Chain 4 is the last leg chain that has been created – do not cut the yarn as we will begin working on Leg 4 right away (where the yarn currently is).
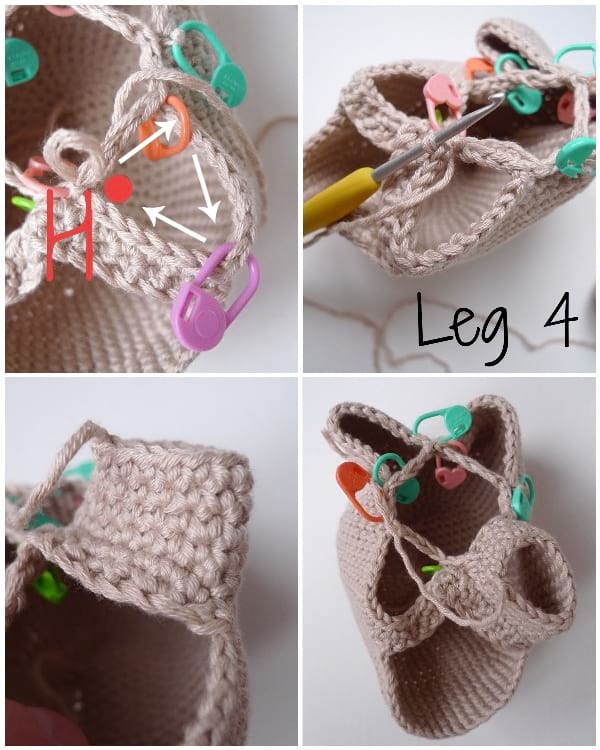
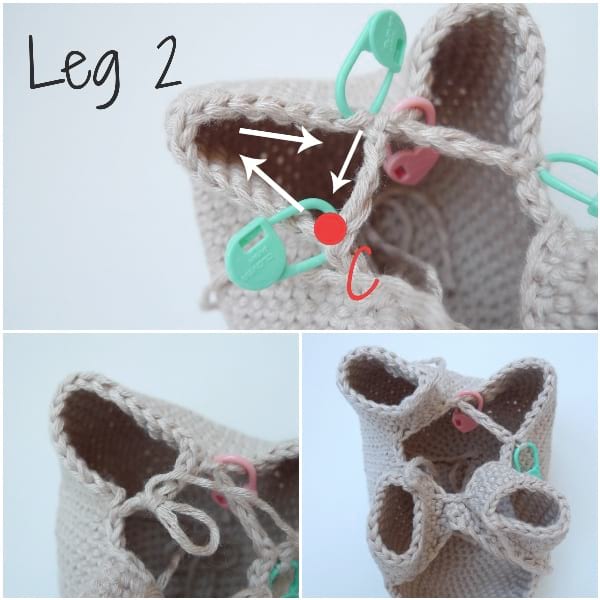
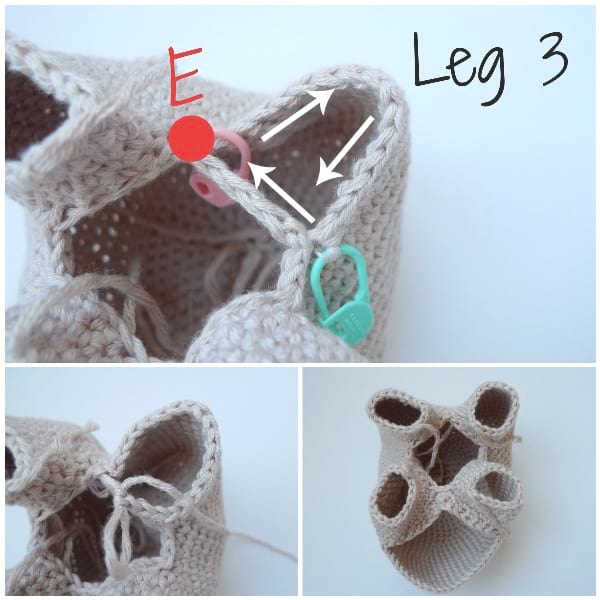
It is now time to crochet the legs of the ox. It is important to note that the stitches where the stitch markers were placed (e.g. H and G) count as stitches and that we will always be working clockwise (as shown by the arrows in the pictures). Each leg will consist of 21 stitches. You can technically remove the stitch markers but leave H, A, C and E so you know where to begin each leg.
Leg 4 starts at H (where yarn currently is) and consists of: 4 stitches across the chains and 17 stitches around the body). Each leg consists of only four rounds, and when you are finished you can fasten off (you do not need to leave a long end for seaming as we will be seaming the hooves onto the legs later on, so we will use the long tail from the hoof for the seaming).
Leg 1 begins at A and consists of: 17 stitches around the body and 4 stitches across the chains.
Leg 2 begins at C and consists of: 17 stitches around the body and 4 stitches across the chains.
Leg 3 begins at E and consists of: 17 stitches around the body and 4 stitches across the chains.
Now that you have created the four legs, you are ready to move onto Part 2 and create the rest of the body parts such as the snout, hair, hooves, belly, horns, ears and tail! Check out Part 2 of the step-by-step tutorial HERE and don’t forget that the written-out crochet pattern with all the specific numbers can be found HERE!