***You can purchase an INEXPENSIVE AD-FREE PDF of this pattern on Etsy HERE! This beautifully formatted PDF includes the step-by-step pictures and is a total of 14 pages including the cover page! You can also check out my Chinese New Year Zodiac Amigurumi Bundle HERE as it includes ALL my special zodiac designs to date at a discounted price!
***I have split the crochet pattern into TWO BLOG POSTS since there are so many process photos:
- Part 1 covers the making of the head, ears and body – it can be found HERE! The complete materials list and notes can also be found in Part 1.
- Part 2 covers the making of the legs, arms, tail and assembly!
LEGS (make 2)
***Note that there is a difference between the right leg and left leg starting at Round 16.
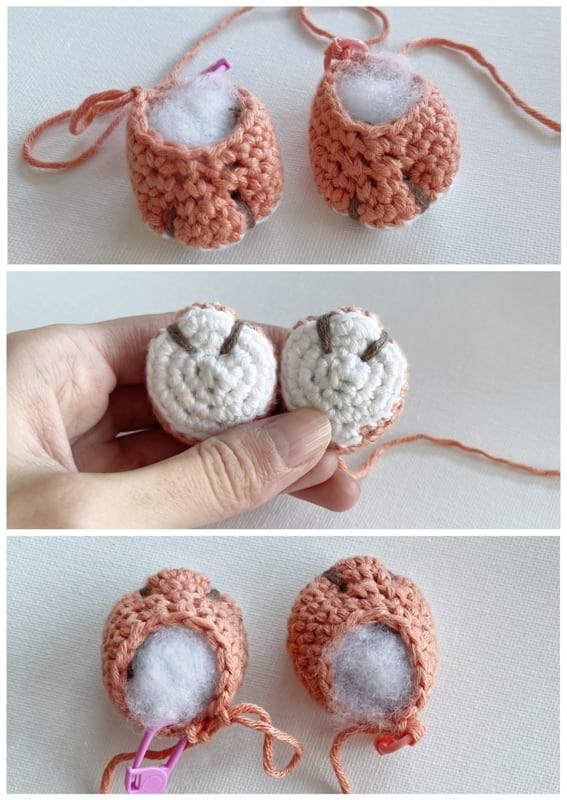
Using white yarn,
Ch 3 (this is the foundation chain),
R1: Starting from second chain from hook, Sc 2 in back loops of foundation chain. Turn and Sc 2 in front loops of the foundation chain [we are making an oval by crocheting around the chain]. (4 sts)
R2: Inc around. (8 sts)
R3: Inc around. (16 sts)
R4: *Sc 1, Inc*, rep 8 times. (24 sts)
Switch to peach yarn,
R5: In BLO, Sc 24. (24 sts)
R6: Sc 24. (24 sts)
R7: Sc 9, Dec x 3, Sc 9. (21 sts)
R8: Sc 1, Dec, Sc 4, Dec x 3, Sc 4, Dec, Sc 2. (16 sts)
R9: Sc 7, Dec, Sc 5, Dec. (14 sts)
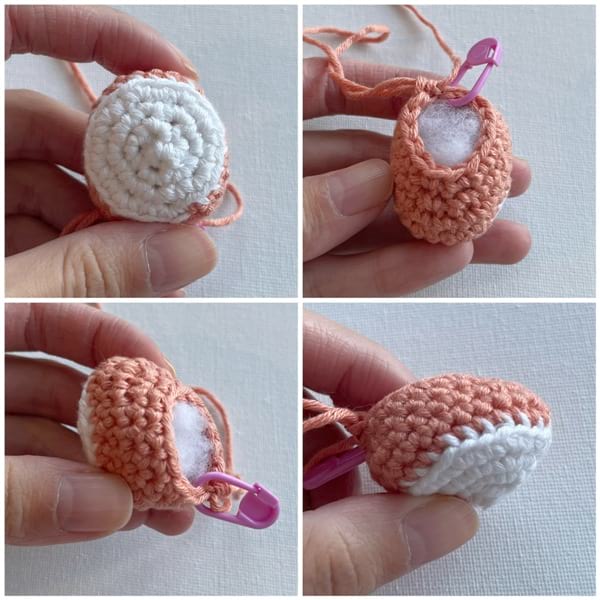
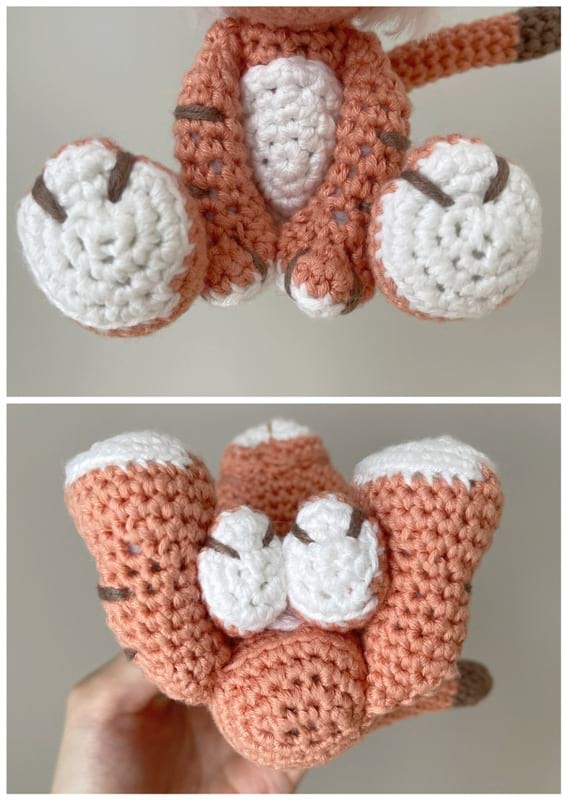
It is now time to do the paw embroidery. Stuff the paw firmly. Using taupe yarn, follow the instructions and diagram below to embroider two lines onto the top of the paw (note that each line consists of two strands of yarn by the end of the paw embroidery).
Steps 1 and 2: Cut taupe yarn strand at least 20”/51 cm long and thread through yarn needle. Insert needle through upper right peach section (approximately third peach round) and through upper right white section (approximately two rounds of white from outer edge).
Steps 3 and 4: Insert needle back into same upper right peach point and down through upper left white section (about 2 sts away from initial white point).
Steps 5 and 6: Insert needle into upper left peach section (about 2 sts away from initial peach point) and back down through same upper left white point.
Steps 7 and 8: Insert needle through upper left peach point and upper right peach point.
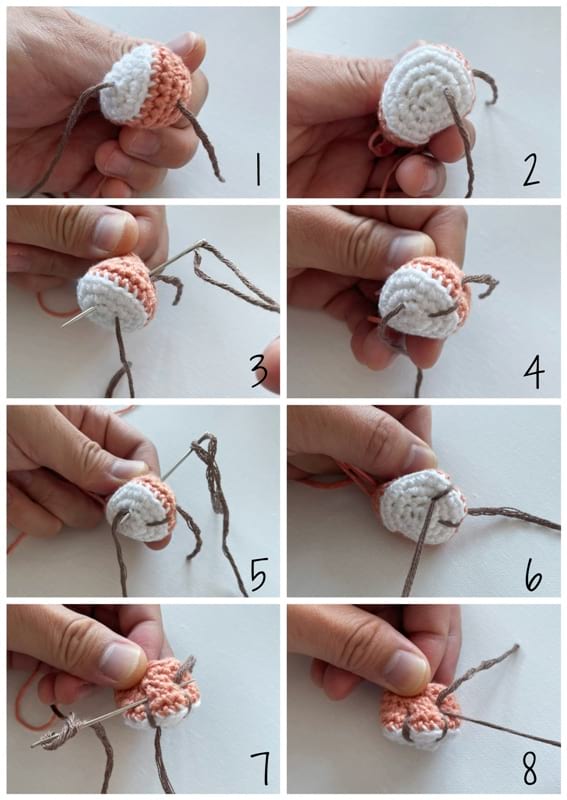
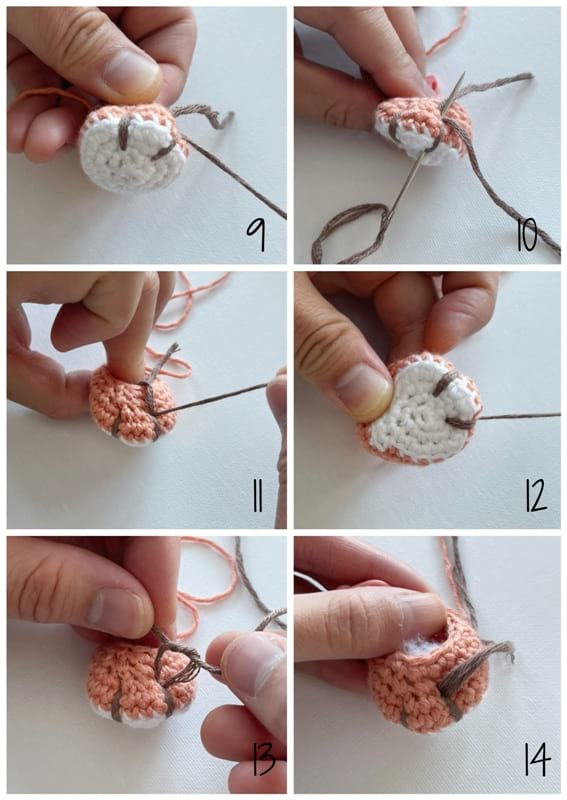
Step 9: Yarn strand has been pulled through both peach points.
Steps 10, 11 & 12: Insert needle through upper right white point and upper right peach point.
Steps 13 and 14: Both initial and final ends should be coming out from the same upper right peach point. Tie knots tightly and weave in ends.
R10-15: Sc 14. (14 sts)
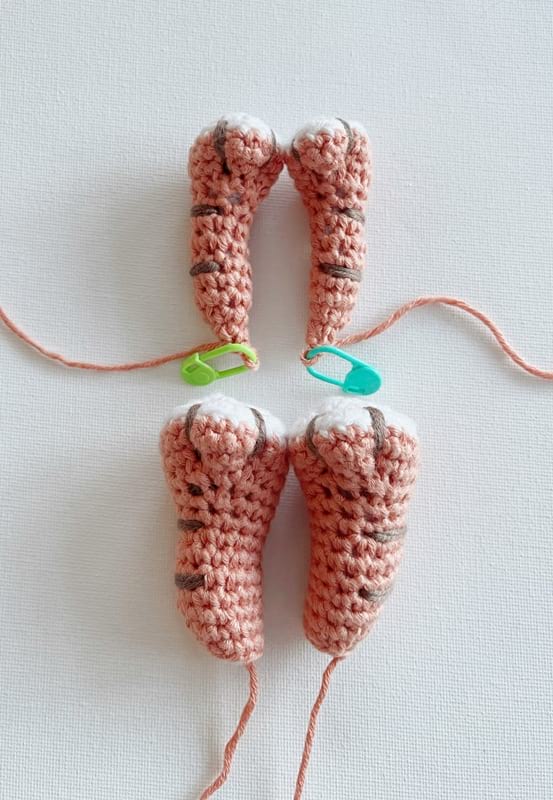
Now the instructions differ depending on if you are working on the left leg or right leg:
Right Leg:
R16: Dec, Sc 8, Dec x 2. (11 sts)
R17: Dec, Sc 5, Dec x 2. (8 sts)
Fasten off and leave long end for sewing. Stuff leg.
Left Leg:
R16: Sc 2, Dec x 3, Sc 6. (11 sts)
R17: Sc 1, Dec x 3, Sc 4. (8 sts)
Fasten off and leave long end for sewing. Stuff leg.
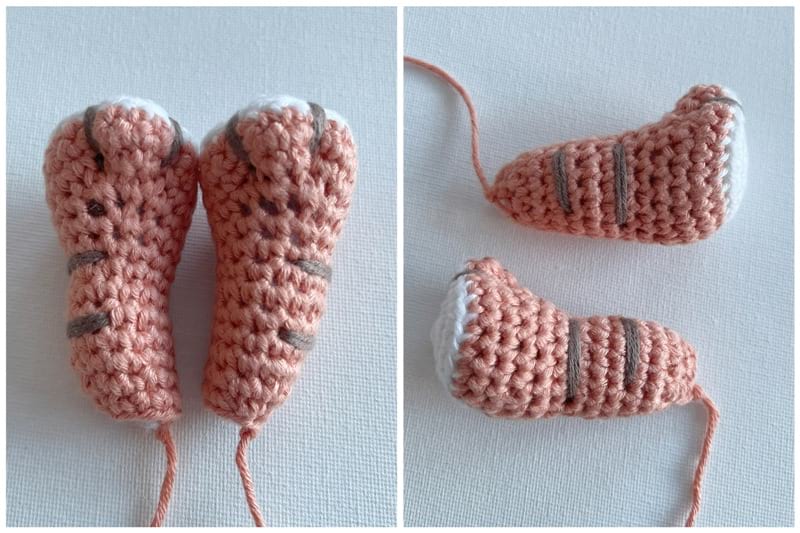
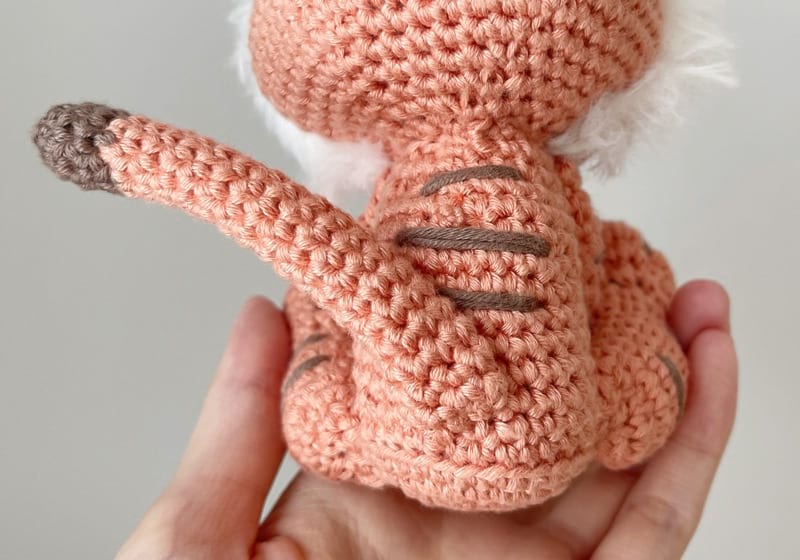
Now we will add two stripes onto the outside of each leg (the section that curves). Each stripe consists of two passes of yarn. You can embroider the stripes in the same manner as the paw embroidery so that the initial and final yarn end exit from the same spot (this leaves a cleaner finish since you can tie the initial and final yarn ends together). The stripes are positioned:
- Between Rounds 13 and 14, about 3.5 sts across
- Between Rounds 10 and 11, about 4 sts across
ARMS (make 2):
***Note that there is a difference between the right arm and left arm starting at Round 14.
Using white yarn,
Ch 3 (this is the foundation chain),
R1: Starting from second chain from hook, Sc 2 in back loops of foundation chain. Turn and Sc 2 in front loops of the foundation chain [we are making an oval by crocheting around the chain]. (4 sts)
R2: Inc around. (8 sts)
R3: Inc around. (16 sts)
Switch to peach yarn,
R4: In BLO, Sc 16. (16 sts)
R5: Sc 16. (16 sts)
R6: Sc 4, Dec x 3, Sc 6. (13 sts)
R7: Dec, Sc 1, Dec x 3, Sc 1, Dec, Sc 1. (8 sts)
It is now time to do the paw embroidery. Stuff the paw firmly. Using taupe yarn, follow the same instructions and diagram as for the legs in order to embroider two lines onto the top of the paw (once again, note that each line consists of two strands of yarn by the end of the paw embroidery).
R8-13: Sc 8. (8 sts)
Stuff the arm. Now the instructions differ depending on if you are working on the left arm or right arm:
Right Arm:
R14: Sc 4, Dec x 2. (6 sts)
R15: Dec, Sc 2, Dec. (4 sts)
Fasten off and leave long end for sewing.
Left Arm:
R14: Sc 1, Dec x 2, Sc 3. (6 sts)
R15: Dec x 2, Sc 2. (4 sts)
Fasten off and leave long end for sewing.
Now we will add two stripes onto the outside of each arm (the section that curves). Stripes are embroidered in the same way as the legs:
- Between Rounds 11 and 12, about 3 sts across
- Between Rounds 8 and 9, about 3 sts across
TAIL:
Using taupe yarn,
R1: 6 sc in Magic Ring. (6 sts)
R2: *Sc 2, Inc*, rep 2 times. (8 sts)
R3-4: Sc 8. (8 sts)
Switch to peach yarn,
R5-22: Sc 8. (8 sts)
Fasten off and leave long end for sewing. You do not need to stuff the tail.
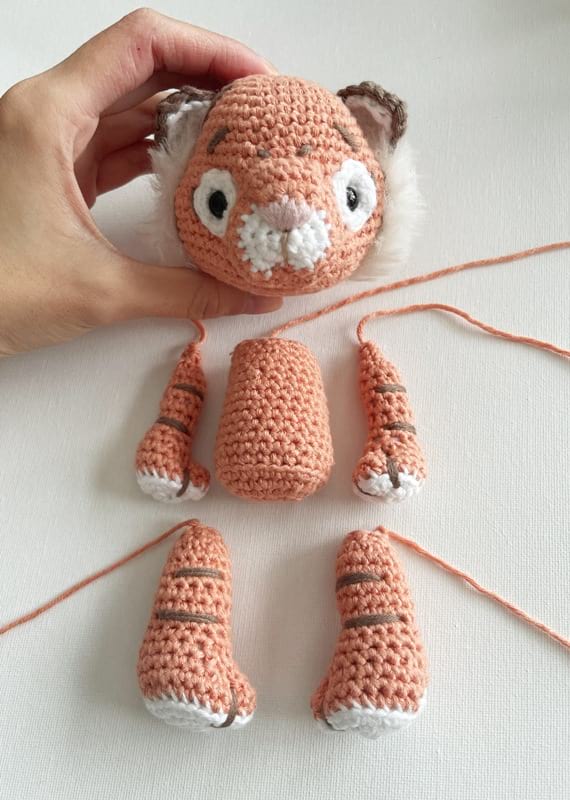
ASSEMBLY:
- Stuff body and seam onto head. We positioned the head so that it is tilting downwards.
- Seam arms to sides of body towards the top (be sure to differentiate left arm from right arm).
- Seam legs to sides of body towards the bottom (be sure to differentiate left leg from right leg).
- As an optional step, you can run a strand of yarn through all four limbs to lock the sitting position into place (position the two arms between the two legs).
- Seam tail towards bottom back of body so that it is pointing upwards and curving towards one side (seam approximately last 4 rounds of tail onto back to make it secure and strong).
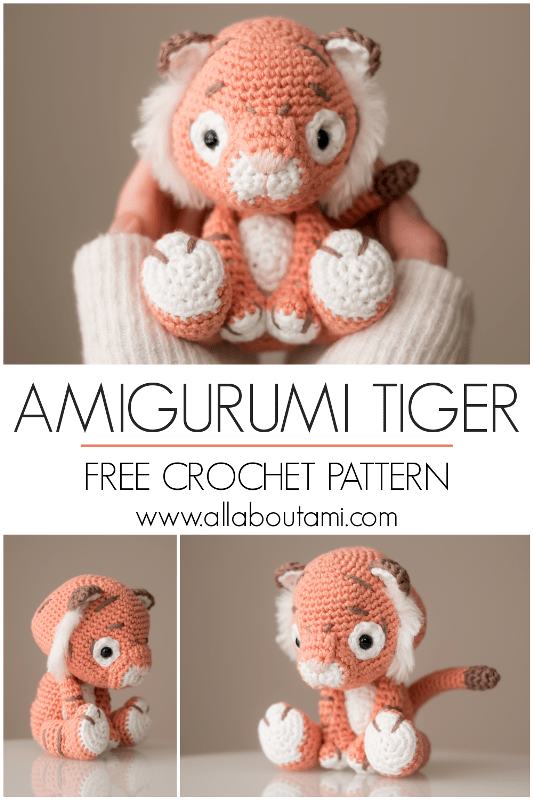
We hope you enjoy crocheting your own amigurumi tigers! I adore his sitting position, soft color palette, adorable paws, protruding snout and faux fur detailing. He is such a sweet little tiger who I have affectionately been calling “Tigey”!
Here are some different angles of our amigurumi tiger so you can take a better look:
I think he looks so adorable leaning forward!
Here you can see his cute tail curving off towards one side!
He is so sweet in his sitting position with his arms tucked in between his legs!
It is always such a thrill designing these zodiac amigurumi since we started this tradition way back in January 2011 when I first started my blog. Every year we have added to this collection and we now only have one more design left to go: Rabbit. Ryan and I always thought that the Ox and Tiger would be the most challenging to design, and I cannot believe that we have finished both already now! I always look forward to seeing the group picture that Ryan takes and I am amazed that there is still space for all of them on our little table haha.
It’s been such a joy adding to this collection and using new techniques that we have learned along the way. If you are interested in the zodiac animals, you can check them out here: Ox, Lamb, Dragon, Rooster, Monkey, Pony, Snake, Rat, Dog, Chinese New Year Doll, and Pig ! All of these patterns can be found in my Chinese New Year Zodiac Amigurumi Bundle HERE that contains all 12 patterns so far (79 pages) at a discounted price! You can also check out the All About Ami Amigurumi Pattern Bundle HERE that contains ALL the amigurumi patterns we’ve designed so far (over 30 patterns). Subscribe to my e-mail newsletter HERE to keep up to date with all my newest crochet and knit designs!
Thank you for reading, and enjoy crocheting your own tigers and going through the zodiac collection!
Thank you to Lion Brand Yarn for providing the yarn for this design! This pattern is an original pattern by Stephanie Lau of All About Ami. Please do not claim this pattern as your own. If you wish to share this pattern, you may link to this pattern but please do not reprint it on your site. You may keep a copy for your own personal use but please DO NOT sell the pattern or distribute it.
You may sell products made from this pattern but please clearly credit the design to me, Stephanie Lau of All About Ami, and provide a link to my blog www.AllAboutAmi.com. Permission is NOT granted for mass production or factory manufacturing of any kind. Thank you for being respectful and for your understanding!