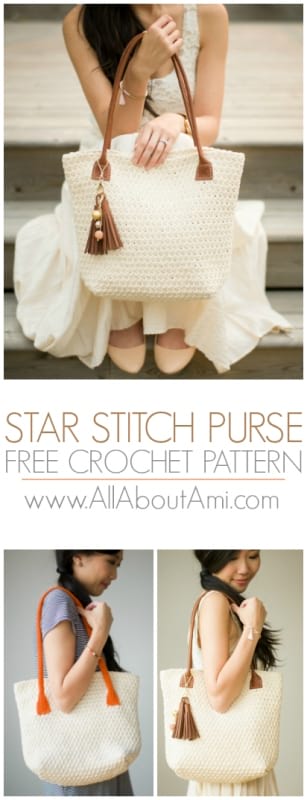
***You can purchase an INEXPENSIVE AD-FREE PDF of this pattern on Etsy HERE and on LoveCrochet HERE! This beautifully formatted PDF includes the step-by-step pictures, the full star stitch tutorial, the full pattern, and the crochet & leather handle tutorials! It is a total of 13 pages including the cover page! You can also purchase a kit with all the yarn to make this purse (with the crochet handles) on the Lion Brand site HERE!
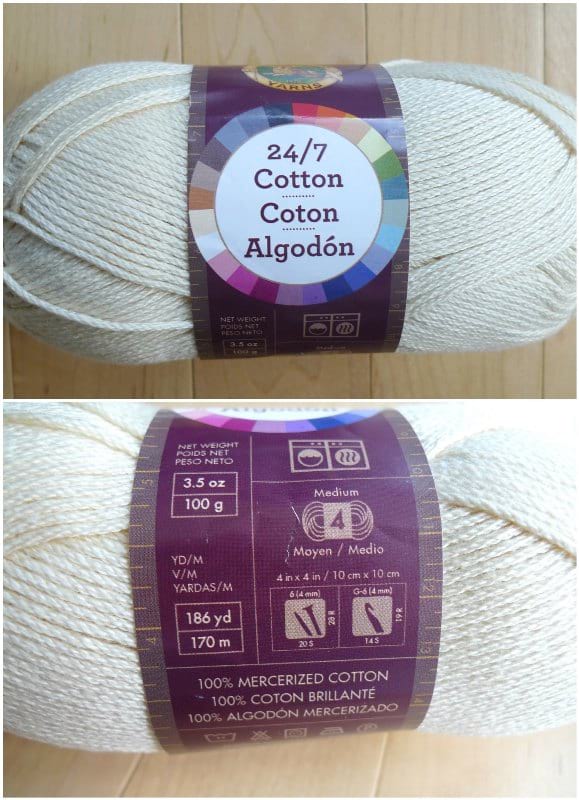
After designing my Star Stitch Pouches almost exactly a year ago, I knew what I wanted to tackle next: a Star Stitch PURSE! I adore the modern look and texture of star stitches, and it is very addictive working them in a round. I wanted to use the same beautiful mercerized cotton I used with my pouches as they really help show off the crisp definition of the stitches: Lion Brand Yarn’s 24/7 Cotton! I also used this yarn for my Star Stitch Cup Cozies HERE. I will forever associate star stitches with 24/7 Cotton! To make my purse sturdier, I held two strands of yarn together while crocheting!
Initially I was going for a colour-blocked look, and I started off by crocheting a black oval base with single crochets and then switched to cream star stitches later on. However, towards the end, I decided to frog my work as I wasn’t quite happy with how it was looking. The black single crochet base was not as sturdy and dense as the cream star stitches, and I preferred a flatter base so that the purse could actually stand by itself or hold its shape without flopping over.
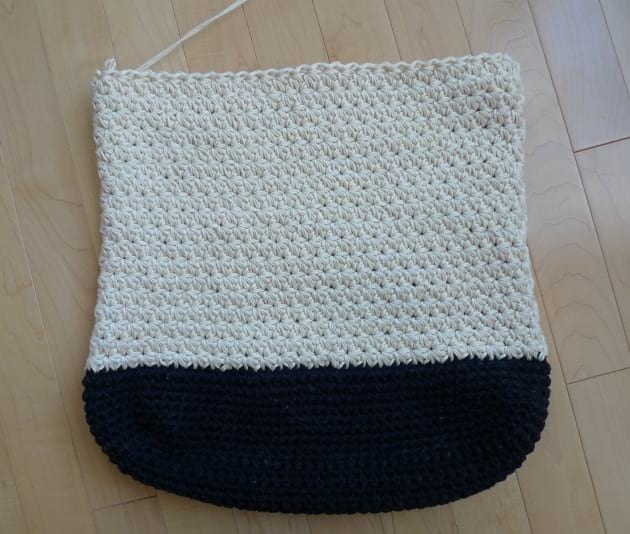
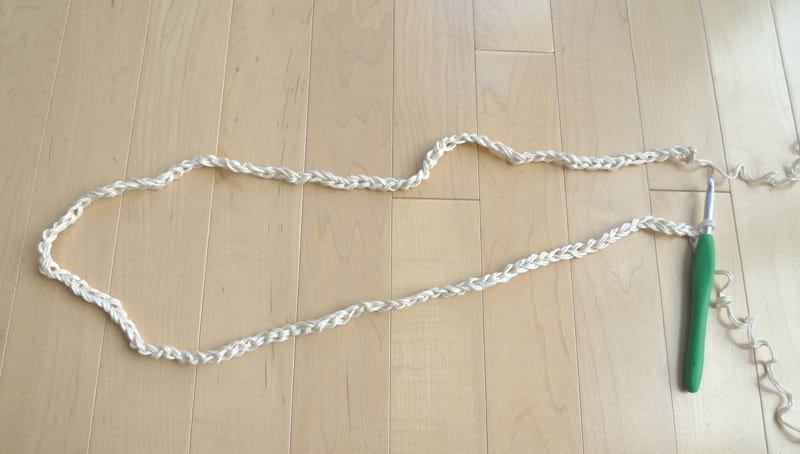
I remember seeing a brilliant technique that Molla Mills used for her Day Bag inspired by the popular Longchamp bag (see free pattern and tutorial HERE): she seamed up the bottom and folded it in a way that allowed it to be flat! Thus, I decided to crochet a tube and started off by crocheting a series of chain stitches and then joining it in a round. I ended up keeping my whole bag the same colour (perhaps I will do a colour-blocked purse in the future)!
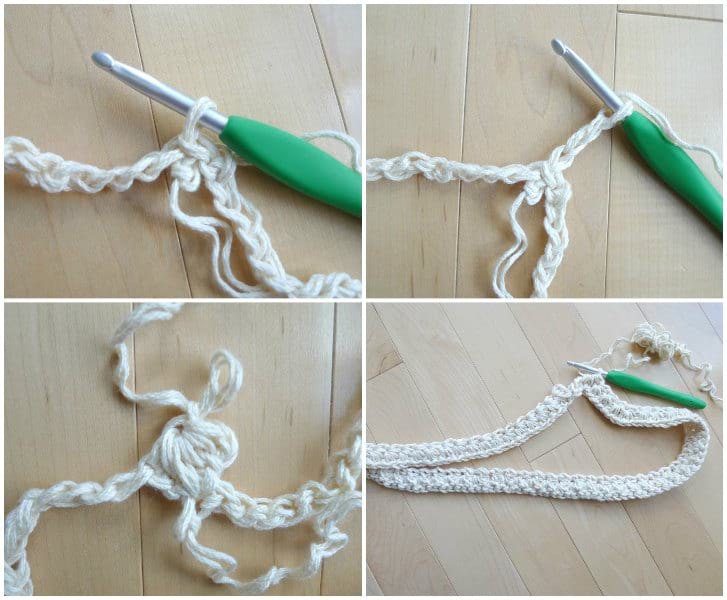
For a step-by-step tutorial on how to do the Star Stitch, please check out my Star Stitch Pouch blog post HERE! Moogly also has a very helpful video tutorial HERE. After joining the chain stitches together in a round, I chained 3 and began working my star stitches.
In order to make a cleaner seam with fewer gaps, I made a change to the last star stitch before joining to the round. Instead of yarning over and pulling up a loop to form the eye of the last star stitch, I simply slip stitched to the beginning chain gap of the previous round.
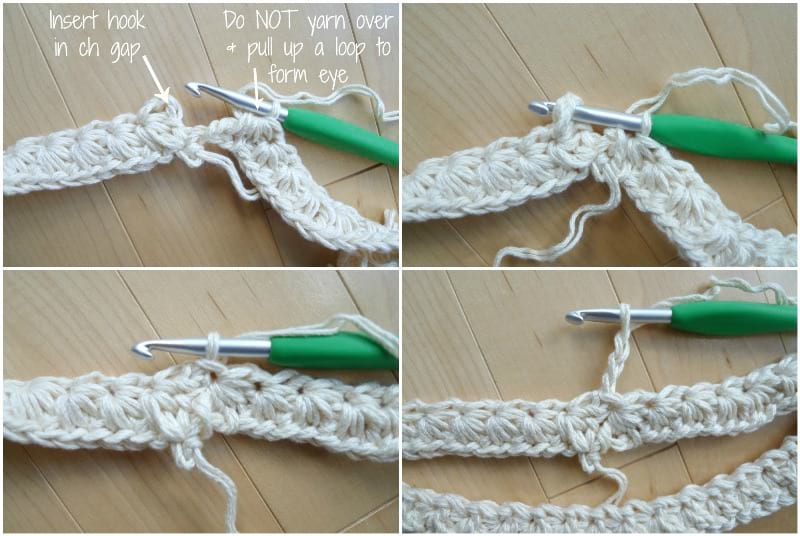
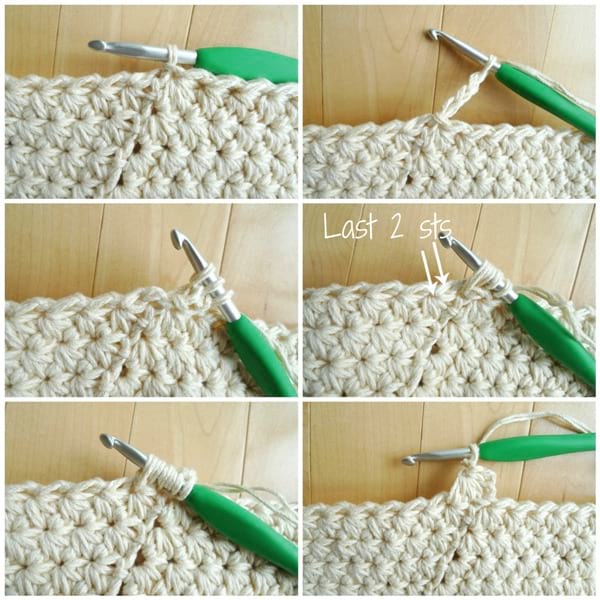
Here is another example in subsequent rounds. As I am working my last star stitch of the round, the last two stitches that I will insert my crochet hook into are indicated below. I omit the step of forming the eye of the last star stitch and simply insert my hook in the chain gap and close up the round!
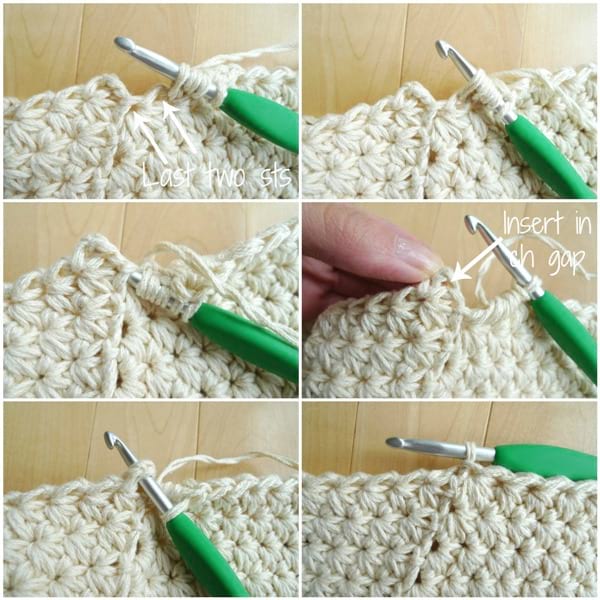
The first star stitch of each round is created as shown below. Remember that the last two stitches should be the larger stitch and the eye of the star stitch from the round below.
After using 6 skeins of yarn, I was happy with the height of my bag, keeping in mind that some of it would be folded downwards to form the bottom! I did a final round of slip stitches to smooth out the top of my bag for a cleaner edge.
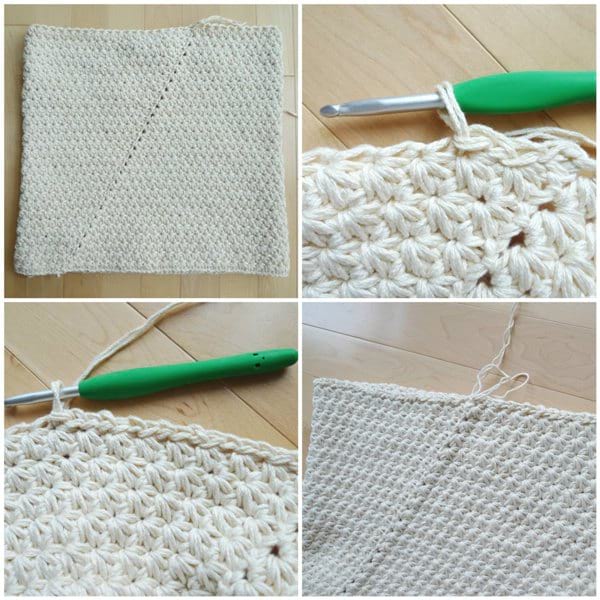
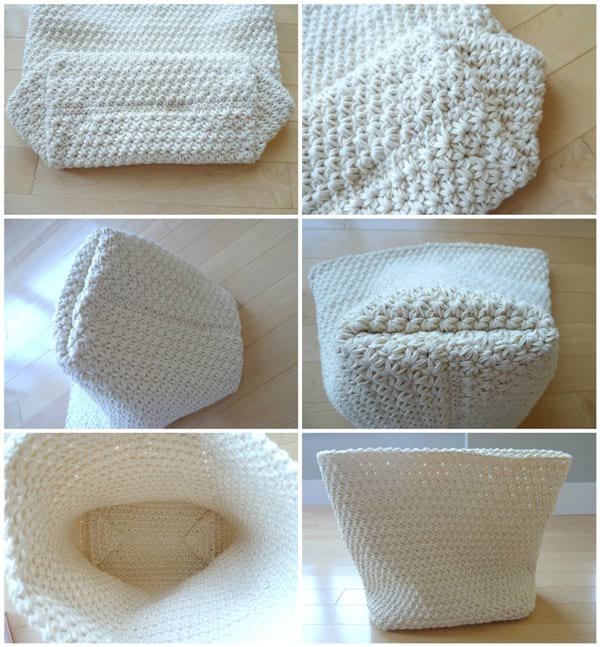
To form the flat base, I flipped my bag inside-out and whip stitched the bottom together with a yarn needle.
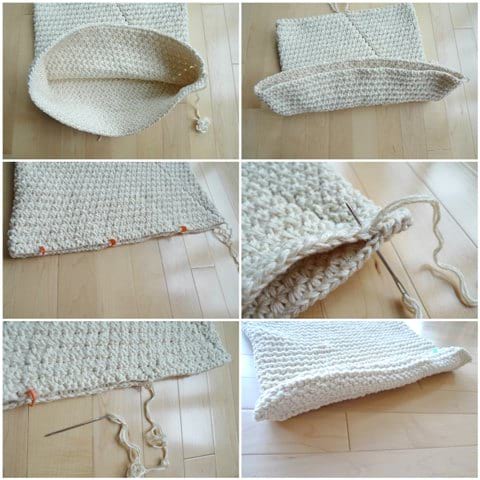
With the bottom seamed up, two protruding corners were formed. I folded the bag (still inside-out) so that the bottom seam ran down the middle. Two triangles were formed and I placed stitch markers approximately 3″ from the tip (at around the fifth line). The bottom two pictures in the collage below show how the bag looks when flipped rightside-out with these triangles formed.
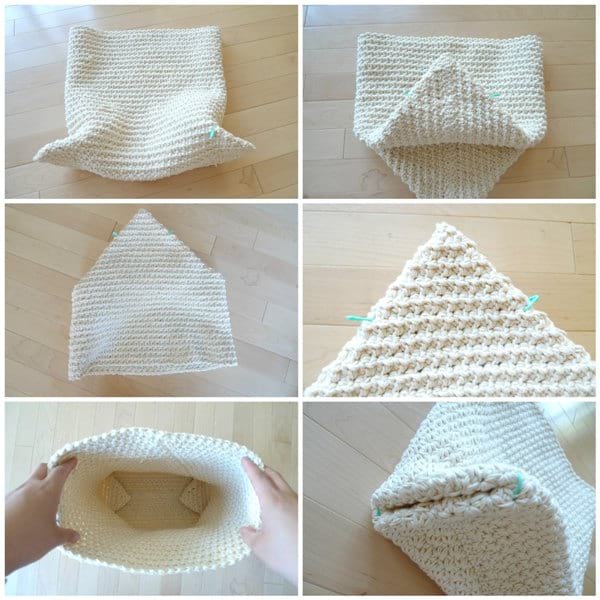
With a yarn needle, I sewed from stitch marker to stitch marker along the dashed line indicated below. I did the same to the triangle on the opposite side.
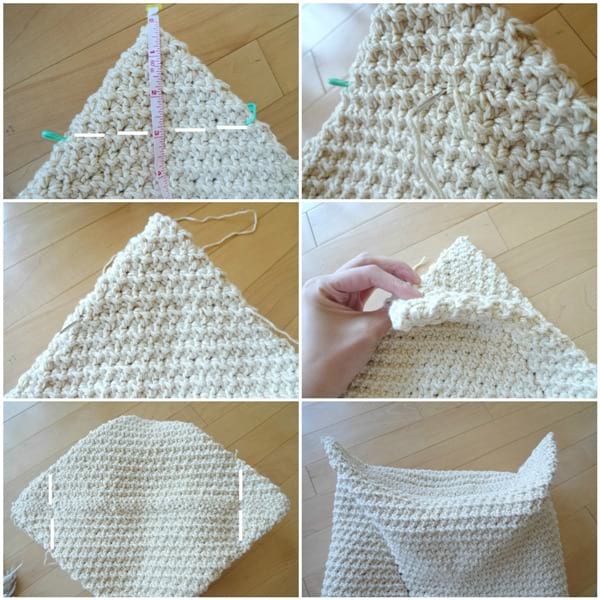
Next, I folded the triangles towards the midline (bag is still inside-out) and sewed them into place along the dashed lines.
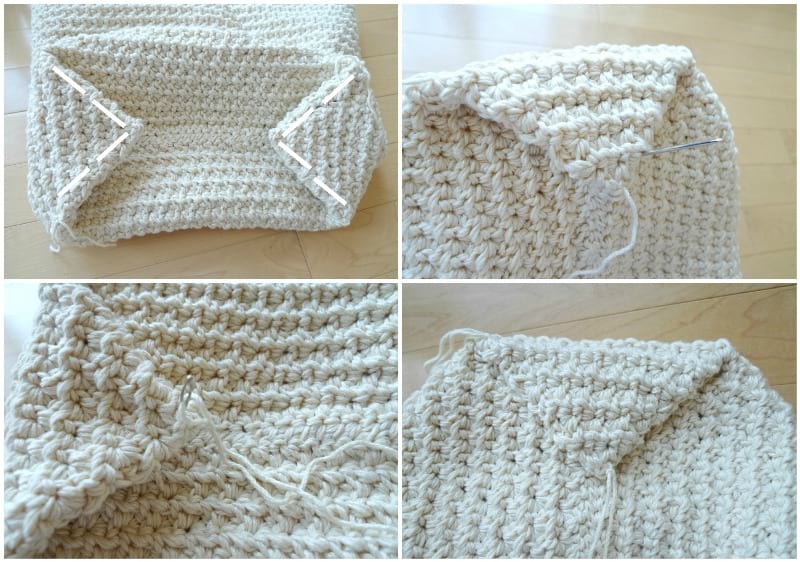
Once I flipped my bag rightside-out, this is what it looked like! This technique gives such a clean, sturdy, and flat base! It also gives the height of the bag a beautiful tapered look even though the crocheted piece started off as a rectangular tube!
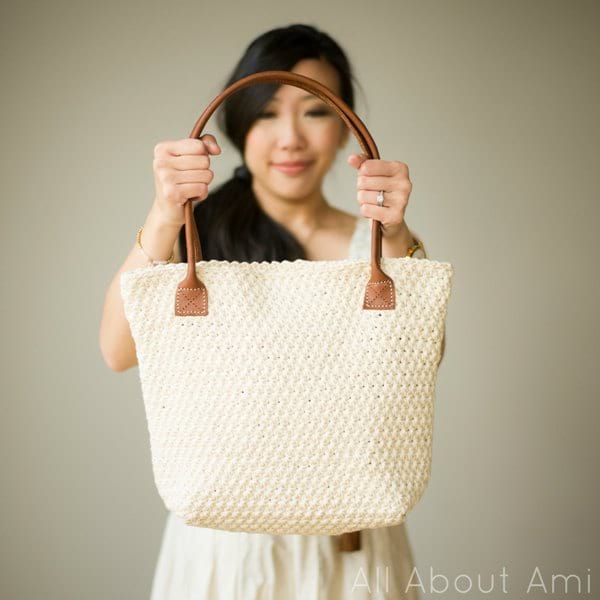
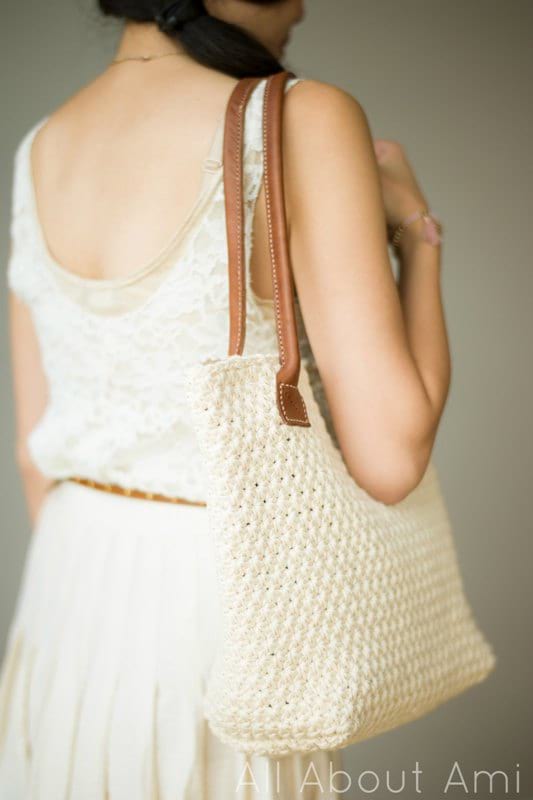
Next, it was time to figure out what handles to add! From the beginning, we wanted to add leather handles as we love combining textures and materials. Leather handles add such a luxurious and elegant touch to crochet pieces! However, I knew that some of you would not like to work with leather, so I figured out a crochet alternative as well! Check out my blog post HERE to see an in-depth tutorial on how to create these beautiful and stylish handles with minimal stretch (the tube contains a cord so that it will not stretch)! If your bag is a neutral colour like mine, you can try going with a fun pop of colour for the handles like this tangerine colour! You could also add buttons or some hardware to dress it up!
![]()
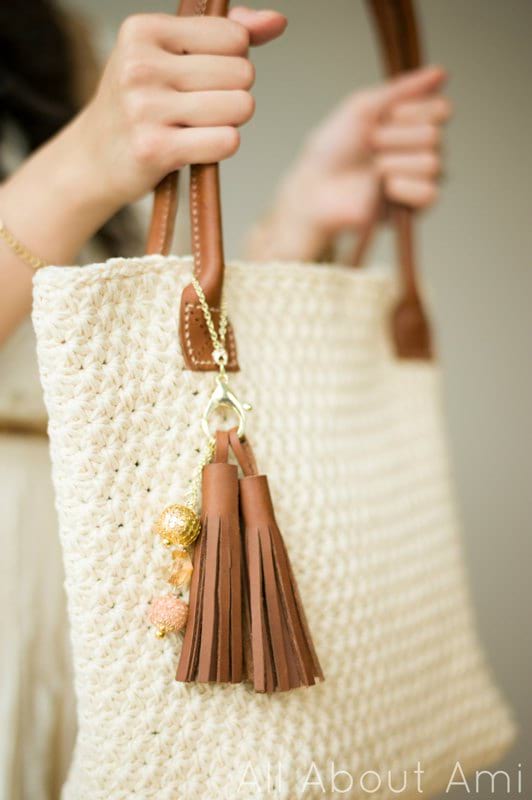
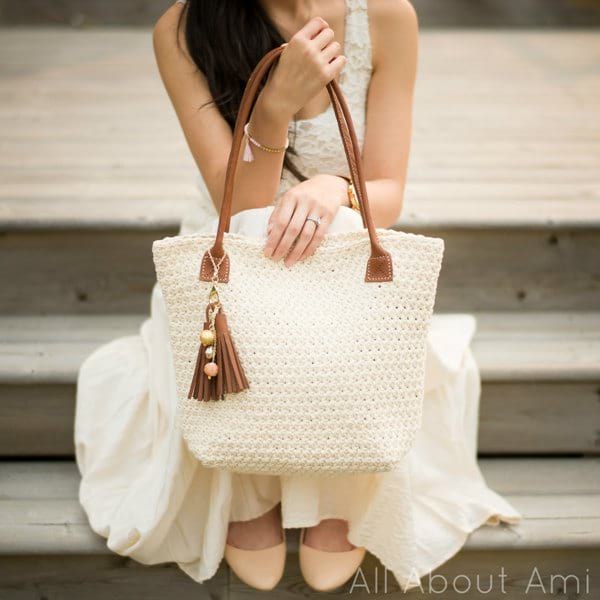
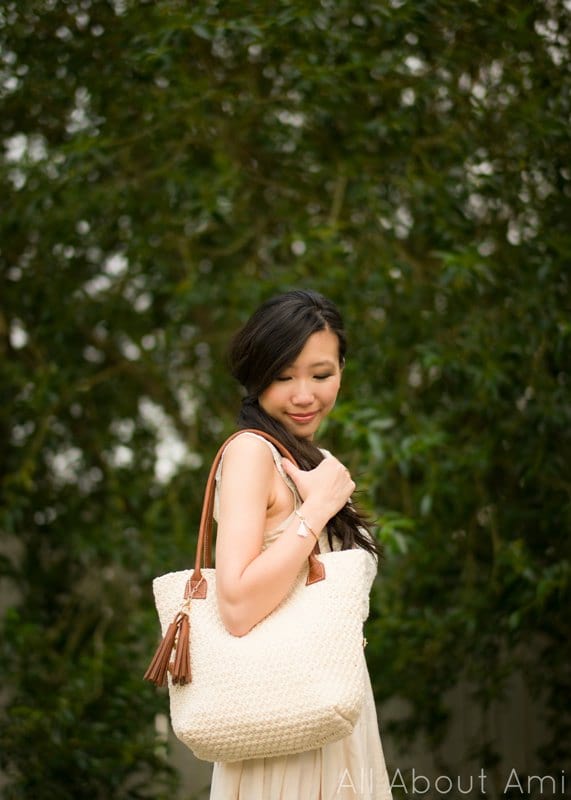
Our final purse has these beautiful leather handles! Ryan cut and sewed these professional-looking handles from scratch with a lot of love and care! Check out the full in-depth tutorial HERE to see how we made them!
The leather handle tutorial also shows how we made luxurious leather tassels and beautiful bag charms as well!
We took some video clips of us making the leather handles, tassels, and bag charms, and you can check them all out in this video we made below!
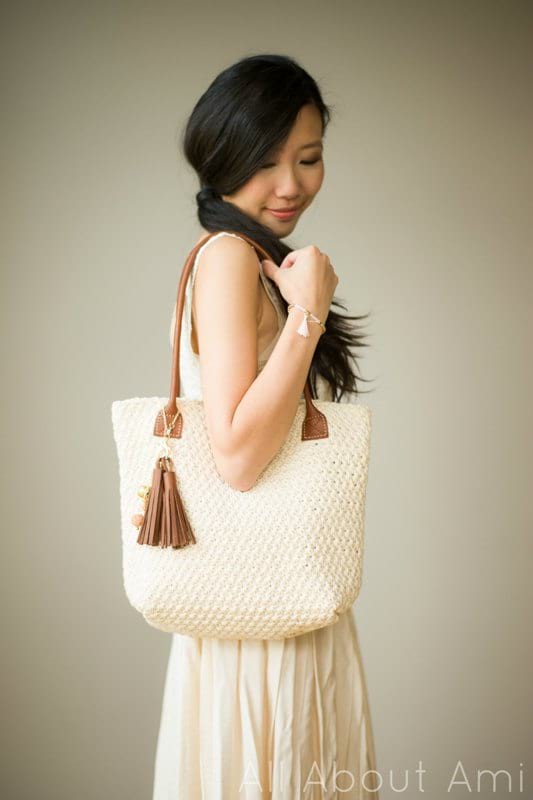
I could not believe my eyes when our Star Stitch Purse was finally complete along with its amazing leather handles!
![]()
Instead of adding a fabric lining, I inserted this fabulous Periea Handbag Organizer/Liner that fits perfectly inside (I designed the dimensions of the purse to make sure this lining would fit). This lightweight organizer has 13 inner and outer compartments including two large zippered compartments. It is very lightweight and comes in a wide range of colours. This organizer can help keep your items organized if you are using crocheted purses or large tote bags as all your items tend to become jumbled messes with large roomy bags. It also has reinforced handles so that you can easily lift the organizer out of your purse and switch it to another handbag! I researched different organizers before purchasing this one on Amazon and it is very reasonably priced. This organizer also gives my purse more structure so that it does not flop over, and it makes finding items inside much easier! You could insert your crochet hooks, notions, yarn and patterns into the various compartments too! Find this organizer on Amazon HERE!
![]()
********************************
Here is the free pattern for my Star Stitch Purse:
***You can purchase an INEXPENSIVE AD-FREE PDF of this pattern on Etsy HERE and on Craftsy HERE! This beautifully formatted PDF includes the step-by-step pictures, the full star stitch tutorial, the full pattern, and the crochet & leather handle tutorials! It is a total of 13 pages including the cover page! You can also purchase a kit with all the yarn to make this purse (with the crochet handles) on the Lion Brand site HERE!
Materials:
- Lightweight or medium yarn, level 3 or 4 (I used Lion Brand Yarn’s 24/7 Cotton in “Ecru” for the purse and “Tangerine” for the handles – found on the Lion Brand website HERE): 6 skeins or ~ 555 grams for the purse; 1 skein or ~ 66 grams for two crocheted handles
- 5.5 mm Clover Amour hook (for the purse), 3.5 mm Clover Amour hook (for the handles)
- Yarn needle (bent tip helpful)
- Stitch Markers
- Macrame cording/rope/ribbon for crocheted handles
- Leather, leather tools (optional) – Adjustable Groover, Diamond Punch (4 Prong, 2 mm), Waxed Braided Cord, Rubber Mallet
- Periea Handbag Organizer/Liner Large (optional)
Dimensions: 14.5″/37 cm wide x 11.5″/29 cm tall
Gauge: 2 star stitches across = 1”; 4 rounds of star stitches = 2” in height
Notes:
- This pattern assumes basic knowledge of how to work star stitches- see Star Stitch Pouch blog post HERE
- To adjust the width of your purse, increase or decrease the number of initial chains by 2, keeping it an odd number. Each star stitch is worked over two stitches. To add a star stitch, add 2 stitches. To decrease a star stitch, subtract 2 stitches.
- To adjust the height of your purse, increase or decrease the number of rounds.
Holding two strands of yarn together and using a 5.5 mm hook, chain 131 (start with an odd number). Leave a long initial tail of about 50″ (we will use this to seam the bottom shut later on). Being careful not to twist the chains, slip stitch to first chain to form a ring.
Round 1: Chain 3. Insert hook in second ch from hook and pull up a loop. Insert hook in next ch from hook and pull up a loop. Insert hook in same st where Chain 3 was made and pull up a loop. *Insert hook in next st and pull up a loop*, rep 2 times (you should have 6 loops on your hook). Yarn over and pull through all 6 loops. Yarn over and pull up a loop (i.e Chain 1) to close up first star stitch forming the “eye” of the star.
Subsequent star stitches in Round 2: Insert hook in “eye” you just made and pull up a loop. Insert hook in both loops of the last spike of the previous star stitch (the side of that last spike) and pull up a loop. Insert hook in same st where last spike of previous star stitch came out of and pull up a loop. *Insert hook in next st and pull up a loop*, rep 2 times (you should now have 6 loops on your hook). Yarn over and pull through all 6 loops. Yarn over and pull up a loop (i.e. Chain 1) to close up the star stitch forming the “eye” of the star.
Continue working star stitches around until the last star stitch. For the last star stitch, omit the last step- that is, do not yarn over and pull up a loop (i.e. Chain 1) to close up the star stitch forming the “eye” of the star. Slip stitch to beginning chain gap to close up round. [65 star stitches]
Rounds 2: Chain 3. Insert hook in second ch from hook and pull up a loop. Insert hook in next ch from hook and pull up a loop. Insert hook in same st where Chain 3 was made and pull up a loop. *Insert hook in next st and pull up a loop*, rep 2 times (you should have 6 loops on your hook). Yarn over and pull through all 6 loops. Yarn over and pull up a loop (i.e Chain 1) to close up first star stitch forming the “eye” of the star.
Subsequent star stitches in round: Insert hook in “eye” you just made and pull up a loop. Insert hook in both loops of the last spike of the previous star stitch (the side of that last spike) and pull up a loop. Insert hook in same st where last spike of previous star stitch came out of and pull up a loop. *Insert hook in next st and pull up a loop*, rep 2 times (you should now have 6 loops on your hook). Yarn over and pull through all 6 loops. Yarn over and pull up a loop (i.e. Chain 1) to close up the star stitch forming the “eye” of the star. Note that the last stitch you insert your hook into for each star stitch will always be the “eye” of the star stitch underneath.
Continue working star stitches around until the last star stitch. For the last star stitch, omit the last step- that is, do not yarn over and pull up a loop (i.e. Chain 1) to close up the star stitch forming the “eye” of the star. Slip stitch to beginning chain gap to close up round. [65 star stitches]
Rounds 3-28: Repeat Round 2.
Round 29: Slip stitch loosely around. Fasten off and weave in end.
How to form the flat base:
- Flip bag inside-out and whip stitch the bottom shut using the long initial ends you left.
- Flatten the bag sideways and pinch the corners to form a triangle.
- Seam 3″/7.6 cm down from top or along the fifth line.
- Seam the triangle down towards the midline onto the bottom of the bag.
Adding Crochet Straps:
See HERE for in-depth tutorial.
Dimensions: 25″/63.5 cm long, 1.6″/4 cm wide when flat, 0.8″/2 cm wide when tube is formed (Gauge: 10 sts = 2″/5 cm in length in case you want to modify the length of your straps)
Using 3.5 mm hook and one strand of yarn (not holding two together anymore),
Chain 126.
R1: Starting from second chain from hook, Sc 125 (125 sts).
R2: Chain 1, turn. Starting from second chain from hook, Sc 125 (125 sts).
R3-8: Repeat Row 2.
Slip stitch across short edges to smooth them out. Measure 2″/5 cm on each side and add a stitch marker. Place macrame cording or some type of rope/ribbon onto the crocheted piece – this will help prevent the strap from stretching too much. Fold the crochet piece over the rope and whip stitch the sides closed from one stitch marker to the other stitch marker. Attach the ends of the strap about 4.75″/12 cm down from the top (approximately 10 star stitch rounds from the top) and 2.75″/7 cm from the sides of the bag. First sew the rope/cord/ribbon into place (to prevent it from moving within the tube) and then sew the squares/rectangles onto the purse.
Sewing Leather Straps:
See HERE for in-depth tutorial.
Dimensions: 27″/69 cm long, 0.75″/1.9 cm wide (once flattened)
Cut leather straps so that they are 27″/69 cm long and 1.5″/3.8 cm wide.
Using adjustable groover, form grooves along each edge of both handles so that the stitches will be flush with the leather.
Using diamond punch (2 mm) and rubber mallet, poke holes along both edges of each strap. Poke holes to form square at bottoms of both straps. Poke holes to form an X within each square.
Pinch sides of leather strap together and use waxed braided cord to sew them together using the saddle stitch as demonstrated HERE. Sew squares onto crocheted bag using back stitch, approximately 2.5″/6.4 cm from top (bottom of square to top of bag) and 2.5″/6.4 cm from sides. Cut ends and melt to secure them.
****************
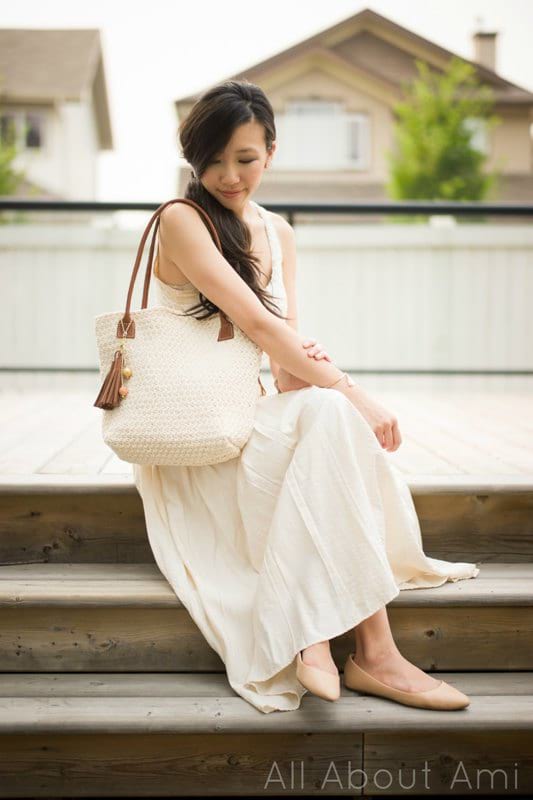
I am absolutely delighted with my luxurious Star Stitch Purse and can’t believe we made everything from scratch! Those leather handles take the purse to the next level.
There are so many elements about this classic purse that I love: the flat sturdy base, the leather handles, the textured and romantic star stitches, and the fact that it perfectly fits my handy purse organizer! If you prefer more closure, you could always add a zipper or some button snaps!
I’ve always wanted to crochet a chic purse and I’m so glad we finally brought this vision to life! You could make your own purse in your favourite colour or go with a colour-blocked look with colourful handles!
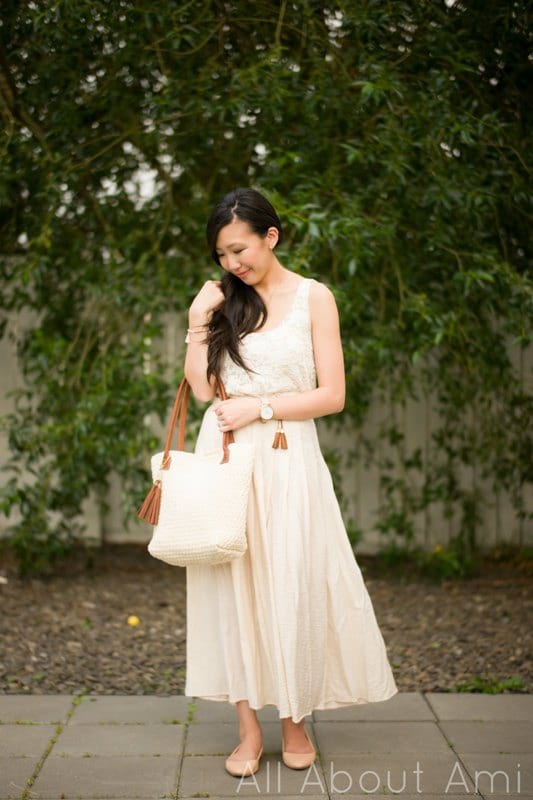
A purse is such a practical project that can be used everyday. It’s so special being able to carry something you crocheted around with you all the time, and you’ll be so proud whenever you use it! It’s a great conversation starter as you’ll proudly declare, “I made it!” if someone admires your purse! If you’re looking for some handmade pouches for everyday use or to put in your purse, do check out my Star Stitch Pouches and Crochet Zipper Pouch!
I would love to see your finished Star Stitch Purses, so don’t forget to tag me on social media- I’ve loved showing the behind-the-scenes of my projects on Instagram Stories, so be sure to check them out! You can also subscribe to my newsletter HERE to get weekly updates about my projects and newest designs! I love how we can crochet year round and work with different fibers throughout the year! This Star Stitch purse is a fun summer project and I can’t wait to make more purses in the future!
{This post is sponsored by Lion Brand Yarn! I’ve loved working with their yarn throughout the years and I’m thrilled that I get to collaborate with them every month!}
This pattern is an original pattern by Stephanie Lau of All About Ami. Please do not claim this pattern as your own. If you wish to share this pattern, you may link to this pattern but please do not reprint it on your site. You may keep a copy for your own personal use but please DO NOT sell the pattern or distribute it.
You may sell products made from this pattern but please clearly credit the design to me, Stephanie Lau of All About Ami, and provide a link to my blog www.AllAboutAmi.com. Permission is NOT granted for mass production or factory manufacturing of any kind. Thank you for being respectful and for your understanding!