***You can purchase an INEXPENSIVE AD-FREE PDF of this pattern on Etsy HERE and on LoveCrafts HERE! This beautifully formatted PDF includes ALL the step-by-step pictures and pattern and is a total of 11 pages including the cover page! Lion Brand Yarn has made a convenient kit HERE that includes the pattern and all the 24/7 Cotton yarn needed (choose any shade you want) to crochet this elegant bag!
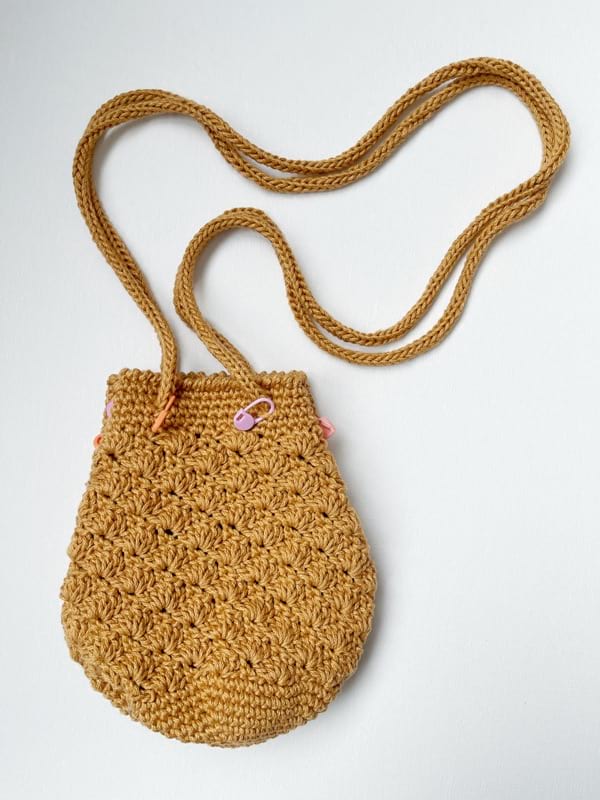
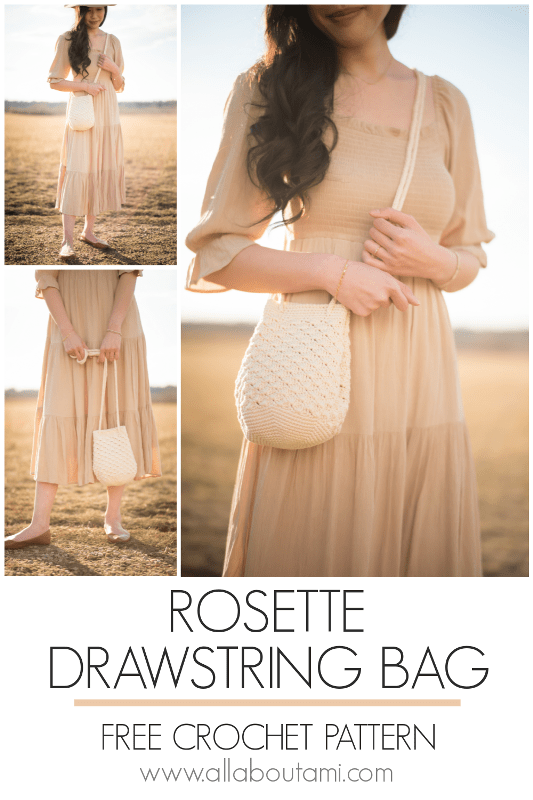
Pattern Description: Crochet this modern day Regency-inspired drawstring bag using the lovely shell stitch! This elegant and romantic bag is quick to work up and can be worn cross body. Make one for yourself and your little ones so you can match!
Skill Level: Level 2 – Easy
Materials:
- 24/7 Cotton yarn (worsted weight level 4 yarn); Size 1 requires 90 g/167 yds (I used “Camel” colorway) and Size 2 requires 140 g/260 yds (I used “Ecru” colorway); purchase the convenient Lion Brand Kit HERE (contains all the yarn required to make TWO BAGS in your choice of color plus digital pattern)
- 3.25 mm (bag) and 2 mm (strap) Clover Amour crochet hooks
- Yarn Needle (bent tip helpful)
- Lock ring stitch markers (at least 8)
- Steamer (optional for blocking bag– I use this affordable one HERE)
Gauge:
- First 6 rounds of base = 2.5”/6 cm across (diameter) using 3.25 mm hook
- First 9 rounds of base = 3.5”/9 cm across (diameter) using 3.25 mm hook
- 3.5 shells and 11 rounds = 4”/10 cm in shell stitch using 3.25 mm hook
Final Dimensions:
- Size 1: 6”/15 cm across, 7”/18 cm tall, 14.5”/37 cm circumference, straps are 16”/41 cm long (measured from top of bag)
- Size 2: 8”/20 cm across, 9”/23 cm tall, 19”/48 cm circumference, straps are 18”/46 cm long (measured from top of bag)
Abbreviations:
- Magic Ring (MR): Make a loop. Hold yarn where ends cross. Insert hook into loop and pull up working yarn. Yarn over and work beginning chains. Work subsequent stitches in magic ring and then pull tight to close. See my Magic Ring tutorial HERE!
- Sc = single crochet
- Inc = Increase: Work 2 sc in the next stitch. [1 stitch becomes 2 stitches.]
- Rep = repeat
- Sts = stitches
- Sl st = slip stitch
- Ch = chain
- Dc = double crochet
- SM = stitch marker
Notes:
- This bag is worked in rounds and requires minimal seaming (connecting the straps at the very end).
- The base is worked in continuous/unjoined rounds using single crochet stitches.
- Next, the shell stitch is used for the body of the bag (requires a multiple of 6 stitches) and is worked in joined rounds.
- After the body of shell stitches is completed, the top edging is crocheted using single crochet stitches and joined rounds.
- The first round of top edging smooths out/flattens the shell stitches at the top.
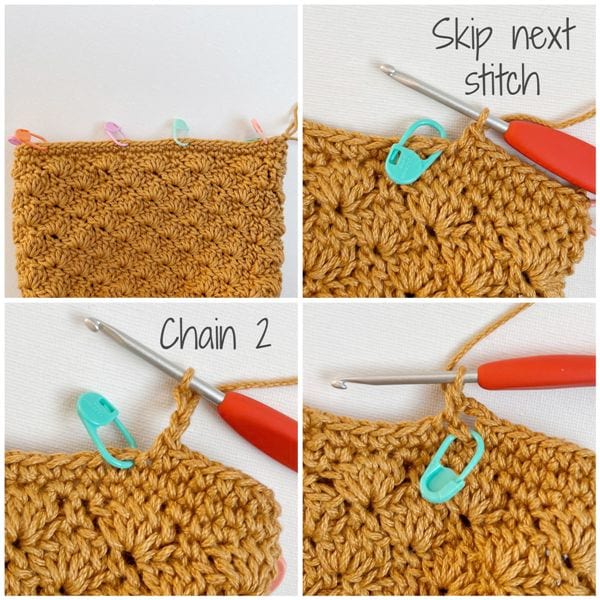
- When it is time to create the holes through which the strap will be woven through, eight stitch markers are placed to indicate where these holes will be created.
- When crocheting that round, the stitch with the stitch marker is skipped while a chain 2 is worked over it.
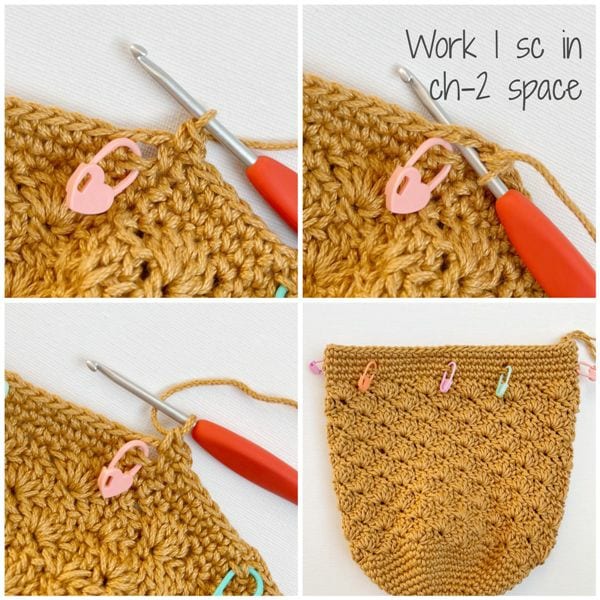
- During the next round, one single crochet stitch is worked in each chain-2 space.
- The last round of the top edging uses the reverse single crochet stitch/crab stitch for a beautiful finish.
- Two sizes are provided in this pattern – please reference the final dimensions when determining which size you would like to make.
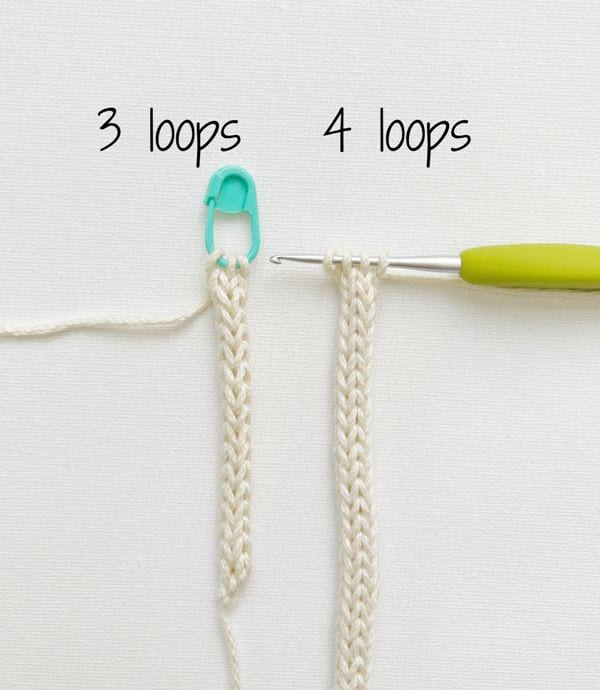
- The strap is crocheted by working an I-cord. Note that I used different sized I-cords for Size 1 (3 loops on hook) and Size 2 (4 loops on hook). I have filmed a video demonstrating how I crochet an I-cord: please reference it in the strap section of Size 2.
- When you have worked your approximate strap length, you can put the live loops onto a stitch marker (do not fasten off). Weave the strap in and out of the 8 holes and use the stitch marker to join the end of the strap to the beginning of the strap. You can try on the bag and see if you like the strap length and where the bag hits. You can take away some rounds to shorten the strap or add more rounds to add length.
- Keep in mind that the strap will stretch with wear and when heavier items are carried in the bag.
- You can carry/wear the bag with either one strap or two straps, so keep that in mind when you are determining your strap length (you could carry the bag with two straps on one shoulder and then wear it with one strap cross-body; approximate strap length would be 40”/102 cm).
- Once you are happy with the strap length, both ends of the strap are whip stitched together.
- I made Size 1 bags for my daughters (ages 7 and 9) and they like to carry their stuffed animals in it. Using the strap length provided, they wear the bag cross-body
- I made Size 2 for myself, and using the strap length provided, I wear the bag cross-body. I am 5’6 for reference.
- I used smaller crochet hooks for the bag and strap to get tight, dense and sturdy stitches to provide more structure for the bag with less stretching. You may use larger crochet hooks – keep in mind that your overall bag will turn out larger and there may be more gaps (you will require more yardage as well).
Watch this video below that walks you through the entire construction of the bag and demonstrates what stitches are required (e.g. shell stitch, reverse single crochet, how to thread the strap through the holes):
PATTERN INSTRUCTIONS
***SIZE 1
Base:
Using 3.25 mm hook and working in unjoined rounds,
Round 1: 6 sc in Magic Ring. (6 sts)
R2: *Inc*, rep 6 times. (12 sts)
R3: *Sc 1, Inc*, rep 6 times. (18 sts)
R4: *Sc 2, Inc*, rep 6 times. (24 sts)
R5: *Sc 3, Inc*, rep 6 times. (30 sts)
R6: *Sc 4, Inc*, rep 6 times. (36 sts)
R7: *Sc 5, Inc*, rep 6 times. (42 sts)
R8: *Sc 6, Inc*, rep 6 times. (48 sts)
R9: *Sc 7, Inc*, rep 6 times. (54 sts)
R10: *Sc 8, Inc*, rep 6 times. (60 sts)
R11: *Sc 9, Inc*, rep 6 times. (66 sts)
R12: *Sc 10, Inc*, rep 6 times. (72 sts)
My base measured 4.75”/12 cm across at this point.
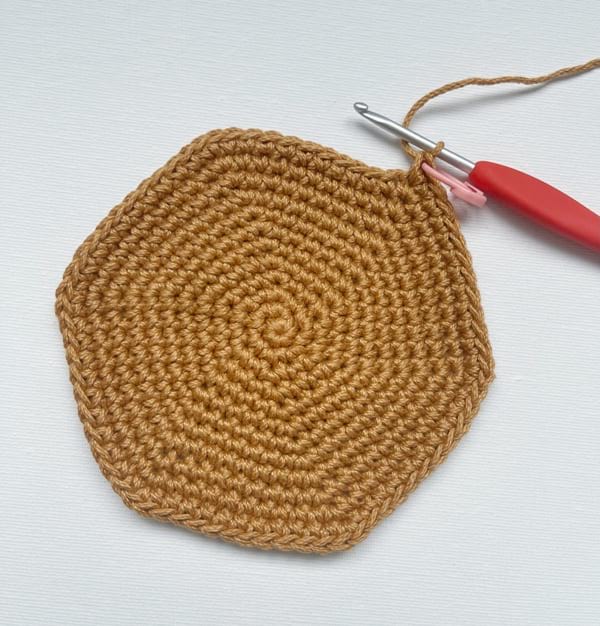
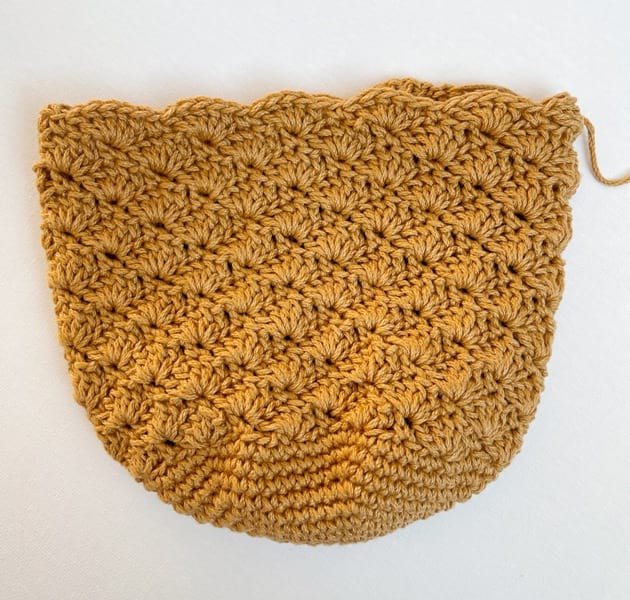
Body:
We will now begin the solid shell stitch rounds. Work in joined rounds.
R13: Ch 1, sc in the 1st st. *Skip 2 sts, work 5 dc in the next st, skip 2 sts, sc in the next st. Repeat from * until 2 sts remain (this will be after you work 5 dc). Skip 2 sts, join with a sl st to the first sc of the round. (12 shells)
R14: Ch 3 (counts as first dc), work 2 dc in the same (1st) st. *Skip 2 sts, sc in the next st (top of the shell from previous round), skip 2 sts, 5 dc in the next st (the sc from previous round). Repeat from * until 2 sts remain (this will be after you work 1 sc). Work 2 dc in the same st you started the round with. Join with a sl st to the top of the ch 3. (12 shells)

R15-25: Repeat Rounds 13 and 14. (12 shells)
Top Edging:
We will now smooth the shell stitches to create a flat top (your last shell stitch round must be a R13 repeat for this smoothing to work).
R26: Chain 1, sc in same stitch. Sc 1 in next stitch. *Sl st 3, sc 3*, rep across until 4 sts remain. Sl st 3, sc 1. Slip stitch to first sc of round. (72 sts)
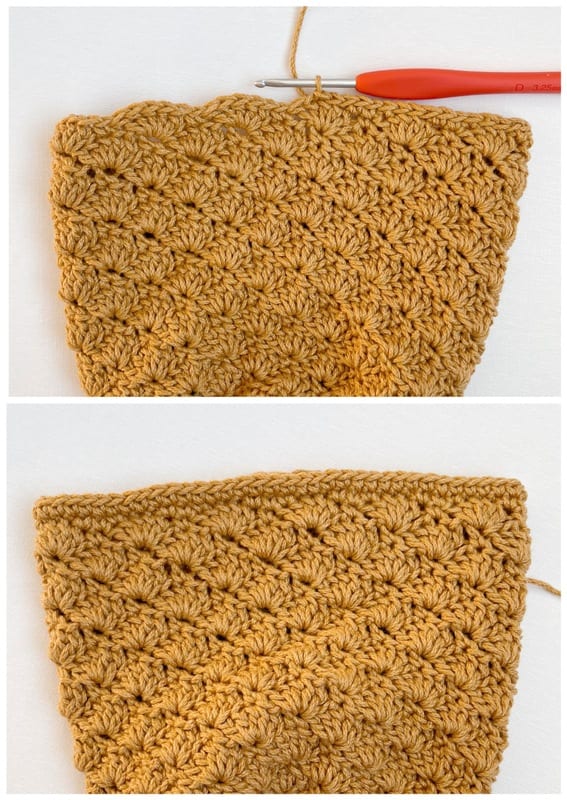
R27: Chain 1, sc in same st. Sc around. Sl st to first sc of round. (72 sts)
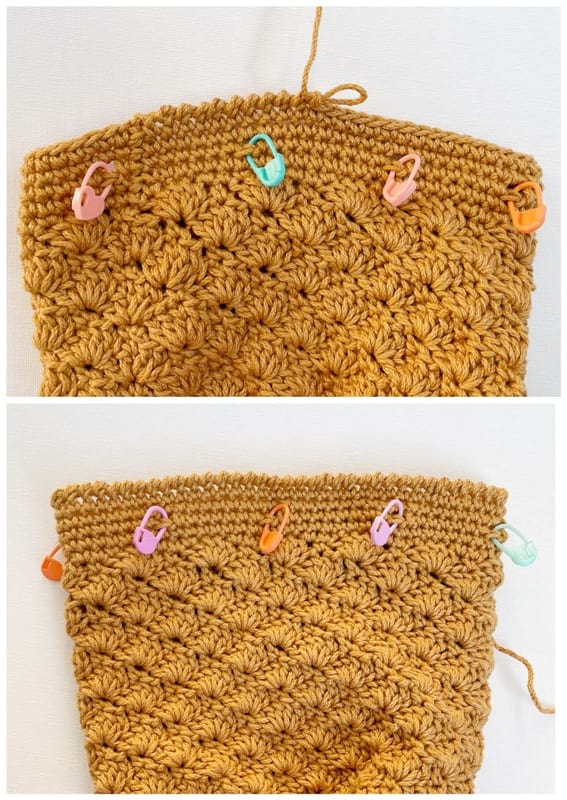
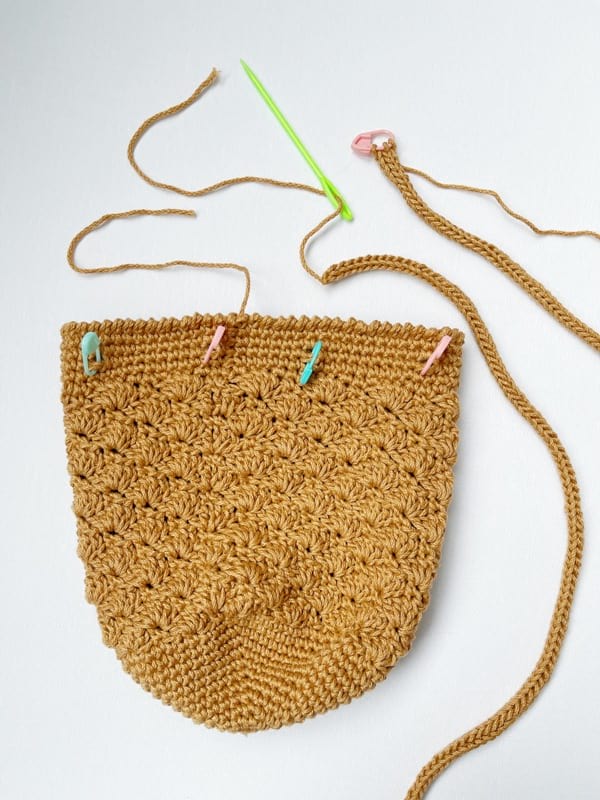
Now it is time to create the holes through which the strap will be woven through later on. Place 8 stitch markers in the following stitches (please reference diagram): 2, 12, 20, 30, 38, 48, 56 and 66.
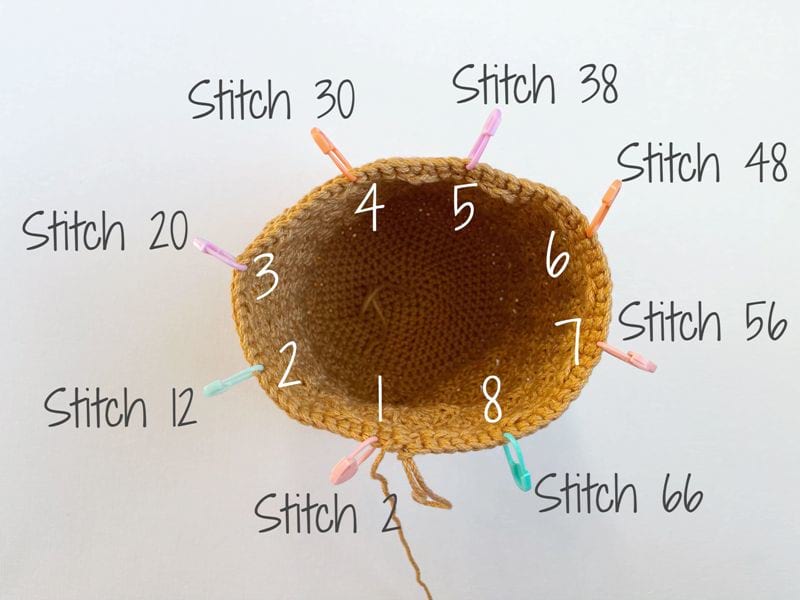
R28: Chain 1, sc in same stitch. Skip next stitch (1st stitch marker), chain 2. Sc 9, skip next st (2nd SM), chain 2. Sc 7, skip next st (3rd SM), chain 2. Sc 9, skip next st (4th SM), chain 2. Sc 7, skip next st (5th SM), chain 2. Sc 9, skip next st (6th SM), chain 2. Sc 7, skip next st (7th SM), chain 2. Sc 9, skip next st (8th SM), chain 2. Sc 6, slip stitch to first sc.
R30: Chain 1, sc in same st. Sc around. Sl st to first sc of round. (72 sts)
R31: Chain 1, reverse single crochet/crab stitch around. (72 sts) Please reference this video HERE to see how to work this stitch.
Fasten off and weave in end.
Strap:
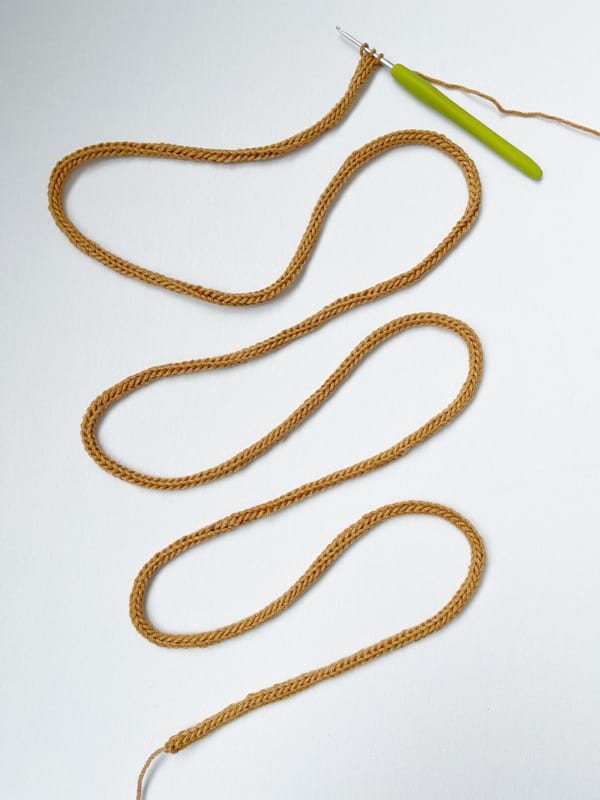
Using 2 mm hook, crochet an I-cord to desired length. Here are the details:
- Leaving long initial yarn tail (at least 9”/23 cm), chain 3. Insert hook into 2nd chain from hook, yarn over and draw up a loop. Insert hook into next chain, yarn over and draw up a loop. There are 3 loops on the hook.
- *Remove 2 loops from hook and hold onto these loops with your non-hook hand so that they do not become undone or twisted.
- Yarn over and draw through remaining loop on hook.
- Insert hook into first dropped loop, yarn over and draw through. There are now 2 loops on hook on the hook.
- Insert hook into second dropped loop, yarn over and draw through. There are now 3 loops on the hook.*
- Repeat all the steps between the asterisks until you have reached your desired length of I-cord.
- For Size 1, my I-Cord was 70”/178 cm long (long enough for my 7 and 9 year old daughters to wear the bag cross-body).
- When you are ready to test the strap length of the bag, place a stitch marker through the three loops (so that the strap does not unravel with these live stitches).
- Thread the initial yarn tail through a yarn needle (this makes it easier to weave the strap through the holes).
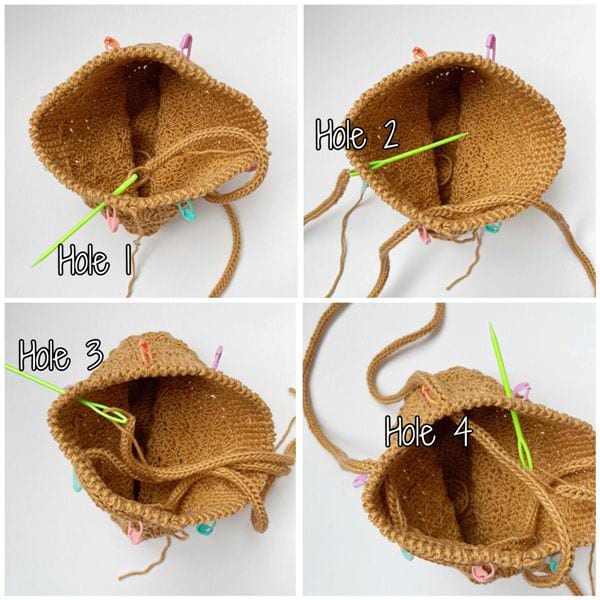
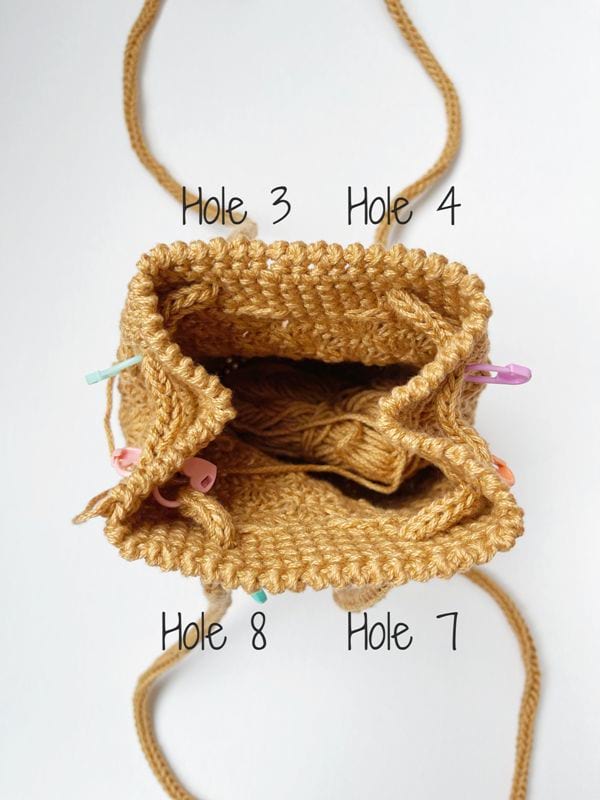
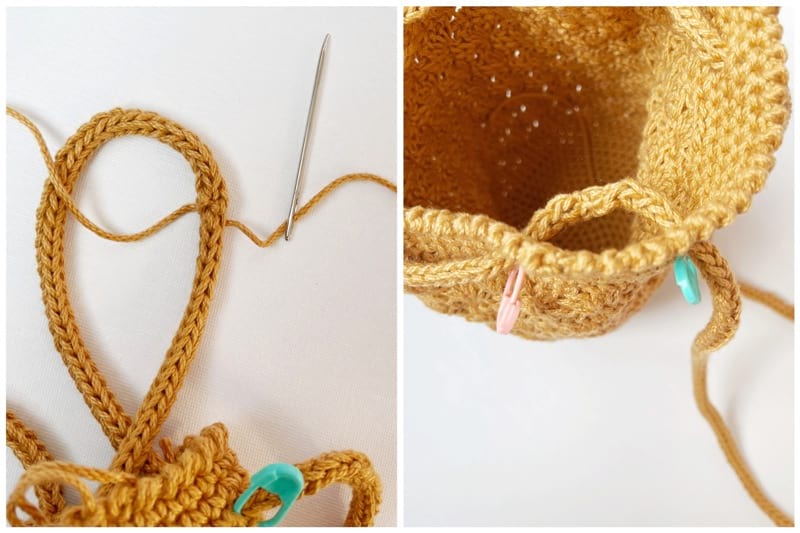
- Starting from the inside of the bag and with Hole 1, weave the strap in and out of the bag through Holes 1-8 as shown in collage. The two straps will extend outwards between Holes 3 and 4 and between Holes 7 and 8 as shown in diagram.
- Use the same stitch marker that is holding the three loops and attach it to the beginning of the strap.
- Even out the straps and try on the bag to see if you like where it is hitting. Try putting items into your bag so you can get an idea of how much the strap will stretch and where the bag will hit once it has been weighed down.
- Adjust the strap length if necessary (frog rounds to decrease the length or continue crocheting the I-cord to add length). You can keep crocheting the I-cord while the strap has been woven through the holes – this makes it easy to keep trying on the bag as you add length.
- Once you are happy with the length, cut off the yarn (leave a long yarn tail) and weave the tail through a yarn needle. Thread the yarn tail through the three remaining loops and pull tight.
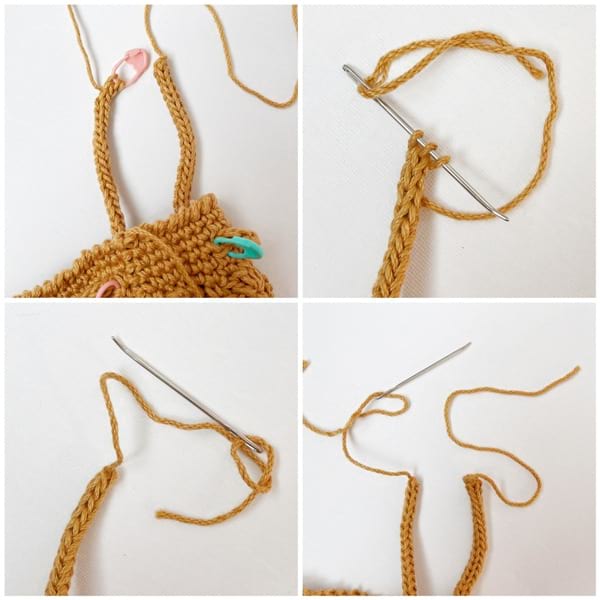
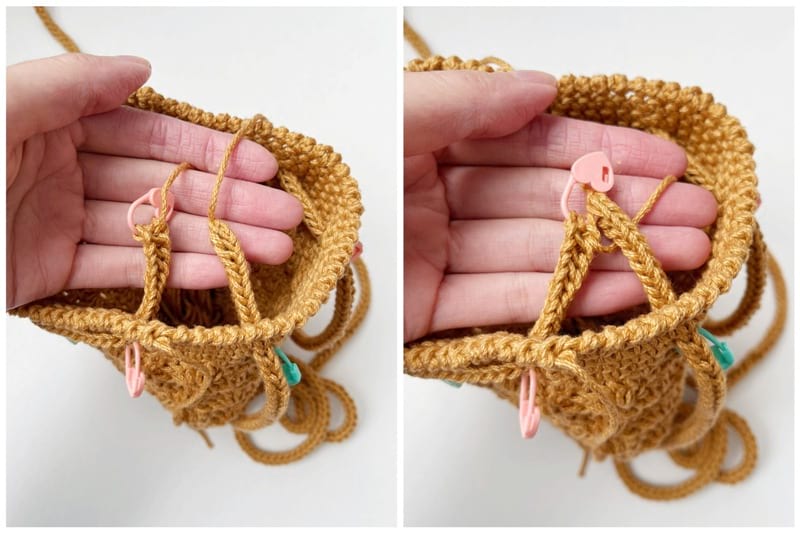
- Seam the beginning of the strap to the end of the strap. You can use the whip stitch or try and attach the V’s from one end of the V’s from the other end as shown in picture. Be sure to pass the yarn through both ends of the strap multiple times to ensure this seam is secure.

- You can tie the initial yarn end and final yarn end into knots to help secure this junction at the very end.
- I like to hide the strap seam on the inside of the bag (between Holes 1 and 8). The seam will shift with wear, but you can keep moving it back in this spot to keep it hidden inside the bag!
- Weave in the ends and you are done!
You can block the final bag as an optional step to smooth out the stitches.
***SIZE 2
Base:
Using 3.25 mm hook and working in unjoined rounds,
Round 1: 6 sc in Magic Ring. (6 sts)
R2: *Inc*, rep 6 times. (12 sts)
R3: *Sc 1, Inc*, rep 6 times. (18 sts)
R4: *Sc 2, Inc*, rep 6 times. (24 sts)
R5: *Sc 3, Inc*, rep 6 times. (30 sts)
R6: *Sc 4, Inc*, rep 6 times. (36 sts)
R7: *Sc 5, Inc*, rep 6 times. (42 sts)
R8: *Sc 6, Inc*, rep 6 times. (48 sts)
R9: *Sc 7, Inc*, rep 6 times. (54 sts)
R10: *Sc 8, Inc*, rep 6 times. (60 sts)
R11: *Sc 9, Inc*, rep 6 times. (66 sts)
R12: *Sc 10, Inc*, rep 6 times. (72 sts)
R13: *Sc 11, Inc*, rep 6 times. (78 sts)
R14: *Sc 12, Inc*, rep 6 times. (84 sts)
R15: *Sc 13, Inc*, rep 6 times. (90 sts)
R16: *Sc 14, Inc*, rep 6 times. (96 sts)
Body:
We will now begin the solid shell stitch rounds. Work in joined rounds.
R17: Ch 1, sc in the 1st st. *Skip 2 sts, work 5 dc in the next st, skip 2 sts, sc in the next st. Repeat from * until 2 sts remain (this will be after you work 5 dc). Skip 2 sts, join with a sl st to the first sc of the round. (16 shells)
R18: Ch 3 (counts as first dc), work 2 dc in the same (1st) st. *Skip 2 sts, sc in the next st (top of the shell from previous round), skip 2 sts, 5 dc in the next st (the sc from previous round). Repeat from * until 2 sts remain (this will be after you work 1 sc). Work 2 dc in the same st you started the round with. Join with a sl st to the top of the ch 3. (16 shells)
R19-33: Repeat Rounds 17 and 18. (16 shells)
Top Edging:
We will now smooth the shell stitches to create a flat top (your last shell stitch round must be a R17 repeat for this smoothing to work).
R34: Chain 1, sc in same stitch. Sc 1 in next stitch. *Sl st 3, sc 3*, rep across until 4 sts remain. Sl st 3, sc 1. Slip stitch to first sc of round. (96 sts)
R35: Chain 1, sc in same st. Sc around. Sl st to first sc of round. (96 sts)
Now it is time to create the holes through which the strap will be woven through later on. Place 8 stitch markers in the following stitches (please reference diagram): 2, 15, 26, 39, 50, 63, 74 and 87.

R36: Chain 1, sc in same stitch. Skip next stitch (1st stitch marker), chain 2. Sc 12, skip next st (2nd SM), chain 2. Sc 10, skip next st (3rd SM), chain 2. Sc 12, skip next st (4th SM), chain 2. Sc 10, skip next st (5th SM), chain 2. Sc 12, skip next st (6th SM), chain 2. Sc 10, skip next st (7th SM), chain 2. Sc 12, skip next st (8th SM), chain 2. Sc 9, slip stitch to first sc.
R37: Chain 1, sc in same stitch. Sc around, working 1 sc in each ch-2 space. Sl st to first sc of round. (96 sts) You can keep the stitch markers in place if you would like a visual reminder of where the holes have been created.
R38: Chain 1, sc in same st. Sc around. Sl st to first sc of round. (96 sts)
R39: Chain 1, reverse single crochet/crab stitch around. (96 sts)
Fasten off and weave in end.
Strap:
Using 2 mm hook, crochet an I-cord to desired length. Here are the details:
- Leaving long initial yarn tail (at least 9”/23 cm), chain 4. Insert hook into 2nd chain from hook, yarn over and draw up a loop. Insert hook into next chain, yarn over and draw up a loop. Insert hook into next chain, yarn over and draw up a loop. There are 4 loops on the hook.
- *Remove 3 loops from hook and hold onto these loops with your non-hook hand so that they do not become undone or twisted.
- Yarn over and draw through remaining loop on hook.
- Insert hook into first dropped loop, yarn over and draw through. There are now 2 loops on the hook.
- Insert hook into second dropped loop, yarn over and draw through. There are now 3 loops on the hook.
- Insert hook into third dropped loop, yarn over and draw through. There are now 4 loops on the hook.*
- Repeat all the steps between the asterisks until you have reached your desired length of I-cord.
- For Size 2, my I-Cord was 78”/198 cm long so that I could wear the bag cross-body (I am 5’6 for reference).
- When you are ready to test the strap length of the bag, place a stitch marker through the four loops (so that the strap does not unravel with these live stitches).
- Thread the initial yarn tail through a yarn needle (this makes it easier to weave the strap through the holes).
- Starting from the inside of the bag and with Hole 1, weave the strap in and out of the bag through Holes 1-8 as shown in collage. The two straps will extend outwards between Holes 3 and 4 and Holes 7 and 8 as shown in diagram.
- Use the same stitch marker that is holding the four loops and attach it to the beginning of the strap.
- Even out the straps and try on the bag to see if you like where it is hitting. Try putting items into your bag so you can get an idea of how much the strap will stretch and where the bag will hit once it has been weighed down.
- Adjust the strap length if necessary (frog rounds to decrease the length or continue crocheting the I-cord to add length). You can keep crocheting the I-cord while the strap has been woven through the holes – this makes it easy to keep trying on the bag as you add length.
- Once you are happy with the length, cut off the yarn (leave a long yarn tail) and weave the tail through a yarn needle. Thread the yarn tail through the four remaining loops and pull tight.
- Seam the beginning of the strap to the end of the strap. You can use the whip stitch or try and attach the V’s from one end of the V’s from the other end as shown in picture. Be sure to pass the yarn through both ends of the strap multiple times to ensure this seam is secure.
- You can tie the initial yarn end and final yarn end into knots to help secure this junction at the very end.
- I like to hide the strap seam on the inside of the bag (between Holes 1 and 8). The seam will shift with wear, but you can keep moving it back in this spot to keep it hidden inside the bag!
- Weave in the ends and you are done!
Please watch this video below to see how I crochet an I-cord with 4 loops:
You can block the final bag as an optional step to smooth out the stitches.
Here is a side-by-side visual showing the difference in thickness between an I-Cord with 3 loops and 4 loops! I used the 3 loops I-cord with the Size 1 bag and the 4 loops I-cord with the Size 2 bag. You can choose which thickness you would like to use for your bag!
******************************
I first designed my Regency Reticule HERE for the Pride & Prejudice balls we attended years ago. I’ve always loved this elegant and romantic design, and I wanted to crochet a more modern version that I could wear with my everyday outfits. I ADORE how the Rosette Drawstring Bag turned out!
This bag is perfect for the Spring and Summer months as you can wear it cross body and be hands-free! The drawstring opening and closure makes it easy to carry and access your essential items. You can wear the bag on your everyday adventures in addition to more formal events such as weddings, graduations and formals!
I found this gorgeous Regency-inspired dress from Oak and Fort, and I love the tiered skirt, slight puff sleeves and smocked bodice. I felt like Elizabeth Bennet frolicking in the English countryside in this romantic dress!
It is so fun and relaxing working shell stitches in the round. I love this clean design as there is minimal to no seaming – the only part you need to seam is the strap at the very end!
The Rosette Drawstring bag is very quick to work up, and there are so many beautiful shades of 24/7 Cotton available! I think they would make wonderful gifts, and you could either choose a neutral color so that the bag will match with every outfit, or choose a bright and bold color to make a statement. It is a great way to use up 24/7 Cotton in your stash since each size only requires 1-1.5 balls of yarn!
I hope you enjoy both sizes of the bag! Whenever I design something for myself, I always think if my daughters would like a smaller version too. We love being able to match, and I hope that you will enjoy matching with your little ones with two sizes provided for this design!
I love designing crochet bags, and I hope you enjoy working up your own Rosette Drawstring Bags! You can use the hashtag #rosettedrawstringbag if you post about your bags on social media! Thank you for following along, everyone! Happy crocheting!
{This post is sponsored by Lion Brand Yarn! I’ve loved working with their yarn throughout the years and I’m thrilled that I get to collaborate with them every month!}
This pattern is an original pattern by Stephanie Lau of All About Ami. Please do not claim this pattern as your own. If you wish to share this pattern, you may link to this pattern but please do not reprint it on your site. You may keep a copy for your own personal use but please DO NOT sell the pattern or distribute it.
You may sell products made from this pattern but please clearly credit the design to me, Stephanie Lau of All About Ami, and provide a link to my blog www.AllAboutAmi.com. Permission is NOT granted for mass production or factory manufacturing of any kind. Thank you for being respectful and for your understanding!