**You can purchase an INEXPENSIVE AD-FREE PDF of this pattern on Etsy HERE! This beautifully formatted PDF includes the step-by-step pictures and is a total of 27 pages including the cover page. This pattern is also available in the “Daisy Granny Square Crochet PATTERN BUNDLE” which includes all my lovely daisy designs at a discounted price – check out the bundle HERE! Lion Brand Yarn has put together TWO kits that contain all the yarn you need to crochet this elegant tank top: the single-colored kit can be found HERE and the multi-colored kit can be found HERE!
Please note that this is PART 3 of the pattern which includes the instructions for the top edging, straps, bottom edging and how to work a clean finish. Part 1 HERE includes all the materials, notes and instructions for the granny squares (sizes S-5X). Part 2 HERE contains the instructions for the granny triangles and assembly/seaming.
Please reference the “Breezy Days Daisy Tank Top” video tutorial to see how to crochet the various sections:
**************************
Top Edging & Straps
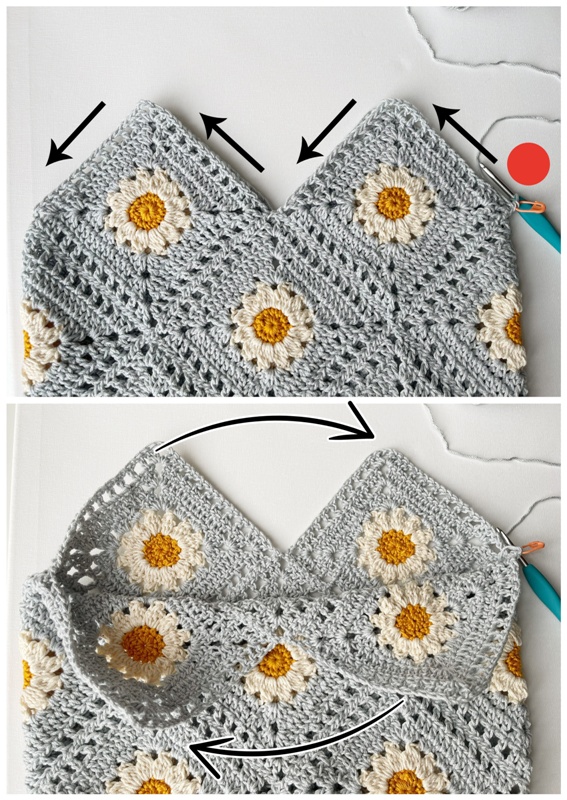
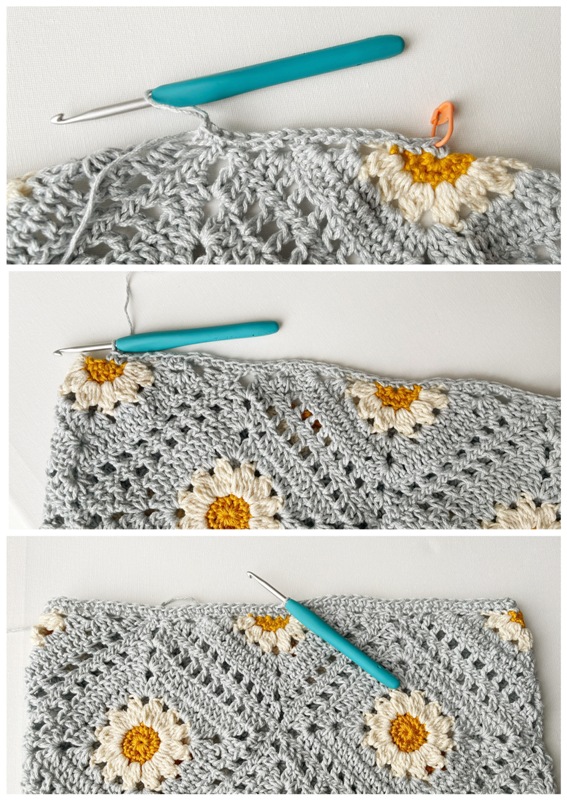
We will now be crocheting the top edging and straps of the tank top that are worked along the top edges of the granny squares. We will be working in joined rounds. Note that the right side of the granny squares should be facing you.
Using 4.5 mm hook,
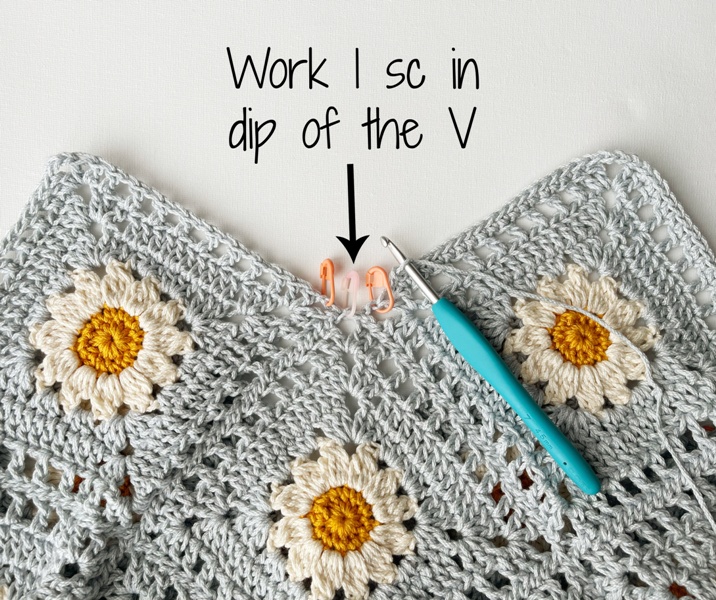
Round 1: Starting in right corner of top edge and working clockwise, sc in each stitch around top edges of both granny squares of one side, and then the top edges of both granny squares of the other side. To do so, make a slip knot. Insert your crochet hook into right corner. Add the slip knot and pull through. Yarn over and chain 1. Work a sc in same st and continue single crocheting around (work single crochets in the chain stitches too and work 1 sc in the dip of the V).
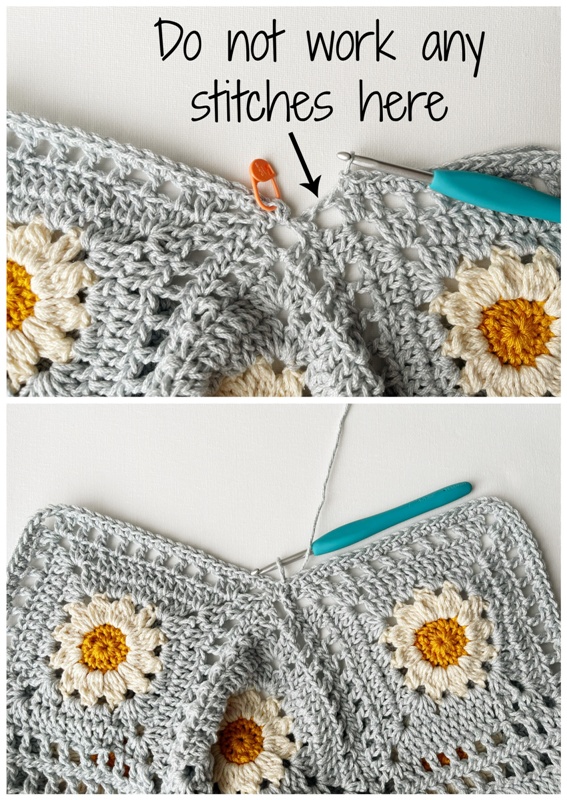
When approaching the end of the round, do not work any stitches across the last chain space to prevent bunching. Join with slip stitch to the first sc to close the round.
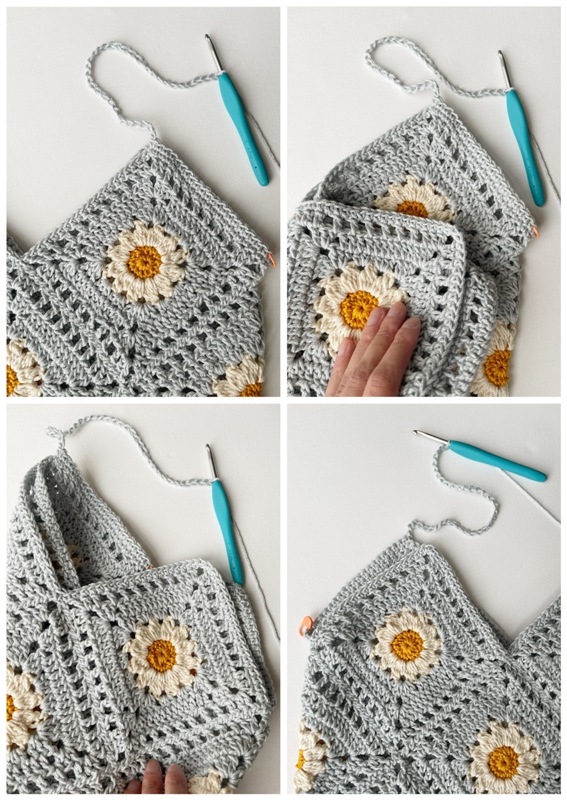
During this next round, we will be crocheting one strap that emerges from the top tip of the granny square on one side of the tank top to the top tip of the granny square on the other side of the tank top.
Round 2: Chain 1, sc in next st and in each st around until you reach the top tip of the granny square. Chain 35 for the strap (adjust this number as necessary).
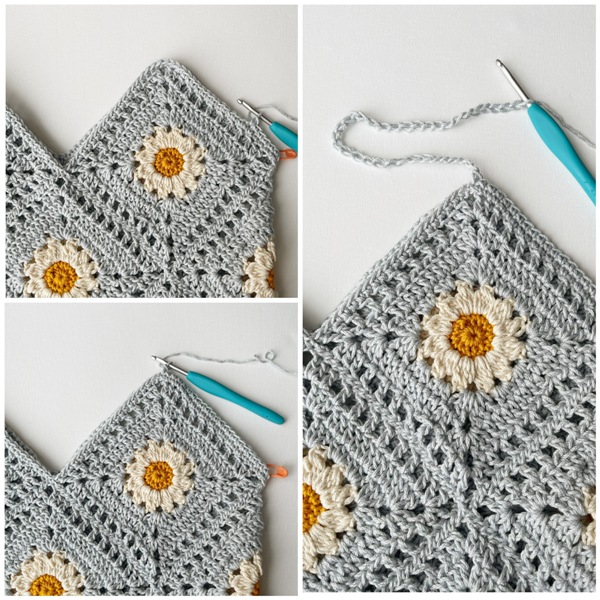
Flip the tank top to the other side from left to right and slip stitch to top tip of granny square on other side of the tank top with the right side facing you (be careful not to twist the chain). Continue working single crochets in each stitch around (heading back towards the stitch marker or beginning of the round).
When approaching end of round, work an invisible sc decrease across the last 2 stitches. Slip stitch to first sc to close the round.
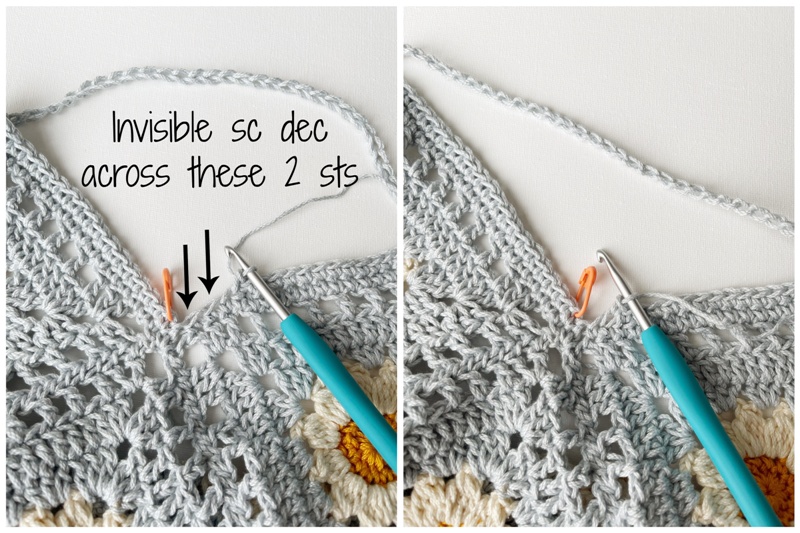
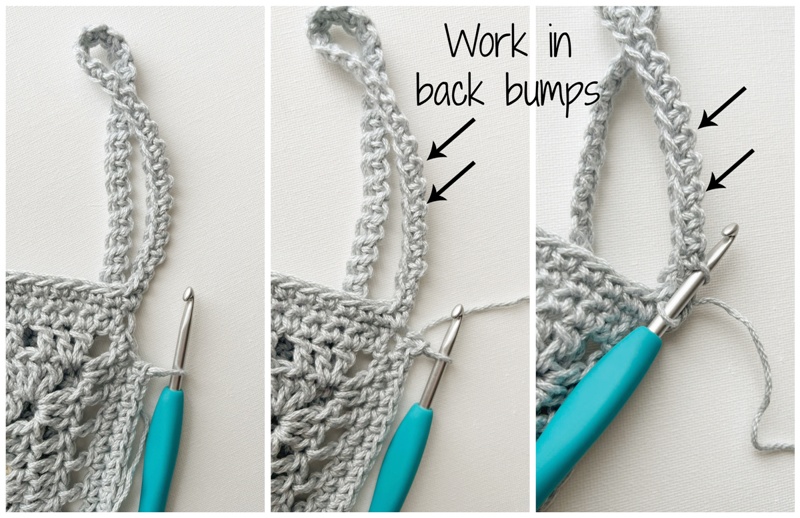
Round 3: Chain 1, sc in next stitch and in each st around. When working into the chain stitches of the strap, insert your hook into both the front and back loops of the chains but leave the back bumps untouched. When approaching the end of the round, work an invisible sc dec across the last 2 stitches. Slip stitch to first sc to close the round. Fasten off. [Reference “How to Work a Clean Finish” towards the end of this blog post.]
Note: Try on tank top at this point to ensure you like the length of the strap before beginning second strap.

SECOND STRAP:
Rejoin yarn in other armpit area.
Round 1: Join with slip stitch, chain 1, sc in next st and in each st around until you reach the top tip of the granny square. Chain 35 for the strap (adjust this number as necessary). Flip the tank top to the other side from left to right and slip stitch to top tip of granny square on other side of the tank top with the right side facing you. Continue working single crochets in each stitch around. When approaching end of round, work an invisible sc decrease across the last 2 stitches. Slip stitch to first sc to close the round.
Round 2: Chain 1, sc in next stitch and in each st around. When working into the chain stitches of the strap, insert your hook into both the front and back loops of the chains but leave the back bumps untouched. When approaching the end of the round, work an invisible sc dec across the last 2 stitches. Slip stitch to first sc to close the round. Fasten off.
MIDDLE OF TANK & STRAPS
We will now be building up the top edging in the dip of the V in the middle of the tank top and increasing the width of the straps.
Using 4.5 mm hook,
Rejoin yarn in top right of V (where sc of strap is coming out of).
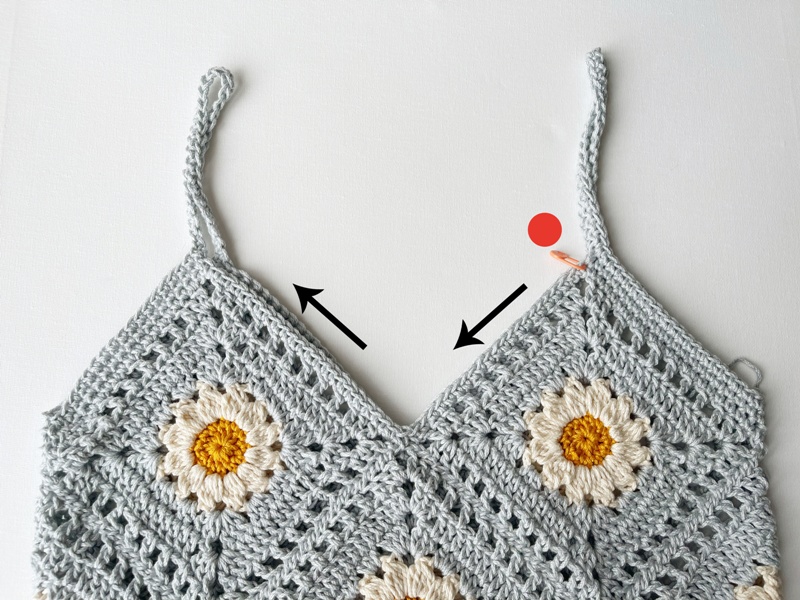
Round 1: Chain 1, sc in next st and in each st around until dip of V. Invisible sc dec across 3 middle stitches.
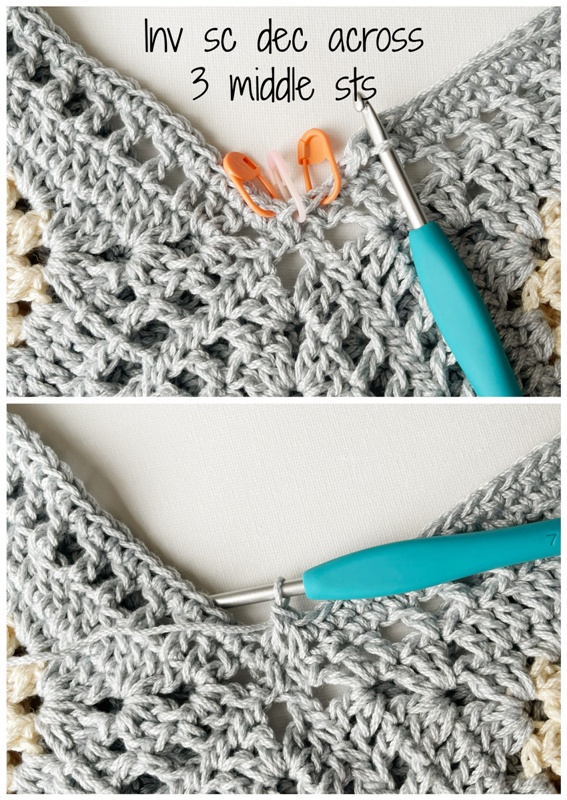
Sc around, then sc in back bumps along strap. Continue working sc around until dip of V of other side. Invisible sc dec across 3 middle stitches. Sc around, then sc in back bumps along second strap. Slip stitch to chain 1 and fasten off.
BOTTOM EDGING:
Using 4.5 mm hook,
Holding tank top upside down, rejoin yarn in magic circle of far right triangle.
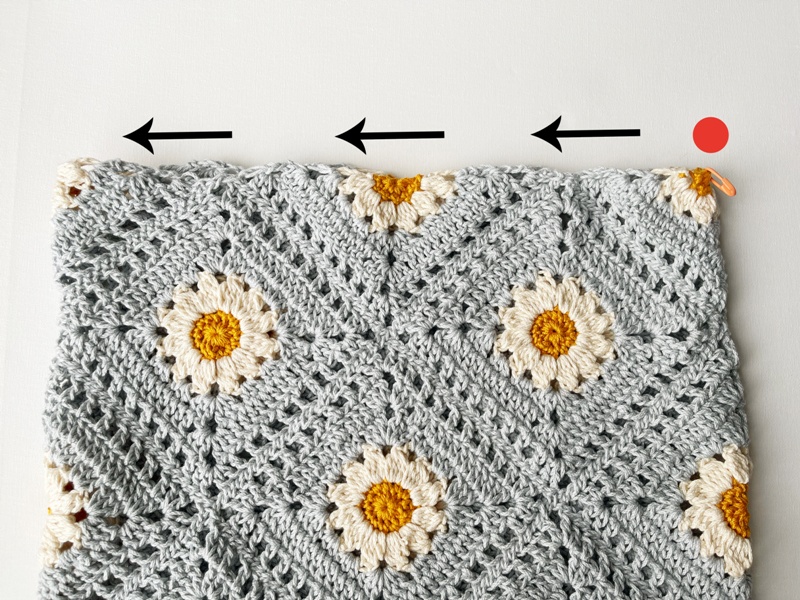
Round 1: Chain 1, sc in same stitch. Pick up single crochet stitches along entire bottom of tank top, slip stitch to first sc to close round. Be sure to pick up enough stitches and do not work too tightly otherwise the bottom of the tank top will be cinched or feel tight when you are wearing it. Generally, I picked up these amount of stitches: 3-4 across the daisy centers, 3 across each petal, 3 across chains.
Round 2: Chain 1, sc in same stitch. Sc in each sc around, slip stitch to first sc to close round.
If more length is desired, add more single crochet rounds before working the final picot edging.
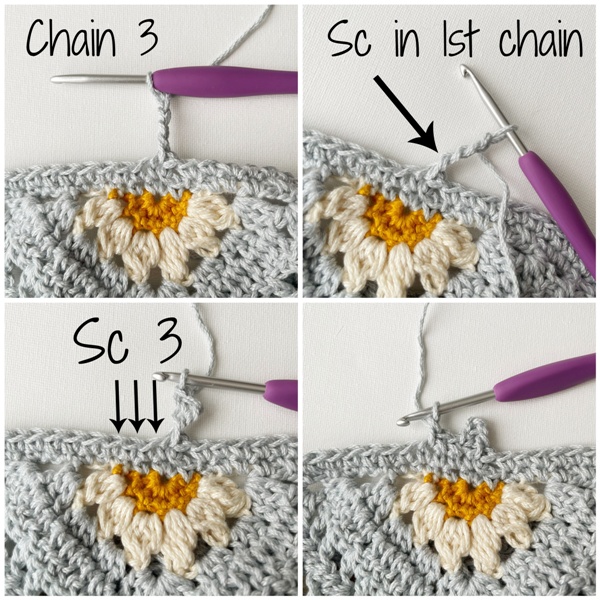
Switch to 4 mm hook,
Round 3: Chain 1, sc in same stitch. Work picot edging: *Chain 3, sc in 1st chain, sc 3*, repeat around. Slip stitch to first sc, fasten off and weave in ends. Adjust as necessary depending on the number of stitches you have (e.g. you might sc 1 or 2 before working the slip stitch to close the round).
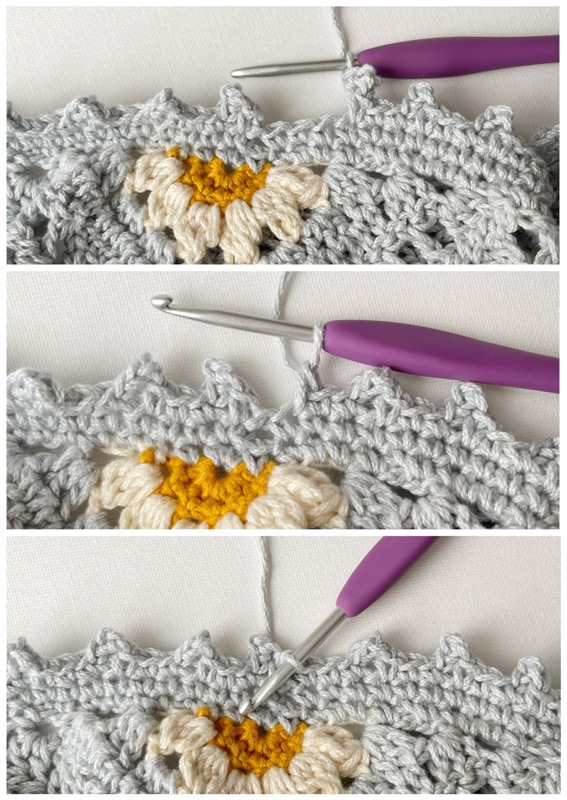
My bottom edging measured about 1”/2.5 cm.
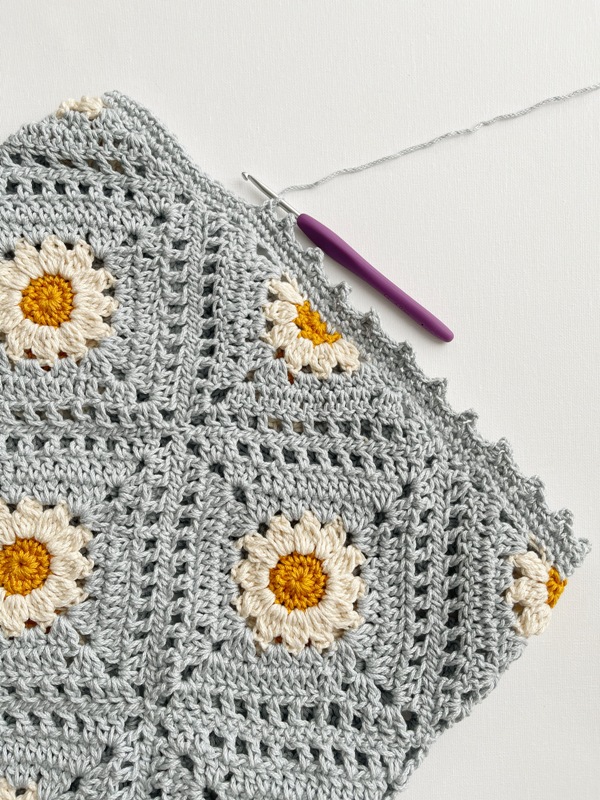
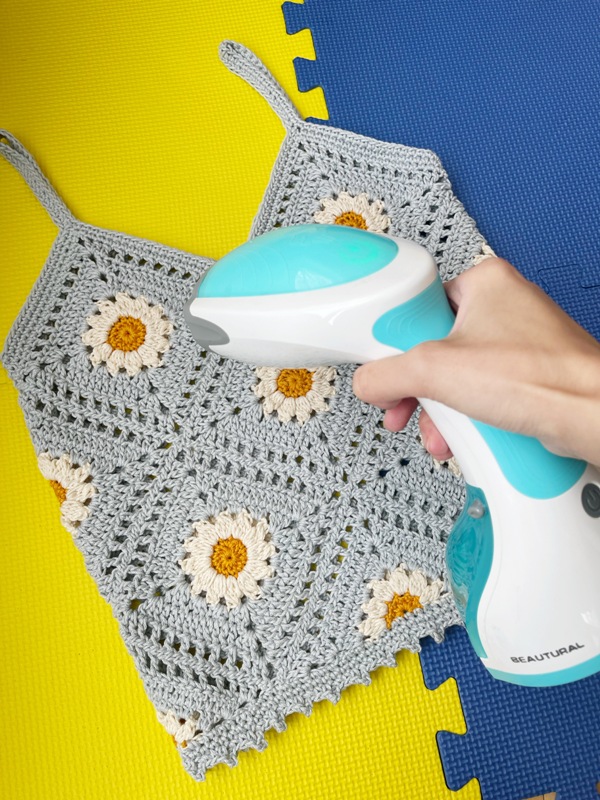
Block the final tank top to relax the fibres and smooth the stitches, seams, straps, and bottom and top edging!
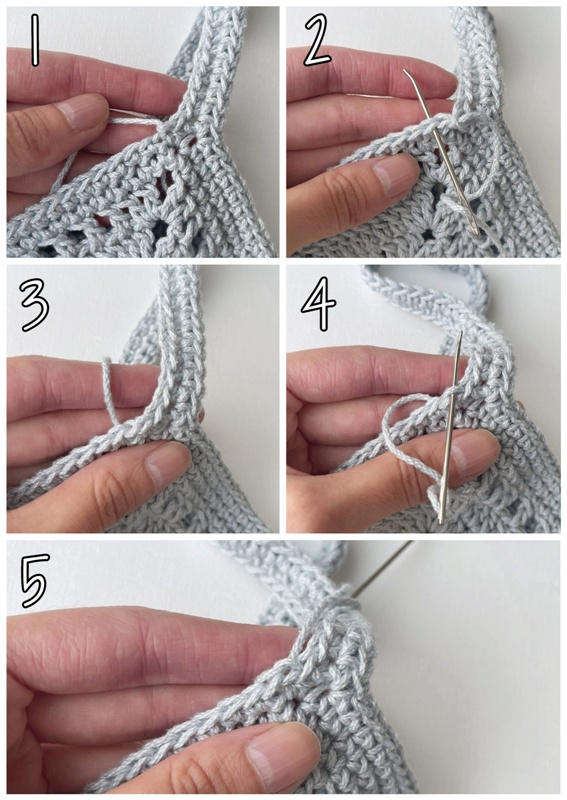
HOW TO WORK A CLEAN FINISH IN THE ROUND:
- Thread the yarn tail through a yarn needle.
- Insert the needle through both the front and back loops of the next stitch.
- Pull through.
- Insert your needle through the back loop only of the previous stitch and pull through.
- This technique mimics the look of the stitches around it to produce a clean finish! Weave in the end.
***********************
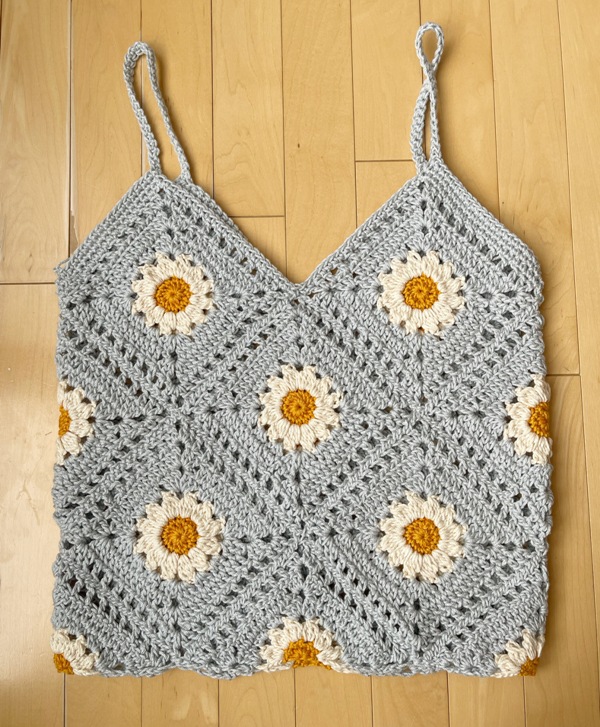
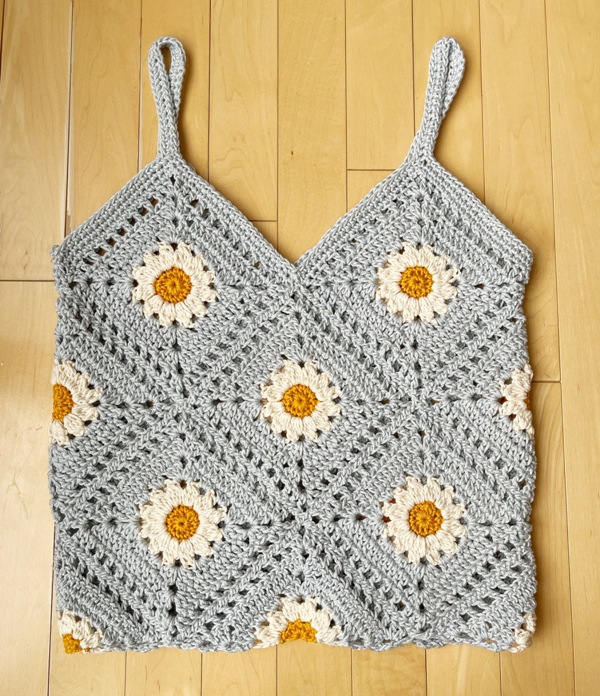
Ever since I started designing granny square bags, people have been suggesting that I try making tank tops too! I am so happy that I decided to give it a try and figure out the equivalent daisy granny triangles to help smooth out the bottom of the tank top. I was actually inspired to design a tank top version of the Breezy Days Daisy Bag a DAY BEFORE we left on a family vacation. I brought the yarn with me and worked away at the tank top in the airport, on the flight, and before and after our outings while on the trip. I was really hoping we could take final photos with a beautiful (and warm) backdrop, and I managed to finish it in time! The photo below is one of my favorite photos ever of one of my crochet designs!
I love the delicate picot edging of the tank top and how you can layer it over tank tops, dresses, swimwear and pair it with skirts, shorts or wide-legged pants!
The back of the tank top looks exactly like the front of the tank top!
When we returned home from the trip, I started working on the multi-colored version so that I could take photos and videos along the way! There are so many beautiful color combination possibilities with 24/7 Cotton!
I hope you enjoy crocheting your own Breezy Days Daisy Tank Tops! They are very fun to work up, and it is so special seeing the tank tops take shape when you combine these granny squares and triangles together! You can use the hashtag #BreezyDaysDaisyTankTop when posting your work-in-progress and final photos! Thank you for your support, everyone!

{This post is sponsored by Lion Brand Yarn! I’ve loved working with their yarn throughout the years and I’m thrilled that I get to collaborate with them regularly!}
This pattern is an original pattern by Stephanie Lau of All About Ami. Please do not claim this pattern as your own. If you wish to share this pattern, you may link to this pattern but please do not reprint it on your site. You may keep a copy for your own personal use but please DO NOT sell the pattern or distribute it.