**You can purchase an INEXPENSIVE AD-FREE PDF of this pattern on Etsy HERE or LoveCrochet HERE! This beautifully formatted PDF includes the step-by-step pictures and is a total of 10 pages including the cover page. Lion Brand Yarn has put together a convenient kit HERE that contains all the yarn you need to make this lovely cardigan!
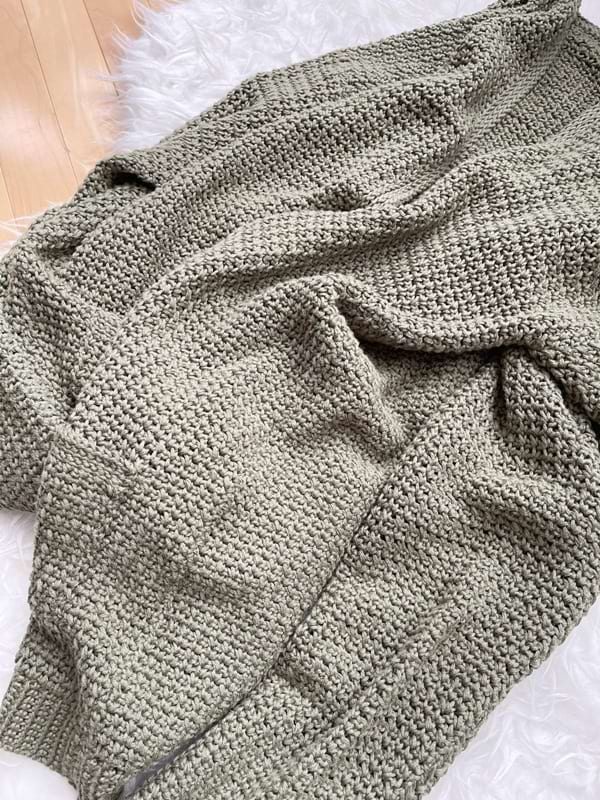
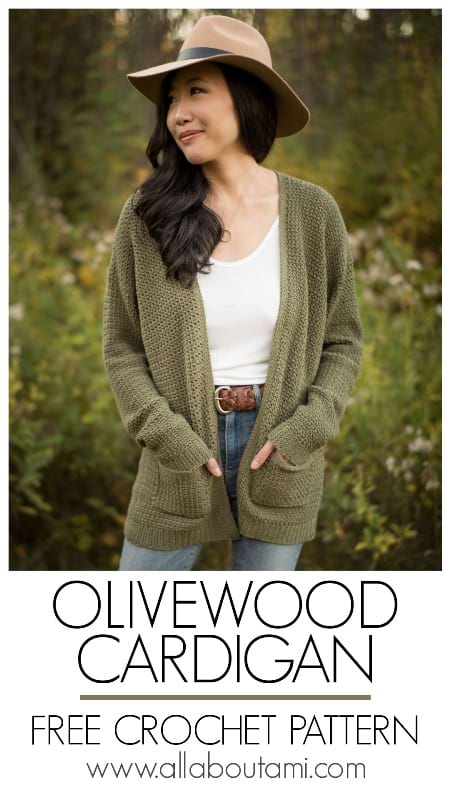
Pattern Description: The Olivewood Cardigan is a gorgeous relaxed cardigan with amazing texture! Crocheted using a cotton/bamboo yarn, this garment drapes beautifully and feels lovely against the skin. The sophisticated ribbing, cozy pockets and beautiful stitches will have you reaching for this cardigan again and again!
Materials:
- Coboo Yarn– level 3 DK lightweight yarn (see below for yardage) – 51% cotton/49% rayon from bamboo; I used the colour “Olive” – purchase the convenient KIT HERE that contains all the yarn you need!
- 2.75, 4, and 6 mm mm Clover Amour hooks
- Bent tip yarn needle
- Lock Ring Stitch Markers
- Steamer for blocking
Gauge: 21 sts and 18 rows = 4″ in single crochet columns stitch using 4 mm hook after blocking
Approximate Yardage/Number of Skeins Required:
- Small: 7 skeins, ~672 g/1560 yds
- Medium: 8 skeins, ~736 g/1710 yds
- Large: 9 skeins, ~795 g/1845 yds (requires 8 balls, but I would buy a 9th ball to be safe)
- Extra Large: 9 skeins, ~864 g/2000 yds
- 2X: 10 skeins, ~934 g/2170 yds
- 3X: 11 skeins, ~991 g/2300 yds (requires 10 balls, but I would buy an 11th ball to be safe)
- 4X: 11 skeins, ~1069 g/2480 yds
- 5X: 12 skeins, ~1121 g/2600 yds
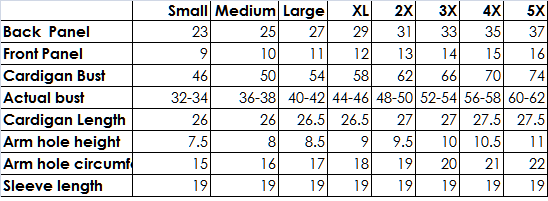
Sizing Chart (in inches):
Notes:
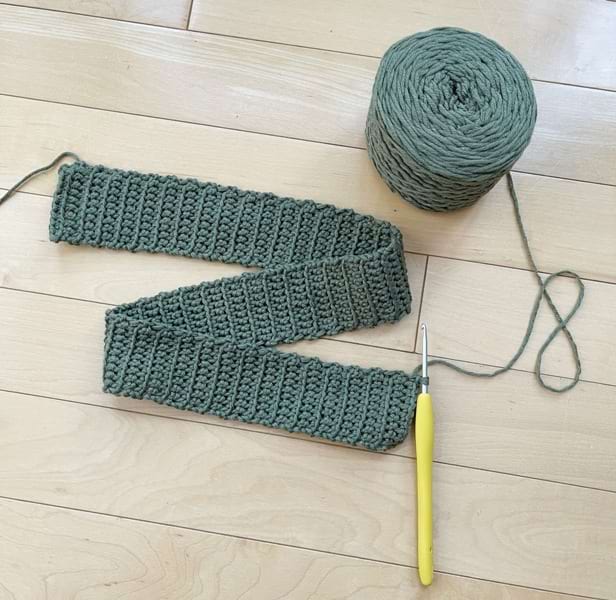
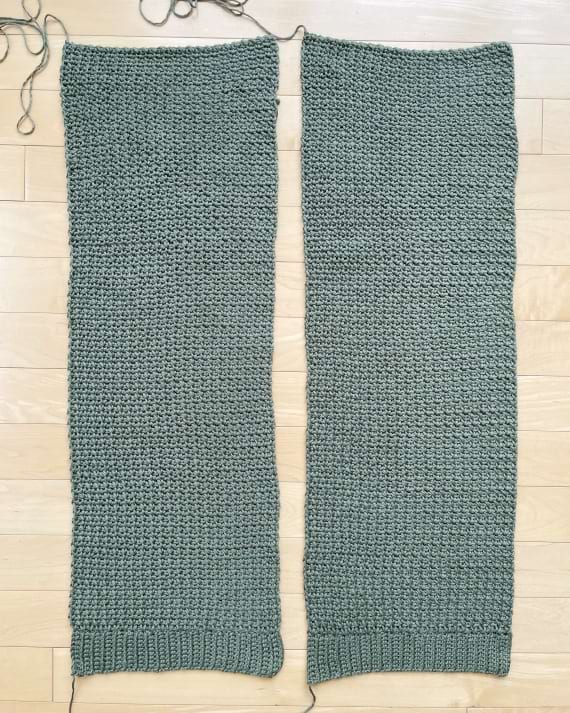
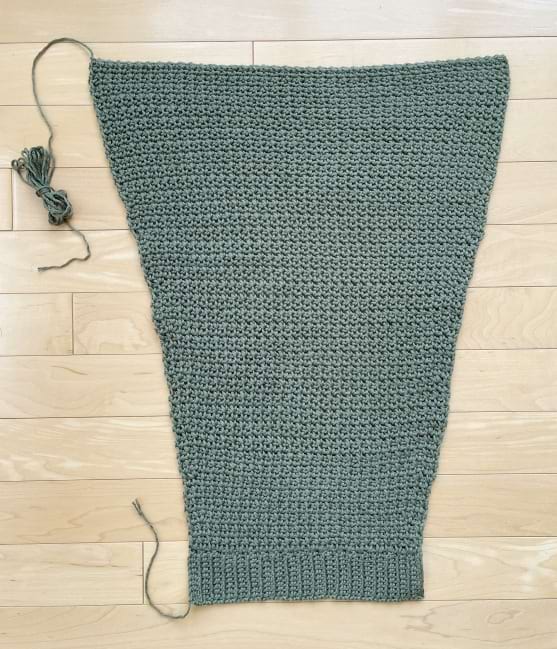
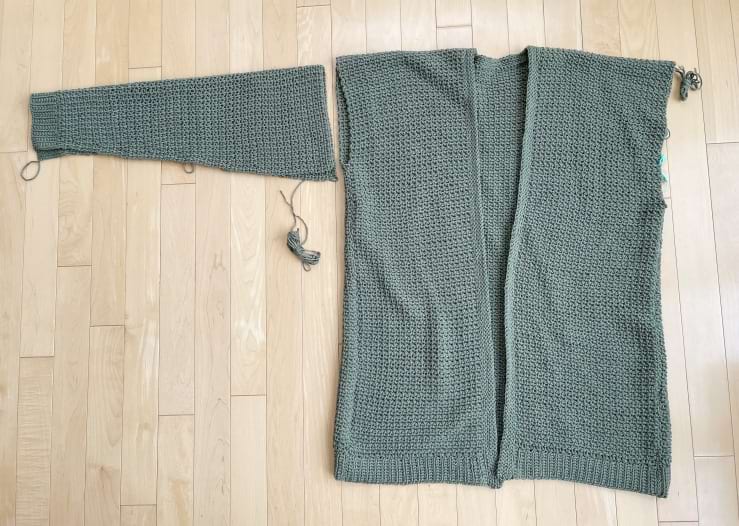
- This cardigan is crocheted in separate pieces from the bottom up (one back panel, two front panels and two sleeves) and seamed together.
- For the back panel, front panel and sleeves, a ribbing is first crocheted by working single crochets in the front loop only (FLO) in turned rows. Each stitch is composed of a front loop and a back loop (looks like a V together). The front loop is the loop closest to you, while the back loop is the loop farthest from you.
- My ribbing was about 1.5”/3.8 cm tall, and every 4 rows was approximately 1”/2.5 cm.
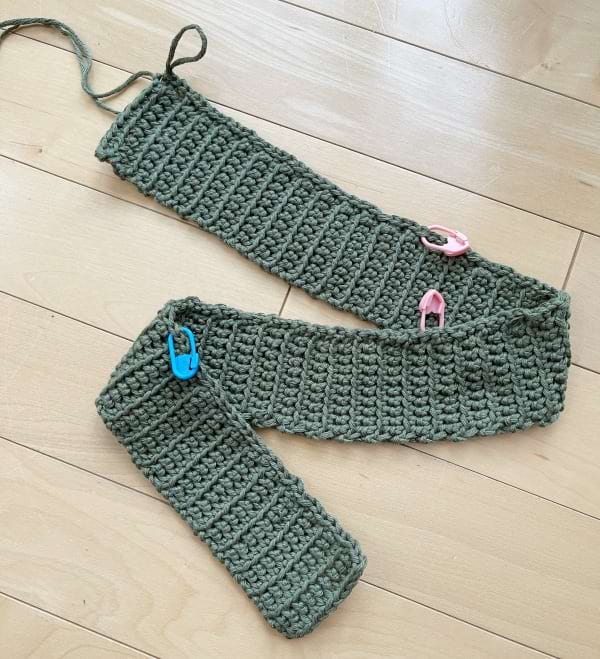
- Next, slip stitches are picked up evenly along the ribbing. To help distribute the stitches evenly, add stitch markers at check points (e.g. halfway or every quarter) to help indicate how many stitches you should have picked up by that point. For example, if you need to pick up 121 stitches in total, by the quarter mark, you should have picked up around 30 stitches.
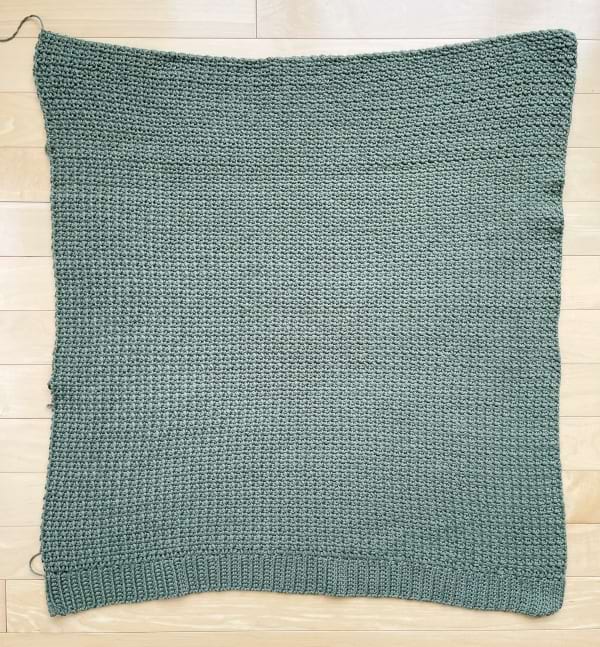
- The rest of the piece is crocheted in turned rows using the “Single Crochet Columns” stitch. Single crochet stitches are stacked upon each other row by row with chain 1’s in between. Note that for this stitch, you need an odd number of stitches (number of stitches picked up along ribbing must be an odd number, such as 47 or 121).
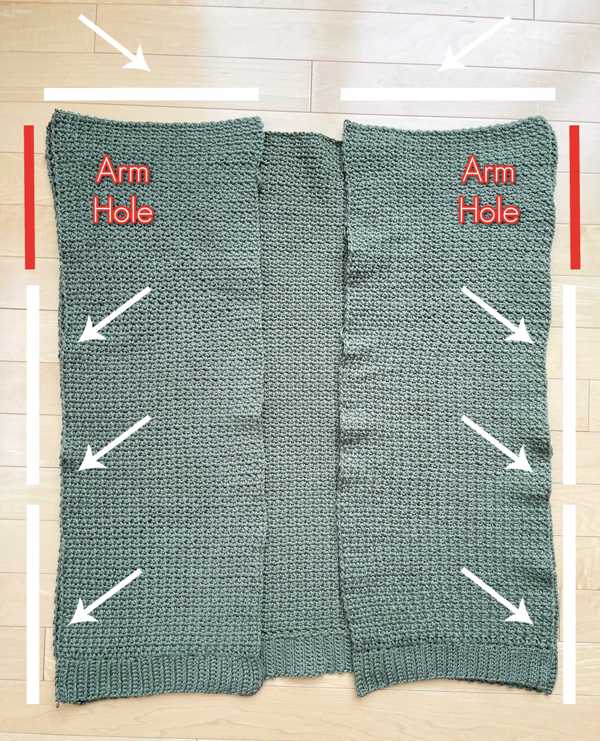
- The back panel and two front panels are then seamed together at the top and sides, leaving space for the arm holes.
- Stitches are picked up along the collar with a larger crochet hook to provide a sleek slip stitch edging. Add more rows of slip stitches if a thicker collar is desired. Work loosely so that the panels do not bunch up and the collar does not become too tight.
- If the slip stitch collar is too difficult, you can use single crochet stitches in the front loop only instead.
- The number of stitches picked up for the collar is approximately: 10 (ribbing) + # of rows of front panel + Stitch gap (stitches left on back panel) + # of rows of front panel + 10 (ribbing).
- The only increases are worked during the sleeves. Please note that an increase is worked as described below and results in the addition of four stitches (two single crochets and two chain 1’s, e.g. from 47 to 51, or 55 to 59). The increases are worked in the second and second to last single crochet stitches of the increase row. There are 8 increase rows in total.
- INCREASE ROW: Chain 1, turn. Starting in second st from hook, sc 1. Chain 1, skip 1. In the next single crochet stitch, work these three stitches to work an increase: {Sc 1, Chain 1, Sc 1}. Chain 1, Skip 1. *Sc 1, chain 1, skip 1* across until second last sc of row. In next single crochet stitch, work these three stitches to work another increase: {Sc 1, Chain 1, Sc 1}. Chain 1, skip 1. Work 1 sc in last sc stitch.
- The sleeves are then whip stitched along the edge and then attached to the arm holes.
- Two optional pockets are crocheted and attached to each front panel. If you would like to adjust the size of the pockets, adjust the initial number of chains (more chains for a wider pocket, fewer chains for a narrower pocket). The initial number of chains must be an even number so that the following row results in an odd number for the single crochet columns stitch. Add more rows to increase the length of the pocket and decrease the number of rows to decrease the length of the pocket.
- When seaming pieces together, have the wrong sides facing you when whip stitching to make the seams less visible on the right side.
- You can block all the panels before seaming and block the final cardigan for added drape. Blocking also smoothes out the fibres, relaxes the stitches and adds a beautiful finishing touch.
Sizing Notes:
- This drop sleeve cardigan is relaxed and slouchy. If you would like your cardigan to be more fitted, move down a size. If you would like your cardigan to be even more oversized, move up a size.
- It is designed with 12-14″ of positive ease. This means that if your actual bust is 32”, the cardigan bust is 14” larger (i.e. 46”).
- Part of the front and back panels become part of the sleeve as they bend past the shoulders. The sleeve length remains the same for all sizes, but the increased width in the front and back panels help lengthen the sleeves of the larger sizes.
- The sleeves are designed to be extra long so that they can be folded up and cuffed if desired. If you would like to shorten the sleeve length, you can decrease the number of rows between Rows 56-77. If you would like to lengthen the sleeve length, you can increase the number of rows between Rows 56-77. You can use stitch markers to attach the sleeves to the front and back panels and try on your cardigan and see how you like the sleeve length and adjust as necessary.
- If you would like the cardigan to be wider, increase the length of the ribbing for the front and back panels and adjust the number of stitches you pick up along the ribbing (number must be an odd number). If you would like the cardigan to be narrower, decrease the length of the ribbing and adjust the number of stitches you pick up as necessary.
- If you would like the cardigan to be longer, increase the number of rows for the back and front panels. If you would like the cardigan to be shorter, decrease the number of rows for the back and front panels.
- I am wearing a size Small, and I am 5’6 for height reference.
- This pattern is written for the following sizes (I would recommend highlighting or circling the numbers for your size throughout the pattern): Small (Medium, Large, XL)(2XL, 3XL, 4XL, 5XL). Please note that for the stitch counts at the end of each row, the sizes are listed as follows (small is first size after bracket): (Small, Medium, Large, XL)(2XL, 3XL, 4XL, 5XL).
Abbreviations:
- Front Loop Only (FLO): Work the stitch in the loop closest to you.
PATTERN:
***Back Panel:
Ribbed Band
Using a 2.75 mm hook,
Chain 11.
Row 1: Starting in second st from hook, sc 10. (10 sts)
R2: Chain 1, turn. Starting in second st from hook, sc 10 in FLO. (10 sts)
R3-97 (105, 114, 122)(131, 139, 148, 156): Repeat R2 or until desired length. Do not cut off yarn as we will continue using it.
The ribbing should measure 23”/58 cm (25”/64 cm, 27”/69 cm, 29”/74 cm)(31”/78 cm, 33”/84 cm, 35”/89 cm, 37”/94 cm) across.
Body
It is now time to work the body of the back panel by picking up slip stitches across the top of the ribbing (add stitch markers as check points if desired).
Row 1: Chain 1 and pick up 121 (131, 141, 153)(163, 173, 183, 193) slip stitches loosely and evenly across the top of the ribbing. To do so, insert hook into space, yarn over and pull through the work and loop on hook, creating a slip stitch. (121, 131, 141, 153)(163, 173, 183, 193)
Switch to 4 mm hook,
Row 2: Chain 1, turn. Work 1 sc in second st from hook. *Chain 1, skip 1, sc 1* across. (121, 131, 141, 153)(163, 173, 183, 193)
Row 3: Chain 1, turn. Work 1 sc in second st from hook (this is the sc from row below). *Chain 1, skip 1, sc 1* across (the single crochets should stack upon each other and the chain 1 gaps should stack upon each other). (121, 131, 141, 153)(163, 173, 183, 193)
Row 4-111 (111, 113, 113)(115, 115, 117, 117): Repeat Row 3 until desired length. Back panel measures ~26”/66 cm (26”/66 cm, 26.5”/67 cm, 26.5”/67 cm)(27”/69 cm, 27”/69 cm, 27.5”/70 cm, 27.5”/70 cm) in length. (121, 131, 141, 153)(163, 173, 183, 193)
Fasten off and leave long end for seaming.
***Front Panels (make 2):
Ribbed Band
Using a 2.75 mm hook,
Chain 11.
Row 1: Starting in second st from hook, sc 10. (10 sts)
R2: Chain 1, turn. Starting in second st from hook, sc 10 in FLO. (10 sts)
R3-38 (42, 46, 50)(55, 59, 63, 67): Repeat R2 or until desired length. Do not cut off yarn as we will continue using it.
The ribbing should measure 9”/23 cm (10”/25 cm, 11”/28 cm, 12”/30 cm)(13”/33cm, 14”/36 cm, 15”/38 cm, 16”/41 cm) across.
Body
It is now time to work the body of the front panel by picking up slip stitches across the top of the ribbing.
Row 1: Chain 1 and pick up 47 (53, 57, 63)(69, 73, 79, 83) slip stitches loosely and evenly across the top of the ribbing. (47, 53, 57, 63)(69, 73, 79, 83)
Switch to 4 mm hook,
Row 2: Chain 1, turn. Work 1 sc in second st from hook. *Chain 1, skip 1, sc 1* across. (47, 53, 57, 63)(69, 73, 79, 83)
Row 3-111 (111, 113, 113)(115, 115, 117, 117): Repeat Row 2 until desired length. Front panel measures ~26”/66 cm (26”/66 cm, 26.5”/67 cm, 26.5”/67 cm)(27”/69 cm, 27”/69 cm, 27.5”/70 cm, 27.5”/70 cm) in length. (47, 53, 57, 63)(69, 73, 79, 83)
Fasten off and leave long end for seaming.
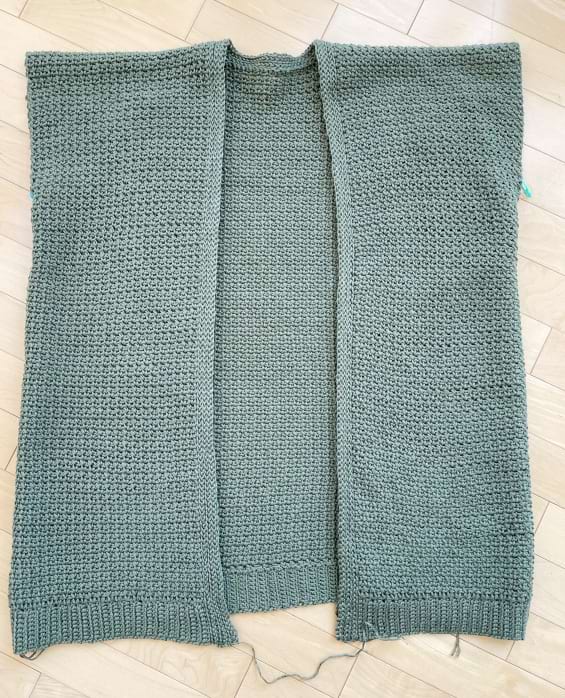
Assembly:
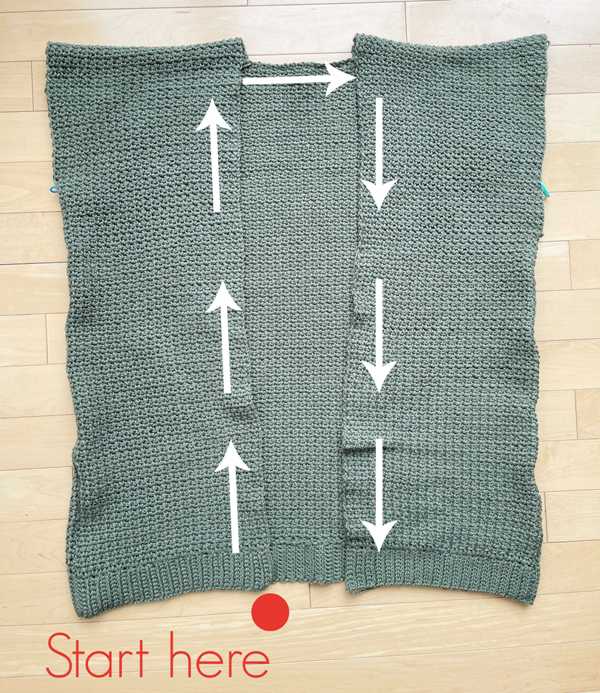
Whip stitch tops of front panels to back panel, going through both front and back loops. Whip stitch sides of front panels to back panel, making sure to leave an arm hole (reference size chart for height of arm hole). Do not fasten off yarn in case you need to adjust the arm hole once it is time to attach the sleeves.
Collar:
We will now be picking up stitches along the length of the first front panel, across the back panel, and down the length of the other front panel to create a beautiful collar. The right side of the cardigan should be facing you when working the collar.
Using 6 mm hook,
Row 1: Starting in bottom left corner, pick up slip stitches around. To do so, make a slip knot. Insert your crochet hook in the bottom left corner, add the slip knot, and pull through. Yarn over and chain 1. Insert your hook into an adjacent space, yarn over, pull through the work and loop on hook, creating a slip stitch. Keep repeating this process to pick up stitches along the collar. The number of stitches you pick up is roughly: (267, 265, 271, 271)(273, 275, 277, 279)
Row 2: Chain 1, turn. Starting in second st from hook, slip stitch in FLO across.
Row 3-5: Repeat R2.
Fasten off and weave in ends.
***Sleeves (make 2):
Ribbed Band
Using a 2.75 mm hook,
Chain 11.
Row 1: Starting in second st from hook, sc 10. (10 sts)
R2: Chain 1, turn. Starting in second st from hook, sc 10 in FLO. (10 sts)
R3-38 (42, 46, 50)(55, 59, 63, 67): Repeat R2 or until desired length. Do not cut off yarn as we will continue using it.
The ribbing should measure 9”/23 cm (10”/25 cm, 11”/28 cm, 12”/30 cm)(13”/33cm, 14”/36 cm, 15”/38 cm, 16”/41 cm) across.
Body
It is now time to work the body of the sleeve by picking up slip stitches across the top of the ribbing.
Row 1: Chain 1 and pick up 47 (53, 57, 63)(67, 73, 79, 83) slip stitches loosely and evenly across the top of the ribbing. (47, 53, 57, 63)(67, 73, 79, 83)
Switch to 4 mm hook,
Row 2: Chain 1, turn. Work 1 sc in second st from hook. *Chain 1, skip 1, sc 1* across. (47, 53, 57, 63)(67, 73, 79, 83)
Row 3-5: Repeat Row 2. (47, 53, 57, 63)(67, 73, 79, 83)
R6: Work INCREASE ROW. (51, 57, 61, 67)(71, 77, 83, 87)
R7: Chain 1, turn. Work 1 sc in second st from hook. *Ch 1, sk 1, sc 1* across. (51, 57, 61, 67)(71, 77, 83, 87)
R8-12: Repeat R7. (51, 57, 61, 67)(71, 77, 83, 87)
R13: Work INCREASE ROW. (55, 61, 65, 71)(75, 81, 87, 91)
R14: Chain 1, turn. Work 1 sc in second st from hook. *Ch 1, sk 1, sc 1* across. (55, 61, 65, 71)(75, 81, 87, 91)
R15-19: Rep R14. (55, 61, 65, 71)(75, 81, 87, 91)
R20: Work INCREASE ROW. (59, 65, 69, 75)(79, 85, 91, 95)
R21: Chain 1, turn. Work 1 sc in second st from hook. *Ch 1, sk 1, sc 1* across. (59, 65, 69, 75)(79, 85, 91, 95)
R22-26: Rep R21. (59, 65, 69, 75)(79, 85, 91, 95)
R27: Work INCREASE ROW. (63, 69, 73, 79)(83, 89, 95, 99)
R28: Chain 1, turn. Work 1 sc in second st from hook. *Ch 1, sk 1, sc 1* across. (63, 69, 73, 79)(83, 89, 95, 99)
R29-33: Rep R28. (63, 69, 73, 79)(83, 89, 95, 99)
R34: Work INCREASE ROW. (67, 73, 77, 83)(87, 93, 99, 103)
R35: Chain 1, turn. Work 1 sc in second st from hook. *Ch 1, sk 1, sc 1* across. (67, 73, 77, 83)(87, 93, 99, 103)
R36-40: Rep R35. (67, 73, 77, 83)(87, 93, 99, 103)
R41: Work INCREASE ROW. (71, 77, 81, 87)(91, 97, 103, 107)
R42: Chain 1, turn. Work 1 sc in second st from hook. *Ch 1, sk 1, sc 1* across. (71, 77, 81, 87)(91, 97, 103, 107)
R43-47: Rep R42. (71, 77, 81, 87)(91, 97, 103, 107)
R48: Work INCREASE ROW. (75, 81, 85, 91)(95, 101, 107, 111)
R49: Chain 1, turn. Work 1 sc in second st from hook. *Ch 1, sk 1, sc 1* across. (75, 81, 85, 91)(95, 101, 107, 111)
R50-54: Rep R49. (75, 81, 85, 91)(95, 101, 107, 111)
R55: Work INCREASE ROW. (79, 85, 89, 95)(99, 105, 11, 115)
R56: Chain 1, turn. Work 1 sc in second st from hook. *Ch 1, sk 1, sc 1* across. (79, 85, 89, 95)(99, 105, 111, 115)
R57-77: Rep R56. (79, 85, 89, 95)(99, 105, 111, 115)
Add or decrease rows between R57-77 to adjust the length of your sleeves. Use stitch markers to attach the sleeves to the front and back panels to try it on before finishing off and doing final seaming.
My final sleeve length was 19”/48 cm.
Fasten off and leave long end for sewing.
Fold each sleeve in half lengthwise and whip stitch sides together. Whip stitch tops of sleeves to arm holes.
Pockets (make 2) – optional
Using 4 mm hook,
Chain 26.
Row 1: Starting in second st from hook, sc 1. *Chain 1, skip 1, sc 1* across. (25 sts)
Row 2: Chain 1, turn. Work 1 sc in second st from hook. *Ch 1, sk 1, sc 1* across. (25 sts)
R3-19: Repeat Row 2. (25 sts)
We will now add a top edging to the pocket.
Switch to 6 mm hook,
R20: Chain 1, turn. Starting in second st from hook, sl st in FLO. (25 sts)
R21-23: Repeat R20. (25 sts)
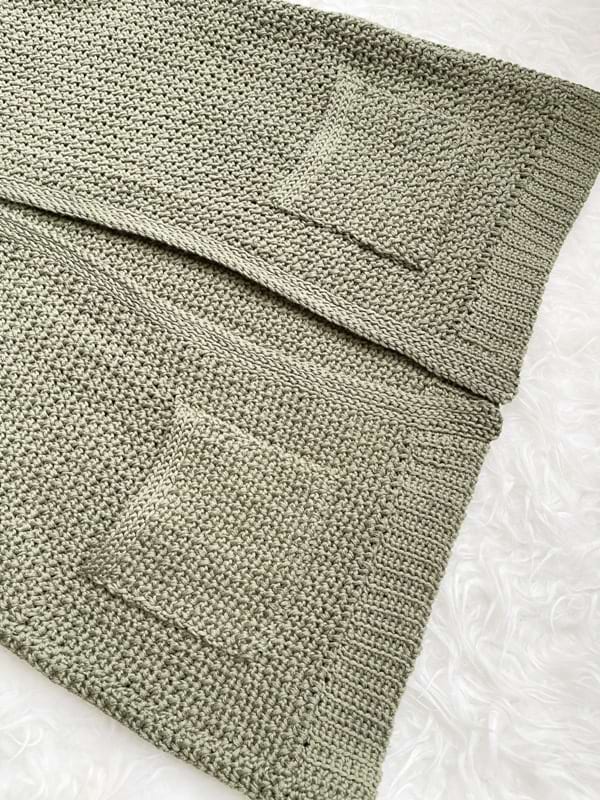
Fasten off and leave long end for sewing. Attach pockets to front panels, trying to line up single crochets of front panels with single crochets of pockets. I attached them approximately 3”/7.6 cm from the bottom of the front panel and 2.5”/6 cm away from the edge of the collar.
Block final cardigan.
***********************************
I adore the fit and feel of the Olivewood Cardigan! It drapes beautifully, and the cotton-bamboo blend feels so soft and amazing against the skin. This olive color is stunning, and Coboo comes in some other lovely shades as well!
The single crochet columns stitch is very easy to learn and crochet since it uses single crochet stitches interspersed with chain 1’s. When I asked you to guess what stitch this cardigan uses on social media, many guessed the moss/granite/linen stitch! It is very similar to this stitch but has a slightly different look. I love the texture it produces, and the stitches look so clean and modern!
I hope you enjoy crocheting your own sophisticated Olivewood Cardigans! This is a sister cardigan to my popular Rosewood Cardigan from years past as it uses the same lovely Coboo yarn, single crochet stitches, and the slip stitch collar. It is so empowering being able to make and wear our own beautiful clothes, and build up our handmade wardrobes!
Once again, you can purchase the kit HERE on the Lion Brand Yarn website. If you would like to post your work-in-progress and finished photos on social media, feel free to use the hashtag #olivewoodcardigan so we can all see your work! Thank you so much for reading this blog post and following along with my patterns! It brings me so much joy seeing you all create your own projects and putting your own special touches on my designs. Happy crocheting, everyone!
{This post is sponsored by Lion Brand Yarn! I’ve loved working with their yarn throughout the years and I’m thrilled that I get to collaborate with them every month!}
This pattern is an original pattern by Stephanie Lau of All About Ami. Please do not claim this pattern as your own. If you wish to share this pattern, you may link to this pattern but please do not reprint it on your site. You may keep a copy for your own personal use but please DO NOT sell the pattern or distribute it.
You may sell products made from this pattern but please clearly credit the design to me, Stephanie Lau of All About Ami, and provide a link to my blog www.AllAboutAmi.com. Permission is NOT granted for mass production or factory manufacturing of any kind. Thank you for being respectful and for your understanding!