***You can purchase an INEXPENSIVE AD-FREE PDF of this pattern on Etsy HERE and on LoveCrochet HERE! This beautifully formatted PDF includes the step-by-step pictures, the pattern for the Cup Cozy, and an appendix showing you how to work the star stitch taken from my Star Stitch Pouch Pattern! It is a total of 6 pages including the cover page!
With Myla’s last week of preschool upon us, I was scrambling to find gifts for her teachers since we had been so busy planning my sister’s bridal shower (see HERE for the recap)! ! I pondered whether to buy something or attempt to make something: I had knitted them toques for Christmas and thought it would be nice to make them something handmade for their year-end gifts as well. However, I had a very short period of time and another crochet design to finish, so I wanted a very quick and simple project. During my initial months of blogging in 2011, one of my very first tutorials was my “Cup Cozy Tutorial” that ended up being well-received. I thought it would be neat to revisit a cup cozy but this time use one of my favourite stitches: the Star Stitch which I used in my popular Star Stitch Pouches from last summer!
![]()
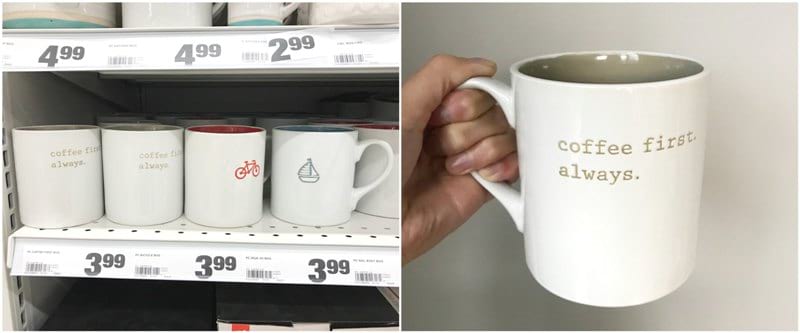
With that idea in mind, I went shopping for mugs at Superstore and found these lovely ones below! I was looking for a large mug of uniform size so that the cozy would be simple to crochet- if the cup tapered or changed sizes throughout the height of the cup, it would be more difficult to shape the cozy. I love these mugs since they have a contrasting colour inside! I ended up going with the grey mug since grey matches well with any colour, and the phrase about coffee is cute! This mug measured 12″ in circumference and about 4″ in diameter, and there were red and blue interior options as well!
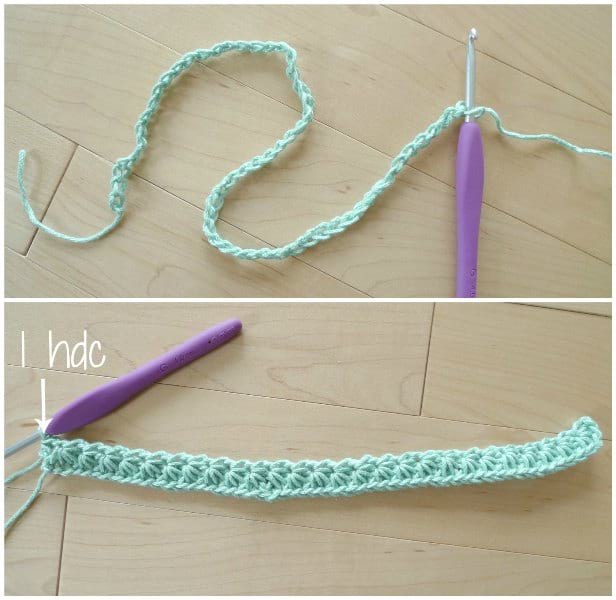
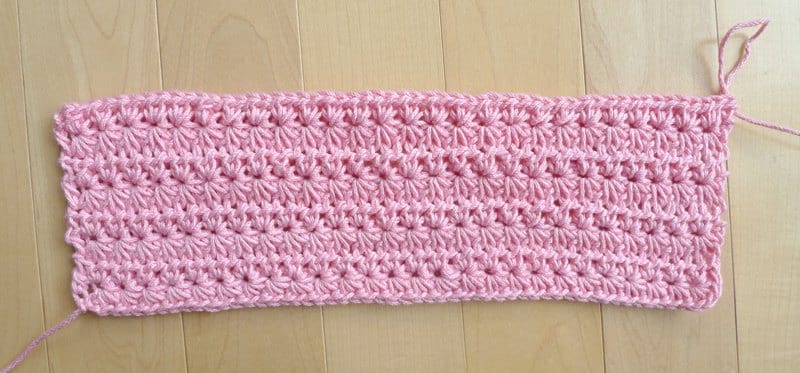
24/7 Cotton by Lion Brand Yarn is one of my favourite cotton yarns as it is mercerized with a beautiful sheen. Since this yarn does not fuzz up or split easily and gives gorgeous stitch definition, I knew it would be the perfect yarn for a cup cozy! I ended up frogging my initial attempts and perfecting the pattern after a number of tries in order to get straight edges. You will see some switches in yarn colour as I took pictures of different attempts! To start, I chained 57 stitches with my 4 mm Clover Amour hook. Then for the first row, I worked a series of star stitches, ending off with 1 hdc in the last stitch. As a refresher on how to work the star stitch, see my “Star Stitch Pouches” step-by-step tutorial HERE and Moogly’s wonderful Star Stitch photo and video tutorial HERE! I measured this first row around my cup to make sure it was the appropriate size. You want to leave about a 1.5″/3.8 cm gap for where you will work the button closure later on. Adjust your initial chains as needed (each star stitch is worked over two stitches, so if you need to add a star stitch, add two more chains, and if you need to subtract a star stitch, subtract two chains).
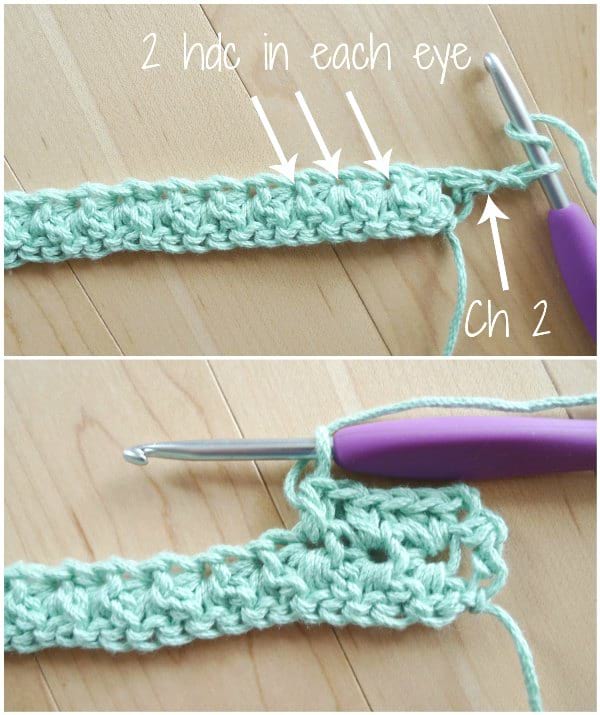
We are working in turned rows for this cup cozy (in contrast to my Star Stitch Pouches where the star stitches are worked in rounds). For Row 2, we Chain 2 and turn (the Chain 2 counts as 1 hdc). Next, we work 2 half double crochets in each eye across the whole row. These hdc’s help “complete” the stars from the row below and give a beautiful effect! I learned how to do this from this very helpful Star Stitch tutorial HERE by Kathryn Vercillo. At the end of the row, work 1 last hdc in the very last stitch.
For Row 3 and all the odd rows, work star stitches across. At the end of the row after the completion of the last star stitch, work 1 hdc in the very last stitch (from where the last spike of the star stitch is originating from). This helps give a straight border on the side of the crocheted piece.
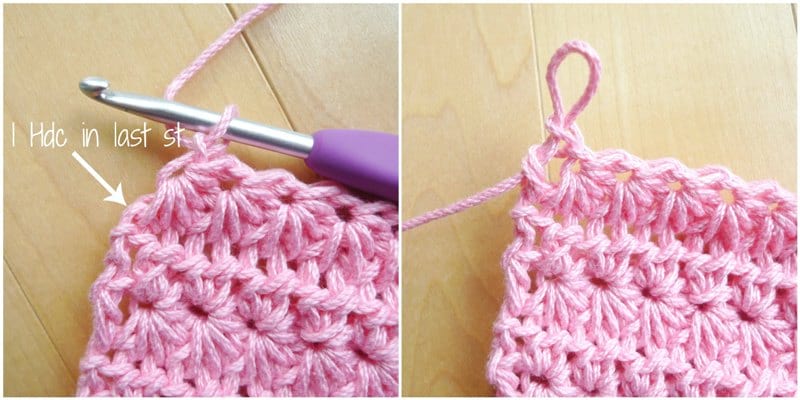
After completing eight rows, I was happy with the height of my cup cozy (you could continue working more rows for taller cups). Remember to leave enough space at the top of the mug to allow the recipient to drink their tea or coffee! As I mentioned above, it took me a couple tries to get nice straight edges!
Next, I wrapped my piece around my mug to visualize what I needed to do. As shown below, I needed to crochet down one side of the rectangle, work some chain stitches across to get to the other side, and then single crochet up the other side of the rectangle.
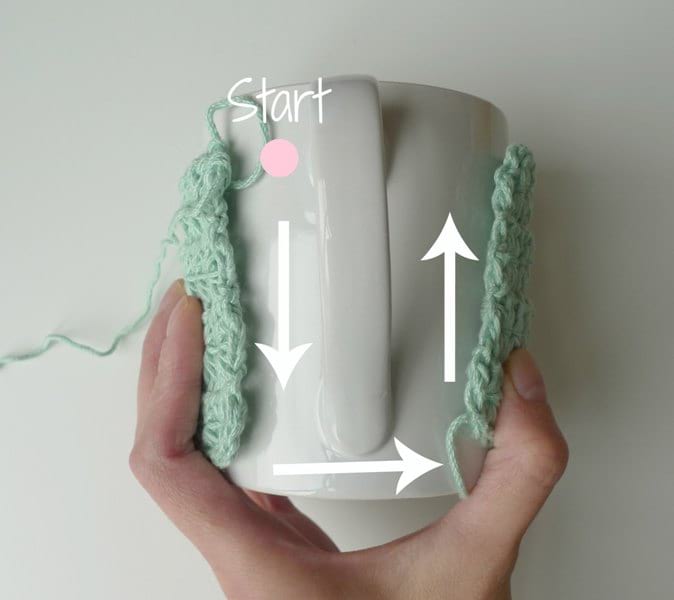
Thus, I crocheted down one side (with wrong side facing you), Chained 3 across, slip stitched to the other side, and then single crocheted up the other side.
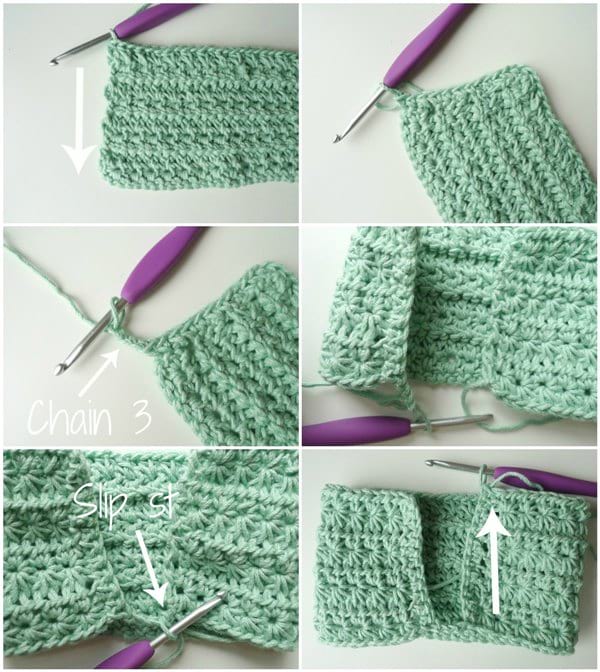
Next I chained 1 and then turned and worked single crochets back the other way (down side, across chain stitches, back up other side). You can see how well the cozy fits around the mug!
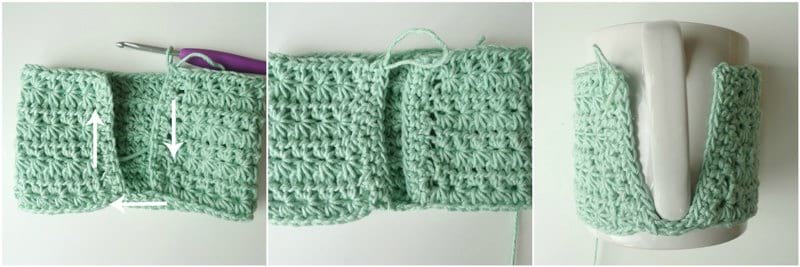
Ryan purchased these wooden buttons from Fabricland, and I sewed one onto the upper corner of the right side (opposite side where working yarn is and where we will work chain stitches). I then chained 16 and worked a slip stitch from where the chain stitches began, measuring these stitches to make sure it fit around the button (not too tight and not too loose).

I was very pleased with my finished Star Stitch Cup Cozy and how well it turned out!
![]()
You can customize these cup cozies to fit any mug, and they are such a quick project to whip up!
![]()
*****************************************************
Here is the FREE PATTERN for my Star Stitch Cup Cozies:
![]()
***You can purchase an INEXPENSIVE AD-FREE PDF of this pattern on Etsy HERE and on Craftsy HERE! This beautifully formatted PDF includes the step-by-step pictures, the pattern for the Cup Cozy, and an appendix showing you how to work the star stitch taken from my Star Stitch Pouch Pattern! It is a total of 6 pages including the cover page!
Materials:
- Lightweight or medium yarn, level 3 or 4: I used Lion Brand yarn’s 24/7 Cotton in “Goldenrod” and “Mint” (on the Lion Brand site HERE) – about 28 g for each cup cozy
- 4 mm Clover Amour crochet hook
- Button
- Thread and needle (to sew button onto cozy)
- Cup/Mug (mine measured 12″/30.5 cm in circumference, 4″/10 cm in diameter)
Notes:
- This pattern assumes basic knowledge of how to work star stitches- see my Star Stitch Pouch tutorial HERE.
- To adjust the size of your cup cozy, increase or decrease the number of initial chains, making it an odd number. Each star stitch is worked over two stitches. To add a star stitch, add 2 stitches. To decrease a star stitch, subtract 2 stitches.
- Pull up the last two stitches of the star stitch a little taller to make them easier to work through later on.
- When closing up the star stitch by creating the “eye”, pull tightly to reduce the size of the hole.
- After completing Row 1, measure the piece around your mug, making sure to leave about a 1.5″/3.8 cm gap (the closure will be worked in this space later on). Adjust numbers if necessary.
- Choose a mug of uniform size versus one that tapers at the bottom or changes shape throughout.
Gauge: 6 star stitches = 2.5″/6.4 cm across
Finished Dimensions: 3.25″/8.3 cm in height, 11.5″/29 cm around
Chain 57
Row 1: Insert hook in second ch from hook and pull up a loop. *Insert hook in next ch from hook and pull up a loop*, rep 4 times (you should have 6 loops on your hook). Yarn over and pull through all 6 loops. Yarn over and pull up a loop (i.e Chain 1) to close up first star stitch forming the “eye” of the star. First star stitch has been created.
Subsequent star stitches in Row 1: Insert hook in “eye” you just made and pull up a loop. Insert hook in both loops of the last spike of the previous star stitch (the side of that last spike) and pull up a loop. Insert hook in same st where last spike of previous star stitch came out of and pull up a loop. *Insert hook in next st and pull up a loop*, rep 2 times (you should now have 6 loops on your hook). Yarn over and pull through all 6 loops. Yarn over and pull up a loop (i.e. Chain 1) to close up the star stitch forming the “eye” of the star.
Continue working star stitches around till the end. Work 1 hdc in last stitch. [26 star stitches and 1 hdc]
Row 2: Chain 2, turn (chain 2 counts as 1 hdc). *2 hdc* in each eye of star stitches across till end. 1 Hdc in last stitch. (54 hdc)
Row 3: Chain 3, turn. Insert hook in second ch from hook and pull up a loop. *Insert hook in next st from hook and pull up a loop*, rep 4 times (you should have 6 loops on your hook). Yarn over and pull through all 6 loops. Yarn over and pull up a loop (i.e. Chain 1) to close up first star stitch forming the “eye” of the star.
Subsequent star stitches in row: Insert hook in “eye” you just made and pull up a loop. Insert hook in both loops of the last spike of the previous star stitch (the side of that last spike) and pull up a loop. Insert hook in same st where last spike of previous star stitch came out of and pull up a loop. *Insert hook in next st and pull up a loop*, rep 2 times (you should now have 6 loops on your hook). Yarn over and pull through all 6 loops. Yarn over and pull up a loop (i.e. Chain 1) to close up the star stitch forming the “eye” of the star.
Continue working star stitches across till the end. Work 1 hdc in last stitch where last spike of star stitch is originating from [26 star stitches and 1 hdc].
R4: Repeat Row 2. (54 hdc)
R5-8: Repeat Rows 3-4. Keep repeating these rows until desired height is reached. Make sure to leave space at the top of the mug so that you can drink from it!
Do not cut yarn. Before adding the closure, my rectangle measured 3.25″/8.3 cm in height/width and 10.5″/26.7 cm in length.
Closure:
Row 1: Chain 1, Single crochet down width of cup cozy. When bottom has been reached, Chain 3 across. Slip stitch to bottom of other side of cup cozy. Single crochet up along width of other side of cozy.
Row 2: Chain 1, turn. Single crochet down the cup cozy, single crochet across the Chain 3, and single crochet up the other side. Sew button onto corner of right side of piece. Chain 16 (adjust this number based on your button and size needed to stretch across handle around button) and slip stitch back into stitch where chains are originating from. Fasten off and weave in ends.
Slip cup/mug into cozy. Wrap chain stitches around button to close it up!
***************************
There is something so delicate, romantic and intricate about star stitches! They look so lovely in a simple and clean design!
![]()
I love how these cozies work up so quickly and use less than one skein of yarn (you can actually make 3 cup cozies with 1 skein of 24/7 Cotton)! You can use leftover cotton yarn or even work different rows in different colours! These yarns were leftover from my Star Stitch Pouch and my Snuggle Bunny Pillow!
![]()
You could add different buttons, add crochet appliques, or embroider the recipient’s initials to personalize these cozies even more! Everything looks so much cuter with a crocheted cozy around it, and the cozies help protect your fingers from getting too hot! I love how the mugs I chose have that solid grey colour inside- the colourful yarn looks so striking against the white mug and grey interior!
![]()
I hope you enjoyed this tutorial and that you’ll keep these in mind when you’re in need of a quick gift! I foresee many Star Stitch Cup Cozies for Myla and Brielle’s future teachers- they just work up so quickly and are a wonderful way to add a touch of handmade crocheted goodness on a work desk or coffee table! They are perfect for people who love collecting mugs (like I do) and for coffee and tea lovers! I’ve got another Star Stitch design in mind, so stay tuned! Keep up to date with my newsletter HERE! Have a wonderful first week of summer, everyone!
![]()
{This post is sponsored by Lion Brand Yarn! I’ve loved working with their yarn throughout the years and I’m thrilled that I get to collaborate with them every month!}
This pattern is an original pattern by Stephanie Lau of All About Ami. Please do not claim this pattern as your own. If you wish to share this pattern, you may link to this pattern but please do not reprint it on your site. You may keep a copy for your own personal use but please DO NOT sell the pattern or distribute it.
You may sell products made from this pattern but please clearly credit the design to me, Stephanie Lau of All About Ami, and provide a link to my blog www.AllAboutAmi.com. Permission is NOT granted for mass production or factory manufacturing of any kind. Thank you for being respectful and for your understanding!