***You can purchase an INEXPENSIVE AD-FREE PDF of this pattern on Etsy HERE and on LoveCrafts HERE! This beautifully formatted PDF includes ALL the step-by-step pictures and pattern and is a total of 8 pages including the cover page! The convenient Lion Brand Yarn Kit can be purchased HERE (contains all the necessary yarn and a copy of the digital crochet pattern)!
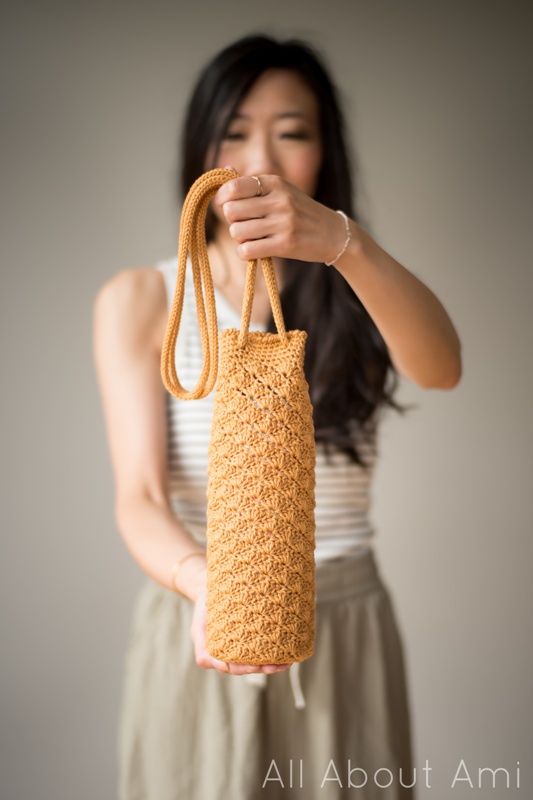
Pattern Description: Crochet a beautiful holder for your water bottle! With a drawstring opening and I-cord strap, you can carry your water bottle with style and protect it from scuffs.
Skill Level: Level 2 – Easy
Materials:
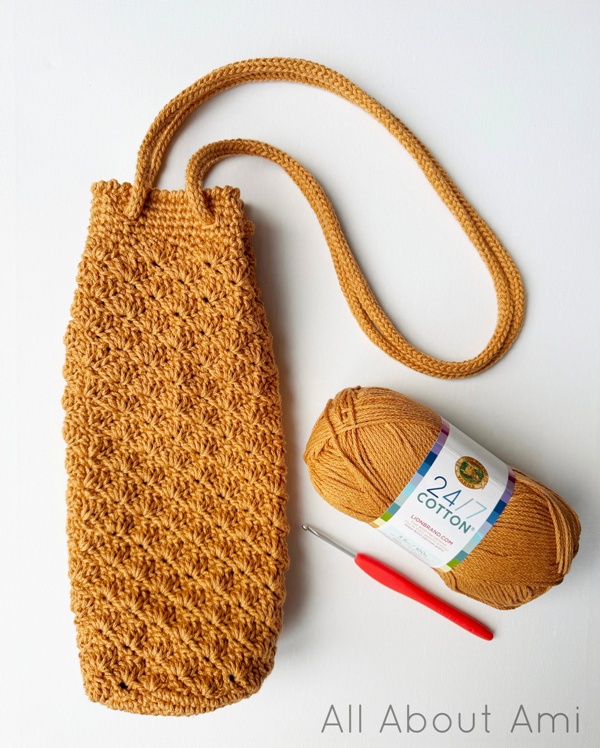
- 24/7 Cotton yarn (worsted weight level 4 yarn); 120 g/223 yds – 2 skeins (I used “Camel” colorway) – buy the Lion Brand Yarn Kit HERE!
- 3.25 mm (holder) and 2 mm (strap) Clover Amour crochet hooks
- Yarn Needle (bent tip helpful)
- Lock ring stitch markers (at least 8)
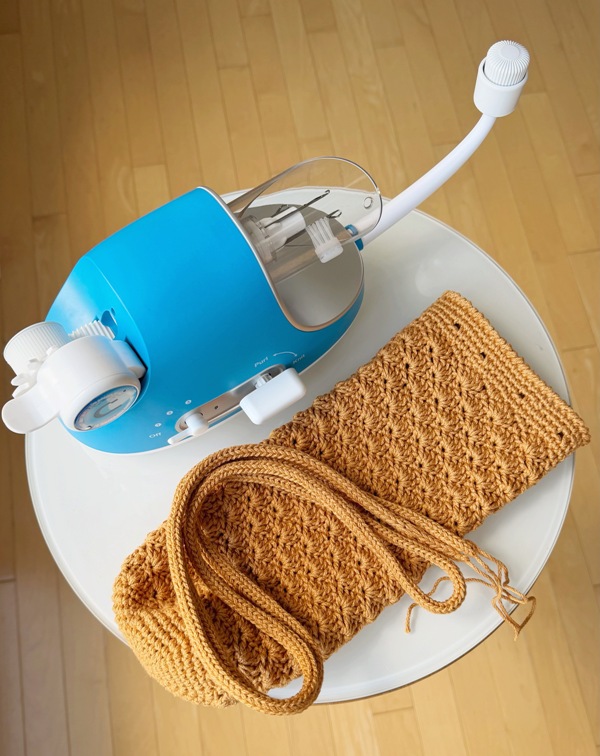
- Steamer (optional for blocking bag– I use this affordable one HERE)
- Caydo Electric I-Cord Knitting Machine (optional to make strap)
Gauge:
- First 6 rounds of base = 2.5”/6 cm across (diameter) using 3.25 mm hook
- 3.5 shells and 11 rounds = 4”/10 cm in shell stitch using 3.25 mm hook
Final Dimensions:
- 5”/12.7 cm across, 11”/28 cm tall, 11”/28 cm circumference, straps are 12”/30.5 cm long (measured from top of bag)
Abbreviations:
- Magic Ring (MR): Make a loop. Hold yarn where ends cross. Insert hook into loop and pull up working yarn. Yarn over and work beginning chains. Work subsequent stitches in magic ring and then pull tight to close. See my Magic Ring tutorial HERE!
- Sc = single crochet
- Inc = Increase: Work 2 sc in the next stitch. [1 stitch becomes 2 stitches.]
- Rep = repeat
- Sts = stitches
- Sl st = slip stitch
- Ch = chain
- Dc = double crochet
- SM = stitch marker
Notes:
- This water bottle holder is designed to fit the Owala FreeSip 32 oz/945 mL water bottle.
- This holder is worked in rounds and requires minimal seaming (connecting the straps at the very end).
- The base is worked in continuous/unjoined rounds using single crochet stitches.
- Next, the shell stitch is used for the body of the bag (requires a multiple of 6 stitches) and is worked in joined rounds.
- After the body of shell stitches is completed, the top edging is crocheted using single crochet stitches and joined rounds.
- The first round of top edging smooths out/flattens the shell stitches at the top.
- When it is time to create the holes through which the straps will be woven through, eight stitch markers are placed to indicate where the holes will be located.
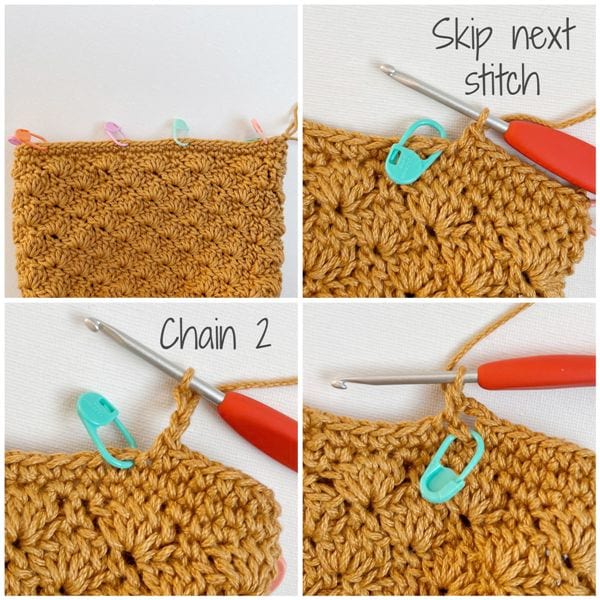
- When crocheting that round, the stitch with the stitch marker is skipped while a chain 2 is worked over it.
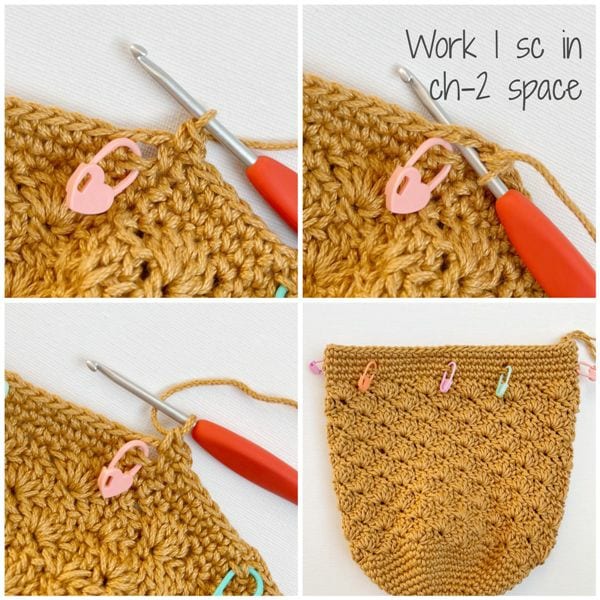
- During the next round, one single crochet stitch is worked in each chain-2 space.
- The last round of the top edging uses the reverse single crochet stitch/crab stitch for a beautiful finish.
- There are two options to make the I-cord strap: you can crochet it or use the Caydo Electric I-Cord Knittng Machine.
- When you have worked your approximate strap length, you can put the live loops onto a stitch marker (do not fasten off). Weave the strap in and out of the 8 holes and use the stitch marker to join the end of the strap to the beginning of the strap. You can place your water bottle into the holder and try it on to see if you like the strap length and where the holder hits. You can take away some rounds to shorten the strap or add more rounds to add length.
- Keep in mind that the strap will stretch with wear and when your water bottle is filled with water.
- Once you are happy with the strap length, both ends of the strap are whip stitched together.
- Some of the pictures in this tutorial will be from the “Rosette Drawstring Bag” pattern as the construction is the same!
Modifying the Pattern:
- If you are modifying this pattern to fit your water bottle, crochet the base until it is the size of the bottom of your water bottle. Ensure that your final stitch count is a multiple of 6 so that the shell stitch can be worked in subsequent rounds for the body.
- Work the shell stitch rounds of the body until your desired height, keeping in mind that the top edging rounds add about 1.25”/3.2 cm in height.
- You can insert your water bottle in the holder as you crochet to ensure that you are liking the fit.
- If you end on a Round 10 repeat rather than a Round 11 repeat for the body, follow this pattern to smooth out the stitches: {Chain 1, sc in same stitch. Sc 1 in next stitch. *Sl st 3, sc 3*, rep across until 4 sts remain. Sl st 3, sc 1. Slip stitch to first sc of round.}
PATTERN
Base:
Using 3.25 mm hook and working in unjoined rounds,
Round 1: 6 sc in Magic Ring. (6 sts)
R2: *Inc*, rep 6 times. (12 sts)
R3: *Sc 1, Inc*, rep 6 times. (18 sts)
R4: *Sc 2, Inc*, rep 6 times. (24 sts)
R5: *Sc 3, Inc*, rep 6 times. (30 sts)
R6: *Sc 4, Inc*, rep 6 times. (36 sts)
R7: *Sc 5, Inc*, rep 6 times. (42 sts)
R8: *Sc 6, Inc*, rep 6 times. (48 sts)
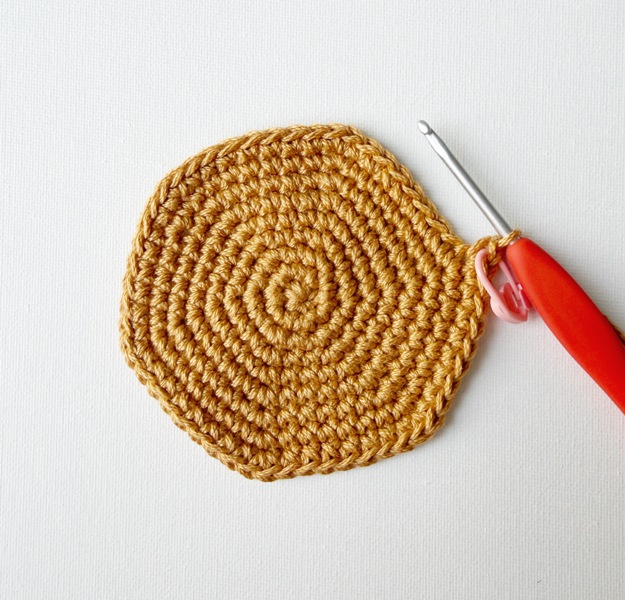
R9: *Sc 7, Inc*, rep 6 times. (54 sts)
My base measured 3.75”/9.5 cm across at this point.
Body:
We will now begin the solid shell stitch rounds. Work in joined rounds.
R10: Ch 1, sc in the 1st st. *Skip 2 sts, work 5 dc in the next st, skip 2 sts, sc in the next st. Repeat from * until 2 sts remain (when 2 sts remain, you will have just worked 5 dc). Skip 2 sts, join with a sl st to the first sc of the round. (9 shells)
R11: Ch 3 (counts as first dc), work 2 dc in the same (1st) st. *Skip 2 sts, sc in the next st (top of the shell from previous round), skip 2 sts, 5 dc in the next st (the sc from previous round). Repeat from * until 2 sts remain (when 2 sts remain, you will have just worked 1 sc). Work 2 dc in the same st you started the round with. Join with a sl st to the top of the ch 3. (9 shells)
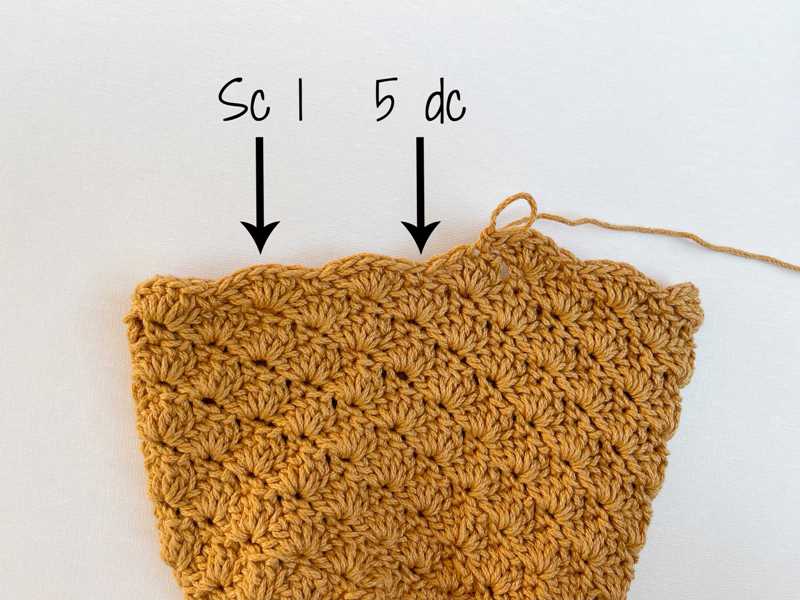
R12-37: Repeat Rounds 10 and 11. (9 shells)
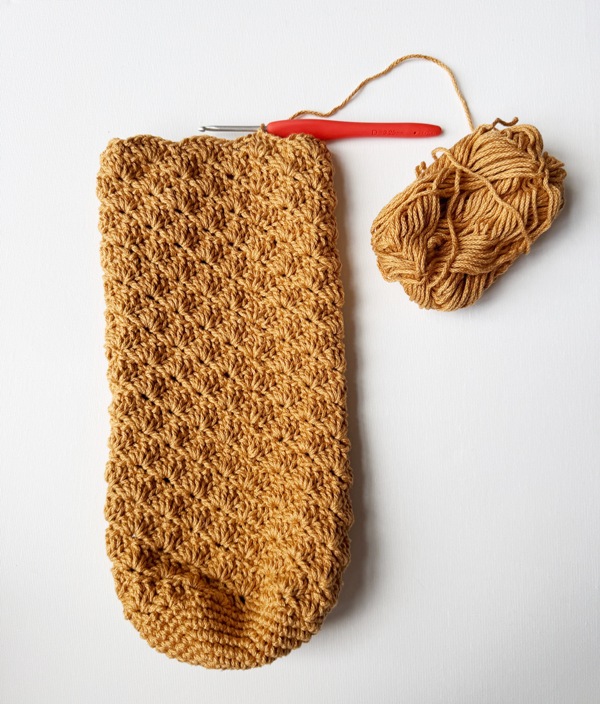
In total, 28 rounds of shell stitches have been worked.
Top Edging:
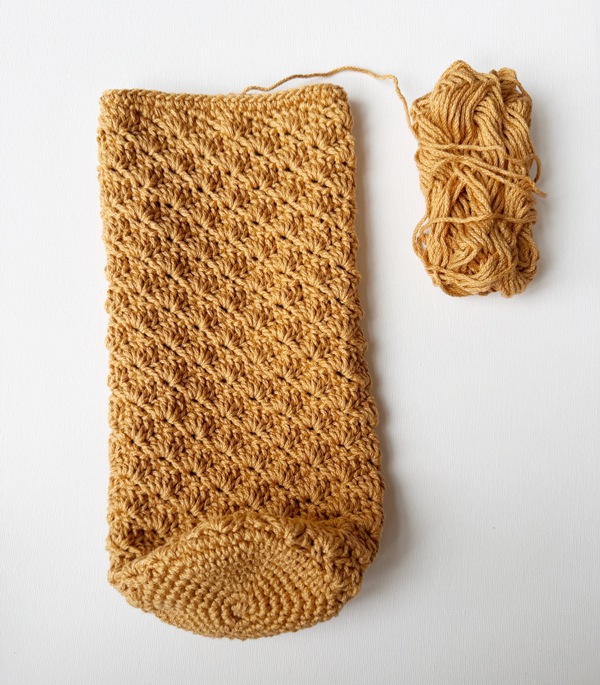
We will now smooth the shell stitches to create a flat top (your last shell stitch round must be a R11 repeat for this smoothing to work – if you end on a R10 repeat, reference the Notes section to see how to create the flat top).
R38: Chain 1, slip stitch in next st. Sc 3. *Sl st 3, sc 3* around until one stitch remains. Slip stitch in last stitch. Join to chain 1 with slip stitch. (54 sts)
R39: Chain 1, sc in same st. Sc around. Sl st to first sc of round. (54 sts)
Now it is time to create the holes through which the strap will be woven through later on. Place 8 stitch markers in the following stitches (please reference diagram): 5, 12, 17, 25, 32, 39, 44 and 52.
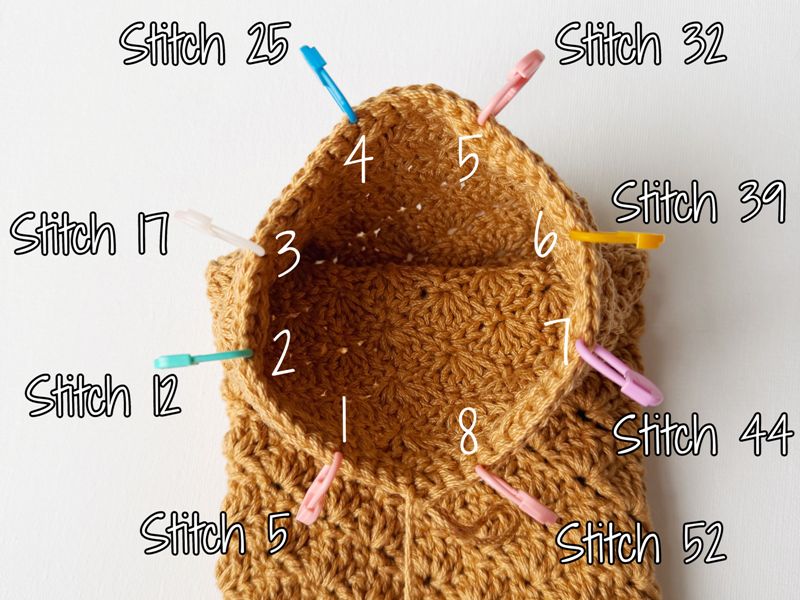
R40: Chain 1, sc in same stitch. Sc in each stitch around. When you come across a stitch marker, skip that stitch and chain 2. At the end of the round, slip stitch to first sc. By the end of the round, you should have created 8 chain-2 spaces/holes.
R41: Chain 1, sc in same stitch. Sc around, working 1 sc in each ch-2 space. Sl st to first sc of round. (54 sts)
You can keep the stitch markers in place if you would like a visual reminder of where the holes have been created.
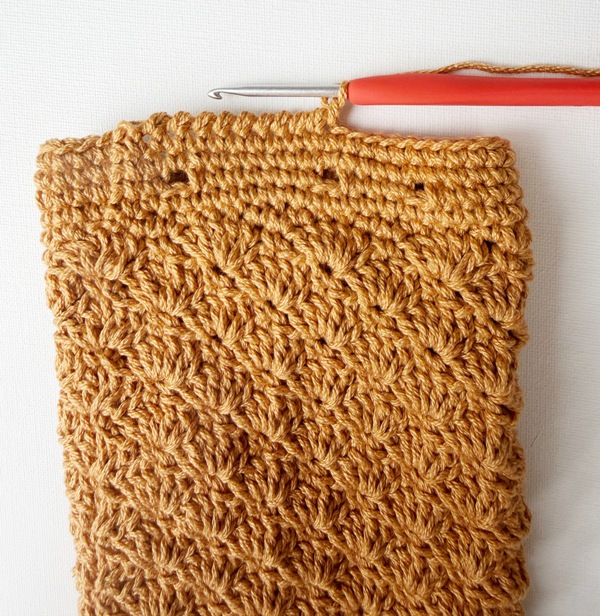
R42: Chain 1, sc in same st. Sc around. Sl st to first sc of round. (54 sts)
R43: Chain 1, reverse single crochet/crab stitch around. (54 sts)
Fasten off and weave in end.
Strap:
Using 2 mm hook, crochet an I-cord to desired length. Here are the details:
- Leaving long initial yarn tail (at least 9”/23 cm), chain 3. Insert hook into 2nd chain from hook, yarn over and draw up a loop. Insert hook into next chain, yarn over and draw up a loop. There are 3 loops on the hook.
- *Remove 2 loops from hook and hold onto these loops with your non-hook hand so that they do not become undone or twisted.
- Yarn over and draw through remaining loop on hook.
- Insert hook into first dropped loop, yarn over and draw through. There are now 2 loops on hook on the hook.
- Insert hook into second dropped loop, yarn over and draw through. There are now 3 loops on the hook.*
- Repeat all the steps between the asterisks until you have reached your desired length of I-cord.
- I aimed for my strap length to be 55”/140 cm.
- Alternatively, you can use the Caydo Electric I-Cord Knitting Machine to create the I-Cord in minutes.
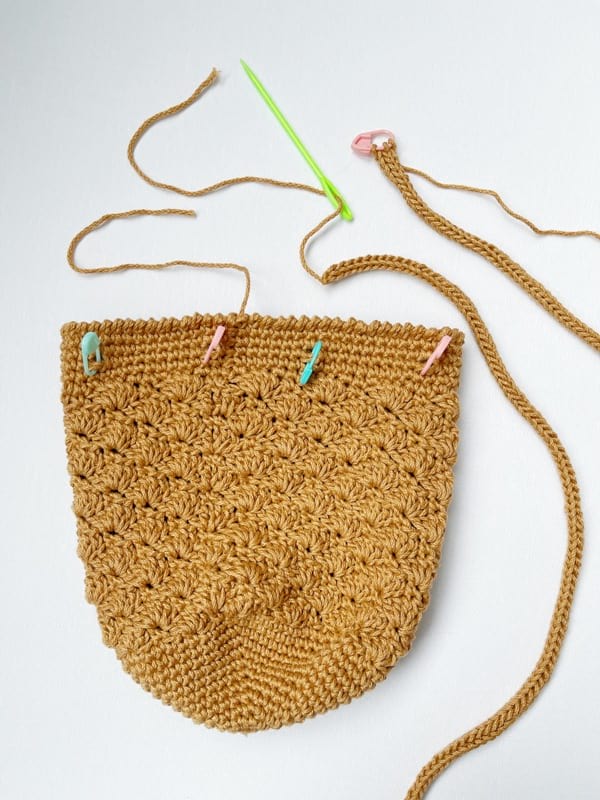
When you are ready to test the strap length of the holder, place a stitch marker through the three loops (so that the strap does not unravel with these live stitches).
Thread the initial yarn tail through a yarn needle (this makes it easier to weave the strap through the holes).
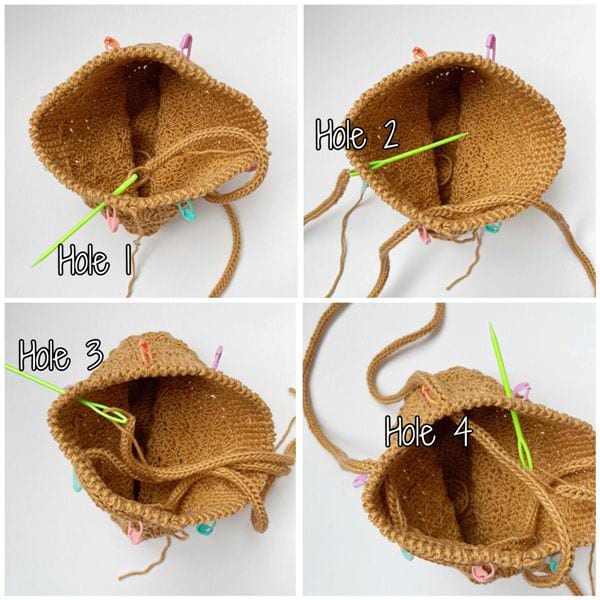
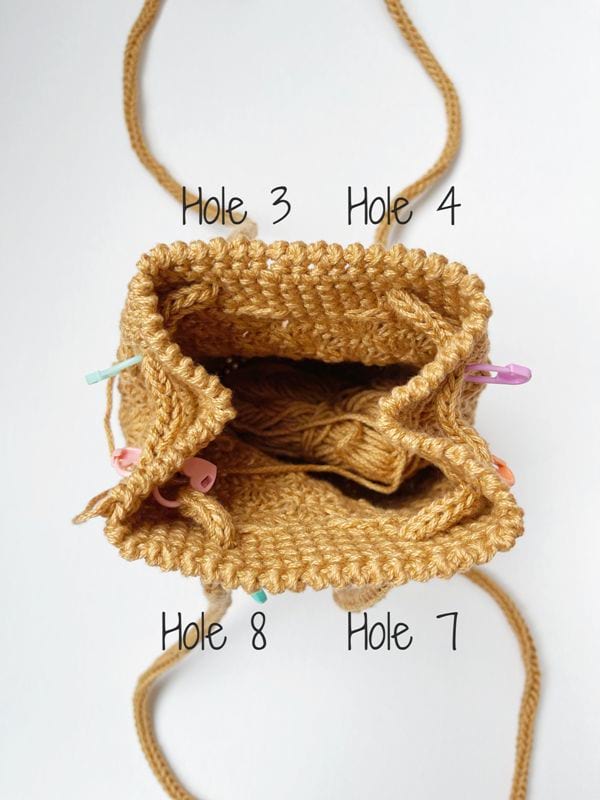
Starting from the inside of the holder and with Hole 1, weave the strap in and out of the bag through Holes 1-8 as shown in collage. The two straps will extend outwards between Holes 3 and 4 and Holes 7 and 8 (as shown in diagram later on).
Use the same stitch marker that is holding the three loops and attach it to the beginning of the strap.
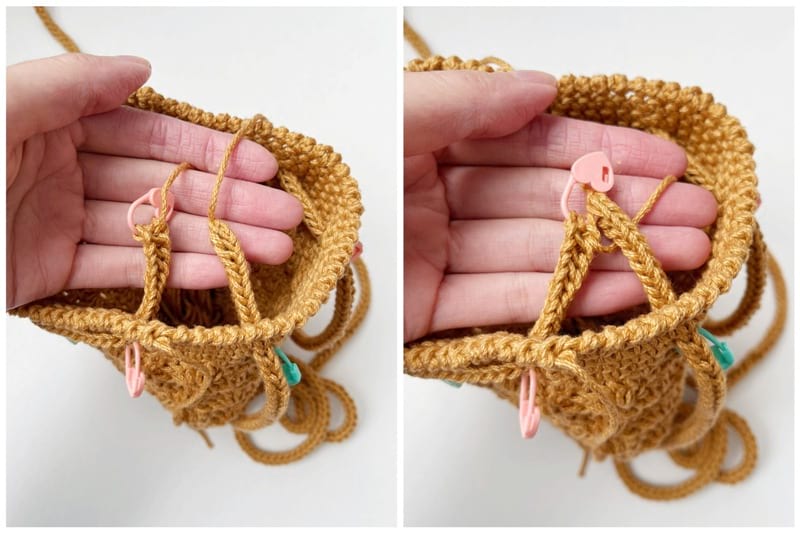
• Even out the straps and try on the holder to see if you like where it is hitting. Try putting your water bottle into the holder so you can get an idea of how much the strap will stretch and where the holder will hit once it has been weighed down. As shown in the picture below, the two straps extend outwards between Holes 3 and 4 and between Holes 7 and 8.
Adjust the strap length if necessary (frog rounds to decrease the length or continue crocheting the I-cord to add length). You can keep crocheting the I-cord while the strap has been woven through the holes – this makes it easy to keep trying on the holder as you add length.
Once you are happy with the length, cut off the yarn (leave a long yarn tail) and weave the tail through a yarn needle. Thread the yarn tail through the three remaining loops and pull tight.
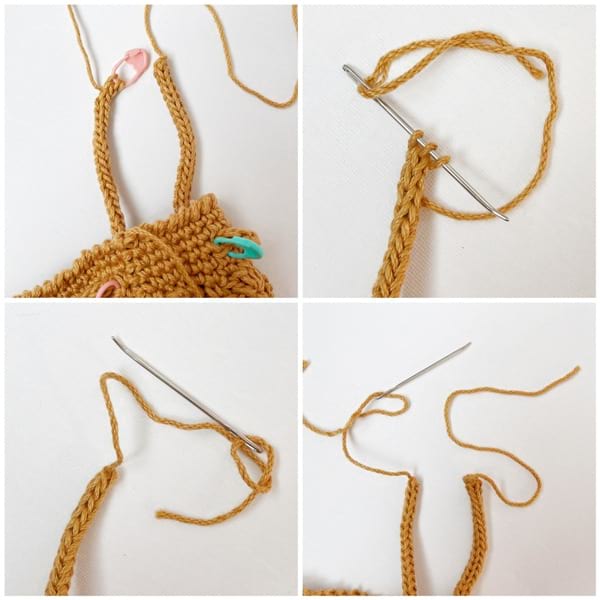
Seam the beginning of the strap to the end of the strap. You can use the whip stitch or try and attach the V’s from one end of the V’s from the other end as shown in picture. Be sure to pass the yarn through both ends of the strap multiple times to ensure this seam is secure.
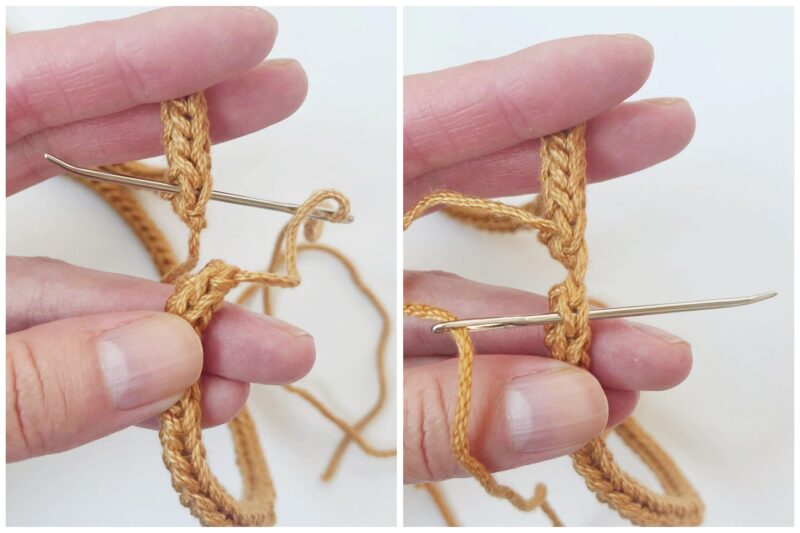
You can tie the initial yarn end and final yarn end into knots to help secure this junction at the very end.
I like to hide the strap seam on the inside of the holder (between Holes 1 and 8). The seam will shift with wear, but you can keep moving it back in this spot to keep it hidden inside the holder!
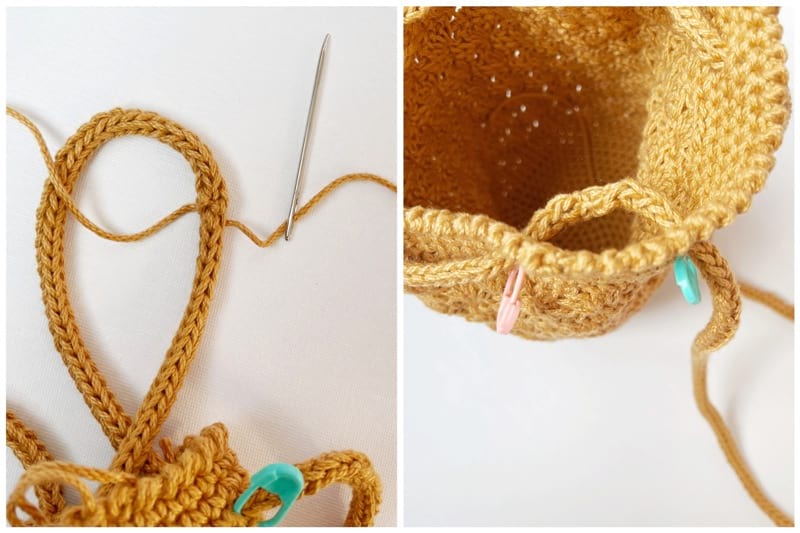
Weave in the ends and you are done! You can block the final holder as an optional step to smooth out the stitches.
*****************************
When I bought my Owala water bottle several months ago, I knew I wanted to crochet some sort of holder/protector for it as I wanted to preserve its beautiful design and try my best to prevent scuffs and nicks. I thought the Rosette Drawstring Bag would be a lovely base for this holder, and I am delighted with how this modification turned out!
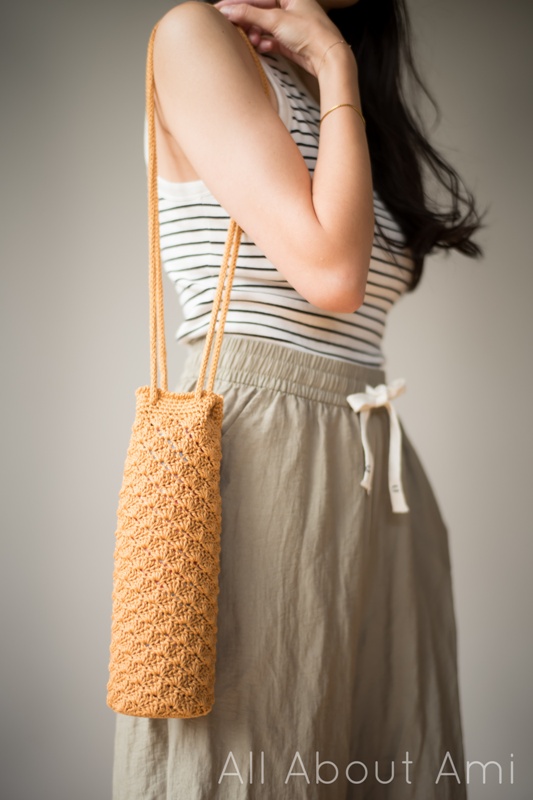
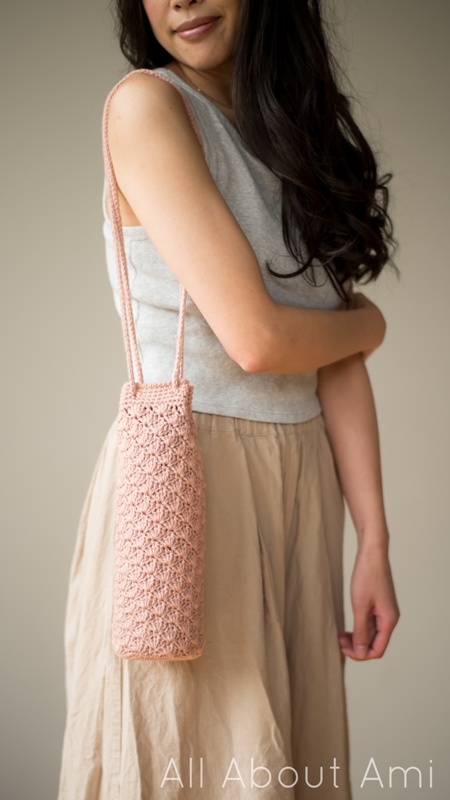
I have started taking Lagree exercise classes to try and do some muscle strengthening, and I have been LOVING them! I take my trusty water bottle with me to every class, and I proudly carry it in my beautiful Rosette Water Bottle Holder. It is wonderful being able to sling my water bottle on my shoulder as I go out and about!
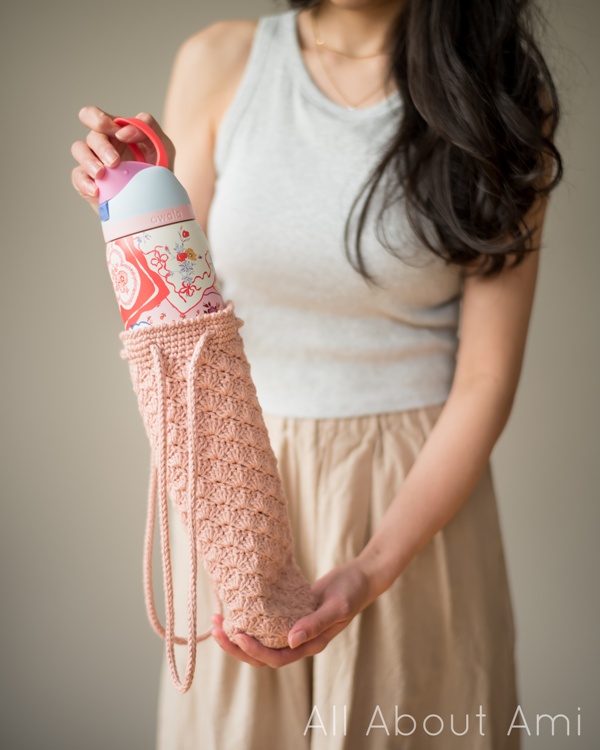
I used “Local Grown Cotton” in my favorite rose pink shade for my first water bottle holder. Sadly this yarn has been discontinued. When I posted pictures of my water bottle holder on social media, people showed interest and so I crocheted another one using my trusty 24/7 Cotton since this yarn is readily available and comes in many different colors! 24/7 Cotton is a very strong and durable mercerized cotton, and I think it is a great choice for a water bottle holder as it will not fuzz up easily. You could crochet holders in many different colors as they are fairly quick to work up, and they would make lovely gifts as well! People have already told me that they will be making them as stocking stuffers and as gifts for their friends and family members who ALWAYS carry their Owala water bottles around!
Happy crocheting, everyone! You can use the hashtag #rosettewaterbottleholder to share your projects on social media! Enjoy carrying your water bottles around with style!
This pattern is an original pattern by Stephanie Lau of All About Ami. Please do not claim this pattern as your own. If you wish to share this pattern, you may link to this pattern but please do not reprint it on your site. You may keep a copy for your own personal use but please DO NOT sell the pattern or distribute it.
You may sell products made from this pattern but please clearly credit the design to me, Stephanie Lau of All About Ami, and provide a link to my blog www.AllAboutAmi.com. Permission is NOT granted for mass production or factory manufacturing of any kind. Thank you for being respectful and for your understanding!