***You can purchase an INEXPENSIVE AD-FREE PDF of this pattern on Etsy HERE! This beautifully formatted PDF is 14 pages including the cover page, detailed step-by-step photo tutorial, written-out pattern for both the adult and child size, and these three tutorials: how to create a thrum, how to crochet a thrum stitch and how to crochet a thrum invisible decrease. These mittens are also part of my “Crochet Mittens PATTERN BUNDLE” that includes all my mitten designs at a discounted price HERE! You can also purchase a convenient Lion Brand Yarn kit that contains all the yarn you need to make two pairs of thrummed mittens HERE!
***Please reference the detailed step-by-step blog post for these mittens for more tutorial photos HERE!
***Note that this blog post includes both the adult and child size – keep scrolling down to find the child pattern.
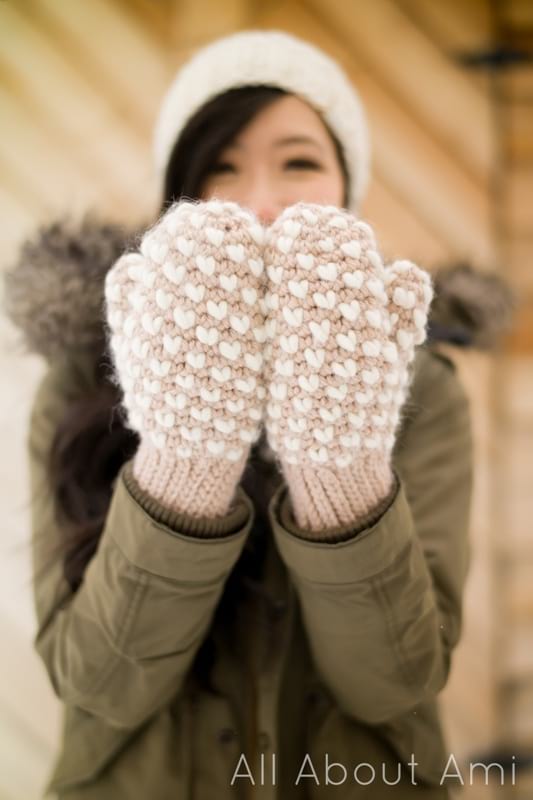
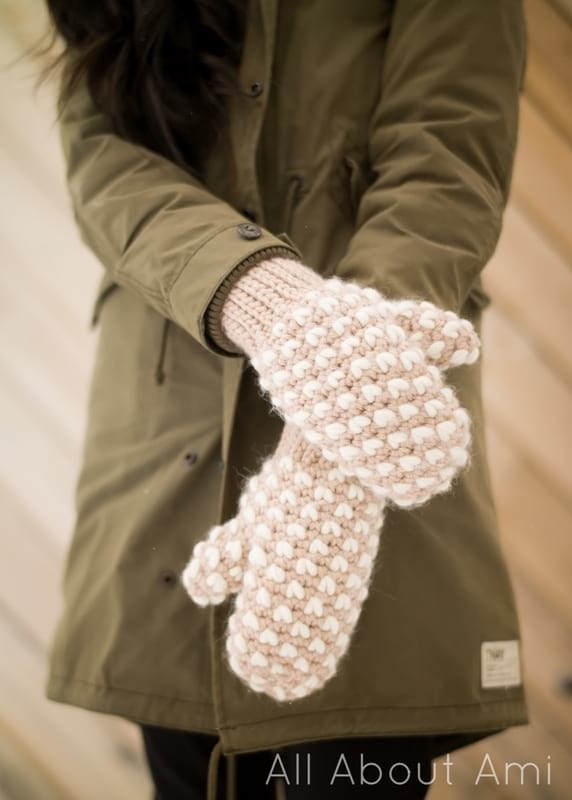
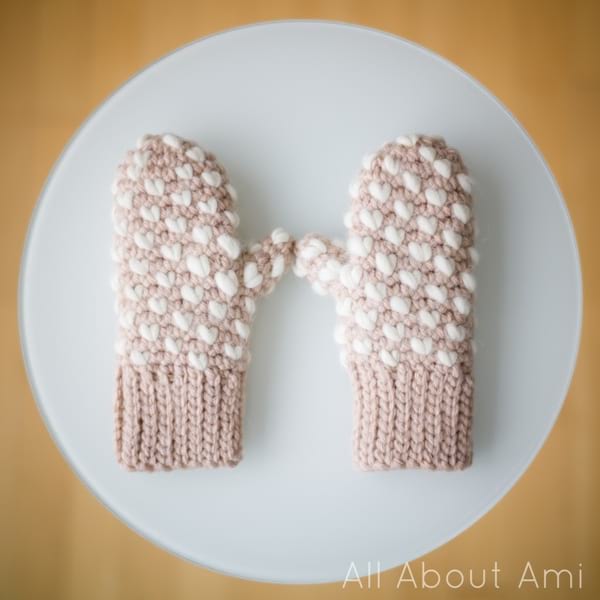
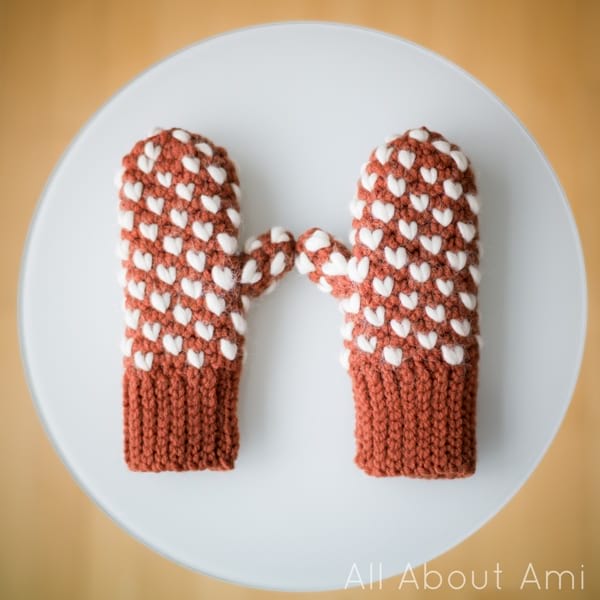
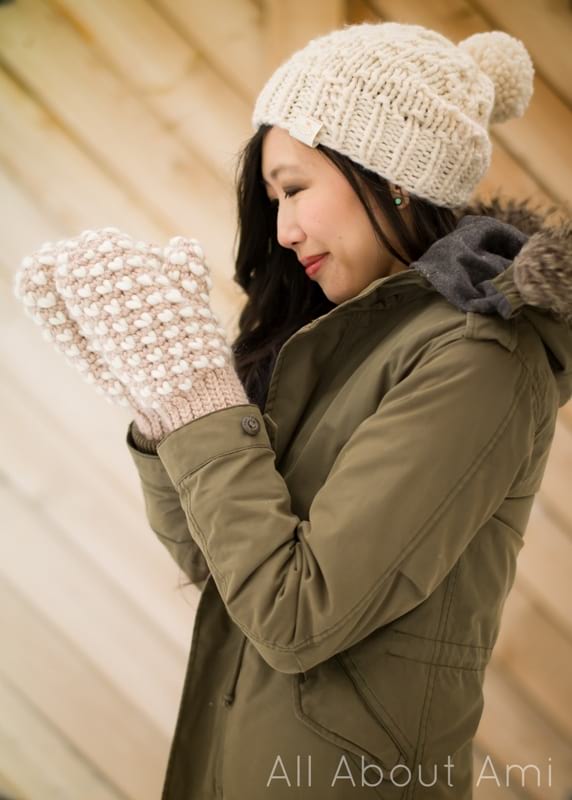
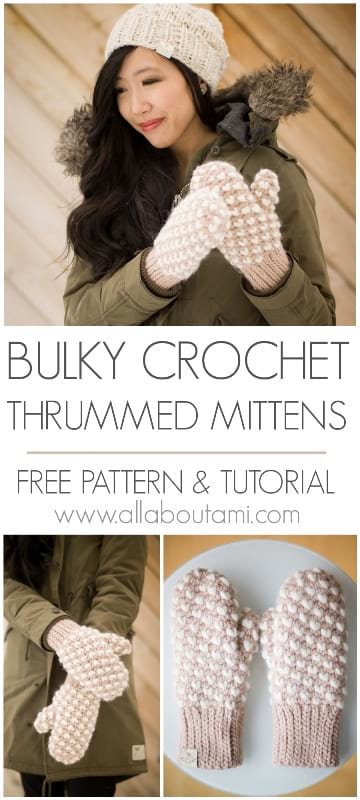
Crochet these incredibly warm mittens that have a wool lining made of “thrums”! These bulky mittens work up quickly and look so adorable with the puffy hearts!
Materials (Adult size):
- 120 grams/132 yds of bulky level 5 yarn (I used Hue + Me in “Desert” by Lion Brand Yarn)
- 60 g of wool roving to make the thrums (I used “Fifty Fifty Yarn” from the LB Collection. This super bulky yarn is 50% alpaca/50% wool and can be gently untwisted to split into two portions. Sections can be gently torn off to create the thrums). Purchase the convenient Lion Brand Yarn kit HERE!
- 5 mm Clover Amour hook
- Yarn needle
- Lock ring stitch marker
- Garment tag (optional)
Notes:
- Thrummed mittens are special mittens that originate from Newfoundland and Labrador.
- Wisps of unspun wool roving called “thrums” are crocheted into the mitten so that a warm inner layer is created. With time, these thrums with felt to form a fleece lining. These mittens are incredibly warm and cozy.
- Since the thrums will felt with time, you do not want your mitten to be too big to begin with. You want your mitten to be snug initially so that when the thrums form the felted layer (and compress), the mitten will still fit you and not be too oversized.
- This mitten pattern uses bulky yarn and works up very quickly. It is worked from the bottom up starting with the ribbed band.
- A ribbed band is first crocheted by working slip stitches in the back loop only. The ends of the ribbed band are slip stitched together to form the ribbed cuff.
- Stitches are picked up along the ribbed cuff as we begin crocheting the body of the mitten. Due to the thrum pattern (every 4th stitch), we want the number of stitches you pick up to be a multiple of 4.
- The body of the mitten is worked in continuous rounds with no seams using single crochet stitches (forms a dense and warm fabric). Use a stitch marker to help you keep track and mark the end of each round.
- The thrums are crocheted into the mitten using a specific pattern (generally every fourth stitch). You can reference the thrum stitches from previous rounds to make sure that the thrums are lining up correctly.
- A thumbhole is created by chaining and skipping stitches. Stitches are picked up around the thumbhole after the body of the mitten is complete.
- Two decrease rounds at the end help to taper the mitten and decrease the number of stitches towards the top. At the very end, you will thread a yarn needle through the front loops of the remaining stitches and pull tight to close up the hole.
- Use the invisible decrease for the decrease rounds (explained in abbreviations section).
- Leave a long initial end when picking up stitches for the thumb, and leave a long final end. You can use these long ends to close up any gaps or holes that may have formed where the thumb emerges from the mitten.
- You will need to make about 142 thrums for each mitten (~ 284 for the pair).
- To alter the size of the mitten without having to change the numbers, you can try using a larger or smaller crochet hook (e.g. 4.5, 5.5, 6 mm hooks) or a different weight of yarn. Note that if you alter the hook size, the amount of yarn you will need will change too.
- Try on your mitten as you go to ensure that you are liking the size or to determine if you need to alter the hook size. As you build up the body of the mitten, you can determine whether you want to add more rounds before you work the two decrease rounds if you want to add more height. You can also determine if you want to add more length to the thumb as you try it on as you go.
- Since both the left and right mittens are exactly the same, you can follow the exact same pattern without having to alter anything to make both mittens.
- If you have extra wool roving/fibre leftover, you can stuff it strategically into the tip of the mitten and the tip of the thumb where you might want some extra warmth. This wool will felt along with the thrums over time.
- Be careful when washing your thrummed mittens: do not throw them in the washing machine as heat and agitation will cause the mittens to felt together on the inside. Wash your mittens by hand gently in lukewarm water with mild soap and lay flat to dry.
- It is recommended that you make all your thrums ahead of time so that they are a consistent size and ready to be used when you need them in the pattern!

Abbreviations:
- Back Loop Only (BLO): When you look at a stitch, it forms a V composed of the front loop (loop closer to you) and the back loop (loop farther away from you). When it says to work a stitch in the back loop only, work that stitch only in that back loop.
- Skip (sk): skip the next stitch
- Decrease (dec) – I use the invisible decrease: Insert hook into front loops of the next two stitches. Yarn over and draw through first two loops. Yarn over and draw through remaining two loops.
Finished Dimensions:
- Adult size: 10.5”/27 cm long, 9.5”/ 24 cm wide
- Child size: 8”/20 cm long, 8”/20 cm wide
Gauge: 10 sts and 12 rounds = 4” in sc thrum pattern with 5 mm hook
How to Create a Thrum:
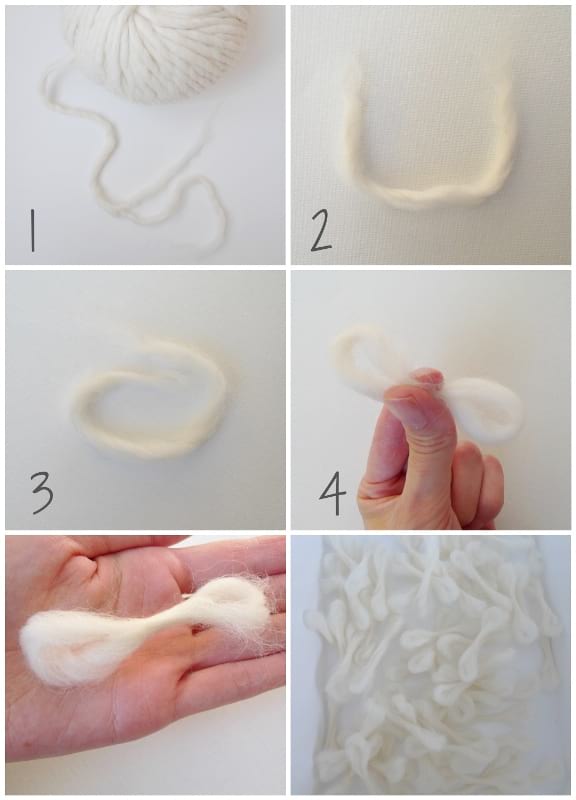
If you are using Fifty Fifty yarn:
- Gently untwist the yarn and split it into two (the thickness created is perfect for the thrum size for this pattern).
- Gently tear off a 8”/20 cm piece.
- Overlap the ends to create a loop.
- Pinch the loop in the center to form a figure 8. Roll the middle pinched part between your fingers to felt the wool. Next, roll the thrum in the palm of your hand using the edge of your other hand.
The length of my thrums was generally between 3-3.5” (8-9 cm) long. If you are using wool roving, you can follow the same instructions as above. You will need to stretch out your wool to thin it out until it is an appropriate thickness. Generally, you want the pinched portion of the thrum to be the same thickness as the yarn you are using to crochet the mitten (in this pattern, bulky yarn).
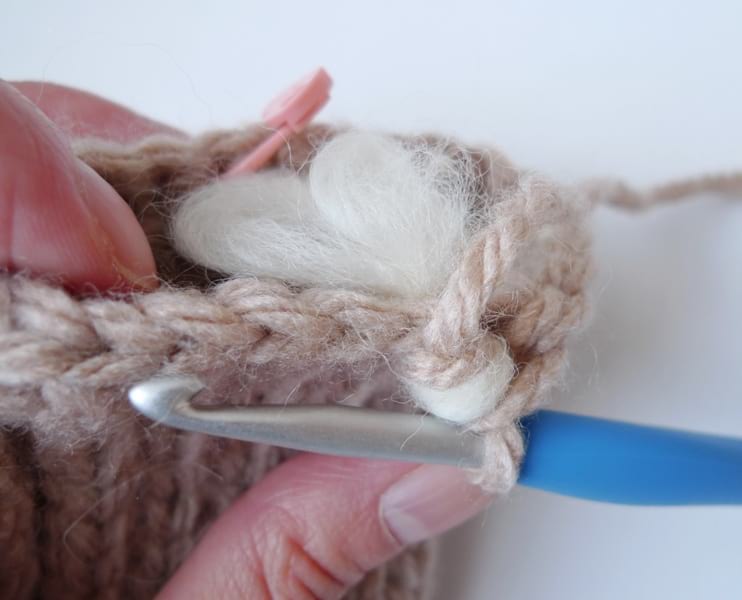
How to Crochet a Thrum Stitch (Single Crochet):
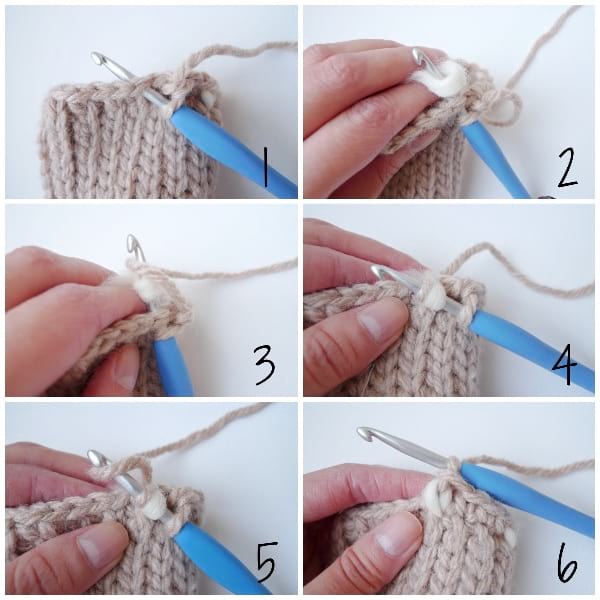
Whenever you see “thrum” or “thrum sc” in the pattern, follow these steps:
- Insert your crochet hook into the next stitch.
- Wrap the thrum around your crochet hook so that the pinched portion is around the hook and the loops are on either end.
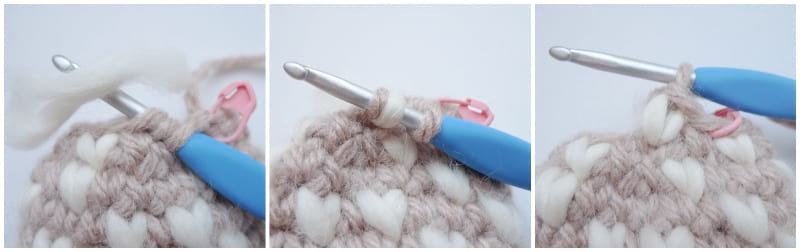
- Yarn over.
- Pull the yarn over strand and the thrum through. You should see three loops on your hook, and they should be in this order: regular yarn, thrum, regular yarn. [Trouble shooting: If the thrum is at the top, your stitches will become muddled with the thrum being less defined. You want the thrum to be in between the two regular yarn loops.]
- Yarn over.
- Pull through all the loops. Your thrum has been set into place and you should see a beautiful puffy V formed.
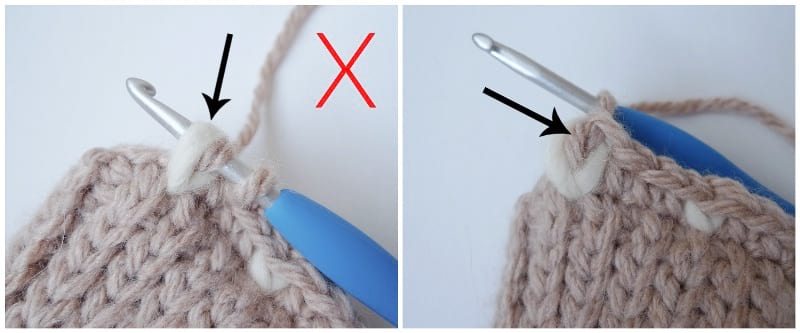
Note that in the photo collage below, you do NOT want this to happen in Step 4: you do not want the thrum to be on top of the two regular loops as indicated by the arrow. This will cause your thrum stitch to become muddled as the regular yarn pokes through the V of the thrum stitch.
This is what your thrum stitch will look like from behind: the two loops will hang on the inside to provide warmth, and the thrum is locked into place with the regular yarn behind it.
How to Crochet a Thrum Stitch with an Invisible Decrease:
Whenever you see “Thrum Decrease” in the pattern, follow these steps
- Insert your crochet hook into the front loops of the next two stitches.
- Wrap the thrum around your crochet hook so that the pinched portion is around the hook and the loops are on either end.
- Yarn over.
- Pull the yarn over strand and thrum through both the front loops. You should see three loops on your hook, and they should be in this order: regular yarn, thrum, regular yarn. [Trouble shooting: If the thrum is at the top, your stitches will become muddled with the thrum being less defined. You want the thrum to be in between the two regular yarn loops.]
- Yarn over.
- Pull through all the loops. Your thrum has been set into place and you have worked a decrease.
***Please watch my VIDEO TUTORIAL below as I demonstrate all the above techniques in action: How to Create a Thrum with Fifty Fifty Yarn, How to Crochet a Thrum Stitch, and How to Work an Invisible Decrease with a Thrum:
ADULT SIZE PATTERN
Ribbed Band:
Using 5 mm hook and regular bulky yarn,
Chain 13.
Row 1: Starting from 2nd chain from hook, Slip stitch in each chain across. (12 sts)
Row 2: Chain 1, turn. Slip stitch in back loops only across. (12 sts)
Row 3-33: Repeat Row 2 or until desired length.
At this point, ribbed band is approximately 6.75”/17 cm long (and approximately 3.25”/8 cm in height). You can make the ribbed band shorter or longer based on your preference. Keep in mind that this ribbed band is capable of stretching quite a bit. Do not fasten off- it is now time to join the short ends of the ribbed band together. Fold the ribbed band so that the short sides are touching each other and so that the V’s will be pointing upwards in the final mitten. Slip stitch to other side of ribbed band. Slip stitch back loops of both edges together to form the ribbed cuff. Do not fasten off as we will now begin crocheting the body of the mitten.
Body:
Round 1: Pick up 24 stitches around circumference of ribbed cuff in a clockwise direction. To do this, chain 1 and work a single crochet in the same stitch (chain 1 does not count as a stitch). Next, insert hook in adjacent space and work a single crochet. Keep inserting hook in adjacent spaces and working single crochets until all 24 stitches have been picked up around the edge. Try to space the stitches out as evenly as possible. As a guide, you should have picked up about 12 stitches by the time you reach the halfway point of the ribbed cuff. (24 sts)
We will now begin the thrum rounds. Thrums are worked in every round until the very end of the mitten.
Round 2: *Sc 3, Thrum*, rep around. (24 sts)
Round 3: Sc 1. *Thrum, Sc 3*, rep till 3 sts remain. Thrum, Sc 2. (24 sts)
R4: Repeat Round 2.
R5: Repeat Round 3.
R6: Repeat Round 2.
R7: Repeat Round 3.
R8: Repeat Round 2.
We will now work the thumbhole:
R9: Chain 8, skip 4 stitches. Sc in 5th stitch. *Thrum, Sc 3*, around till 3 sts remain. Thrum, Sc 2.
R10: Work this pattern in the chain 8: {Sk 1, Sc in BLO, Sk 1, Sc in BLO, Sk 1, Sc in BLO, Sk 1, Thrum in BLO}. *Sc 3, Thrum*, rep around for rest of round. (24 sts).
R11: Sc 1. *Thrum, Sc 3*, rep till 3 sts remain. Thrum, Sc 2. (24 sts)
R12: *Sc 3, Thrum*, rep around. (24 sts)
R13-20: Repeat R11 and R12.
We will now work two decrease rounds to taper off the mitten towards the top. Note that the thrums will not exactly line up anymore compared to the rest of the mitten, but they are still dispersed evenly.
R21: *Sc 1, Dec*, rep 8 times. (16 sts). To work the thrum pattern, note that there are 8 single crochet stitches and 8 decrease stitches. Work the thrums on the 2nd, 4th, 6th and 8th single crochet stitches (NOT the decrease stitches). It will look like this: {Sc, Dec, Thrum Sc, Dec, Sc, Dec, Thrum Sc, Dec, Sc, Dec, Thrum Sc, Dec, Sc, Dec, Thrum Sc, Dec}. Four thrum stitches have been worked.
R22: *Dec*, rep 8 times. (8 sts) Work the thrums with the decreases on the 1st, 3rd, 5th, and 7th decreases. It will look like this: {Thrum decrease, decrease, Thrum decrease, decrease, Thrum decrease, decrease, Thrum decrease, decrease}. Four thrum stitches have been worked.
Eight stitches now remain. Fasten off and leave a long end. Thread the yarn tail through a yarn needle and weave the yarn tail through the front loops of the remaining eight stitches. Pull tight to close up the gap. Tie knots and weave in the end.
Thumb:
We will now pick up stitches around the thumbhole in a clockwise direction to begin crocheting the thumb.
The thumbhole is composed of: 4 stitches at the bottom (from the skip 4 stitches of R9 of body) and 8 stitches at the top from the chain 8 gap. We will be picking up 12 stitches in total as follows: 4 stitches at the bottom, 1 stitch along the side, 6 stitches in the Chain 8 (you will simply skip 2 stitches) and then 1 stitch along the other side.
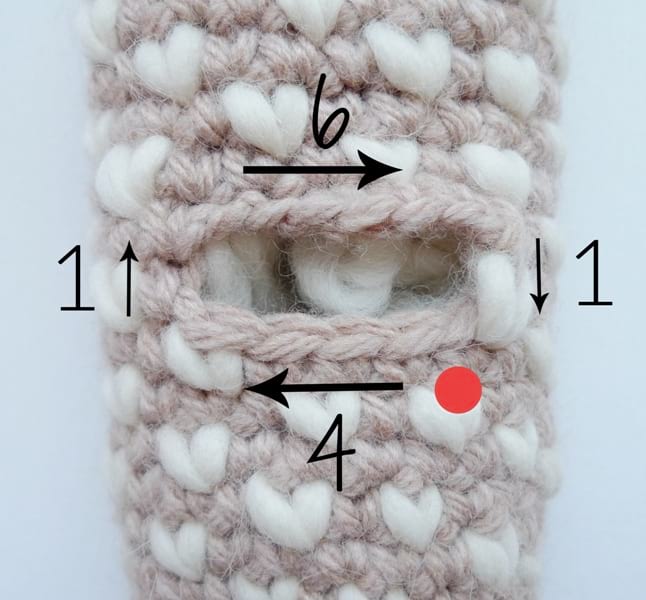
Round 1: Rejoin the yarn at the bottom of the thumbhole in the first stitch. To do this, make a slip knot (leave a long initial end). Insert hook in indicated stitch. Place slip knot on hook and pull through the space. Chain 1 and work a single crochet in the same space (chain 1 does not count as a stitch). Sc 3 along bottom. Sc 1 along side. In chain 8 upper section, work in front loops leftover from Round 10: Work 6 single crochets, for example: {Sc 3, Sk 1, Sc 3, Sk 1}. Sc 1 along side. 12 single crochets have been picked up in total. (12 sts)
We will now begin the thrum rounds.
R2: *Sc 3, thrum*, rep around. (12 sts)
R3: Sc 1. *Thrum, Sc 3*, rep till 3 sts remain. Thrum, Sc 2. (12 sts)
R4-7: Repeat R2 and R3.
We will now work a decrease round:
R8: *Dec*, rep 6 times. (6 sts) Work the thrums with the decreases on the 1st, 3rd and 5th decreases. It will look like this: {Thrum decrease, decrease, Thrum decrease, decrease, Thrum decrease, decrease }. Three thrum stitches have been worked.
Six stitches now remain. Fasten off and leave a long end. Thread the yarn tail through a yarn needle and weave the yarn tail through the front loops of the remaining six stitches. Pull tight to close up the gap and tie knots.
Flip mitten inside out and weave in all the ends. If there are any gaps or holes where the thumb is emerging from the mitten, use the long initial and final ends from creating the thumb to close them up.
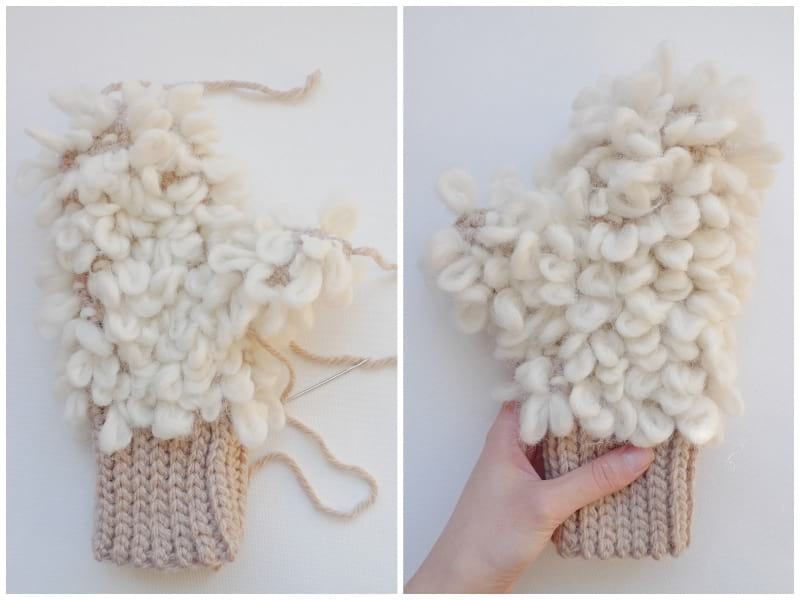
You can stuff remaining wool fibre into the tip of the mitten or tip of the thumb for extra warmth! This wool will felt along with the rest of the thrums over time.
Repeat entire process to create the second mitten!
Optional: Sew garment tag onto ribbed cuff.
********************
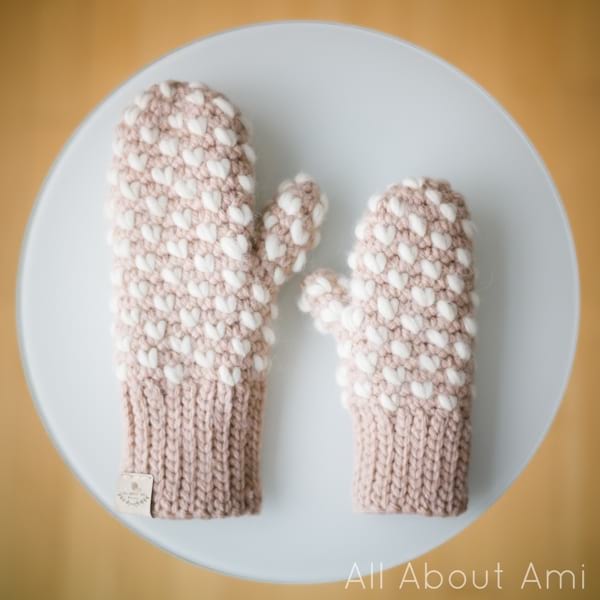
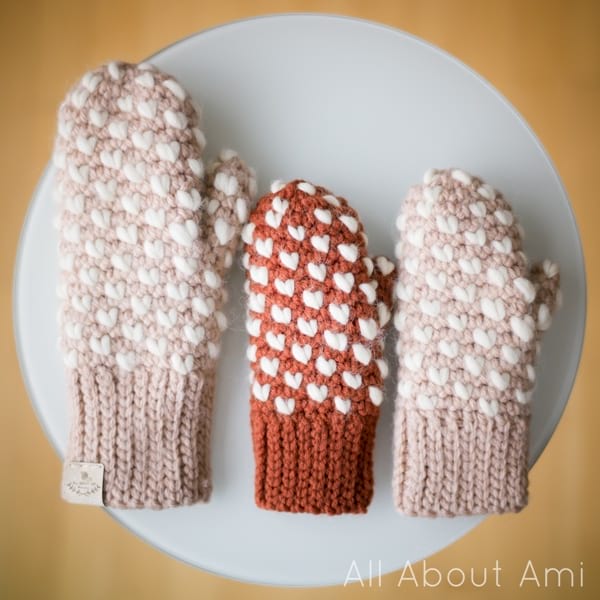
CHILD SIZE THRUMMED MITTENS
Materials:
- 80 grams/88 yds of bulky level 5 yarn (I used Hue + Me in “Desert” and Woolspun in “Mahogany” by Lion Brand Yarn)
- 40 g of wool roving to make the thrums (I used “Fifty Fifty Yarn” from the LB Collection. This super bulky yarn is 50% alpaca/50% wool and can be gently untwisted to split into two portions. Sections can be gently torn off to create the thrums).
- 5 mm Clover Amour hook; I used a 5.5 mm hook for the mittens that I made with Woolspun
- Yarn needle
- Lock ring stitch marker
- Garment tag (optional)
Notes:
- Please reference notes for Adult mittens.
- You will need to make about 90 thrums per mitten (180 in total for the pair).
- I made two pairs of child mittens for my daughters: one using Hue + Me yarn, and the other using Woolspun yarn (both level 5 bulky yarns).
- I needed to move up to a 5.5 mm hook for the body when I worked with Woolspun to achieve a mitten of similar dimensions. Try out different hook sizes to get the final size you are aiming for.
- These mittens fit my daughters who are 6 and 8 years old.
PATTERN (Child Size)
Ribbed Band:
Using 5 mm hook and regular bulky yarn,
Chain 10.
Row 1: Starting from 2nd chain from hook, Slip stitch in each chain across. (9 sts)
Row 2: Chain 1, turn. Slip stitch in back loops only across. (9 sts)
Row 3-29: Repeat Row 2 or until desired length.
At this point, ribbed band is approximately 5.75”/15 cm long (and approximately 2.5”/6 cm in height). You can make the ribbed band shorter or longer based on your preference. Keep in mind that this ribbed band is capable of stretching quite a bit. Do not fasten off- it is now time to join the short ends of the ribbed band together. Fold the ribbed band so that the short sides are touching each other and so that the V’s will be pointing upwards in the final mitten. Slip stitch to other side of ribbed band. Slip stitch back loops of both edges together to form the ribbed cuff. Do not fasten off as we will now begin crocheting the body of the mitten.
Body:
Next, insert hook in adjacent space and work a single crochet. Keep inserting hook in adjacent spaces and working single crochets until all 20 stitches have been picked up around the edge. Try to space the stitches out as evenly as possible. As a guide, you should have picked up about 10 stitches by the time you reach the halfway point of the ribbed cuff. (20 sts)
We will now begin the thrum rounds. Thrums are worked in every round until the very end of the mitten.
Round 2: *Sc 3, Thrum*, rep around. (20 sts)
Round 3: Sc 1. *Thrum, Sc 3*, rep till 3 sts remain. Thrum, Sc 2. (20 sts)
R4: Repeat Round 2.
R5: Repeat Round 3.
R6: Repeat Round 2.
R7: Repeat Round 3.
We will now work the thumbhole:
R8: Chain 6, skip 3 stitches. Work a thrum single crochet stitch in 4th stitch. *Sc 3, Thrum* repeat around.
R9: Work this pattern in the chain 6: {Sk 1, Sc in BLO, Sk 1, Thrum sc in BLO, Sk 1, Sc in BLO}. Sc 2. *Thrum, Sc 3*, rep till 3 sts remain. Thrum, Sc 2 (20 sts).
R10: *Sc 3, Thrum*, rep around. (20 sts)
R11: Sc 1. *Thrum, Sc 3*, rep till 3 sts remain. Thrum, Sc 2. (20 sts)
R12-16: Repeat R10 and R11 (end on a R10 repeat).
We will now work two decrease rounds to taper off the mitten towards the top. Note that the thrums will not exactly line up anymore compared to the rest of the mitten, but they are still dispersed evenly.
R17: *Sc 3, Dec*, rep 4 times. (16 sts) To work the thrum pattern, we will work some thrum stitches during the single crochet stitches. Follow this pattern: {Sc, Thrum Sc, Sc, Dec, Sc, Thrum Sc, Sc, Dec, Sc, Thrum Sc, Sc, Dec, Sc, Thrum Sc, Sc, Dec}. Four thrum stitches have been worked.
R18: *Dec*, rep 8 times. (8 sts) Work the thrums with the decreases on the 2nd, 4th, 6th, 8th and 10th decreases. It will look like this: {Decrease, Thrum decrease, decrease, Thrum decrease, decrease, Thrum decrease, decrease, Thrum decrease}. Four thrum stitches have been worked.
Eight stitches now remain. Fasten off and leave a long end. Thread the yarn tail through a yarn needle and weave the yarn tail through the front loops of the remaining eight stitches. Pull tight to close up the gap. Tie knots and weave in the end.
Thumb:
We will now pick up stitches around the thumbhole in a clockwise direction to begin crocheting the thumb.
The thumbhole is composed of: 3 stitches at the bottom (from the skip 3 sts of R8) and 6 stitches at the top from the chain 6 gap. We will be picking up 8 stitches in total as follows: 3 stitches at the bottom, 1 stitch along the side, 3 stitches in the Chain 6 (you will skip 3 stitches) and then 1 stitch along the other side.
Round 1: Rejoin the yarn at the bottom of the thumbhole in the first stitch. To do this, make a slip knot (leave a long initial end). Insert hook in indicated stitch. Place slip knot on hook and pull through the space. Chain 1 and work a single crochet in the same space (chain 1 does not count as a stitch). Sc 2 along bottom. Sc 1 along side. In chain 6 upper section, work in front loops leftover from Round 9: Work 3 single crochets, for example: {Sc 1, Sk 1, Sc 1, Sk 1, Sc 1, Sk 1}. Sc 1 along side. 8 single crochets have been picked up in total. (8 sts)
We will now begin the thrum rounds.
R2: *Sc 3, thrum*, rep around. (8 sts)
R3: Sc 1. *Thrum, Sc 3*, rep till 3 sts remain. Thrum, Sc 2. (8 sts)
R4-5: Repeat R2 and R3.
We will now close up the thumb: fasten off and leave a long end. Thread the yarn tail through a yarn needle and weave the yarn tail through the front loops of the eight stitches. Pull tight to close up the gap and tie knots.
Flip mitten inside out and weave in all the ends. If there are any gaps or holes where the thumb is emerging from the mitten, use the long initial and final ends from creating the thumb to close them up.
Repeat entire process to create the second mitten!
Optional: Sew garment tag onto ribbed cuff.
Below you can see a size comparison between the Adult Size and Child Size:
********************************
These crocheted thrummed mittens are by far the warmest mittens I now own with the incredible interior wool/alpaca layer. The single crochet stitches provide a wonderful density so that cold air does not go through. It is such an amazing accomplishment that we can create such warm and beautiful mittens with our own two hands from scratch!

It feels like your hands are being enveloped by soft and fluffy clouds when you wear these mittens! It is such a bonus that these functional and practical mittens are also SO cute as well with the lovely heart pattern. I love how each puffy heart is actually a beautiful thrum stitch that provides so much warmth. You can try playing around with different color combinations for the yarn and thrums: I have seen some stunning mittens where they use white or beige as the base with rainbow or ombre thrums!
I always love matching with my daughters, and they were so excited when I made them a pair of these warm thrummed mittens too! When they slipped their hands in, they were so amazed by how soft and warm they were. I hope you enjoy making these special mittens for your loved ones as well as they would make amazing gifts! Since these mittens use bulky yarn, they work up incredibly quickly, and I find it very fun and addictive building up the thrum pattern!
Enjoy crocheting your own warm and cozy thrummed mittens! If you are interested in knitting a pair, you can check out my post HERE about the ones I knitted. I can’t wait to see your finished mittens and what color combinations you choose. These mittens will keep your hands and fingers warm on these frigid winter days for years to come, and you will feel such a wonderful sense of accomplishment that you made these mittens with these special new techniques! I had so much fun designing these mittens and sharing them with you! Happy thrumming and crocheting!
Note: Thank you to Lion Brand Yarn for providing the yarn for this design!