***You can purchase an INEXPENSIVE AD-FREE PDF of this pattern on Etsy HERE! This beautifully formatted PDF is 14 pages including the cover page, detailed step-by-step photo tutorial, written-out pattern for both the adult and child size, and these three tutorials: how to create a thrum, how to crochet a thrum stitch and how to crochet a thrum invisible decrease. These mittens are also part of my “Crochet Mittens PATTERN BUNDLE” that includes all my mitten designs at a discounted price HERE! You can also purchase a convenient Lion Brand Yarn kit that contains all the yarn you need to make two pairs of thrummed mittens HERE!
***This is the step-by-step photo tutorial. The free pattern will all the written-out numbers (both adult and child size available) can be found in this post HERE!
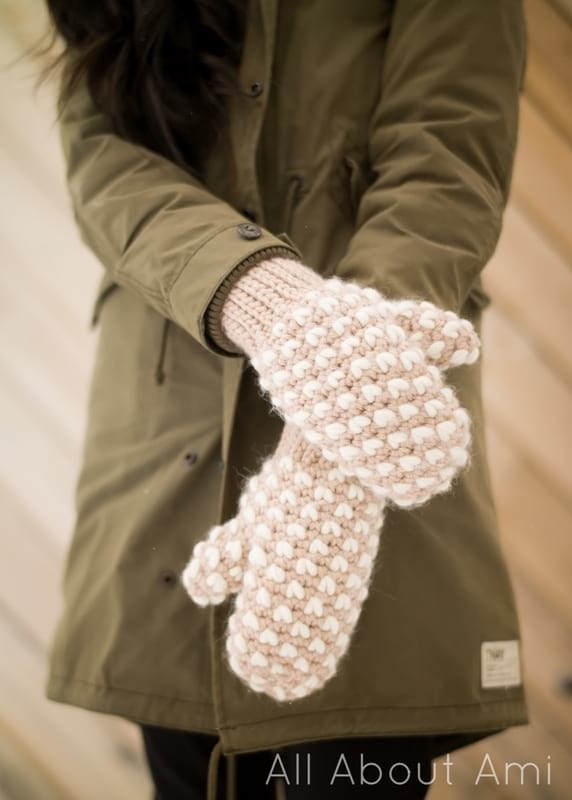
For the past several years, knitting thrummed mittens has been on my bucket list. Thrummed Mittens originate from Newfoundland and Labrador, and they are special mittens where little whisps of unspun wool roving (called “thrums” ) are incorporated into the mitten. These thrums felt over time with repeated wear to form a fleece lining that keeps your hands very warm. Recently, I finally took the plunge and decided to try knitting a pair, and you can read about my experience taking on this challenge project HERE!
After the thrill of knitting thrummed mittens, I thought it would be so neat to try and design some crochet thrummed mittens! There are not too many thrummed crochet patterns currently out there, and I thought that the crocheters of the world should experience the joy of working with and having their hands wrapped in incredibly warm thrums as well! I sat down with my bulky yarn and the design worked up so quickly as the numbers worked out well. I managed to design these mittens within a day and I am so excited to share the process with you!
For my knit mittens, I used the left-over unspun wool roving from my Extreme Knitted Blanket to make the thrums. However, I was running out of this wool roving and was looking into where I was going to source some more locally (I did not want to have to wait for shipping). Thankfully, I made a wonderful discovery: I could use some wool that was already sitting in my basement! Fifty Fifty Yarn from Lion Brand’s LB Collection is a super bulky 50% alpaca/50% wool blend that is very loosely spun. I found out that I could gently untwist the strand and separate it into two parts. This width turned out to be the perfect size to make thrums when working with bulky yarn! I happened to have the “Ecru” cream color in my stash, and it comes in nine different shades. Each ball is 200 grams, which is enough to make thrums for three pairs of adult mittens!
Here are the instructions to make a thrum using Fifty Fifty Yarn:
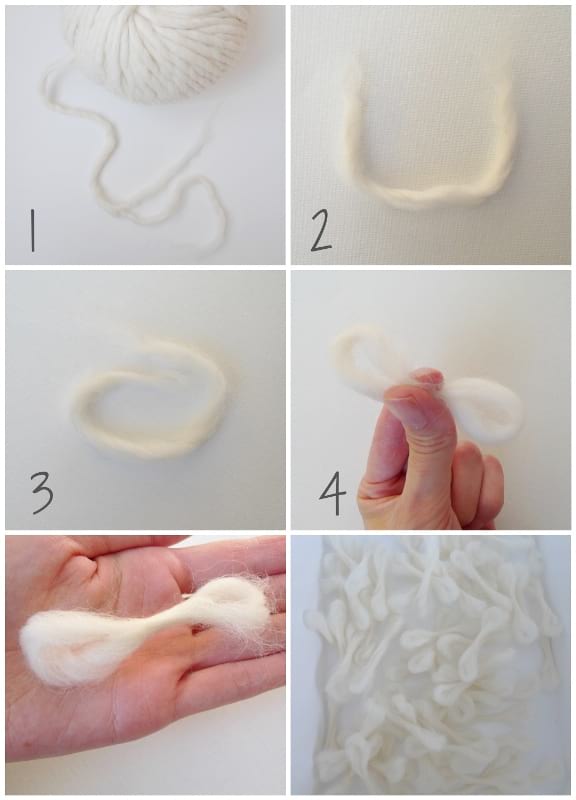
- Gently untwist the yarn and split it into two (the thickness created is perfect for the thrum size for this pattern).
- Gently tear off a 8”/20 cm piece.
- Overlap the ends to create a loop.
- Pinch the loop in the center to form a figure 8. Roll the middle pinched part between your fingers to felt the wool. Next, roll the thrum in the palm of your hand using the edge of your other hand.
The length of my thrums was generally between 3-3.5” (8-9 cm) long. For the adult mittens, you will need approximately 142 thrums per mitten (~284 for the pair) and for the child mittens, you will need approximately 90 thrums per mitten (~180 for the pair).
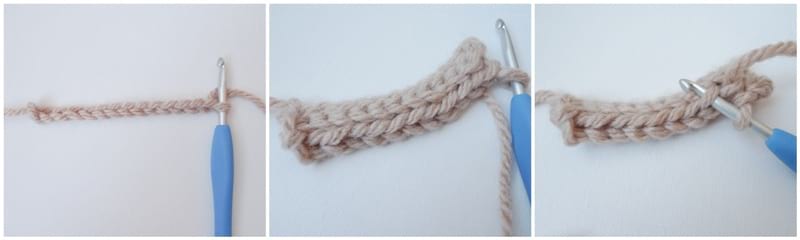
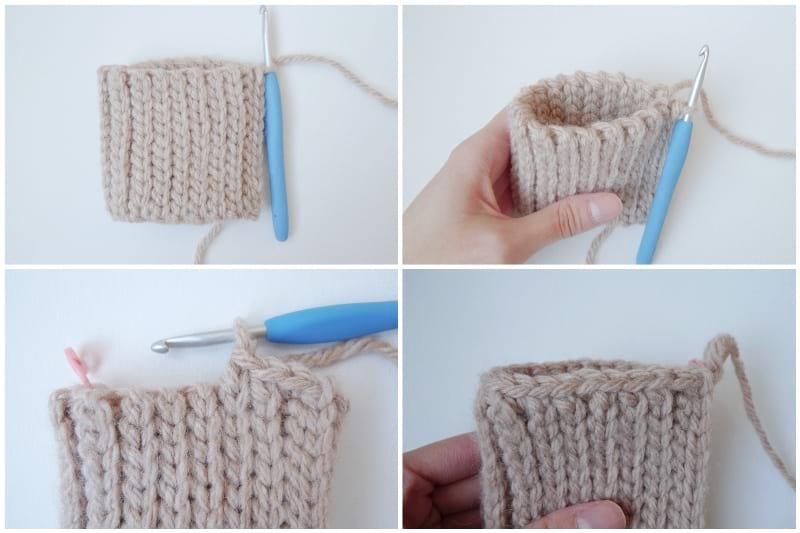
I knew exactly what kind of ribbing I wanted for these mittens: slip stitches in the back loop only. I used this same ribbing for my Crochet Faux Fur Mittens, and this technique creates a beautiful and stretchy ribbing that has a knit-like look. It is reversible as it looks the same on both sides. As a reminder, the back loop is the loop that is further away from you. By simply working slip stitches in the back loops, you create this lovely ribbing!
Once you are happy with the length of the ribbing (keep in mind that it is capable of stretching quite a bit), you will slip stitch the short ends together so that it becomes a ribbed cuff.
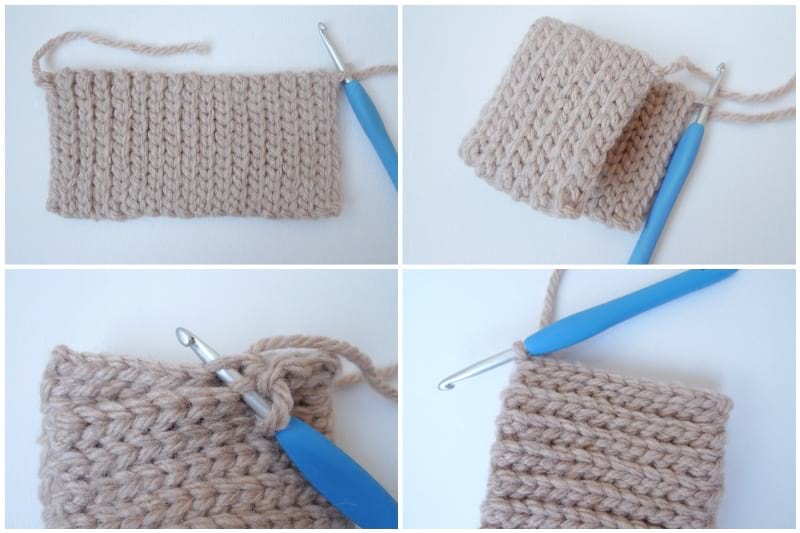
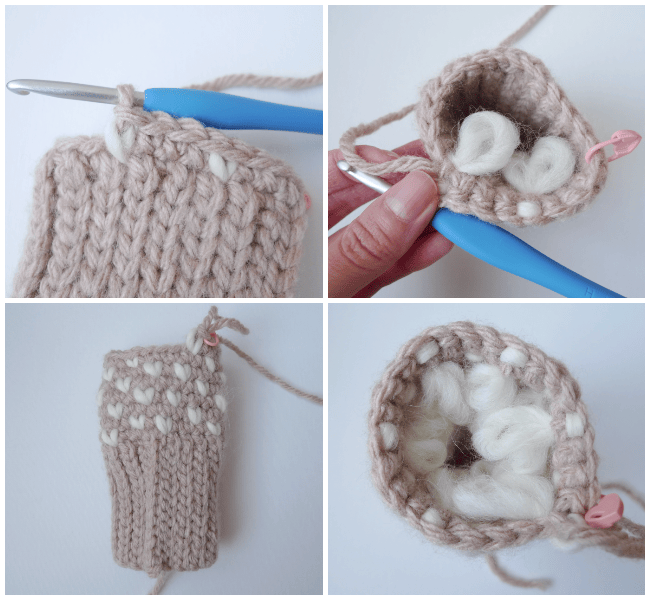
Next, it is time to pick up stitches around the circumference of the top of the ribbed cuff. You will pick up 24 single crochet stitches (for the adult size), trying to space them out as evenly as possible. As a tip, you should have about 12 stitches when you reach the halfway point. This number needs to be a multiple of 4 since the thrum stitches are worked every 4th stitch in this pattern.
Now, it is time to begin the thrum rounds! This is how you incorporate a thrum into your stitch – follow these steps whenever you see “thrum” or “thrum sc” in the pattern:
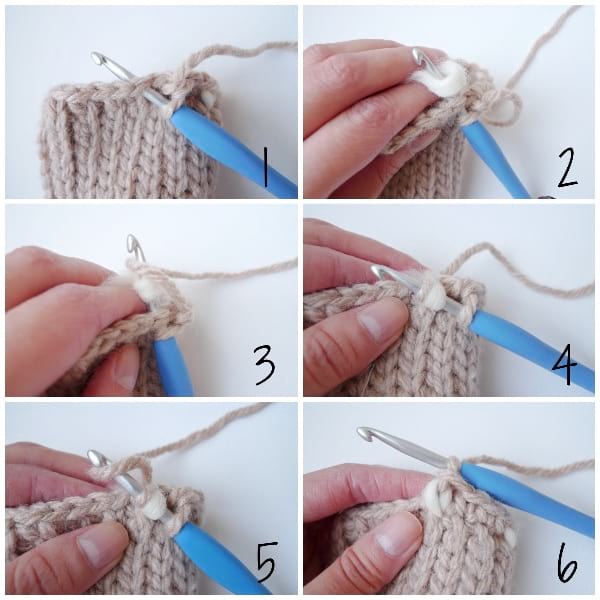
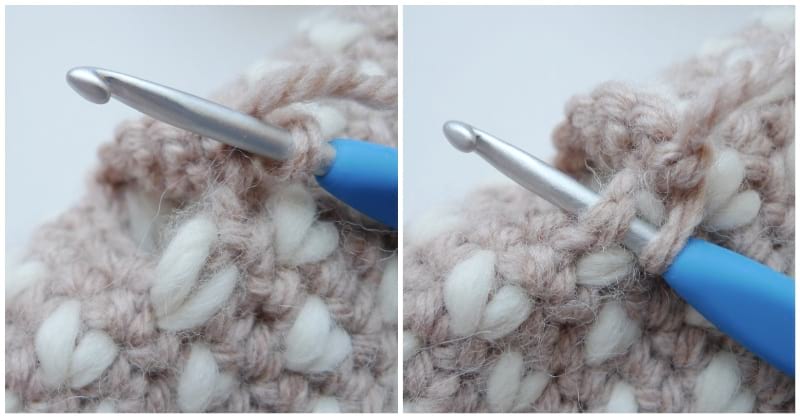
- Insert your crochet hook into the next stitch.
- Wrap the thrum around your crochet hook so that the pinched portion is around the hook and the loops are on either end.
- Yarn over.
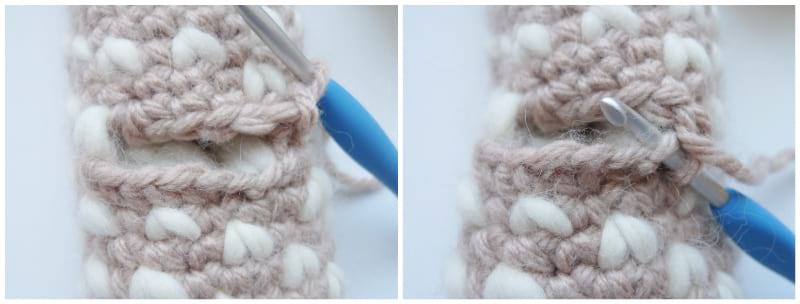
- Pull the yarn over strand and the thrum through. You should see three loops on your hook, and they should be in this order: regular yarn, thrum, regular yarn. [Trouble shooting: If the thrum is at the top, your stitches will become muddled with the thrum being less defined. You want the thrum to be in between the two regular yarn loops.]
- Yarn over.
- Pull through all the loops. Your thrum has been set into place and you should see a beautiful puffy V formed.
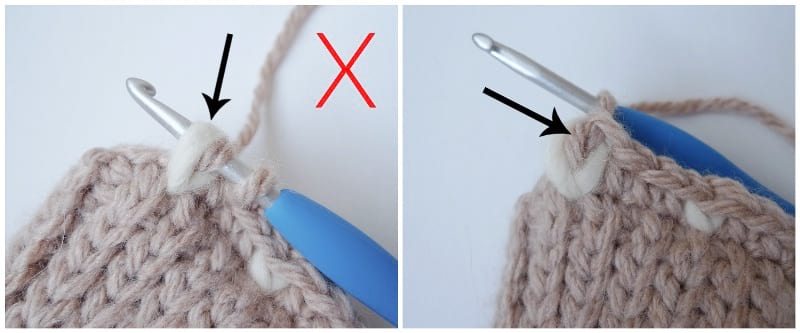
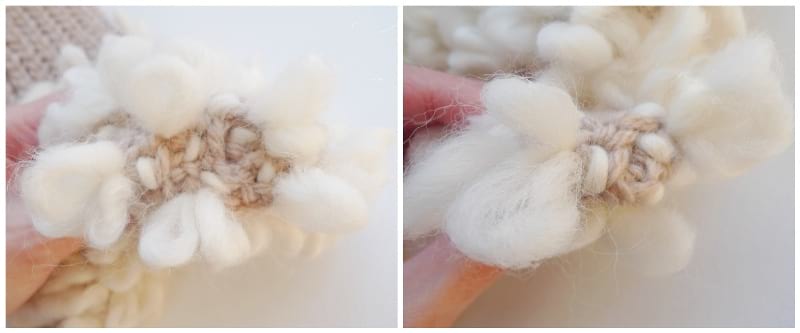
Note that the collage below shows you what you DO NOT want to see: you do not want the thrum to be on top of the two regular loops in Step 4 (as indicated by the arrow). If the thrum is at the top, it will result in a muddled stitch where the regular yarn pokes through the thrum V (the V’s will be less crisp and defined).
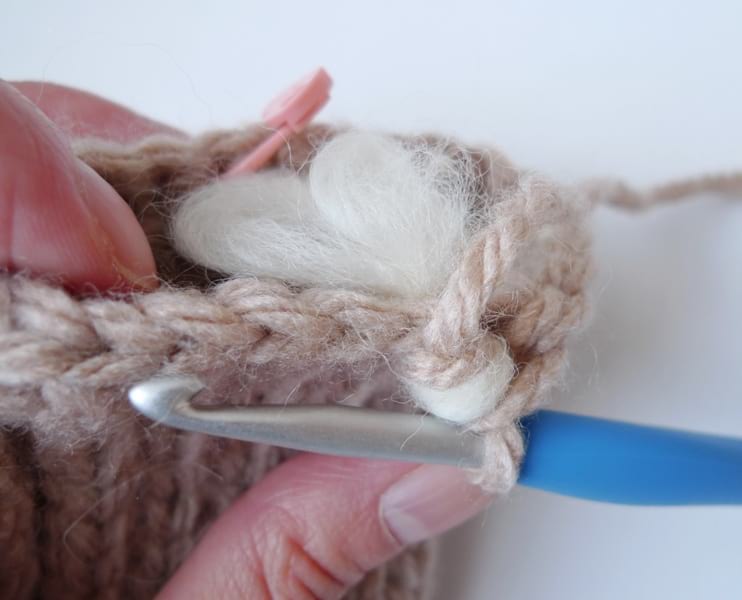
This photo below shows what the thrum stitch looks like from behind: the two loops are hanging on the inside of the mitten to provide warmth, and the thrum is locked into place by the regular yarn behind it.
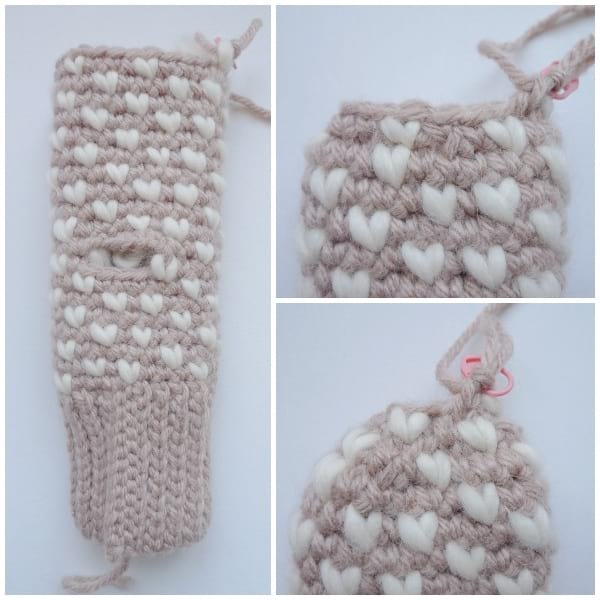
It is very fun building up the thrum rounds and incorporating these special thrums into your mitten! These thrums are spaced evenly around, and you can use the thrums from the previous rounds as a guide to make sure that you are spacing them correctly. Doesn’t the interior look incredibly soft and fluffy? Note that the body of the mittens is worked in continuous unjoined rounds (no slip stitching to close up the round). It is important to use a stitch marker to help you keep track of where you are!
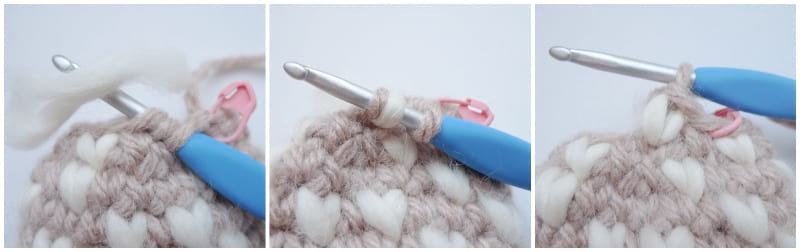
Now it is time to work the thumb hole! At the beginning of this round, you will chain 8 and skip 4 stitches. You will continue working the rest of the round as normal.
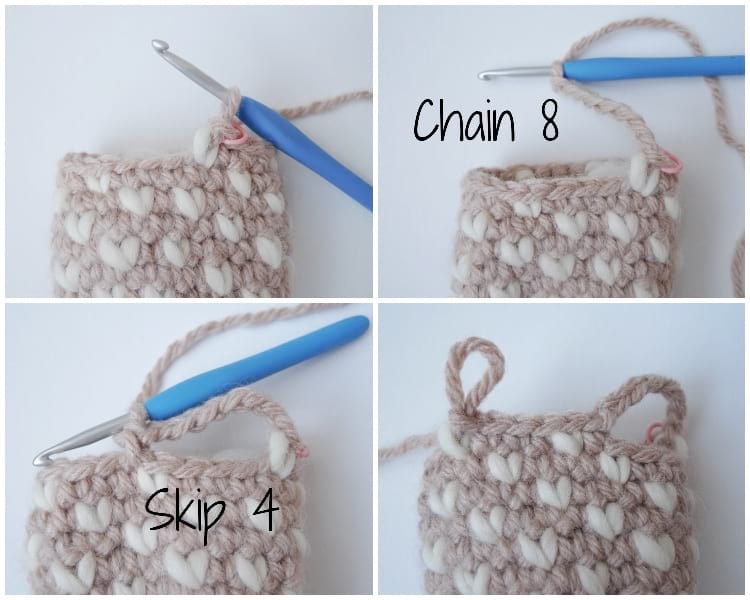
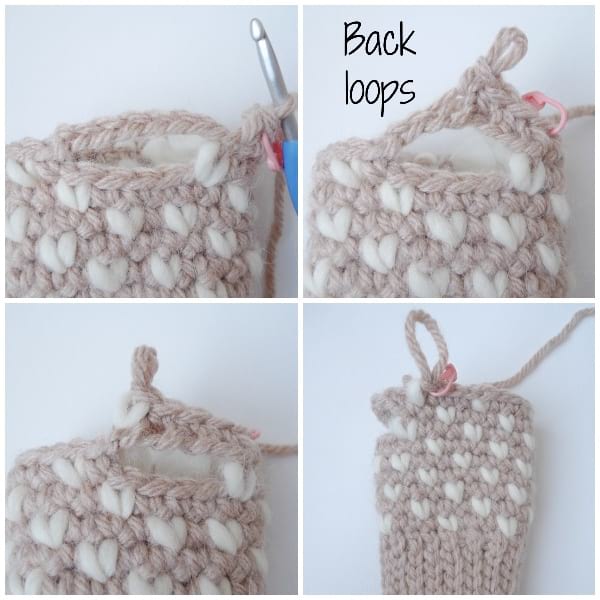
On the following round, you will work in the back loops of the chain stitches (leaving the front loops for when you work the thumb later on). You will only work in some of the stitches of the chains (you will skip some) so that you can keep the overall stitch count a multiple of 4.
Be sure to regularly slip your hand into the mitten to see how you are liking the sizing! You can always switch your hook size if you want the mitten to be larger or smaller. It is recommended that you make your mittens quite snug to begin with as the thrums inside will felt with time (and compress). A reader mentioned that her knitted thrummed mittens became too oversized once the thrums had felted, and she wished that she had made them tighter to begin with. When you are happy with the length of your mittens, you will work two decrease rounds to taper off the mitten at the top!
You will need to learn how to work an invisible decrease with a thrum for the decrease rounds! Follow these instructions:
- Insert your crochet hook into the front loops of the next two stitches.
- Wrap the thrum around your crochet hook so that the pinched portion is around the hook and the loops are on either end.
- Yarn over.
- Pull the yarn over strand and thrum through both the front loops. You should see three loops on your hook, and they should be in this order: regular yarn, thrum, regular yarn. [Trouble shooting: If the thrum is at the top, your stitches will become muddled with the thrum being less defined. You want the thrum to be in between the two regular yarn loops.]
- Yarn over.
- Pull through all the loops. Your thrum has been set into place and you have worked a decrease.
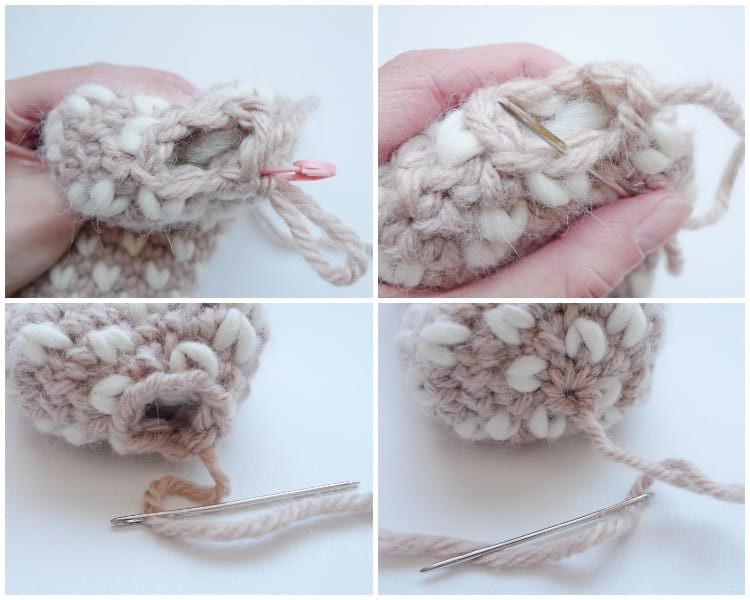
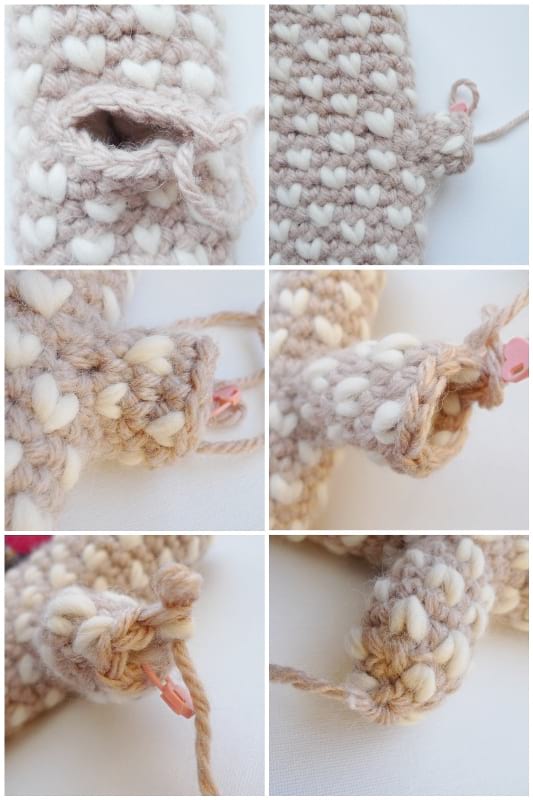
At the end, you will be left with this hole at the tip of the mitten with 8 stitches left. To close up this hole, you will weave your yarn tail through the front loops of 8 stitches and pull tight to close. This part is very fun and satisfying as this hole disappears and you get a nice and clean finish!
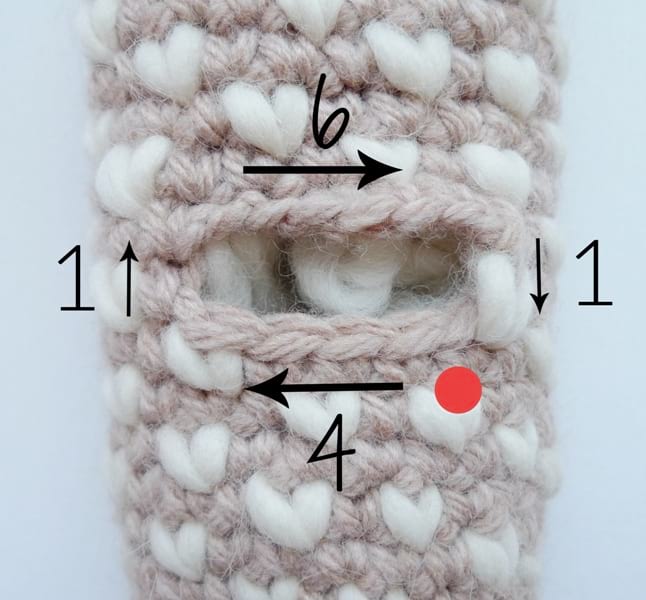
Now it is time to work the thumb! Note that the thumbhole is composed of: 4 stitches at the bottom (from the skip 4 stitches of R9 of body) and 8 stitches at the top from the chain 8 gap. We will be picking up 12 stitches in total as follows: 4 stitches at the bottom, 1 stitch along the side, 6 stitches in the Chain 8 (you will simply skip 2 stitches) and then 1 stitch along the other side. You will begin at the red dot and pick up the stitches in a clockwise direction.
Rejoin the yarn at the bottom of the thumbhole in the first stitch. To do this, make a slip knot (leave a long initial end). Insert hook in indicated stitch. Place slip knot on hook and pull through the space. Chain 1 and work a single crochet in the same space (chain 1 does not count as a stitch).
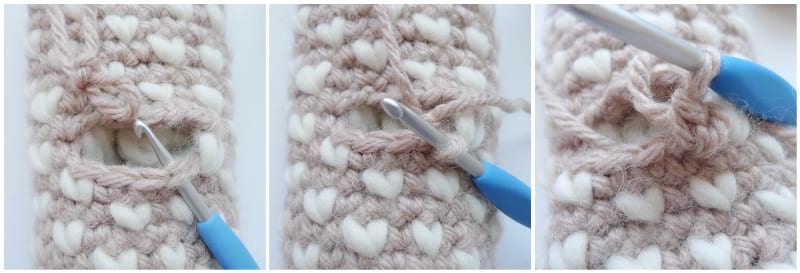
This collage below shows when you will be picking up stitches in that chain 8 gap: you will be working in the front loops that were left over from Round 10.
Note that there will be a thrum stitch along one of the sides where you need to pick up one stitch. I inserted my hook behind the thrum into the regular yarn in order to pick up that stitch.
Continue building up the thrum pattern for the thumb as you increase the length (you picked up 12 stitches, which is a multiple of 4). You can insert your hand and thumb into the mitten to see how it is fitting and to determine whether you want to add more rounds to increase the length of the thumb. At the end, you will work a decrease round and once again pull through the front loops to close up the hole.
To finish up the project, you will flip the mitten inside out and weave in the ends. Note that I left a long initial and final end when working the thumb: you can use these ends to close up any holes or gaps that may have formed where the thumb emerges from the body of the mitten. Doesn’t the inside of the thrummed mitten look incredible? Some have asked whether your fingers can get stuck or caught in the loops: the loops actually collapse to the outer edges as your hand smoothly glides through. My fingers have never gotten stuck in the loops before!
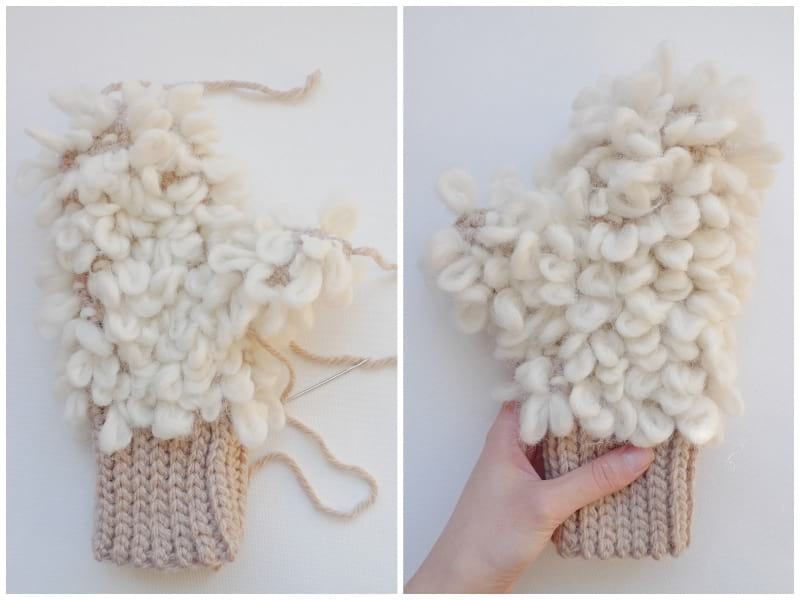
As a final touch, you can add any left-over fibre or wool to areas that might need it for extra warmth, such as the tip of the mitten or the tip of the thumb (where your fingertips would be). This wool will felt along with the rest of the thrums over time!
***Please watch my VIDEO TUTORIAL below as I demonstrate some of the techniques that I went through in this step-by-step tutorial such as: How to Create a Thrum with Fifty Fifty Yarn, How to Crochet a Thrum Stitch, and How to Work an Invisible Decrease with a Thrum:
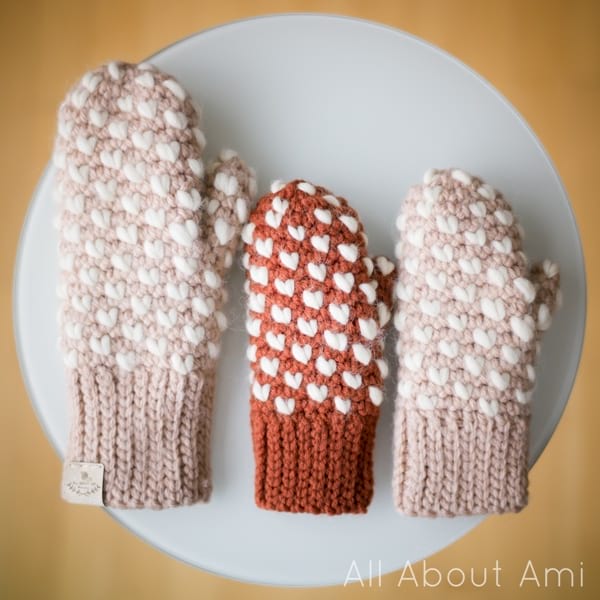
After crocheting a pair of thrummed mittens for myself, I thought it would be so fun to make a pair for my daughters as well! We all love matching, and the girls were so excited to slip their hands into these incredibly warm and cozy mittens. I am so happy to be able to provide sizing for both adult and child, and keep in mind that you can vary the hook size and yarn weight to try and achieve different sizes as well!
Thank you for following along with the step-by-step post! It was such a pleasure learning new techniques such as how to make a thrum using Fifty Fifty Yarn and how to best incorporate the thrum into a single crochet stitch. I love sharing these new techniques and projects with you all, and I hope you enjoy using them too! You can find my free Bulky Crochet Thrummed Mittens Pattern HERE with all the written numbers and sizing for both adult and child!