***You can purchase an INEXPENSIVE AD-FREE PDF of this pattern on Etsy HERE and on LoveCrafts HERE! This beautifully formatted PDF includes the step-by-step pictures and is a total of 13 pages including the cover page (includes this Mini Uptown Cardigan pattern PLUS sizing for adults S-5X)! You can follow along with the adult cardigan STEP-BY-STEP BLOG POST HERE for detailed progress photos as the construction is similar. You can also find this pattern in my Easy & Modern Knits Pattern Bundle found HERE (includes over 30 of my knit patterns at a discounted price)!
The Uptown Cardigan is a popular slouchy and relaxed cardigan that can be worn year-round, and now your little ones can match with you! This classic wardrobe staple is made using lightweight cotton/bamboo yarn that drapes beautifully. This cardigan is perfect for beginners as it uses the basic garter stitch, so it is a very relaxing and mindless project!
Materials:
- Coboo Yarn– level 3 DK lightweight yarn – 50% cotton/50% rayon from bamboo; I used the colour “Magenta” and “Denim“; 520 grams/1206 yards for each cardigan
- Clover Takumi 29″ 4 mm circular needles for panels and pocket; 48″ 3.5 mm needles for collar and picking up stitches along collar
- Yarn needle
- Lock ring stitch markers
Gauge: 22 stitches and 40 rows = 4 inches
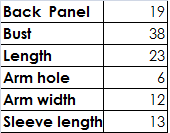
Final Measurements (in inches):
Notes:
- KFB = Knit Front and Back Increase: Step 1: Knit the first stitch on your main needle. Step 2: Before taking the stitch off the main needle, insert the tip of your working needle into the backside of the loop and knit it through the back loop. Then pull the stitch off the needle. See tutorial and video on how to do KFB HERE on New Stitch A Day.
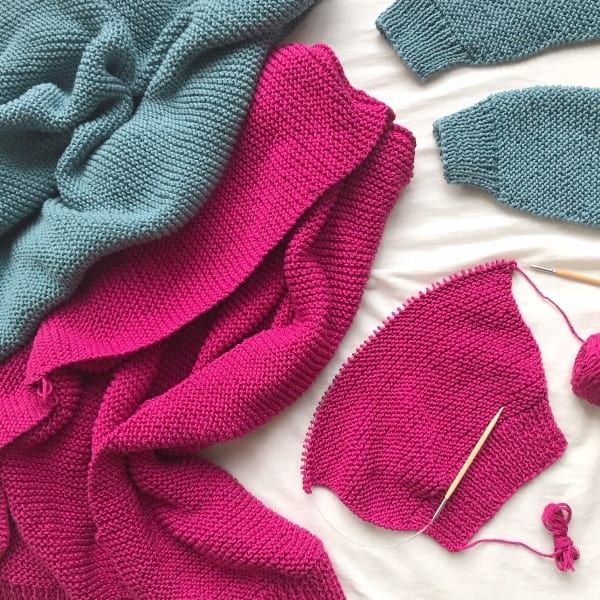
- One back panel and two fronts panels are knitted in garter stitch and seamed together at the top and sides, leaving space for the arm holes. These panels are worked from the bottom up starting with the ribbing. The sleeves are worked from the bottom up (starting from the ribbing as well), whip stitched along the edge, and then attached to the arm holes. Stitches are picked up along the collar and a ribbing pattern is knitted. Two optional pockets are knitted and attached to each front panel.
- To learn or refresh yourself on how to knit the garter stitch, please reference my step-by-step tutorial and video HERE!
Sizing Notes:
- I knit these cardigans for my two daughters, approximately ages 6 and 8. I intentionally made them quite oversized, relaxed, loose and slouchy so that they can continue to wear them as they grow up. This size should be able to fit a range of ages, from children to teenagers (I am able to wear this size as a more fitted cardigan).
- For the adult sizes (size Small – 5X), please visit this pattern HERE.
- Part of the front and back panels become part of the sleeve as they bend past the shoulders. If you would like to lengthen the sleeves, add more rows to the last section (keep adding rows beyond Rows 113-127).
- If you would like the cardigan to be wider, increase the number of stitches you cast on for the front and back panels (using the gauge, you can approximate that every 1″ = 5.5 stitches). If you would like the cardigan to be narrower, decrease the number of stitches you cast on for the front and back panels.
- If you would like the cardigan to be longer, increase the number of rows for the back and front panels (using the gauge, you can approximate that 1″ = 10 rows). If you would like the cardigan to be shorter, decrease the number of rows for the back and front panels. You can hold the panels up to your children and see where you want the cardigan to hit (e.g. at their knees, waist, mid-thigh, etc).
- The INCREASE ROW in the sleeve is worked as follows: {K1, KFB, K across until last two stitches. KFB, K1.} With this increase row, the stitch count increases by two stitches. The increases are always worked in the second stitch and second to last stitch.
PATTERN:
- Back panel
We will begin with the ribbing.
Using 4 mm needles,
Cast on 105 stitches using long tail cast-on.
Row 1: *Purl 1, Knit 1* across, purl last st. (105 sts)
Row 2: *Knit 1, Purl 1* across, knit last st. (105 sts)
Row 3 – 13: Repeat Row 1 and Row 2 (ending off with Row 1 repeat).
Ribbing is now complete! We will now work the rest of the panel in garter stitch.
Row 14 – 229: Knit all stitches. (105 sts)
Cast off all stitches.
- Front panels (make 2)
We will begin with the ribbing.
Using 4 mm needles,
Cast on 41 stitches using long tail cast-on.
Row 1: *Purl 1, Knit 1* across, purl last st. (41 sts)
Row 2: *Knit 1, Purl 1* across, knit last st. (41 sts)
Row 3 – 13: Repeat Row 1 and Row 2 (ending off with Row 1 repeat).
Ribbing is now complete! We will now work the rest of the panel in garter stitch.
Row 14 – 229: Knit all stitches. (41 sts)
Cast off all stitches.
- Sleeves (make 2)
We will begin with the ribbing.
Using 4 mm needles,
Cast on 41 stitches using long tail cast-on.
Row 1: *Purl 1, Knit 1* across, purl last st. (41)
Row 2: *Knit 1, Purl 1* across, knit last st. (41)
Row 3 – 13: Repeat Row 1 and Row 2 (ending off with Row 1).
Ribbing is now complete! We will now work the rest of the sleeve in garter stitch, working increases on certain rows throughout.
Row 14-15: Knit all stitches. (41)
R16: WORK INCREASE ROW. (43)
R17-19: Knit all stitches (43)
R20: WORK INCREASE ROW. (45)
R21-26: Knit all stitches (45)
R27: WORK INCREASE ROW. (47)
R28-43: Knit all stitches. (47)
R44: WORK INCREASE ROW. (49)
R45-53: Knit all stitches (49)
R54: WORK INCREASE ROW. (51)
R55-59: Knit all stitches. (51)
R60: WORK INCREASE ROW. (53)
R61-65: Knit all stitches. (53)
R66: WORK INCREASE ROW. (55)
R67-79: Knit all stitches (55)
R80: WORK INCREASE ROW. (57)
R81-87: Knit all stitches (57)
R88: WORK INCREASE ROW. (59)
R89-95: Knit all stitches. (59)
R96: WORK INCREASE ROW. (61)
R97-103: Knit all stitches. (61)
R104: WORK INCREASE ROW. (63)
R105-111: Knit all stitches. (63)
R112: WORK INCREASE ROW. (65)
R113-127: Knit all stitches. (65)
Cast off all stitches.
Assembly:
- When seaming pieces together, always join wrong sides together to make the seams less visible, then flip inside out at the end.
- Fold each sleeve in half lengthwise and whip stitch sides together. I like to whip stitch the garter bumps together when seaming the sleeve lengthwise.
- Whip stitch tops of front panels to back panel, going through both front and back loops. Whip stitch sides of front panels to back panel, making sure to leave an arm hole. Place sleeve towards top of panels and see how much space is needed for arm holes (should be approximately 6″).
- Whip stitch top of sleeve to arm hole.
- See HERE for more detailed assembly photos!
Collar:
Using 3.5 mm needles,
Starting from bottom left corner, pick up stitches along front panel, across the back panel, and down the front panel. When picking up stitches along vertical edge of garter stitch, pick up one stitch between each ridge (see this video for demonstration).
To pick up stitches, insert your needle into the first stitch along the edge. Yarn over, then pull up a loop. Keep inserting your needle into the next stitch, yarning over, and pulling up a loop.
Row 1: *P1, K1* across.
Row 2: *K1, P1* across.
R3-5: Repeat Rows 1 and 2.
Cast off in rib pattern loosely. Be careful not to knit too tightly, otherwise the front panels will pull upwards.
Pockets (make 2) – optional:
Using 4 mm needles,
Cast on 28 stitches.
R1-46: Knit across. (28)
We will now begin the ribbing section.
R47: *K1, P1* across. (28)
R48-49: Repeat R47. (28)
Cast off in rib pattern.
Place one pocket on each front panel and use running stitch to attach both sides and bottom into place. I placed the pocket approximately 3.5″ from the bottom edge and 1.25″ from the side edge/collar.
You can watch this video below from the “Midtown Cardigan” pattern as I demonstrate how to increase, do the seaming and pick up stitches along the collar:
****************************
I have always wanted to knit cardigans for the girls, and I LOVE how they turned out! The girls chose their very own colors, and Myla went with such a pretty shade of blue while Brielle chose such a vibrant magenta! They will be able to wear this cardigan for years to come, and as I mentioned in the sizing notes above, I can actually wear their cardigans too (a more fitted look). If the sleeves are long in the meantime, they can roll up and cuff their sleeves!
The girls are growing up so quickly! I remember crocheting their newborn baby outfits so vividly, and I have made numerous hats and scarves for them throughout the years. It is so much fun crocheting and knitting items for them and being able to use their favorite colors! The girls were so excited to see me work on their cardigans and would ask what part I was working on (e.g. sleeves or front panel). I worked on both cardigans at the same time so that they would be finished at the same time to make it fair! These cardigans are the perfect relaxing and mindless project as the garter stitch is so soothing. It is so special being able to match with my darling girls!
Enjoy knitting your Mini Uptown Cardigans! Once again, the free adult sizing can be found HERE, the PDF for purchase can be found HERE and my “Easy & Modern Knits PATTERN BUNDLE” can be found HERE! Happy knitting, and enjoy making these adorable cardigans for your little ones!
This pattern is an original pattern by Stephanie Lau of All About Ami. Please do not claim this pattern as your own. If you wish to share this pattern, you may link to this pattern but please do not reprint it on your site. You may keep a copy for your own personal use but please DO NOT sell the pattern or distribute it.
You may sell products made from this pattern but please clearly credit the design to me, Stephanie Lau of All About Ami, and provide a link to my blog www.AllAboutAmi.com. Permission is NOT granted for mass production or factory manufacturing of any kind. Thank you for being respectful and for your understanding!