***You can purchase an INEXPENSIVE AD-FREE PDF of this pattern on Etsy HERE! This beautifully formatted PDF includes the step-by-step pictures and is a total of 14 pages including the cover page! You can also check out my Chinese New Year Zodiac Amigurumi Bundle HERE as it includes ALL my special zodiac designs to date at a discounted price!
***I have split the crochet pattern into TWO BLOG POSTS since there are so many process photos:
- Part 1 covers the making of the head, ears and body.
- Part 2 covers the making of the legs, arms, tail and assembly HERE.
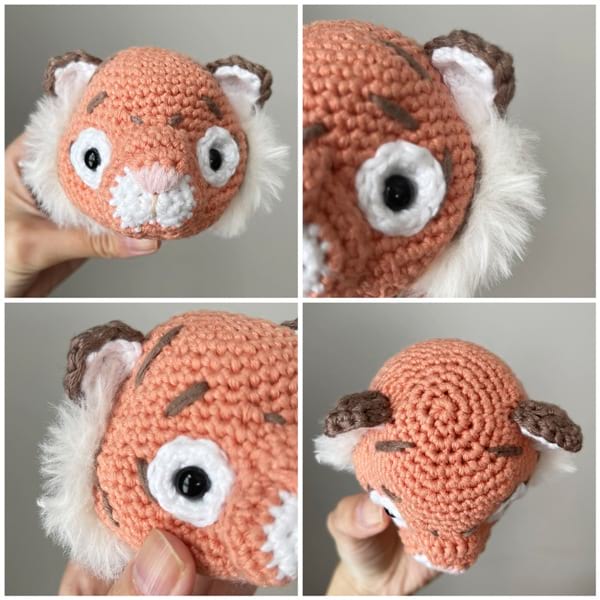
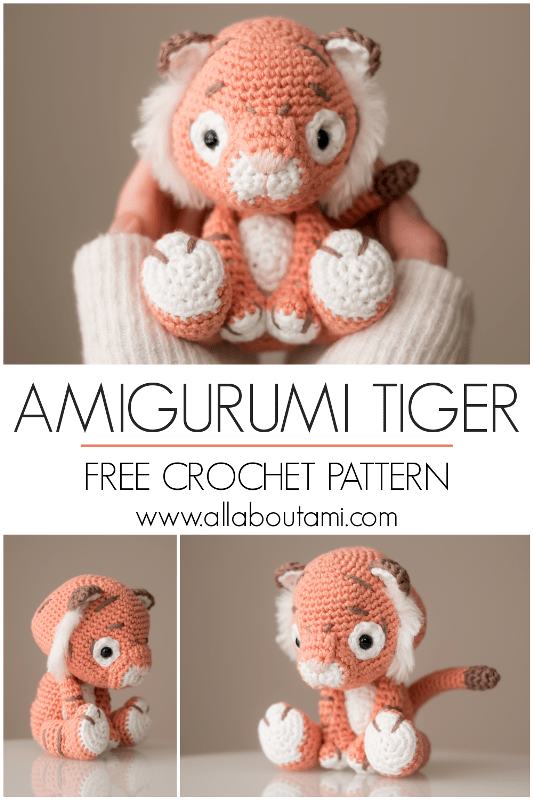
Crochet your own adorable tiger with stripes, cute paws and long tail in a sweet sitting position! This amigurumi tiger is the perfect gift for tiger lovers and those born in the Year of the Tiger!
Materials:
- Coboo Yarn (lightweight level 3) in “Peach” (~48 g/111 yds), “Taupe” (~14 g/32 yds), “White” (~9 g/21 yds) and “Pink” (~1 g/2 yds)
- Super bulky fluffy white yarn (~2 g/5 yds) for the head; I used “Go For Faux” in “Baked Alaska”
- 2.75 mm Clover Amour Hook
- Yarn needle (bent tip helpful for attaching amigurumi parts- see HERE)
- Lock ring stitch markers
- Fiberfill
- 7.5 mm safety eyes
- Beige/tan embroidery floss for mouth line
Notes:
- Please check out my blog posts entitled “Amigurumi for Beginners“, “How to Read Amigurumi Patterns“, “The Magic Circle“, “The Invisible Decrease“, “How to Crochet Around a Foundation Chain” and “The Right Side of Amigurumi” for helpful tips and techniques that you can use when crocheting this amigurumi.
- Work in continuous rounds so there is no visible seam (do not slip stitch after each round).
- Please note which yarn color you are working with for each body part and when you need to switch colors.
- For a cleaner color change when switching yarn colors, work last stitch in old color: work as if typical single crochet until two loops are left on the hook (i.e. insert hook into stitch, yarn over, pull up a loop). Use new color to yarn over and pull through both loops. Work slip stitch in next stitch using new color. Then continue crocheting single crochets as normal with new color.
- The body parts are crocheted using peach, white and taupe yarn. The tiger stripes are added by embroidering lines with the taupe yarn (each stripe is created by passing the yarn needle twice over the line so that there are two strands of yarn). Two strands of fluffy white yarn are also added to the sides of the head.
- The head has many components and steps so please read the pattern carefully. Be sure to follow the steps in order.
- Before closing up the head, we will be attaching a circular snout and a triangular nose to the head.
- Safety eyes are inserted into white eye roundies and then inserted onto the head.
- To prevent the eyes and eye roundies from bulging out too much, we will be doing two steps, one of which is eye indentation (pulls safety eyes back to give more depth). These two steps are detailed in the pattern.
- Next, the ears are crocheted, with each ear consisting of a white triangle and a brown triangle.
- The body is crocheted and then a white ovular belly is attached to it.
- Then, we work on the legs and arms starting from the paws upwards (bottom to the top). The paws of the arms and legs are defined by embroidering taupe lines on each paw – be sure to stuff the paws firmly before working this paw embroidery. The arms and legs have shaping so that they curve towards the body – please note the differences between the right/left leg and right/left arm.
- When stuffing any narrow tubes, such as the arms, you can use a chopstick or bottom of the crochet hook to push the fiberfill in.
- Lastly, a tail is crocheted and attached to the bottom back of the tiger.
- When attaching all the pieces together, the parts are positioned so that the tiger is in a sitting position with the arms between the legs. As an optional step, you can run a yarn strand through both legs and arms to lock them into place.
- Inc (increase) = Work 2 sc in the next stitch. [1 stitch becomes 2 stitches.]
- Dec (I use the invisible decrease): Insert hook into front loops of the next two stitches. Yarn over and draw through first two loops. Yarn over and draw through remaining two loops. You can check out my detailed step-by-step blog post about this very helpful technique HERE.
- BLO (back loop only): Crochet stitches in back loop only: when you look at a stitch, it consists of a V with a front loop (closer to you) and the back loop (further away from you). By working stitches in the back loop only, this leaves the front loops untouched which results in a clearly defined edge.
Finished Dimensions: 5”/12.7 cm tall, 3”/7.6 cm wide (at head)
PATTERN:
SNOUT:
Using white yarn,
R1: 6 sc in Magic Ring. (6 sts)
R2: Inc around. (12 sts)
R3: *Sc 1, Inc*, rep 6 times. (18 sts)
Switch to peach yarn,
R4: *Sc 2, Inc*, rep 6 times. (24 sts)
R5: *Sc 3, Inc*, rep 6 times. (30 sts)
Slip stitch to next stitch, fasten off and leave long end for sewing.
TRIANGULAR NOSE (worked in turned rows):
Using peach yarn,
Chain 2.
Row 1: Starting in second ch from hook, Sc 1. (1 st)
Row 2: Chain 1, turn. Starting in second st from hook, work 3 single crochets in same stitch. (3 sts)
Row 3: Chain 1, turn. Starting in second st from hook, *Inc*, rep 3 times. (6 sts)
Row 4: Chain 1, turn. Starting in second st from hook, Sc 6. (6 sts)
Fasten off and leave long end for sewing.
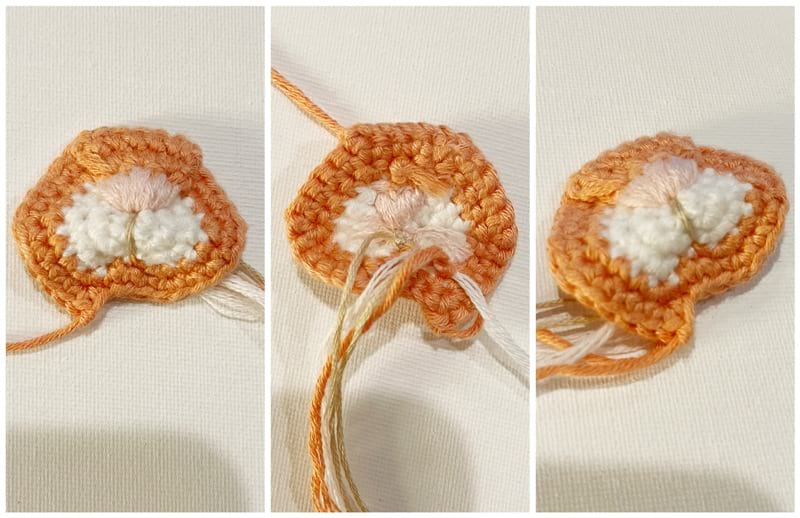
Flip triangular nose upside down (wide end at top) and seam it onto the top of the snout. Use pink Coboo yarn to embroider the bottom tip of the triangle so that a pink upside down triangle is formed (initial 2 rows of triangular nose).
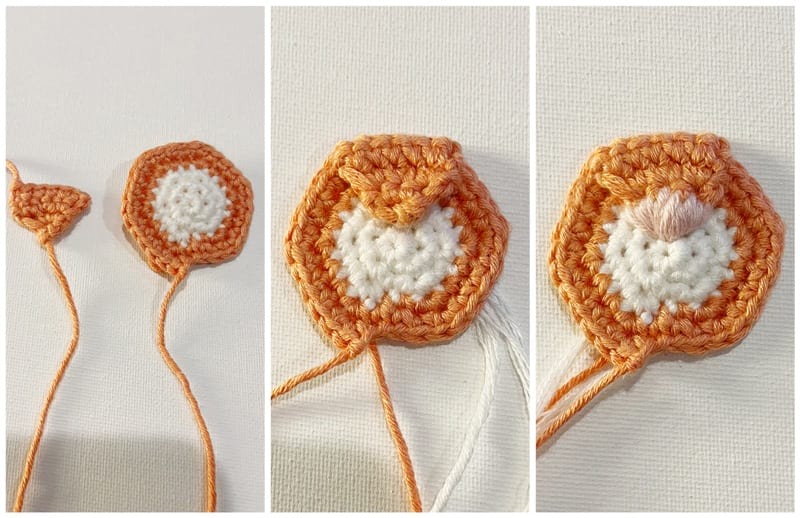
Using beige/tan embroidery floss, embroider the mouth line down from the tip of the pink triangle to the bottom of the white part of the snout. Tie knots tightly from behind the snout so that it folds/bumps out as shown in picture (this will define the mouth). You will later attach this piece to the front of the head.
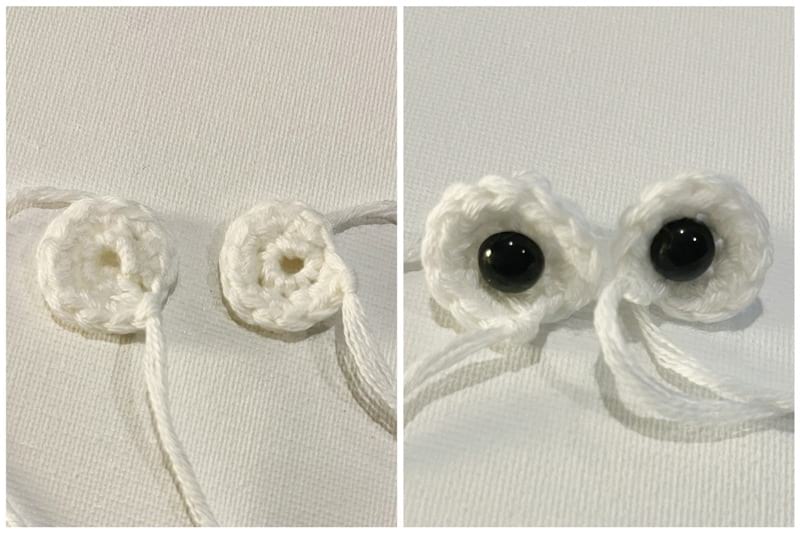
EYE ROUNDIES (make 2):
Using white yarn,
R1: 6 sc in Magic Ring. (6 sts) (You do not need to pull the magic loop tightly closed as you will be inserting the safety eye into the middle of this circle.)
R2: Inc around. (12 sts)
Sl st to next stitch, fasten off and leave long end for sewing (at least 9”/23 cm). Insert safety eye in each eye roundie but do not secure the backing.
HEAD
***Before beginning to crochet, cut two long strands of peach yarn (at least 20″/51 cm) and set aside for eye indentation.
Using peach yarn,
R1: 6 sc in Magic Ring. (6 sts)
R2: Inc around. (12 sts)
R3: Sc 1, Inc x 3, Sc 3, Inc x 3, Sc 2. (18 sts)
R4: Sc 2, Inc, Sc 1, Inc, Sc 1, Inc, Sc 3, Inc, Sc 1, Inc, Sc 1, Inc, Sc 3. (24 sts)
R5: Sc 3, Inc, Sc 1, Inc, Sc 1, Inc, Sc 7, Inc, Sc 1, Inc, Sc 1, Inc, Sc 4. (30 sts)
R6: *Sc 4, Inc*, rep 6 times. (36 sts)
R7: *Sc 5, Inc*, rep 6 times. (42 sts)
R8-10: Sc 42.
R11: *Sc 6, Inc*, rep 6 times. (48 sts)
R12-13: Sc 48. (48 sts)
R14: *Sc 7, Inc*, rep 6 times. (54 sts)
R15-16: Sc 54.
R17: *Sc 8, Inc*, rep 6 times. (60 sts)
R18-19: Sc 60.
R20: *Sc 8, Dec*, rep 6 times. (54 sts)
R21: *Sc 7, Dec*, rep 6 times. (48 sts)
R22: *Sc 6, Dec*, rep 6 times. (42 sts)
R23: *Sc 5, Dec*, rep 6 times. (36 sts)
R24: *Sc 4, Dec*, rep 6 times. (30 sts)
We will now be adding the eyes and the snout. Insert the eye roundies into the head: place them so that the safety eyes are inserted between Rounds 14 and 15, about 12 stitches apart. Do NOT secure washer backing yet and do not seam white eye roundies yet (you will secure the snout first).
Seam snout to head – before closing up, add stuffing between snout and head. The top of the snout is seamed to the bottom of Round 12 and extends downwards until about Round 20.
Seam the white eye roundies onto the head. The eye roundies should be touching the edges of the snout. Keep the white yarn tails for later as we will be using them to supplement the eye indentation.
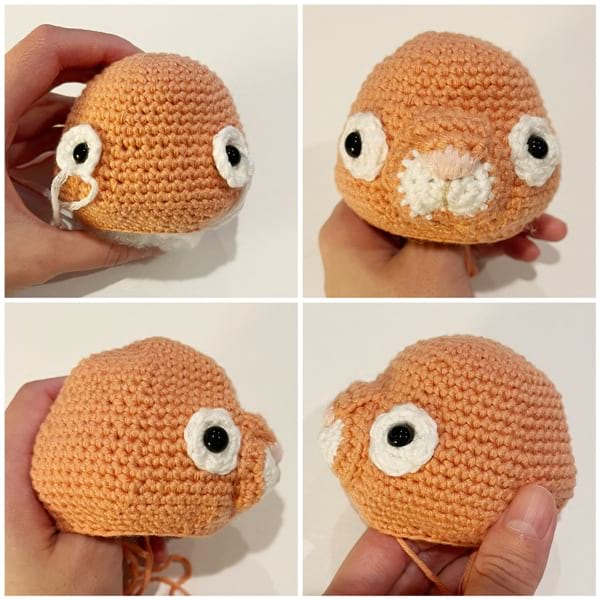
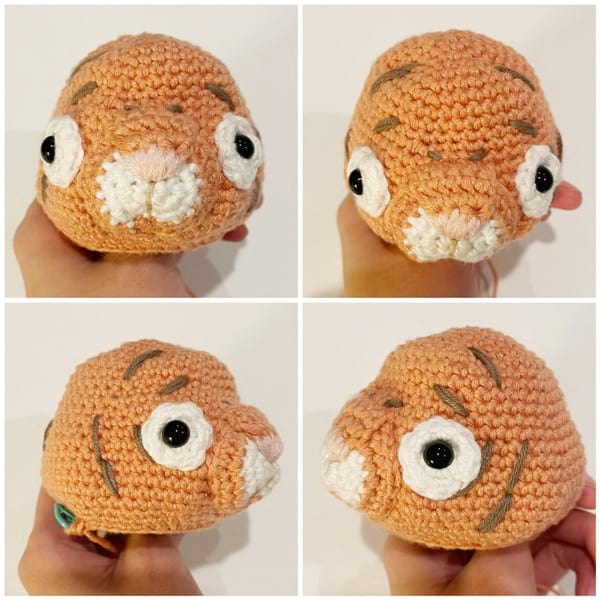
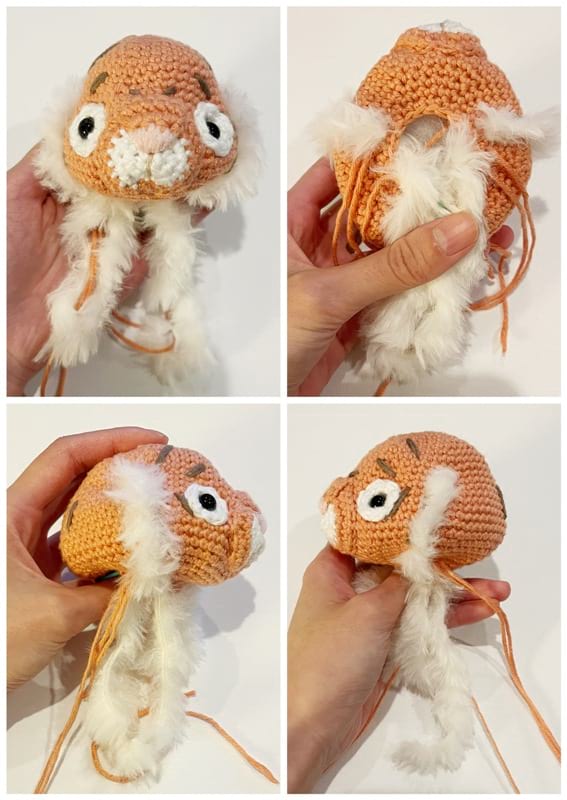
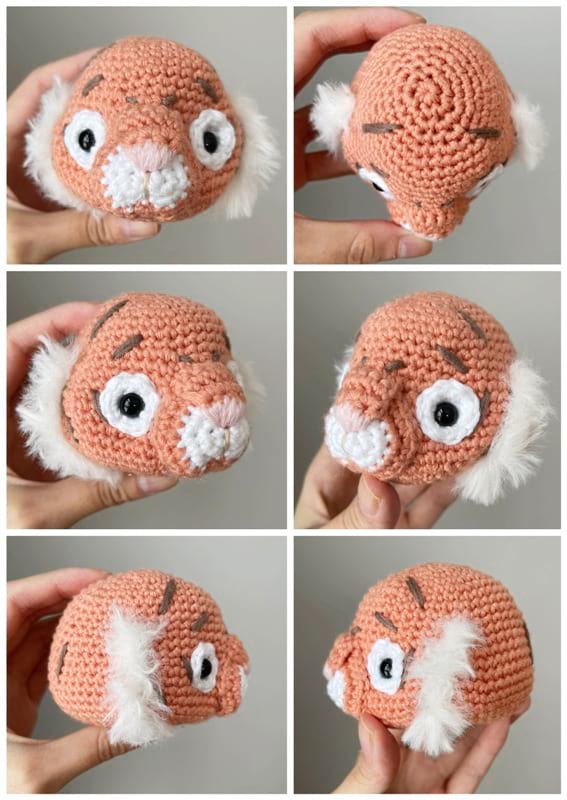
Using a long strand of taupe yarn and threading it through a yarn needle, embroider stripes onto the head. Each stripe consists of two strands of yarn, so once you embroider one stripe, go over it again to embroider that stripe once more so that it consists of two strands of yarn. You can add the stripes wherever you would like: we added two stripes towards the top of the head, two stripes where the eyebrows would be located, two stripes above the snout, two stripes near the eye roundies, and two stripes on the sides of the head. You can also add stripes on the back of the head (we added two vertical lines, but in hindsight would have added multiple horizontal lines if we were to make this again).
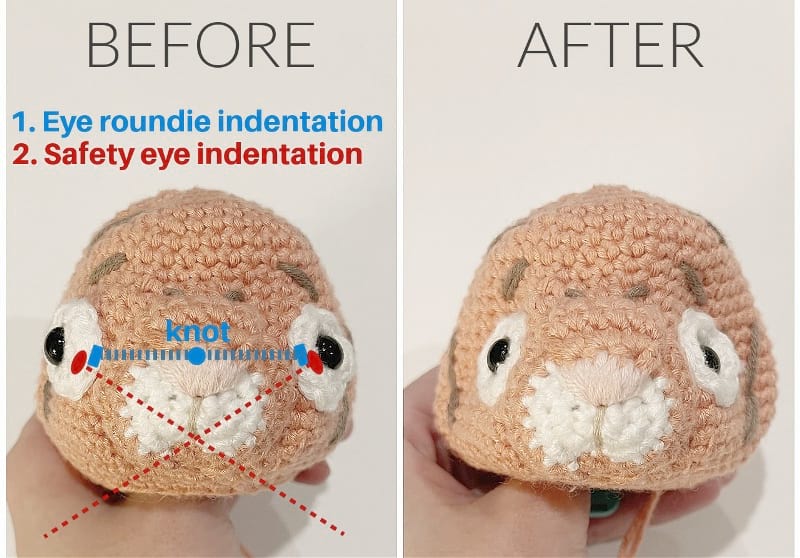
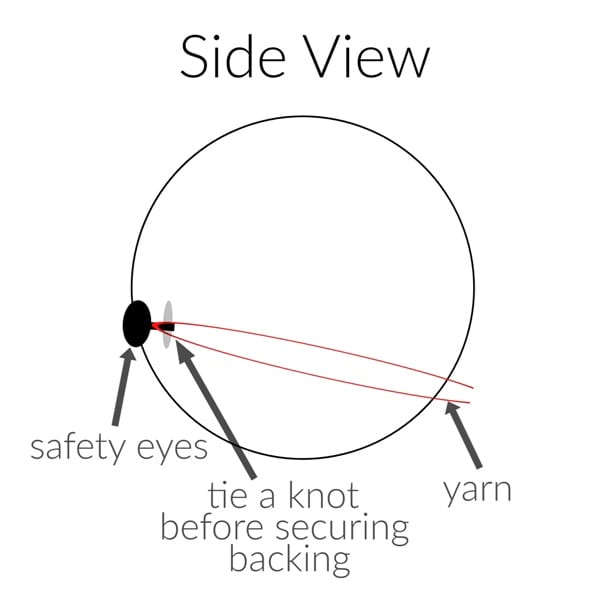
We will do two steps to prevent the eyes and eye roundies from bulging out too much. Please reference the accompanying pictures:
Step 1 (as indicated by blue lines): From inside the head, use the remaining white yarn strand from the eye roundie and thread it through a yarn needle. Have the needle exit the head on the inner part of the white eye roundie close to the snout (as indicated in picture) and re-enter the head nearby. Repeat for other side. Take the two white yarn ends inside the head and tie into knots between the safety eyes – determine how tightly you need to tie the knots to achieve desired look.
R25: *Sc 3, Dec*, rep 6 times. (24 sts)
R26: *Sc 2, Dec*, rep 6 times. (18 sts)
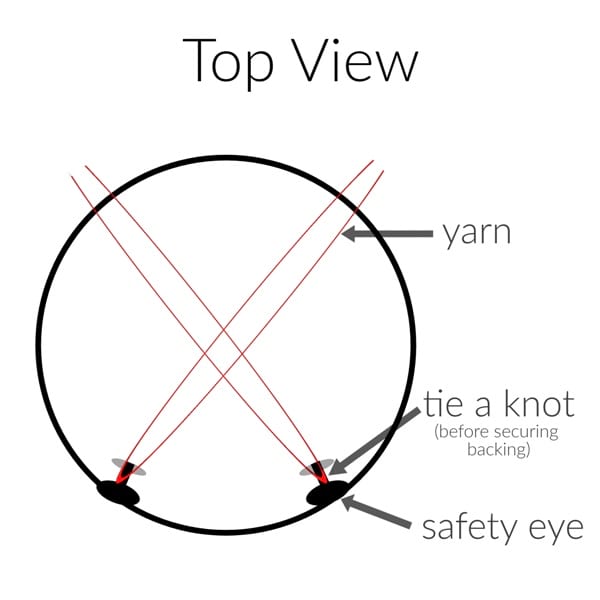
Step 2 (as indicated by red lines): To give the face further definition, we will be using a technique called eye indentation. Use the peach yarn strands you set aside at the beginning and tie knots around the post of each safety eye. Snap in the washers. Have the strands cross each other inside the head and have them exit out towards the bottom/back of the head (our strands exited between Rounds 24 and 25).
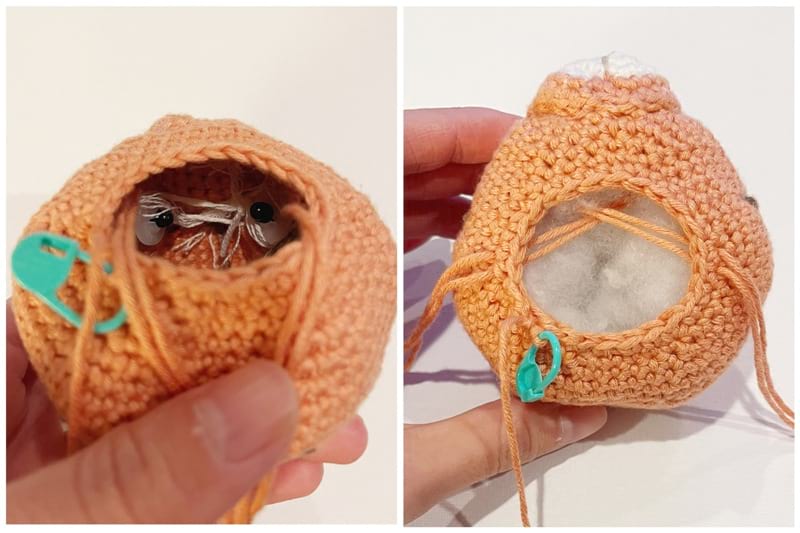
Ensure that both strands from the SAME safety eye are in close proximity to each other when they exit the back of the head to make it easier to tie a knot (but they should not come out of the same hole). After this is done, you should have 4 strands of yarn coming out the back of the head, each exiting from their own hole.
Stuff head densely, making sure there is stuffing above and below the crisscrossed eye indentation strands. Pull the peach yarn strands back to check that you like the look of the eye indentation. You can adjust as needed by stuffing the head more/less or by repositioning the peach yarn strands at the back of the head higher or lower. It is important to check this before continuing on and finishing off the head as this cannot be corrected after the head has been closed off in the next rounds.
Cut two strands of fluffy white yarn (~10”/25 cm) and use yarn needle to embroider them onto either side of head. Each strand extends between Rounds 11/12 and Rounds 24/25. Tie knots and hide ends in head. Finish stuffing head.
R27: *Sc 1, Dec*, rep 6 times. (12 sts)
R28: *Dec*, rep 6 times. (6 sts)
Ensure yarn ends from eye indentation are hanging out. Fasten off working yarn, thread yarn tail through front loops of last remaining 6 stitches. Pull tight and hide end.
Finish off the eye indentation with the peach yarn strands: grab the two strands of yarn that correlate with one safety eye. Pull back to desired indentation and tie a double knot to secure. Repeat with other eye. Weave in ends.
EARS (make 2):
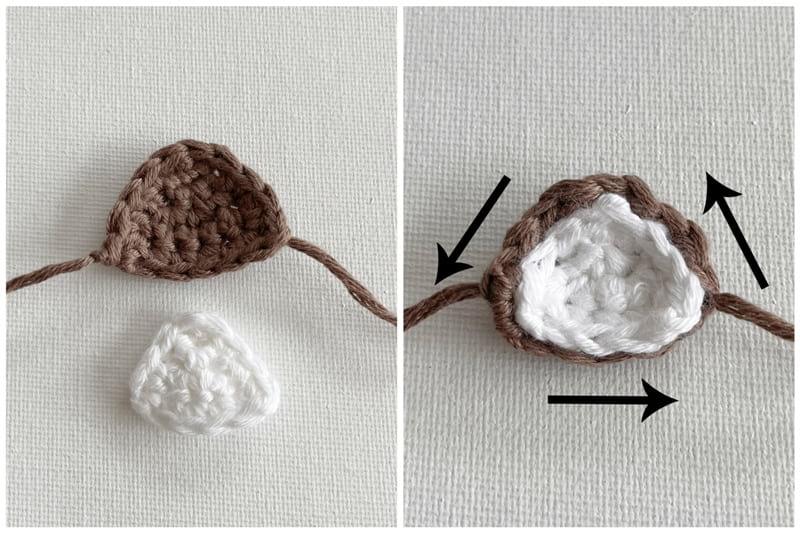
Each ear consists of two pieces: a white triangle and a brown triangle (both are worked in turned rows).
White Triangle (make 2):
Using white yarn,
Chain 2 (leave initial end of ~4”/10 cm).
Row 1: Starting in second ch from hook, Sc 1. (1 st)
Row 2: Chain 1, turn. Starting in second st from hook, Inc. (2 sts)
Row 3: Chain 1, turn. Starting in second st from hook, *Inc*, rep 2 times. (4 sts)
Row 4: Chain 1, turn. Starting in second st from hook, Sc 4. (4 sts)
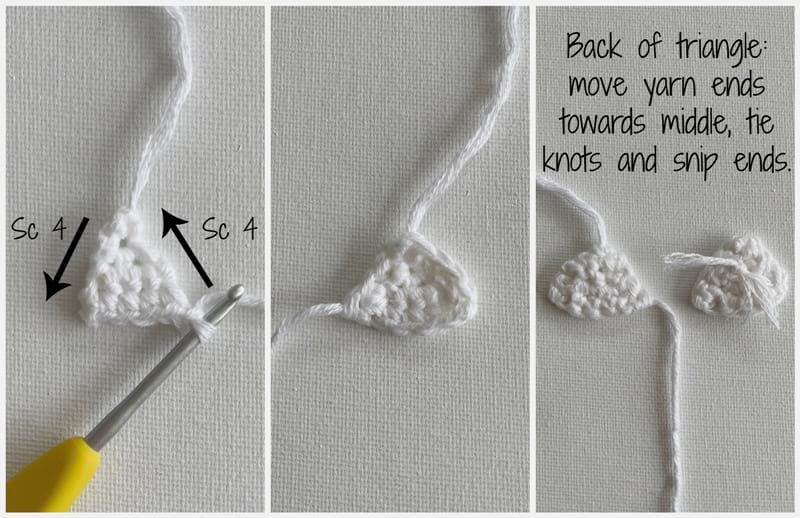
We will now smooth over the edges of the triangle by working single crochets around the two sides. Chain 1, sc 4 up one side, sc 4 down the other side. Fasten off and leave final end of ~4”/10 cm. Move initial and final ends towards the middle of the triangle, tie knots and snip ends short.
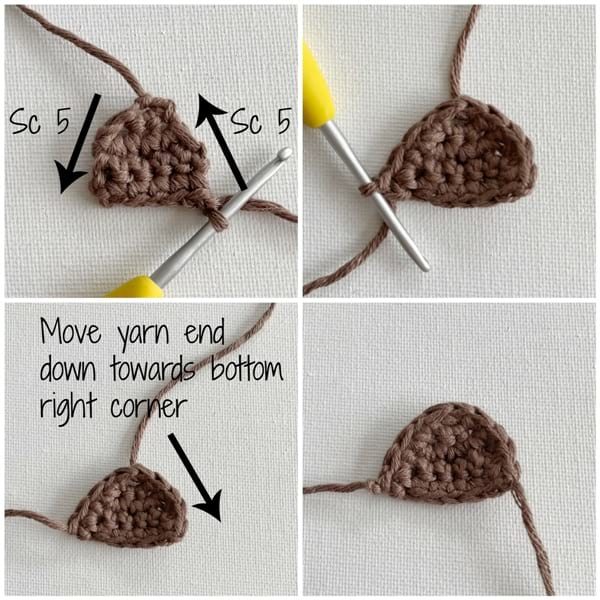
Brown Triangle (make 2):
Using taupe yarn,
Chain 2 (leave long initial end of ~10”/25 cm).
Row 1: Starting in second ch from hook, Sc 1. (1 st)
Row 2: Chain 1, turn. Starting in second st from hook, work 3 single crochets in same stitch. (3 sts)
Row 3: Chain 1, turn. Starting in second st from hook, Inc, Sc 1, Inc. (5 sts)
Rows 4-5: Chain 1, turn. Starting in second st from hook, Sc 5. (5 sts)
We will now smooth over the edges of the triangle by working single crochets around the two sides. Chain 1, sc 5 up one side, sc 5 down the other side. Fasten off and leave long end for seaming (~10”/25 cm). Move initial end down to the bottom right of the triangle.
Place white triangle onto brown triangle. Use one brown end to seam white triangle onto brown triangle (seam all three sides of the triangle so that the yarn strand ends in the same place that it began).
Use two ends to seam ears to head (extend from about Rounds 5/6 to Rounds 12/13, about 1.6”/4 cm apart at the top).
BODY:
Using peach yarn,
Ch 5 (this is the foundation chain),
R1: Starting from second chain from hook, Sc 4 in back loops of foundation chain. Turn and Sc 4 in front loops of the foundation chain [we are making an oval by crocheting around the chain]. (8 sts)
R2: Inc around. (16 sts)
R3: *Sc 1, Inc*, rep 8 times. (24 sts)
R4: *Sc 5, Inc*, rep 4 times. (28 sts)
R5: In BLO, Sc 28. (28 sts)
R6: *Sc 5, Dec*, rep 4 times. (24 sts)
R7-12: Sc 24. (24 sts)
R13: *Sc 4, Dec*, rep 4 times. (20 sts)
R14-15: Sc 20. (20 sts)
R16: *Sc 3, Dec*, rep 4 times. (16 sts)
Fasten off and leave long end for sewing.
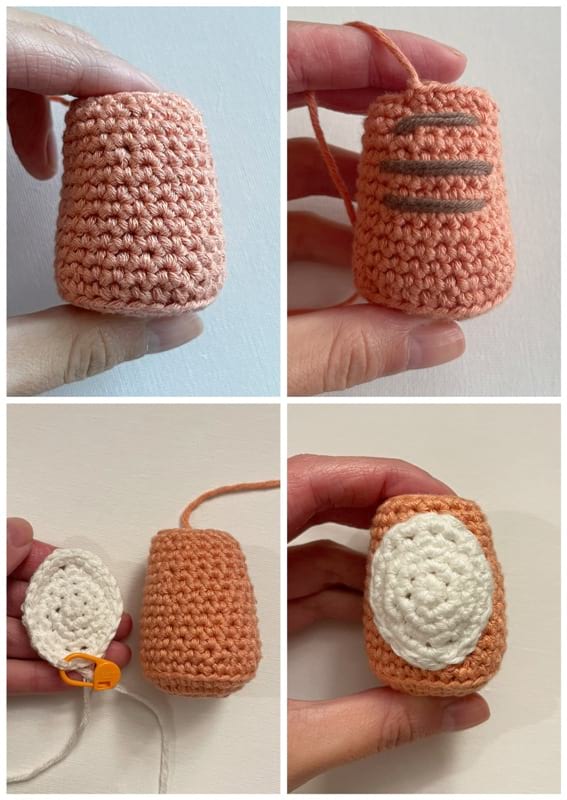
Using taupe yarn, embroider three stripes on back of body (once again, each stripe consists of two passes of yarn):
- Between Rounds 15 and 16, about 5 sts across
- Between Rounds 12 and 13, about 7 sts across
- Between Rounds 10 and 11, about 7 sts across
White Belly:
Using white yarn,
R1: 6 sc in Magic Ring. (6 sts)
R2: Inc around. (12 sts)
R3: *Sc 1, Inc*, rep 6 times. (18 sts)
R4: Sl st 1, sc 1, hdc 1, sc 1, sl st 6, sc 1, hdc 1, sc 1, sl st 5. (18 sts)
R5: Sc 1, Inc x 3, Sc 6, Inc x 3, Sc 5. (24 sts)
Sl st 5 to bring the yarn end down towards the bottom of the oval. Fasten off and leave long end for seaming.
Seam white belly to front of peach body (top of oval begins around bottom of Round 15 of peach body).Try to leave the front and back loops of the white oval belly untouched so that it provides a nicely defined edge around the belly (use stitches behind the front and back loops to attach the white belly to the peach body).
***Click HERE for PART 2 of the tiger pattern that will go through the legs, arms, tail and assembly!
Thank you to Lion Brand Yarn for providing the yarn for this design! This pattern is an original pattern by Stephanie Lau of All About Ami. Please do not claim this pattern as your own. If you wish to share this pattern, you may link to this pattern but please do not reprint it on your site. You may keep a copy for your own personal use but please DO NOT sell the pattern or distribute it.
You may sell products made from this pattern but please clearly credit the design to me, Stephanie Lau of All About Ami, and provide a link to my blog www.AllAboutAmi.com. Permission is NOT granted for mass production or factory manufacturing of any kind. Thank you for being respectful and for your understanding!