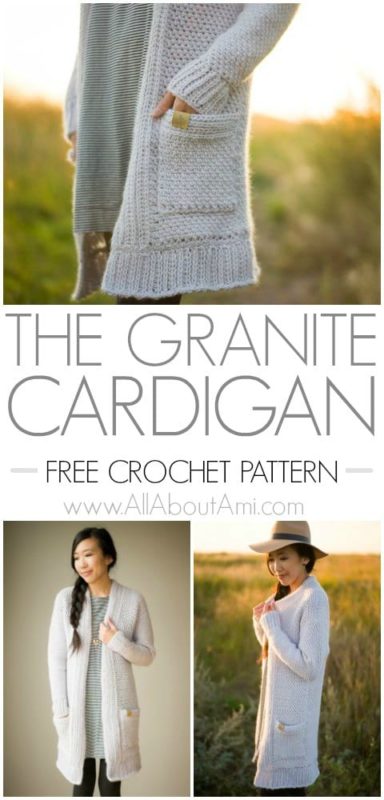
Here is the free pattern for the Granite Cardigan!
***You can purchase an INEXPENSIVE AD-FREE PDF of this pattern on Etsy HERE and on LoveCrochet HERE! This beautifully formatted PDF includes all the step-by-step pictures, the granite stitch tutorial, and the full pattern! It is a total of 9 pages including the cover page! You can also purchase a kit HERE on the Lion Brand Yarn website that includes the pattern and all the yarn needed to make this cardigan!
***PLEASE read through the step-by-step blog post HERE to get a general idea of how this cardigan is constructed and to see detailed photos of the process and assembly!
![]()
Notes:
- This cardigan is worked in three pieces from the bottom-up: the back panel and two front panels.
- The sleeves are worked bottom up and seamed to the panels.
- The collar is worked by picking up stitches along the front panels and back of neck.
- Bottom ribbing is crocheted separately and then seamed onto the bottom of the cardigan.
- Two optional pockets are crocheted and sewn onto each side of the front panels.
- If you would like to shorten the length of the cardigan, crochet fewer rows for the back and front panels.
- If you would like to make the cardigan longer, crochet more rows for the back and front panels and/or increase the number of chains for the bottom ribbing.
- When adding a new skein of yarn, you can felt the yarn ends together with a felting needle so that you do not have to weave in the ends or tie knots.
- Whenever it says to seam two pieces together, always flip them inside out and whip stitch them together to get a cleaner look.
- Keep in mind that this cardigan has the potential to stretch 1-2″ in width and length due to gravity and wear with the granite stitch.
- You absolutely MUST block your pieces in this garment to prevent curling and to get them to lay flat. I pinned my pieces on foam mats and used the steam function on my iron before seaming them together.
- When working the granite stitch, the Ch 2 (turning chain) counts as 1 sc and a chain 1 space.
- Be very careful not to tug or pull the yarn with too much force when seaming pieces together or frogging your work as the yarn can tear. If this happens, you can felt the yarn ends back together.
Materials:
- 6.5 mm Clover Amour hook
- New Basic 175 Yarn by Lion Brand Yarn in “Whisper”: level 4 worsted weight yarn – see information below for approximate yardage and number of skeins needed for each size
- Yarn needle
- Stitch Markers
- Felting needle tool
- Blocking tools: blocking mats, pins, iron with steam function or spray bottle
Final measurements:
Width across back: 17″ (S), 19″ (M), 21″ (L), 23″ (XL)
Length (made up of panel + 3″ of bottom ribbing): 32″ (S), 33″ (M), 34″ (L), 35″ (XL)
Sleeves: 20″ (one size because front and back panels bend past the shoulders to become part of the length of the sleeve)
Collar: 3″
Approximate Yardage/Number of Skeins Required:
Small: 8 skeins, ~770 g
Medium: 10 skeins, ~950 g
Large: 11 skeins, ~1100 g
Extra Large: 12 skeins, ~1200 g
Gauge: If starting with Chain 17, 9 sc with 8 ch 1 spaces and 14 rows = 4″
![]()
Here is a video tutorial showing how to work the granite stitch and the ribbing by working half double crochets in the third and back loops!
BACK PANEL:
Chain 75 (85, 93, 103) [use an odd number of stitches].
Row 1: Sc in the 3rd ch from the hook, *ch 1, skip 1 ch, sc in the next ch* until end. [(38 sc and 37 chain 1 spaces), (43 sc and 42 chain 1 spaces), (47 sc and 46 chain 1 spaces), (52 sc and 51 chain 1 spaces)}
R2: Ch 2, turn. Sc in the next ch 1 space. *Ch 1, sc in the next ch 1 sp* until end, finishing with a sc in the last chain sp at the start of previous row.
For Small Size – R3-101: Repeat Row 2.
For Medium Size – R3-105: Repeat Row 2.
For Large Size – R3-R109: Repeat Row 2.
For Extra Large Size – R3-113: Repeat Row 2.
Fasten off and leave long end for sewing.
Resultant rectangle is: 29″ by 17″ (S), 30″ by 19″ (M), 31″ by 21″ (L) and 32″ by 23″ (XL)
FRONT PANELS (make 2):
Chain 27 (33, 37, 41)
R1: Sc in the 3rd chain from the hook, *ch 1, skip 1 ch, sc in the next ch* until end. [(14 sc and 13 chain 1 spaces), (17 sc and 16 chain 1 spaces), 19 sc and 18 chain 1 spaces, 21 sc and 20 chain 1 spaces)
R2: Ch 2, turn. Sc in the next ch 1 space. *Ch 1, sc in the next ch 1 sp* until end, finishing with a sc in the last chain sp at the start of previous row.
For Small Size – R3-101: Repeat Row 2.
For Medium Size – R3-105: Repeat Row 2.
For Large Size – R3-R109: Repeat Row 2.
For Extra Large Size – R3-113: Repeat Row 2.
Resultant rectangle is: 29″ by 6″ (S), 30″ by 8″ (M), 31″ by 9″ (L), 32″ by 10″ (XL)
SLEEVES (make 2):
We will begin with the Ribbing:
Ch 11
Row 1: Hdc 1 in 2nd chain from hook and across. (10 sts)
R2: Chain 1, turn. Hdc in third loops across. (10 sts)
R3: Chain 1, turn. Hdc in back loops across. (10 sts)
For Small Size – R4-15: Repeat Rows 2 and 3.
Keep in mind that 2 rows = 1″, so my ribbing measured 7.5″ across for Small size.
For Medium Size – R4-19: Repeat Rows 2 and 3. (measures 9.5″ across)
For Large Size – R4-23: Repeat Rows 2 and 3. (measures 11.5″ across)
For Extra Large Size – R4-27: Repeat Rows 2 and 3. (measures 13.5″ across)
We will now begin the Body of the sleeve.
- An Increase row is noted as follows: Chain 2, turn. *Sc, ch 1, sc* in next space. *Ch 1, sc in next ch sp* until two spaces remaining. Ch 1, *sc, Ch 1, sc* in next sp. Ch 1, sc in last sp.
R1: Chain 1 and pick up stitches along the length of the ribbing: that is, Slip stitch 30 (38, 46, 54) across (# of rows times 2). (31, 39, 47, 55 sts)
R2: Chain 2, turn. Sc in 3rd stitch from hook. *Chain 1, Skip 1 st, sc in next st * until end [(17 sts, 16 sps), (21 sc, 20 sps), (25 sc, 24 sps), (29 sc, 28 sps)]
R3: Chain 2, turn. Sc in next chain 1 sp. *Chain 1, sc in the next ch 1 sp* till end.
R4-6: Repeat Row 3.
R7: Increase Row [(19 sts, 18 sps), (23 sc, 22 sps), (27 sc, 26 sps), (31 sc, 30 sps)]
R8: Chain 2, turn. Sc in next chain 1 sp. *Chain 1, sc in the next ch 1 sp* till end.
R9-12: Repeat R8.
R13: Increase Row [(21 sts, 20 sps), (25 sc, 24 sps), (29 sc, 28 sps), (33 sc, 32 sps)]
R14: Chain 2, turn. Sc in next chain 1 sp. *Chain 1, sc in the next ch 1 sp* till end.
R15-18: Repeat R14.
R19: Increase Row [(23 sts, 22 sps), (27 sc, 26 sps), (31 sc, 30 sps), (35 sc, 34 sps)]
R20: Chain 2, turn. Sc in next chain 1 sp. *Chain 1, sc in the next ch 1 sp* till end.
R21-24: Repeat R20
R25: Increase Row [(25 sts, 24 sps), (29 sc, 28 sps), (33 sc, 32 sps), (37 sc, 36 sps)]
R26: Chain 2, turn. Sc in next chain 1 sp. *Chain 1, sc in the next ch 1 sp* till end.
R27-30: Repeat R26.
R31: Increase Row [(27 sts, 26 sps), (31 sc, 30 sps), (35 sc, 34 sps), (39 sc, 38 sps)]
R32: Chain 2, turn. Sc in next chain 1 sp. *Chain 1, sc in the next ch 1 sp* till end.
R33-36: Repeat R32
R37: Increase Row [(29 sts, 28 sps), (33 sc, 32 sps), (37 sc, 36 sps), (41 sc, 40 sps)]
R38: Chain 2, turn. Sc in next chain 1 sp. *Chain 1, sc in the next ch 1 sp* till end.
R39-42: Repeat R38
R43: Increase Row [(31 sts, 30 sps), (35 sc, 34 sps), (39 sc, 38 sps), (43 sc, 42 sps)]
R44: Chain 2, turn. Sc in next chain 1 sp. *Chain 1, sc in the next ch 1 sp* till end.
R45-48: Repeat R44.
R49: Increase Row [(33 sts, 32 sps), (37 sc, 36 sps), (41 sc, 40 sps), (45 sc, 44 sps)]
R50: Chain 2, turn. Sc in next chain 1 sp. *Chain 1, sc in the next ch 1 sp* till end.
R51-54: Repeat R50.
R55: Increase Row [(35 sts, 34 sps), (39 sc, 38 sps), (43 sc, 42 sps), (47 sc, 46 sps)]
R56: Chain 2, turn. Sc in next chain 1 sp. *Chain 1, sc in the next ch 1 sp* till end.
R57-60: Repeat R56.
R61: Increase Row [(37 sts, 36 sps), (41 sc, 40 sps), (45 sc, 44 sps), (49 sc, 48 sps)]
R62: Chain 2, turn. Sc in next chain 1 sp. *Chain 1, sc in the next ch 1 sp* till end.
R63-66: Repeat R62.
Fasten off and leave long end for sewing.
Block back panel, front panels and sleeves to prevent curling.
Assembly:
- Always whip stitch with wrong sides facing out and do NOT pull too hard on the yarn as it can break or rip.
- Whip stitch edges of sleeves together. Flip right side out and slip stitch along bottom of ribbing for a cleaner edge.
- Whip stitch top of front panels to top of back panel.
- Whip stitch sides of front panels to sides of back panel, leaving arm holes. Measure top of sleeves to arm holes to see how much space to leave.
- Whip stitch top sleeves into arm holes.
COLLAR RIBBING:
Row 1: Starting in bottom left corner of collar (with cardigan facing you), rejoin yarn and Chain 1. Pick up half double crochets along the collar (I had 226 sts- increase as needed for larger sizes, approximately 232 sts for Medium, 240 sts for Large, 250 sts for XL).
R2: Chain 1, turn. Hdc in third loops across.
R3: Chain 1, turn. Hdc in back loops across.
R4-7: Repeat R2 and R3.
Fasten off and weave in ends.
BOTTOM RIBBING:
Chain 11
Row 1: Hdc 1 in 2nd chain from hook and across. (10 sts)
R2: Chain 1, turn. Hdc in third loops across. (10 sts)
R3: Chain 1, turn. Hdc in back loops across. (10 sts)
R4-81: Repeat Rows 2 and 3.
My bottom ribbing measured about 40-41″ in length for Small Size. Increase as needed for larger sizes, measuring it up against the bottom of the cardigan as you go to make sure it matches. For a cleaner edge, slip stitch across top, side and bottom of bottom ribbing. Fasten off and leave long end for sewing. Block bottom ribbing.
Sew the ribbing onto the bottom of the sweater (once again, whip stitch from the inside).
POCKETS (make 2)
Chain 21.
Row 1: Sc in the 3rd ch from the hook, *ch 1, skip 1 ch, sc in the next ch* until end. (11 sc and 10 chain 1 spaces)
R2: Ch 2, turn. Sc in the next ch 1 space. *Ch 1, sc in the next ch 1 sp* until end, finishing with a sc in the last chain sp at the start of previous row.
R3-18: Repeat Row 2.
R19: Chain 1, turn. Hdc in 3rd st (i.e. chain gap) from hook and across (20 hdc).
R20: Chain 1, turn. Hdc in third loops across.
R21: Chain 1, turn. Hdc in back loops across.
R22: Repeat R20.
Fasten off and leave long end for sewing. Place pockets in desired position on front panels of cardigan and attach by sewing sides and bottom but leave top open. For Small Size, I positioned my pockets 7 rows above bottom ribbing and 2 sts on either side of collar ribbing. If needed, block entire cardigan.
Enjoy your chic and comfortable Granite Cardigan, and don’t forget to tag me on social media!
![]()
{This post is sponsored by Lion Brand Yarn! I’ve loved working with their yarn throughout the years and I’m thrilled that I get to collaborate with them every month!}
This pattern is an original pattern by Stephanie Lau of All About Ami. Please do not claim this pattern as your own. If you wish to share this pattern, you may link to this pattern but please do not reprint it on your site. You may keep a copy for your own personal use but please DO NOT sell the pattern or distribute it.
You may sell products made from this pattern but please clearly credit the design to me, Stephanie Lau of All About Ami, and provide a link to my blog www.AllAboutAmi.com. Permission is NOT granted for mass production or factory manufacturing of any kind. Thank you for being respectful and for your understanding!
![]()