The granny square is such a classic crochet design element. They are produced by working in rounds from the center outward, and they are typically assembled together to form blankets, garments, and other larger projects. When I was younger, I crocheted some granny squares to form a purse (see HERE) and I attempted to complete an afghan made of granny squares, although I never ended up finishing it! As an adult, I crocheted a “Granny Square Baby Blanket” for Myla using red, yellow, grey, and white yarn- see the blog post HERE. That blanket was actually one massive granny square, and it was fun continuing to work outwards as the granny square expanded.
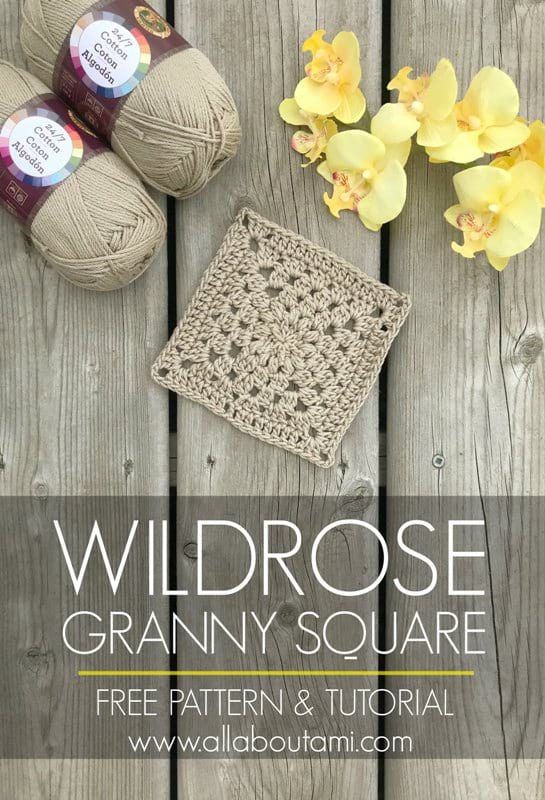
In my new Spring design called “The Wildrose Backpack” (free pattern found HERE), the project is centered around a granny square- I am calling it the “Wildrose Granny Square“. In this step-by-step tutorial, I will walk you through how to crochet this beautiful granny square featuring various stitches such as clusters and puff stitches. I am using Lion Brand Yarn’s 24/7 Cotton in the color “Taupe” and my 3.75 mm Clover Amour hook! Let’s begin!
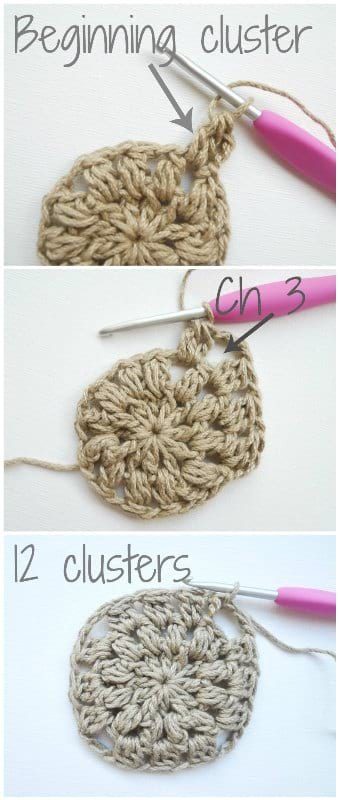
Start off with a Magic Ring (see my step-by-step tutorial HERE) and chain 4- this initial chain 4 counts as the first double crochet and Chain 1.
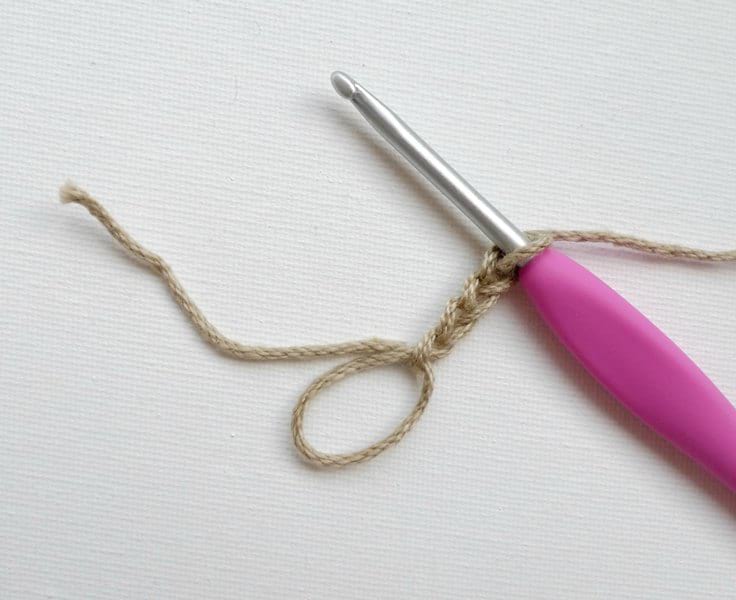
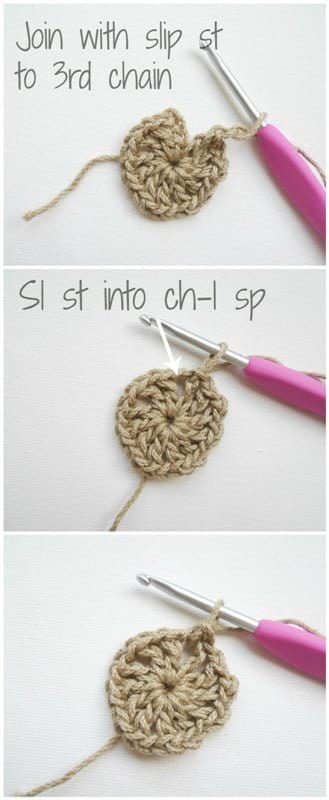
Work double crochets separated by chain 1’s into the Magic Ring (in total, there will be 12 dc’s and 12 chain-1’s). Pull the initial tail to close the center hole (I love the Magic Ring and how it eliminates this beginning center circle). To close off Round 1, join with a slip stitch to the 3rd chain of the initial Chain 4. We want to begin Round 2 in a ch-1 space. Thus, work a slip stitch into the ch-1 space so that we can begin there. You will see this technique all throughout the granny square as we usually want to begin working the round in a ch-1 space, so we will need to work slip stitches to get to this position.
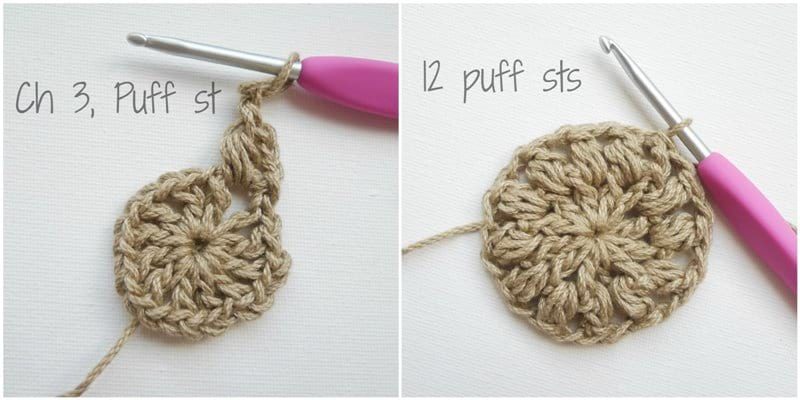
To begin Round 2, chain 3 and work a puff stitch. You work a puff stitch and a chain 1 in each ch-1 space around. By the end of Round 2, you should have 12 puff stitches separated by chain 1’s.
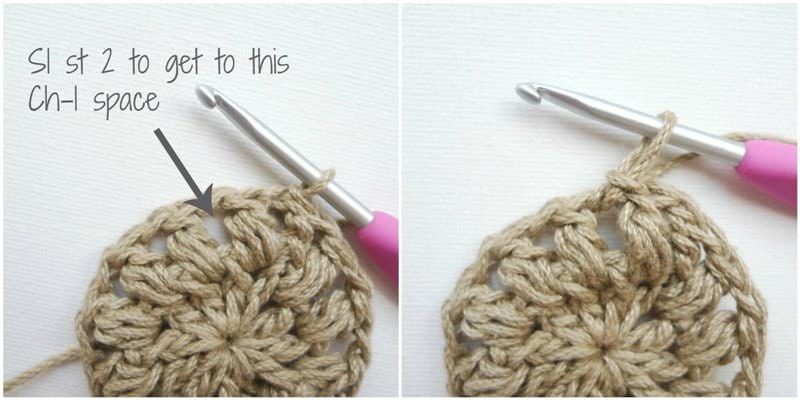
Once again, you then slip stitch 2 to get into the ch-1 space. We are now ready to begin Round 3!
Work a beginning cluster and then work two more clusters in the subsequent ch-1 spaces (be sure to work a Chain 1 between each cluster to space them apart). It will now be time to form the first corner of the granny square. To do so, chain 3, and then work the next cluster. Repeat this pattern around so that you have four chain 3 spaces (one in each corner), each separated by three clusters.
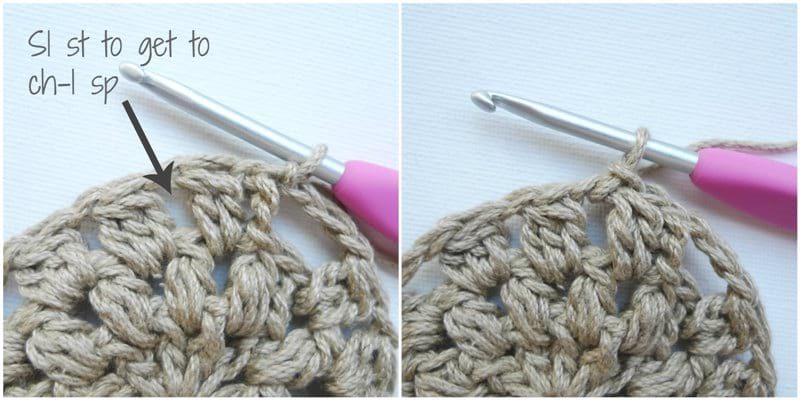
To begin Round 4, slip stitch 2 to get to the nearest ch-1 space.
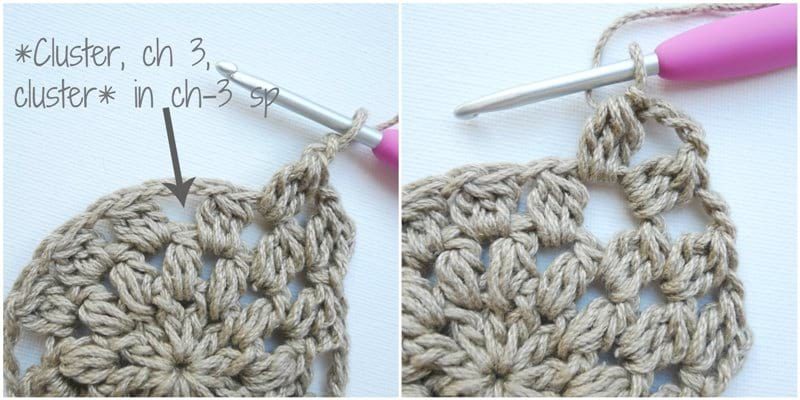
You will work clusters in each ch-1 gap. When you come to the first ch-3 space, it is time to accentuate the corner. To do so, work *cluster, ch 3, cluster* in this ch-3 space.
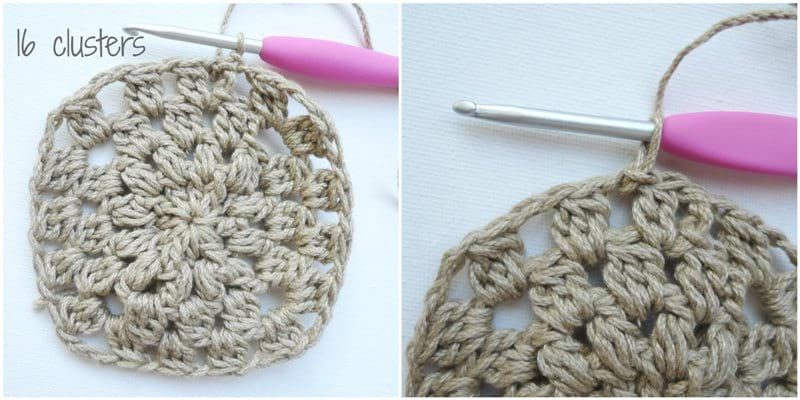
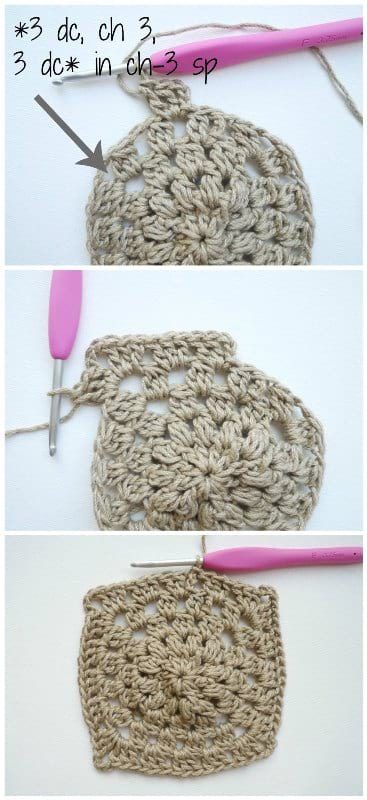
At the end of Round 4, you should have 16 clusters with ch-3 spaces in each corner (each separated by 4 clusters). To get ready for Round 5, slip stitch to the nearest ch-1 space.
In the first ch-1 space, chain 3 and work 2 double crochets in the same space. In each ch-1 space, you will work 3 double crochets. When you come to the ch-3 spaces (in each corner), you will work *3 dc, ch 3, 3 dc* as indicated by the arrow below. By the end of Round 5, you will have 60 double crochets.
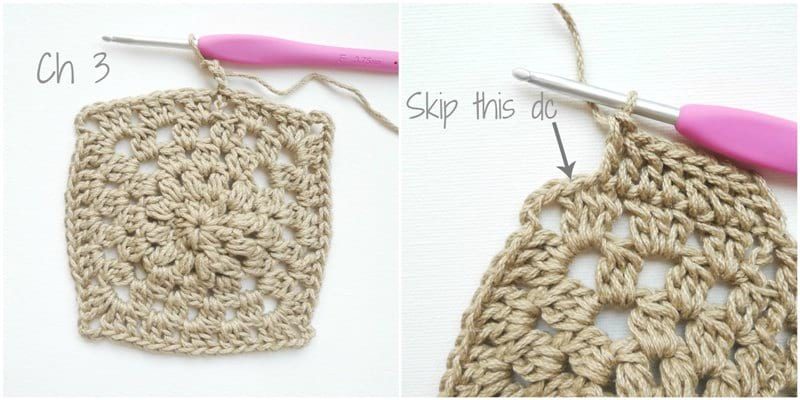
This is the first round where you do not need to slip stitch to the nearest ch-1 space! To begin Round 6, chain 3. Work 1 double crochet in each double crochet until you reach the double crochet before the chain 3. Skip that double crochet as indicated by the arrow.
In the corner ch-3 space, work *3 dc, ch 3, 3 dc*. Skip the double crochet immediately after the ch-3 space as indicated by the arrow.
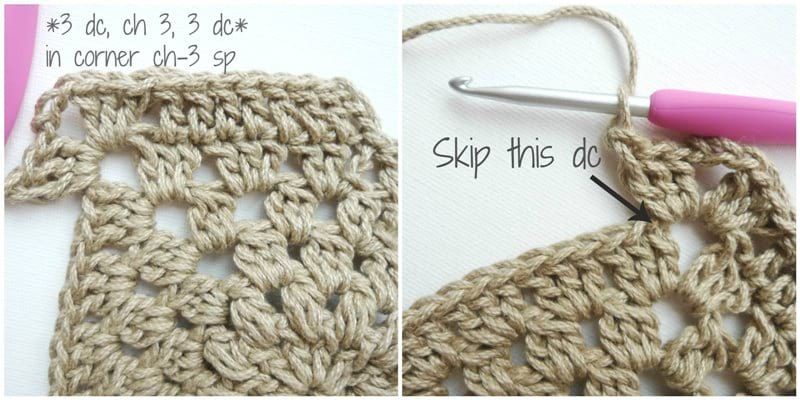
You continue this pattern around, always skipping the double crochets immediately before and after the ch-3 spaces. Your granny square is now complete!
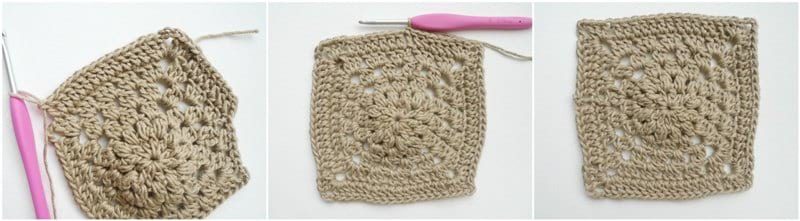
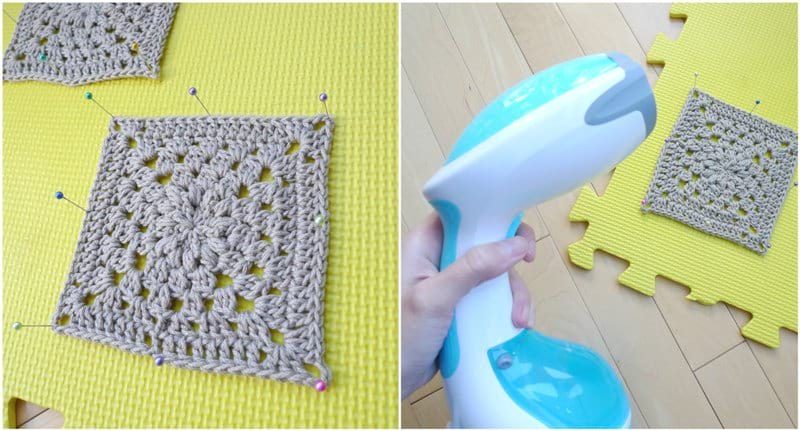
The edges of your granny square may be a bit uneven. To accentuate the square shape, even out the edges, and ensure that the granny square is flat, you can use a steamer to block the granny square like I did! Below you will see how I have pinned my granny square into place on a foam mat (from the Dollar Store) and am blasting it with hot steam. I use this affordable Beautural Steamer that I purchased on Amazon HERE to block my crochet and knit projects – it is very easy to use and I highly recommend it!
***********************************
Here is the free crochet pattern for the Wildrose Granny Square:
Materials:
- 24/7 Cotton in Taupe (worsted weight level 4 yarn, ~17 g for one square)
- 3.75 mm Clover Amour crochet hook
Abbreviations:
- Magic Ring (MR): Make a loop. Hold yarn where ends cross. Insert hook into loop and pull up working yarn. Yarn over and work beginning chains. Work subsequent stitches in magic ring and then pull tight to close. {See step-by-step tutorial HERE}
- Puff stitch (puff st): [YO, insert hook in next st, YO, pull up a loop], repeat 3 times in same st, YO, draw yarn through 7 loops on hook.
- Beginning cluster: Ch 3, [YO, insert hook in st or sp, YO, pull up a loop, YO, draw through 2 loops], rep 2 times in same st or sp, YO, draw through 3 loops on hook.
- Cluster: [YO, insert hook in st or sp, YO, draw up a loop, YO, draw through 2 loops on hook], rep 3 times in same st or sp, YO, draw through 4 loops on hook.
Using 3.75 mm hook,
Round 1: Make Magic Ring (see step-by-step tutorial HERE). Chain 4 (counts as 1st double crochet and chain 1). *1 dc, ch 1*, rep 11 times in ring. Join with slip stitch to 3rd chain of beginning chain 4. (12 ch-1 spaces and 12 dc).
Round 2: Slip stitch into ch-1 space, Chain 3. *Puff st, chain 1* in each ch-1 space around. Join with slip stitch to 3rd chain of beginning ch-3. (12 puffs)
Round 3: Slip stitch 2 to get to ch-1 space. Work beginning cluster in space. [*Ch 1, cluster* in next 2 ch-1 spaces, Ch 3. Cluster in next ch-1 sp]. Repeat everything between brackets [ ] 2 more times. *Ch 1, cluster* in next 2 ch-1 spaces. Ch 3, slip stitch to 3rd chain of beg ch-3. (12 clusters).
Round 4: Slip stitch 2 to get to ch-1 space. Work beginning cluster in space. Ch 1, work cluster in next space, ch 1. In ch-3 space, work *cluster, ch 3, cluster*. [In next 2 ch-1 sps, work *ch 1, cluster*, Ch 1. In Ch-3 sp, work *cluster, ch 3, cluster*]. Repeat everything between brackets [ ] 2 more times. Ch 1, slip stitch to 3rd chain of beg ch-3. (16 clusters)
Round 5: Slip stitch 2 to ch-1 space, ch 3. Work 2 dc in same space. 3 dc in next ch-1 sp. [In next ch-3 sp, *3 dc, ch 3, 3dc*. 3 dc in next 3 ch-1 sp.]. Repeat everything between brackets [ ] 2 more times. In next ch-3 sp, *3 dc, ch 3, 3dc*. 3 dc in last chain space. Slip stitch to 3rd chain of beg ch-3. (60 dc]
Round 6: Ch 3 (counts as dc). Dc in each dc until you reach dc before Ch 3 (7 dc). Skip next dc, *3 dc, ch 3, 3 dc* in Ch-3 corner. [Skip next dc, dc across until reach dc before Ch 3 (13 dc). Skip next dc, *3 dc, ch 3, 3 dc* in ch-3 corner.]. Repeat everything between brackets [ ] 2 more times. Skip next dc, dc 5. Slip stitch to top of Ch 3. (76 dc). Fasten off.
Final dimensions of granny square: 5″ (12.7 cm) x 5″ (12.7 cm)
***Please watch the “Wildrose Granny Square” video tutorial below that shows you how to crochet the granny square and its variations (the Wildrose Backpack goes to Round 6, the Wildrose Market Bag goes to Round 7, and the Wildrose Shoulder Bag uses a different Round 5). Note the following timestamps:
1:33 Round 1
3:08 Round 2
5:24 Round 3
8:46 Round 4
11:20 Round 5 (Wildrose Shoulder Bag)
13:16 Round 5 (Wildrose Backpack & Wildrose Market Bag)
15:18 Round 6 (Wildrose Backpack & Wildrose Market Bag)
18:20 Round 7 (Wildrose Market Bag)
***********************************
I love the look of this modern granny square with its puff stitches and clusters. This Wildrose Granny Square takes center stage in the Wildrose Backpack design!
Subscribe to my e-mail newsletter HERE so you can be the first to know when I post my latest crochet and knit designs! I hope you love using this granny square in your projects and that you enjoy seeing it used in a design that I have never tackled before: a crochet backpack- once again, get the free Wildrose Backpack crochet pattern HERE!