***You can purchase an INEXPENSIVE AD-FREE PDF of this pattern on Etsy HERE! This beautifully formatted PDF includes the step-by-step pictures and pattern and is a total of 10 pages including the cover page! You can also find this pattern in my Easy & Modern Knits Pattern Bundle found HERE (includes over 30 of my knit patterns at a discounted price)! Lion Brand Yarn has made a convenient kit HERE that includes the pattern and all the Hue + Me yarn needed to make this chunky sweater (choose any color)!
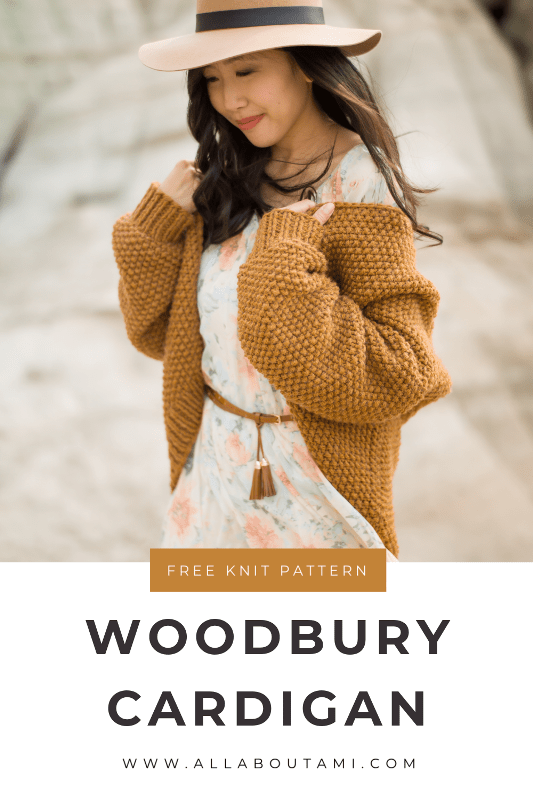
Knit this beautifully textured cardigan using bulky yarn and the lovely seed stitch! The Woodbury Cardigan will become your favorite chunky cardigan with its relaxed, oversized style and gorgeous drape. Wear this cardigan over your favorite dresses, jeans and leggings and add an extra layer of chic coziness!
Materials
- Hue + Me Yarn (bulky level 5, 80% acrylic/20% wool) in “Arrowwood”- see approximate yardage and number of skeins required below. Purchase the convenient KIT HERE that contains all the yarn you need! Please compare the yardage if you are thinking of substituting the yarn (e.g. “Woolspun” and “Color Made Easy” have different yardage than Hue + Me yarn, so you cannot simply purchase the same number of skeins).
- Clover Takumi 8 mm needles and 6.5 mm needles (straight or circular, at least 24″)
- Yarn needle
- Steamer for blocking
- Lock ring and O-ring stitch markers
- Clover Felting Tool (optional): for felting yarn ends together when adding a new skein
Gauge: 11 sts and 19 rows = 4” using 8 mm needles in seed stitch
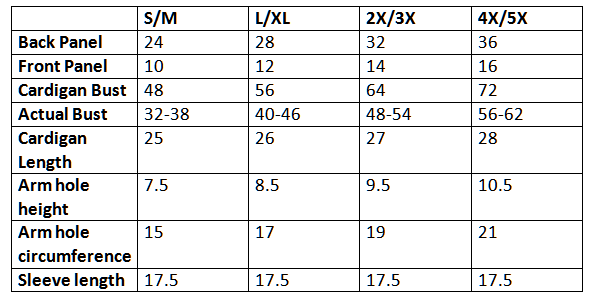
Sizing Chart (in inches):
Approximate Yardage/Number of Skeins Required:
Small/Medium: 6 skeins, ~ 710 g/780 yds
Large/XL: 7 skeins, ~ 835 g/915 yds
2X/3X: 8 skeins, ~ 990 g/1090 yds
4X/5X: 10 skeins, ~ 1160 g/1270 yds, ~ 790 g/867 yds
Abbreviations:
• KFB = Knit Front and Back Increase: Step 1: Knit the first stitch on your main needle. Step 2: Before taking the stitch off the main needle, insert the tip of your working needle into the backside of the loop and knit it through the back loop. Then pull the stitch off the needle.
• Three needle bind-off:
(1) Place two pieces together so that right sides are facing each other (wrong sides are outwards). Both pieces should have live stitches on the needles.
(2) Take a third needle and insert it into the first stitch knitwise on the first needle (closest to you), then insert the needle into the first stitch knitwise on the second needle.
(3) Wrap the working yarn around the third needle.
(4) Pull the stitch through both stitches (treating them as if they were one stitch).
(5) Pull the stitches off the two needles creating one on the third needle.
(6) Repeat above steps until two stitches have been created on third needle.
Pull the first stitch over the second stitch to cast it off. Keep repeating so that all the stitches have been casted off (you should always have a maximum of 2 stitches on the third needle at any time). See how to work the three needle bind off in this video HERE!
• PM: Place Marker: place marker at indicated spot (this is the first time you place the marker)
• SM: Slip Marker: slip the marker from left needle to the right needle
Notes:
- The initial cast on number is an even number for the front and back panels and the sleeves.
- One back panel and two front panels are knitted in the seed stitch and seamed together at the top and sides, leaving space for the arm holes. You can use the Three Needle Bind-Off to seam the tops of the front panels to the top of the back panel (shoulder seam). If you do not use the Three Needle Bind-Off for the shoulder seam, you can whip stitch the tops together.
- These panels are worked from the bottom up starting with the ribbing. Use the mattress stitch (vertical invisible seaming technique) for seed stitch when seaming together the sides of the back and front panels.
- A simple collar is worked by picking up stitches along the collar and casting them off right away. As soon as 2 stitches are picked up, cast off a stitch. This results in a simple and clean edge that frames the seed stitch nicely. Be sure to work loosely when casting off the stitches, otherwise the front panels will pull up if the cast off is too tight.
- The sleeves are worked from the bottom up, starting with the ribbing and then the seed stitch. The seed stitch is framed by garter stitches at the beginning and end of each row – the increases are worked in these garter sections so that the seed stitch in the middle of the sleeves remains undisturbed. Stitch markers are used to help frame the seed stitch.
- Row 12 of the sleeve is a set-up row that increases the stitch count for the various sizes – please follow the instructions for your specific size.
- With each subsequent increase row of the sleeve, the stitch count increases by two stitches. The increases are always worked in the second stitch and second to last stitch. There are four increase rows in total (including the set-up row).
- 6.5 mm needles are used for the ribbed cuff of the sleeve while 8 mm needles are used for the rest of the sleeve. If you do not want your ribbed cuff to be as tight (you want a looser cuff), you can use 8 mm needles for the entire sleeve including the ribbed cuff.
- The sleeves are seamed together using the mattress stitch (vertical invisible seaming technique) for garter stitch (since the edges of the sleeves are worked in the garter stitch). Then, the sleeves are attached to the arm holes using the whip stitch.
- Before seaming the sleeves, I would recommend using stitch markers to attach the sides of the sleeves together and attach the sleeves to the arm holes of the cardigan. Try on the cardigan to see if you like the length of the sleeves, and add or decrease the number of rows if you want the sleeves to be longer or shorter based on your personal preference and arm length.
- Whenever using the whip stitch, whip stitch the wrong sides together for a cleaner seam.
- You can block the finished cardigan to smooth out the stitches.
- You can add optional pockets if you desire!
- When adding a new skein of yarn, you can felt the yarn ends together with a felting tool (instead of having to tie knots and weave in the ends). Check out my blog post HERE to see how to felt the yarn ends together.
Sizing Notes:
- This drop sleeve cardigan is oversized, relaxed, loose and slouchy with 10-16” of positive ease built into the design. This means that if the actual bust of your body is 32” (typically a size small), the bust of your size small sweater is 10-16” larger (48”).
- Part of the front and back panels become part of the sleeve as they bend past the shoulders. The sleeve length remains the same for all sizes, but the increased width in the front and back panels help lengthen the sleeves of the larger sizes. The width of the sleeve varies by size.
- If you would like the cardigan to be wider, increase the number of stitches you cast on for the front and back panels (add by a multiple of 2). If you would like the cardigan to be narrower, decrease the number of stitches you cast on for the front and back panels.
- If you would like the cardigan to be longer, increase the number of rows for the back and front panels. If you would like the cardigan to be shorter, decrease the number of rows for the back and front panels.
- This pattern is written for the following sizes (I would recommend highlighting or circling the numbers for your size throughout the pattern): Small/Medium (Large/XL, 2XL/3XL, 4XL/5XL). Please note that for the stitch counts at the end of reach row, the sizes are listed as follows (Small/Mediums is first size after bracket): (Small/Medium, Large/XL, 2XL/3XL, 4XL/5XL).
- I am wearing a size Small/Medium and I am 5’6 for height reference.
PATTERN
- Back Panel:
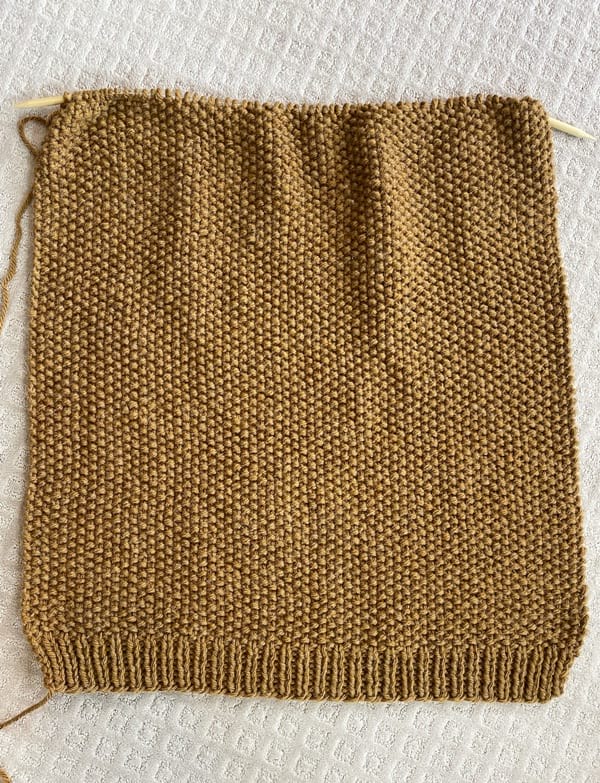
We will begin with the ribbing.
Using 8 mm needles,
Cast on 66 (76, 88, 98) stitches using the long tail cast-on.
Row 1 (Wrong side): *P1, K1*, rep across. (66, 76, 88, 98)
R2 (Right side): *P1, K1*, rep across. (66, 76, 88, 98)
R3-9: Repeat Rows 1 and 2. (66, 76, 88, 98)
The ribbing is complete – we will now move onto the seed stitch section.
R10: *K1, P1*, rep across. (66, 76, 88, 98)
R11: *P1, K1*, rep across. (66, 76, 88, 98)
Size Small/Medium:
R12-118: Repeat Rows 10 and 11. (66)
Size L/XL:
R12-124: Repeat Rows 10 and 11. (76)
Size 2X/3X:
R12-128: Repeat Rows 10 and 11. (88)
Size 4X/5X:
R12-134: Repeat Rows 10 and 11. (98)
End off on an even right side row if you will be working the 3 Needle Bind-Off. Leave the stitches on hold (either on these needles, a different set of needles, or scrap yarn).
If you are not working the 3 Needle Bind-off, cast off all the stitches in seed stitch after finishing designated rows (i.e., R118 for S/M, R124 for L/XL, R128 for 2X/3X, R134 for 4X/5X).
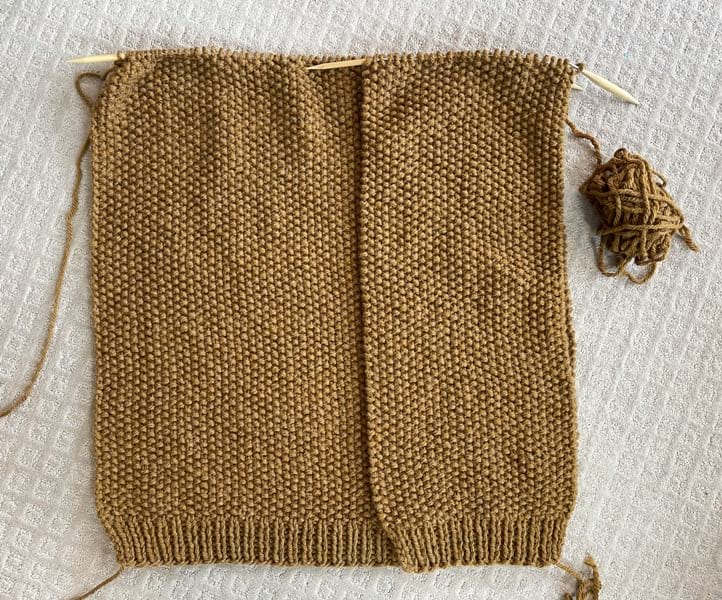
- Front Panels (make 2):
We will begin with the ribbing.
Using 8 mm needles,
Cast on 28 (32, 38, 44) stitches using the long tail cast-on.
Row 1 (Wrong side): *P1, K1*, rep across. (28, 32, 38, 44)
R2 (Right side): *P1, K1*, rep across. (28, 32, 38, 44)
R3-9: Repeat Rows 1 and 2. (28, 32, 38, 44)
The ribbing is complete – we will now move onto the seed stitch section.
R10: *K1, P1*, rep across. (28, 32, 38, 44)
R11: *P1, K1*, rep across. (28, 32, 38, 44)
Size Small/Medium:
R12-118: Repeat Rows 10 and 11. (28)
Size L/XL:
R12-124: Repeat Rows 10 and 11. (32)
Size 2X/3X:
R12-128: Repeat Rows 10 and 11. (38)
Size 4X/5X:
R12-134: Repeat Rows 10 and 11. (44)
End off on an even right side row if you will be working the 3 Needle Bind-Off. Leave the stitches on hold (either on these needles, a different set of needles, or scrap yarn).
If you are not working the 3 Needle Bind-off, cast off all the stitches in seed stitch after finishing designated rows (i.e., R118 for S/M, R124 for L/XL, R128 for 2X/3X, R134 for 4X/5X). Whip stitch tops of front panels to top of back panel.
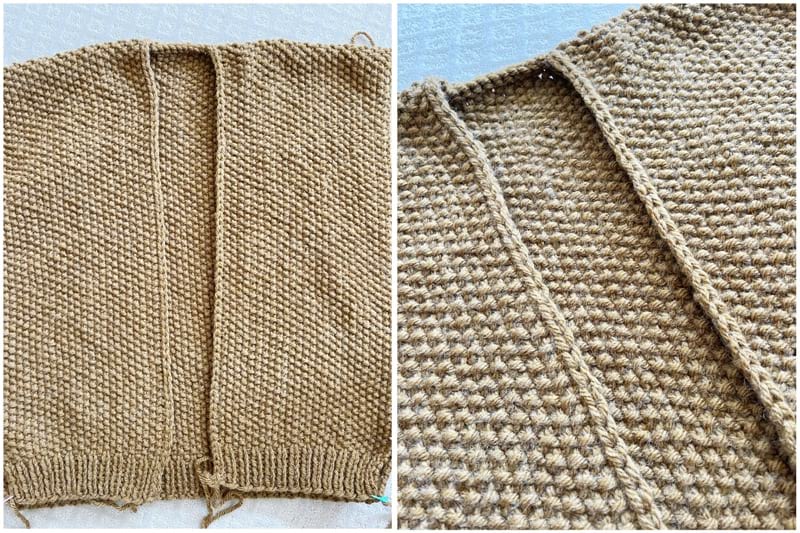
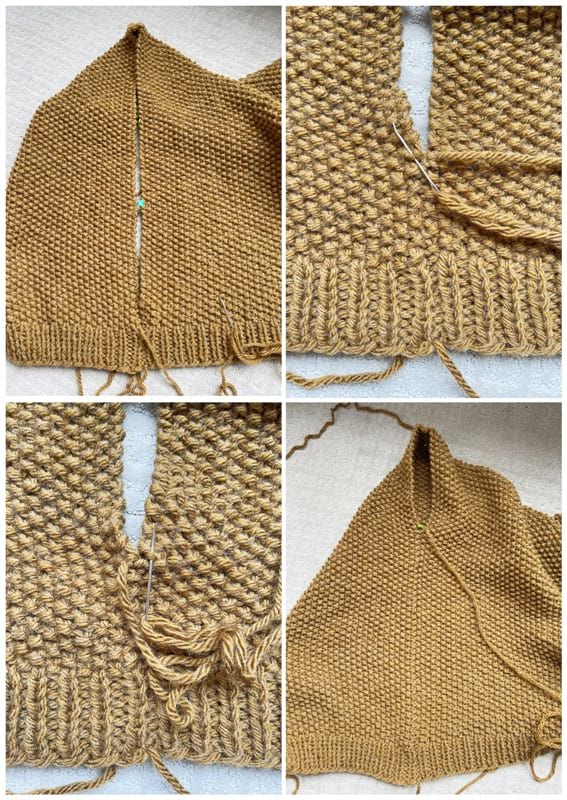
Three Needle Bind-Off:
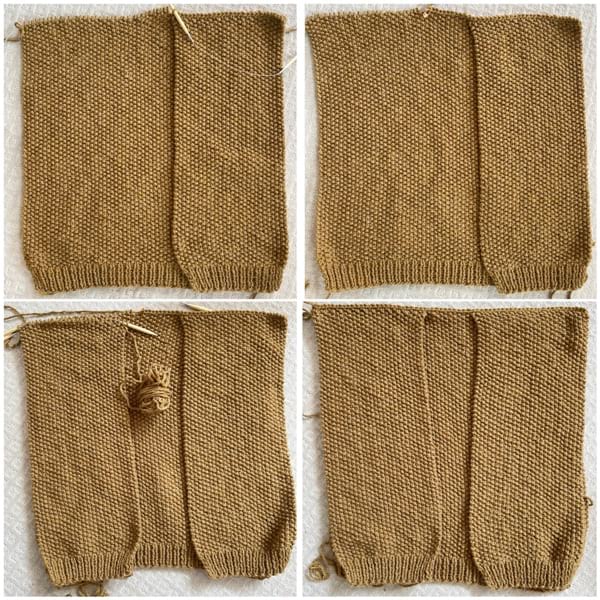
Once the back panel and front panels have been knitted, it is time to seam the front panels to the back panel by using the 3 needle bind off. See how to work the three needle bind off in this video HERE! Note that each panel ended off on an even/right side/knit row since we want to work the 3 needle bind off on the wrong side as it creates a ridge that will be only visible on the inside of the cardigan.
Position the front panel and back panel so that the right sides are touching each other and the wrong sides are facing outwards.
Using 3 needle bind off, cast off 28 (32, 38, 44) stitches of front panel and back panel together.
One front panel has been attached to the back panel. Next, cast off 10 (12, 12, 10) stitches of back panel normally (not using 3 needle bind off) since this is the gap between the two front panels. Position the second front panel and back panel so that the right sides are touching each other and the wrong sides are facing outwards. Using 3 needle bind off, cast off 28 (32, 38, 44) stitches of front panel and back panel together. Now, both front panels have been attached to the back panel.
- Collar:
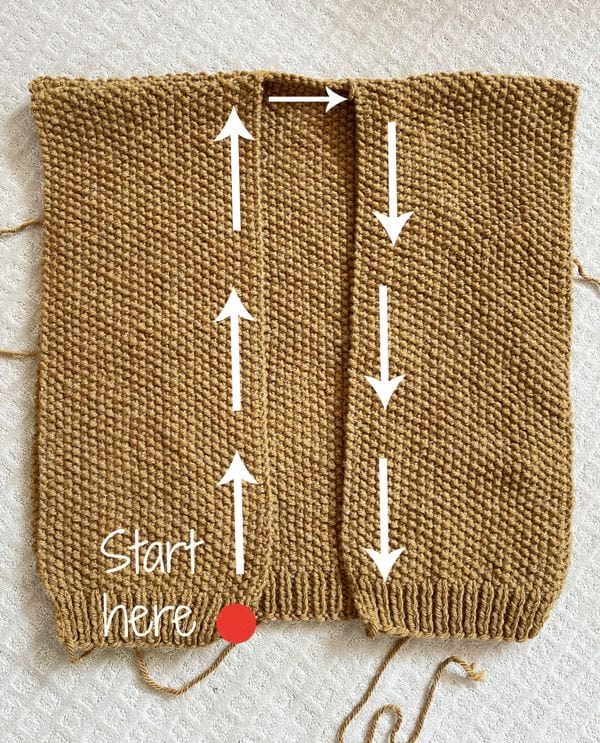
To create a clean and simple edge, we will be picking up stitches along the collar and immediately casting them off (we will never have more than 2 stitches on our right needle at the same time). Starting in bottom left corner, we will be picking up stitches along the front panel, across the back panel (pick up every stitch for the back panel portion), and down the front panel.
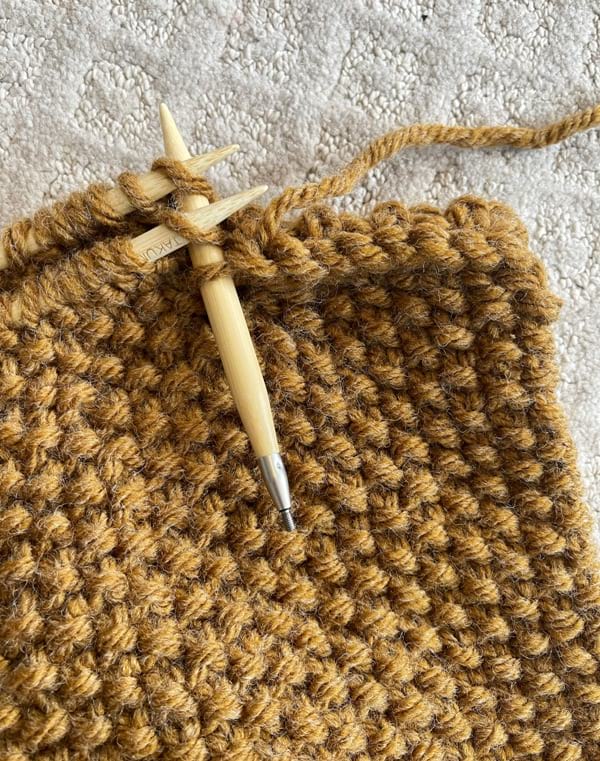
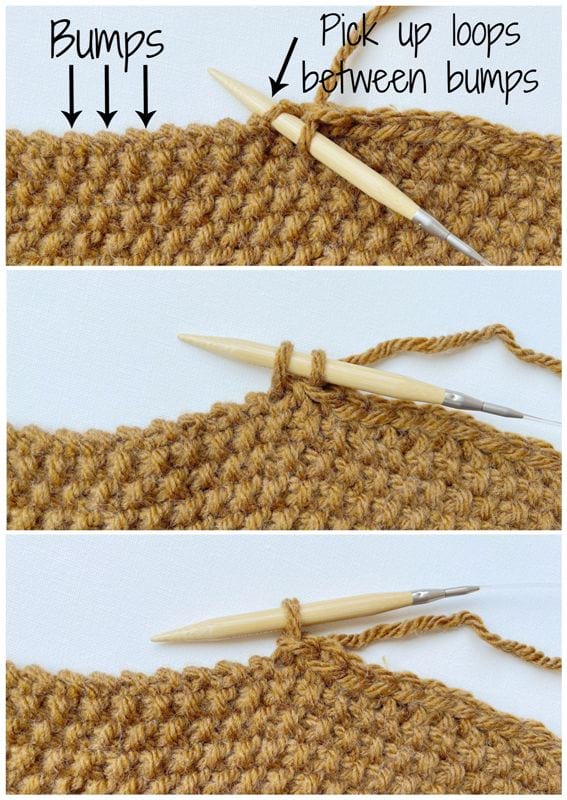
Note that the edge consists of bumps (purl stitches) separated by loops (knit stitches). When picking up stitches along the vertical edge of seed stitch, pick up each loop that is separated by a bump. To pick up stitches using working yarn, insert your needle into the first stitch along the edge. Yarn over, then pull up a loop. Keep inserting your needle into the next stitch, yarning over, and pulling up a loop. As soon as you have 2 stitches on your right needle, cast off a stitch. Continue working in this way until you have worked a clean edge along the entire collar. Be sure to work loosely when casting off the stitches, otherwise the front panels will pull up if the cast off is too tight. Fasten off and weave in end.
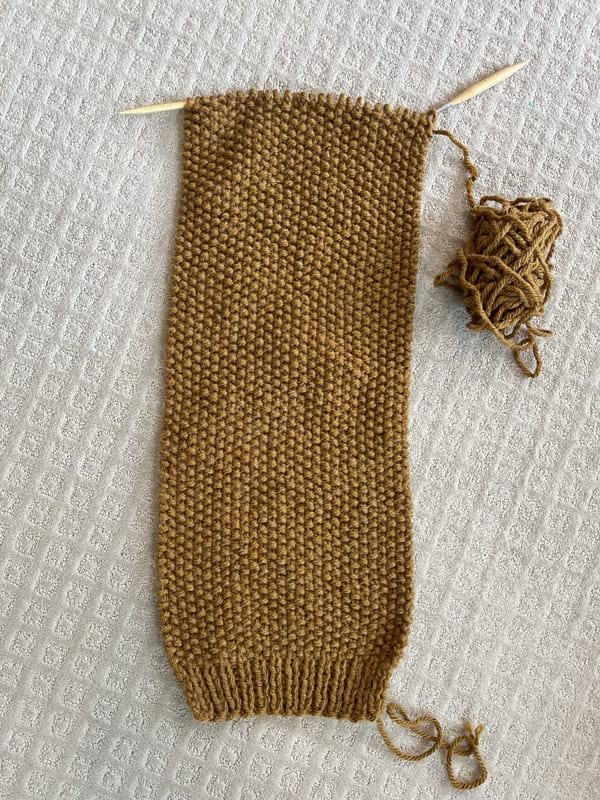
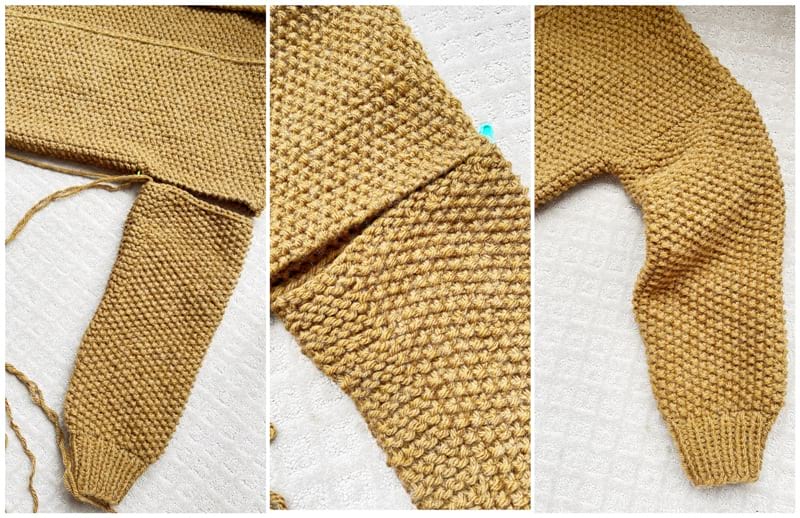
- Sleeves (make 2):
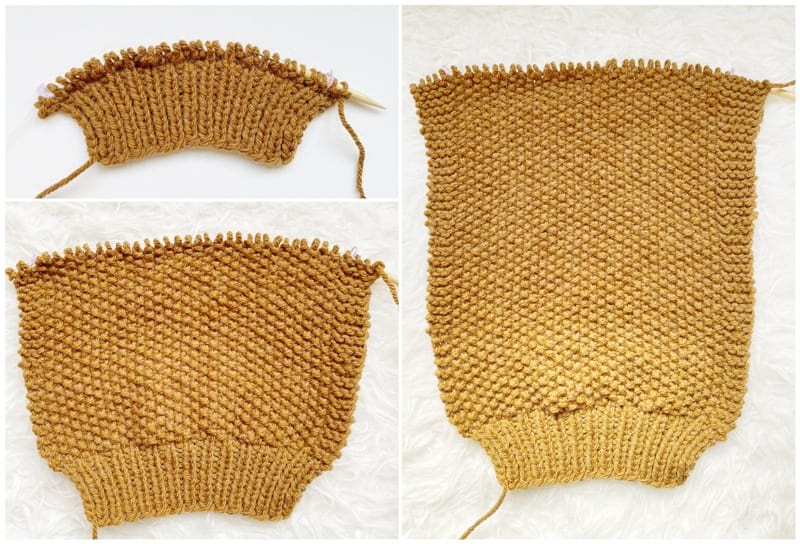
We will begin with the ribbing.
Using 6.5 mm needles,
Cast on 30 (34, 40, 46) stitches using the long tail cast-on.
Row 1 (Wrong side): *P1, K1*, rep across. (30, 34, 40, 46)
R2 (Right side): *P1, K1*, rep across. (30, 34, 40, 46)
R3-11: Repeat Rows 1 and 2. (30, 34, 40, 46)
The ribbing is complete. We will now do a set-up row to increase the number of stitches and to prepare for the seed stitch. Please follow the Row 12 for your specific size:
Switch to 8 mm needles,
Size S/M:
R12: *K4, KFB*, rep 6 times. (36)
Size L/XL:
R12: K2. *K4, KFB*, rep 6 times. K2. (40)
Size 2X/3X:
K12: K5. *K4, KFB*, rep 6 times. K5. (46)
Size 4X/5X:
K12: K2. *K6, KFB*, rep 6 times. K2. (52)
We will now begin the seed stitch portion which is framed by the garter stitch. Everything between the square brackets [ ] is the seed stitch worked exactly like the back and front panels. The seed stitch is framed by garter stitches (knit stitches on even and odd rows), and these garter stitches are where we will work the increases so that the seed stitch section within the [ ] remains undisturbed.
We will use two stitch markers to indicate where the seed stitch section begins and ends for each row. Continue following the pattern for ALL sizes now:
R13: K2, PM. [*P1, K1* across till last 2 sts.] PM, K2. (36, 40, 46, 52)
R14: K2, SM. [*K1, P1* across till last 2 sts.] SM, K2. (36, 40, 46, 52)
R15-29: Rep Rows 13 and 14 (end on R13 repeat).
R30 (INC ROW): K1, KFB, SM. [*K1, P1* across till marker.] SM, KFB, K1. (38, 42, 48, 54)
R31: K3, SM. [*P1, K1* across till marker.] SM, K3. (38, 42, 48, 54)
R32: K3, SM. [*K1, P1*, across till marker.] SM, K3. (38, 42, 48, 54)
R33-49: Repeat Rows 31 and 32 (end on R31 repeat). (38, 42, 48, 54)
R50 (INC ROW): K1, KFB, K1, SM. [*K1, P1* across till marker.] SM, K1, KFB, K1. (40, 44, 50, 56)
R51: K4, SM. [*P1, K1* across till marker.] SM, K4. (40, 44, 50, 56)
R52: K4, SM. [*K1, P1* across till marker.] SM, K4. (40, 44, 50, 56)
R53-71: Repeat Rows 51 and 52 (end on a R51 repeat). (40, 44, 50, 56)
R72 (INC ROW): K1, KFB, K2, SM. [*K1, P1* across till marker.] SM, K2, KFB, K1. (42, 46, 52, 58)
R73: K5, SM. [*P1, K1* across till marker.] SM, K5. (42, 46, 52, 58)
R74: K5, SM. [*K1, P1* across till marker.] SM, K5. (42, 46, 52, 58)
R75-83: Repeat Rows 73 and 74 (end off on a R73 repeat).
Cast off all stitches knitwise and leave long end for assembly.
- Assembly:
Fold each sleeve in half lengthwise.
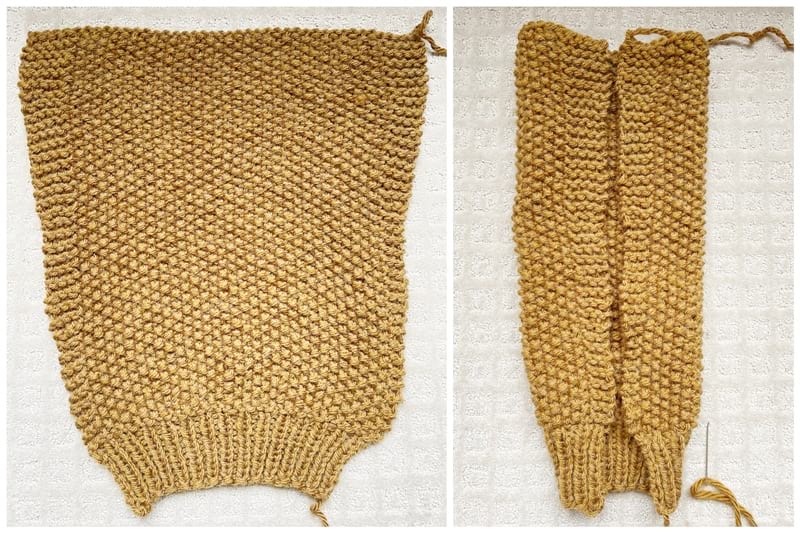
Use the mattress stitch (vertical invisible seaming technique) for garter stitch to seam sides together. The garter stitch bumps consist of “smiles” and “frowns”. With the right sides of the sleeve facing you, connect the frowns of the left side to the smiles of the right side as demonstrated in this video HERE.
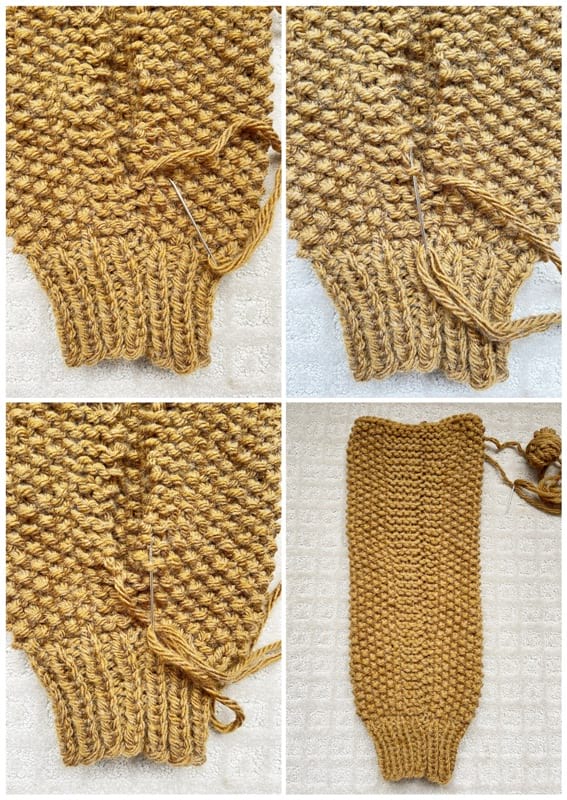
Use the mattress stitch (vertical invisible seaming technique) for seed stitch to seam the sides of the front and back panels together with the right sides facing you. This video HERE demonstrates some different ways to work the mattress stitch – I used the first method where you connect the purl bumps from both sides together. Leave space for the arm hole (you can place your sleeve right next to the panels to see exactly how much space to leave – you can indicate where to stop seaming the sides of the panels with a stitch marker).

Whip stitch the tops of the sleeves to the arm holes (remember to have the wrong sides facing you when whip stitching two pieces together).
Block your final cardigan and enjoy wearing your beautiful handmade garment!
************************
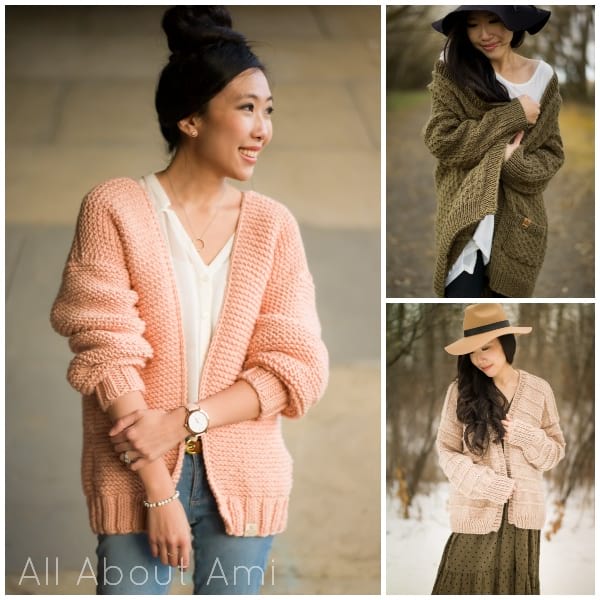
As you know, I am a BIG fan of chunky and cozy oversized cardigans as they have such a chic look! They are so easy to throw on over any outfit in the fall and winter as they look beautiful over dresses, jeans, leggings and jumpsuits!
I have always wanted to knit a cardigan using the seed stitch as it is one of my favorite stitches. I adore the texture and how it lays flat with no curling. I also LOVE this “Arrowwood” shade of Hue + Me yarn as I think it looks amazing with this stitch and can match with many outfits in my wardrobe.
We took these final photos of the Woodbury Cardigan in the Hoodoos in Drumheller, Alberta. We took a family vacation there on our very first RV trip at the end of the summer, and we were amazed by the beautiful and unique landscape! I finished this cardigan just in time as I brought it along our trip, hoping that we might be able to sneak in a photoshoot. Thankfully, the weather was great on this day and it was not busy at all when we visited the stunning Hoodoos!
I know that this cardigan will be a staple in my wardrobe, and I hope you enjoy knitting your own Woodbury Cardigans as well! It is a quick knit since it uses bulky level 5 yarn, and I actually managed to design and knit this cardigan within two weeks!
If you love chunky knit cardigans, please check out my other designs that all use bulky level 5 yarn: the Downtown Cardigan, the Dotty Cardigan, and the Ridgeline Cardigan. They all work up quickly and it is so satisfying being able to whip up a garment that you can wear all fall/winter long. If you loved the popular Downtown Cardigan, I hope you will love the Woodbury Cardigan too as it is essentially the same cardigan using the seed stitch instead of the garter stitch!
Feel free to pin the below image to your Pinterest boards! Thank you for supporting my work and helping to share my designs with your friends and loved ones! Happy knitting, my fellow fiber enthusiasts!
{This post is sponsored by Lion Brand Yarn! I’ve loved working with their yarn throughout the years and I’m thrilled that I get to collaborate with them on my knit and crochet projects!}
This pattern is an original pattern by Stephanie Lau of All About Ami. Please do not claim this pattern as your own. If you wish to share this pattern, you may link to this pattern but please do not reprint it on your site. You may keep a copy for your own personal use but please DO NOT sell the pattern or distribute it.
You may sell products made from this pattern but please clearly credit the design to me, Stephanie Lau of All About Ami, and provide a link to my blog www.AllAboutAmi.com. Permission is NOT granted for mass production or factory manufacturing of any kind. Thank you for being respectful and for your understanding!