***You can purchase an INEXPENSIVE AD-FREE PDF of this pattern on Etsy HERE! This beautifully formatted PDF includes the step-by-step pictures and is a total of 4 pages including the cover page. This pattern is also available in the “Easy & Modern Knits PATTERN BUNDLE” which includes over 30 beautiful designs at a discounted price – check out the bundle HERE! Lion Brand Yarn has put together a convenient kit HERE that contains all the yarn you need to make this luxurious scarf (choose any color you would like)!
Ever since I released my popular crocheted Willow Scarf using Wool-Ease Thick & Quick, I have received many requests to make a knit version! The Willow Scarf has luxurious fringe and cozy pockets (pocket scarves have been taking the crochet and knit world by storm), so I wanted to make sure that the knit counterpart had these same elements as well! I went with a lovely ribbed design that uses basic knits and purls, and I made sure to give this scarf clean edges by using the special chained edge technique (see details in the pattern below). With this technique, you work the first and last stitch of each right and wrong side row in a special manner. I absolutely fell in love with this new “Flax” color as it is such a gorgeous and rich color!
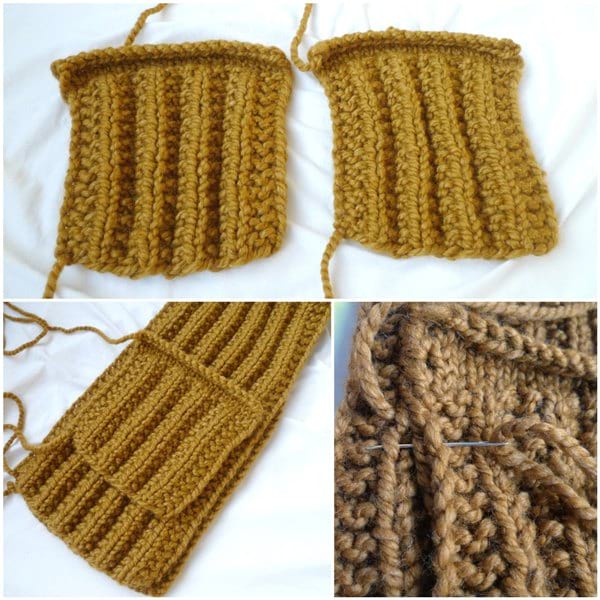
Once I was happy with the length, it was time to knit the two pockets! I decided to use the same ribbing pattern and worked some stockinette stitches towards the top for some visual interest. When it was time to seam the pockets to the scarf, I placed the pockets on the scarf and made sure that the ribbing of the pockets lined up with the ribbing of the scarf for a continuous and seamless look! I used the whip stitch and seamed both the front and back loops of the chained edge of the pocket to the outermost loop of the stockinette V section (explained in the pattern below). It was very handy having this line as a guide when placing and whip stitching the pocket into place!
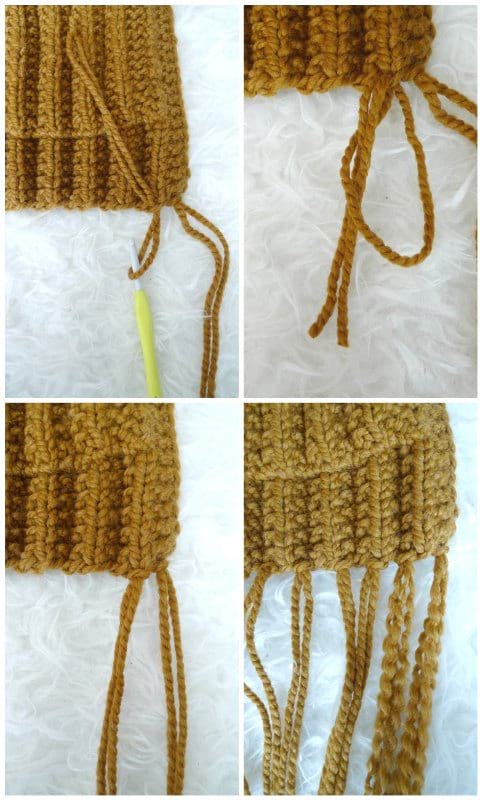
I used a large crochet hook to add strands of fringe as shown below. For a fuller look, I carefully untwisted the strands of Wool-Ease Thick & Quick so that two strands of yarn became four strands. You could also add tassels or leave the scarf without fringe if you wanted!
*****************************
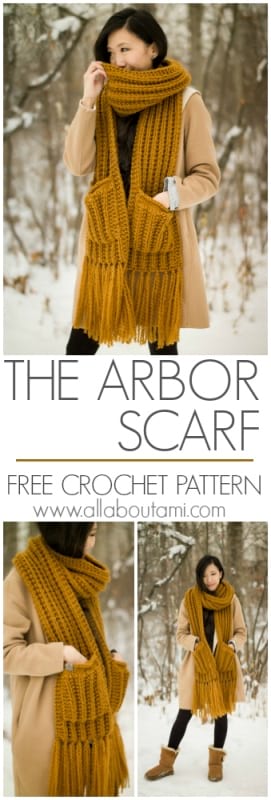
Here is the free pattern for the Arbor Scarf:
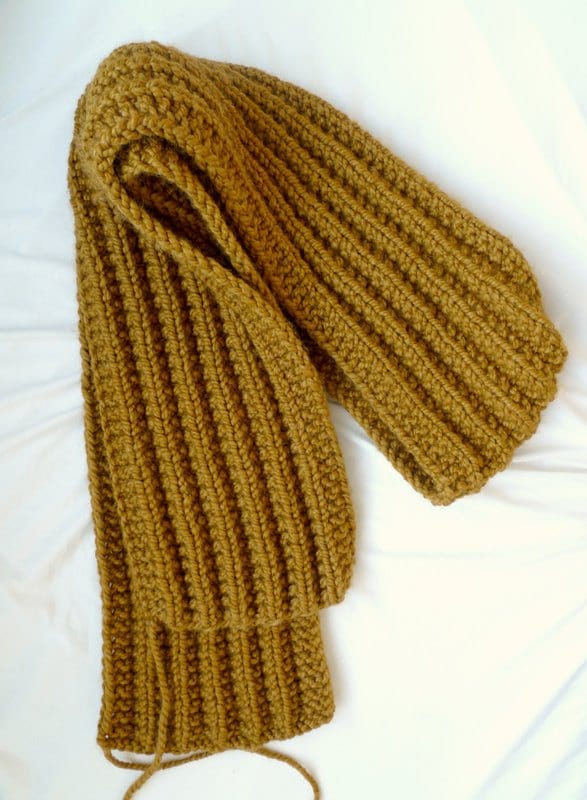
Knit this stunning statement scarf using a warm wool blend yarn in your favorite shade! This chic scarf will be a staple in your winter wardrobe with the cozy pockets and luxurious fringe!
Notes:
- This scarf is knit in a beautiful ribbed design using only knit and purl stitches worked in turned rows.
- Chained edges are created by working the first and last stitch of each wrong and right side row in a special way (written in the pattern). This gives a smooth and clean edge.
- Optional pockets and fringe are added at the end.
- If you want to make the scarf wider, increase the number of stitches you cast on. If you want to make the scarf more narrow, decrease the number of stitches you cast on. Your cast on number must be a multiple of 4 + 3 (for example: 23, 31, 35, 39, etc).
- If you want to make the scarf longer, increase the number of rows. If you want to make the scarf shorter, decrease the number of rows.
- You can use a felting tool when joining a new skein of Wool-Ease Thick & Quick for this scarf (check out my blog post HERE to see how to join a new skein using this technique – no knots or weaving in ends required)!
- To have fuller fringe, you can separate and untwist the strands of Wool-Ease Thick & Quick yarn.
Materials:
- 9 mm 24″ circular knitting needles (flat needles can also be used)
- Wool-Ease Thick & Quick by Lion Brand Yarn (super bulky level 6) – 700 g/436 yards (5 skeins – be sure to check the yardage of your colourway as different shades of Wool-Ease Thick & Quick vary in yardage) – I used the colourway “Flax”; the convenient Lion Brand Yarn kit can be found HERE
- Yarn Needle
- Steamer for Blocking
- Tags (optional) and embroidery floss for attaching tags
- Large crochet hook to attach fringe
Gauge: 13 sts and 15 rows = 4″/10 cm (worked in ribbing pattern as described in pattern)
PATTERN
Scarf
Using long tail cast-on, cast on 27 stitches. {Optional: Leave an extra long initial tail to incorporate into the fringe later on, at least 11”/28 cm.}
R1 (Wrong Side Row): Knit first st through back loop. K2, P1. *K3, P1*, repeat until last 3 sts. K3. (27 sts)
R2 (Right Side Row): Slip first st purlwise with yarn in front. K4, P1. *K3, P1*, repeat until last 5 sts. K4, slip last st purlwise with yarn in front. (27 sts)
R3-323: Repeat Rows 1 and 2. (27 sts)
Cast off all stitches. {Optional: Leave an extra long final tail to incorporate into the fringe later on, at least 11”/28 cm.}
Pockets (make 2)
Using long tail cast-on, cast on 19 stitches.
R1 (Wrong Side Row): Knit first st through back loop. K2, P1. *K3, P1*, repeat until last 3 sts. K3. (19 sts)
R2 (Right Side Row): Slip first st purlwise with yarn in front. K4, P1. *K3, P1*, repeat until last 5 sts. K4, slip last st purlwise with yarn in front. (19 sts)
R3-26: Repeat Rows 1 and 2. (19 sts)
R27 (Wrong Side Row): Knit first st through back loop. Purl all sts across until last stitch. Knit last stitch. (19 sts)
R28 (Right Side Row): Slip first st purlwise with yarn in front. Knit all sts across until last stitch. Slip last st purlwise with yarn in front. (19 sts)
R29: Repeat R27.
Cast off all stitches and leave long end for sewing.
Attaching Pockets to Scarf:
Position pockets about 2.75”/7 cm above bottom of scarf. The scarf has 6 main “V sections” where you can see the stockinette stitches running upwards prominently (between each V section is a valley). The pocket has 4 main “V sections”. Position the pocket so that the 4 main V sections of the pocket line up with the 4 middle V sections of the scarf. The edges of the pocket should line up with the outermost V sections of the scarf (you can seam the pocket to the loop of the V on the outermost side). Seam down the pocket side, across the bottom, and up the other side. Weave in end.

Adding Fringe:
Cut 18 strands of yarn, each 22” long (9 strands for each side). Fold the strands in half. Insert a crochet hook into a space at the bottom, from wrong side to right side. Pull folded loop of strand through. Pull tips of the strands through the loop. Pull tightly and repeat this process across the bottom edge, ensuring there is some space between each fringe (we do not want to space them too closely together, otherwise the bottom will bulge). Repeat for both sides, aiming for 9 strands of fringe on each side.
If fuller fringe is desired, you can carefully untwist each strand of yarn – each strand untwists into two separate strands (so each chunk of 2-stranded fringe becomes 4 strands). Block fringe and trim if necessary (my final fringe is about 10.5”/27 cm in length).
If fuller fringe is desired, you can carefully untwist each strand of yarn – each strand untwists into two separate strands (so each chunk of 2-stranded fringe becomes 4 strands). Block fringe and trim if necessary (my final fringe is about 10.5”/27 cm in length).
Finished Dimensions: 8”/20 cm wide, 86.5”/220 cm long (not including fringe)
**************************
The Arbor Scarf is such a classic design with beautiful texture! I love how you only need to know how to knit and purl to create this scarf, and the chained edges give such clean and smooth sides.
This “Flax” shade is one of my all-time favourite colourways of Wool-Ease Thick & Quick as it is such a rich and earthy colour! It looks stunning against my neutral jackets, and I am itching to knit and crochet more with this shade. Ryan tried on the Arbor Scarf, and it looked wonderful on him too! The Arbor Scarf would make a wonderful gift for any loved ones in your life!
I love pockets and being able to rest my hands in a cozy and warm place. The Arbor Scarf exudes comfort and warmth as your neck, chest and hands feel so warm when you wear this stunning design using this wool blend yarn! I love pocket scarves so much, and I hope you enjoy knitting this design too!
Once again, you can find the Lion Brand Yarn kit HERE, the Etsy PDF HERE, and the crochet version called the “Willow Scarf” HERE! Thank you for your support, everyone, and happy knitting!
{This post is sponsored by Lion Brand Yarn! I’ve loved working with their yarn throughout the years and I’m thrilled that I get to collaborate with them every month!}
This pattern is an original pattern by Stephanie Lau of All About Ami. Please do not claim this pattern as your own. If you wish to share this pattern, you may link to this pattern but please do not reprint it on your site. You may keep a copy for your own personal use but please DO NOT sell the pattern or distribute it.
You may sell products made from this pattern but please clearly credit the design to me, Stephanie Lau of All About Ami, and provide a link to my blog www.AllAboutAmi.com. Permission is NOT granted for mass production or factory manufacturing of any kind. Thank you for being respectful and for your understanding!