***You can purchase an INEXPENSIVE AD-FREE PDF of this pattern on Etsy HERE! This beautifully formatted PDF includes the step-by-step pictures and pattern and is a total of 7 pages including the cover page (includes the detailed alpine stitch tutorial)! This pattern is also available in the “Home Decor Crochet Pattern Bundle” which includes over 10 beautiful designs (blankets, baskets, cushions, carry-all trays) at a discounted price – check out the bundle HERE!
***Please note that this blog post begins with the step-by-step photo tutorial. Keep scrolling down to see the free crochet pattern with all the written numbers!
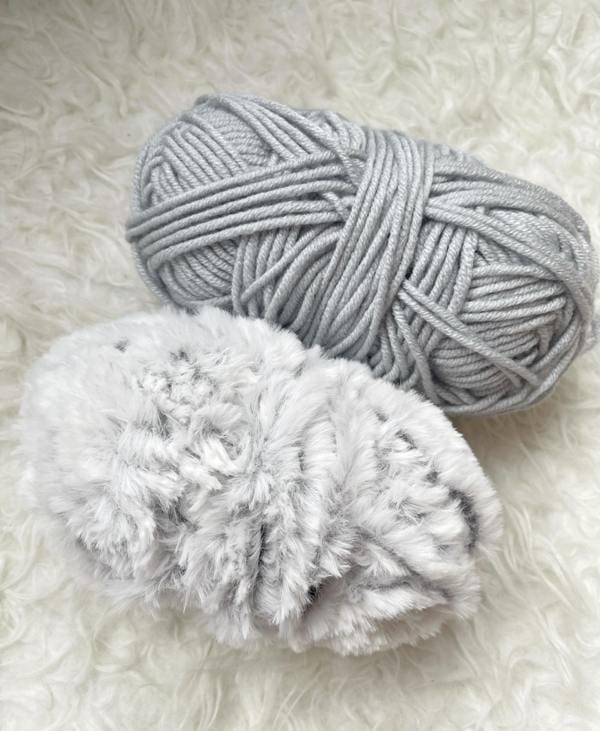
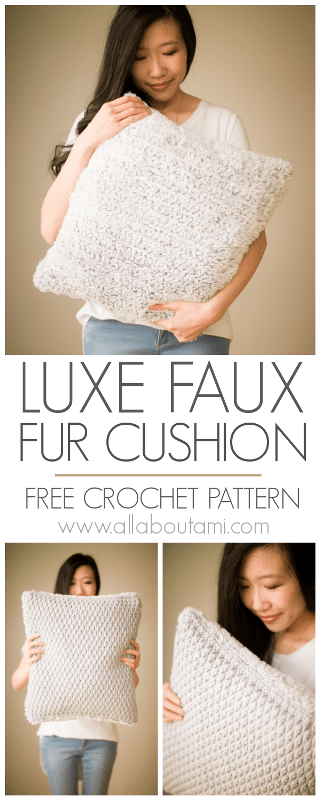
I love combining different textures in my projects, and one of my favorite cowls to design has been the “Luxe Faux Fur Cowl” as I have both a crochet and knit version. This cowl design has two contrasting sides that use different yarns and textures: a faux fur side and a side using regular yarn with the alpine stitch. I thought it would be wonderful to apply this same concept to a home decor item so that I could enjoy these textures year round and in my home in the form of a cushion! I actually started this design a year ago and finished it half a year ago – I am excited to finally share it on the blog. I used these two yarns for my Luxe Faux Fur Cushion: Go For Faux and Color Made Easy, both by Lion Brand Yarn. Note that Color Made Easy has been sadly discontinued now so it is harder to find, but you can substitute any bulky yarn such as Hue + Me or Woolspun. Choose two complementary shades that you think will go well together!
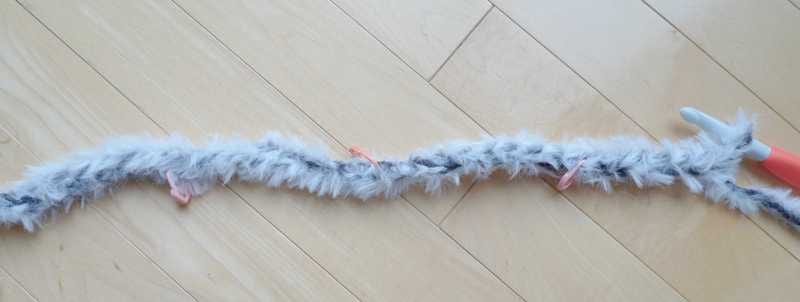
To make this cushion, we will crochet two separate squares using the two different yarns and then seam them together. First, we will start with the faux fur side. Since it can be difficult to see your stitches when crocheting with faux fur yarn, here are some tips: for the initial chain length, you can add stitch markers to every 10th stitch (e.g. 10, 20, 30) to help you keep track and serve as landmarks when you are working back down the chain length for the first row. You need to feel for the next stitch when crocheting with this yarn since you cannot easily see your stitches. When working each row, remember that by the halfway point you should have reached half the number of stitches (and by the one quarter mark you should have reached one quarter of the stitches). To help you keep track of your rows, you can write them down or keep a note on your phone. Since this is a cushion, you can keep crocheting the rows until your desired height, so it is not especially crucial to keep track of your number of rows.
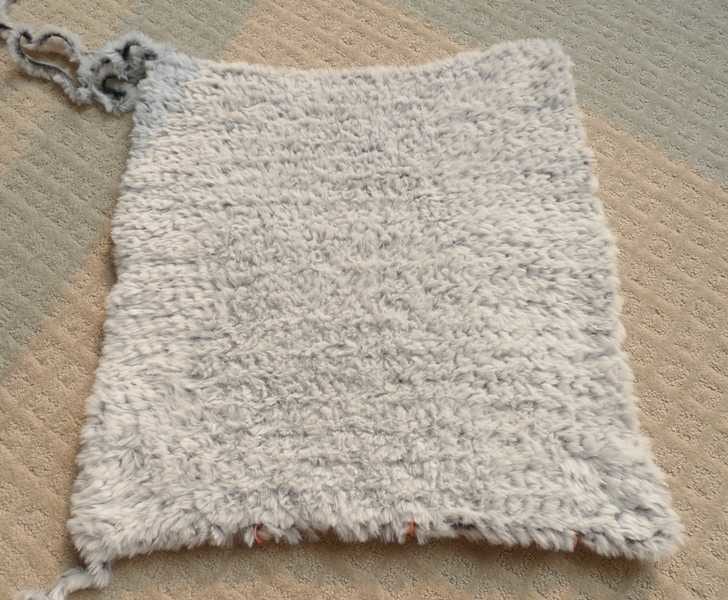
Half of the cushion is complete! Working with faux fur yarn is amazing since all the stitches get blurred. This yarn is so soft and I adore this shade!
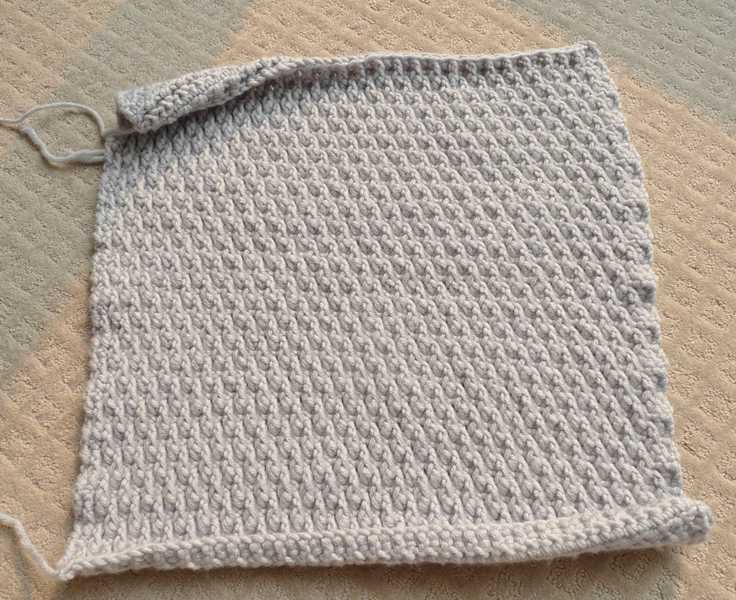
Next, the other half is crocheted using bulky yarn and the alpine stitch! The alpine stitch is one of my favorite stitches since it has such amazing texture. It is very fun building up the rows, and this stitch is worked over a four row repeat. I have a separate blog post dedicated to how to crochet the alpine stitch in a step-by-step tutorial HERE so please reference this post if this stitch is new to you.
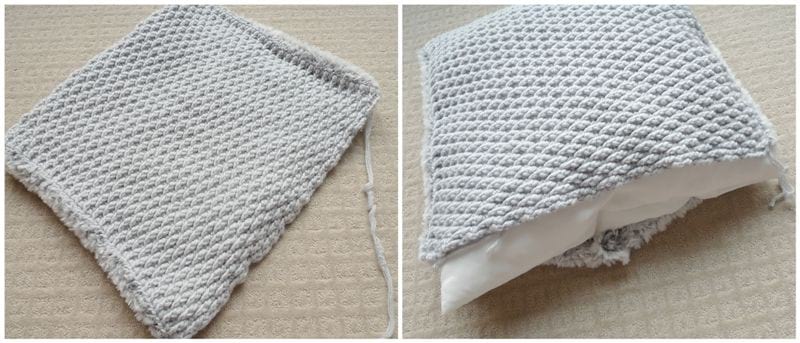
Once you have crocheted both squares, it is time to seam them together! Place the squares on top of each other so that the right sides are touching and facing each other and the wrong sides are on the outside (there is no right or wrong side for the faux fur square). When we whip stitch the wrong sides together, it makes the seam less visible. Using the bulky yarn tail, whip stitch three sides together and leave one side open so we can insert the cushion!
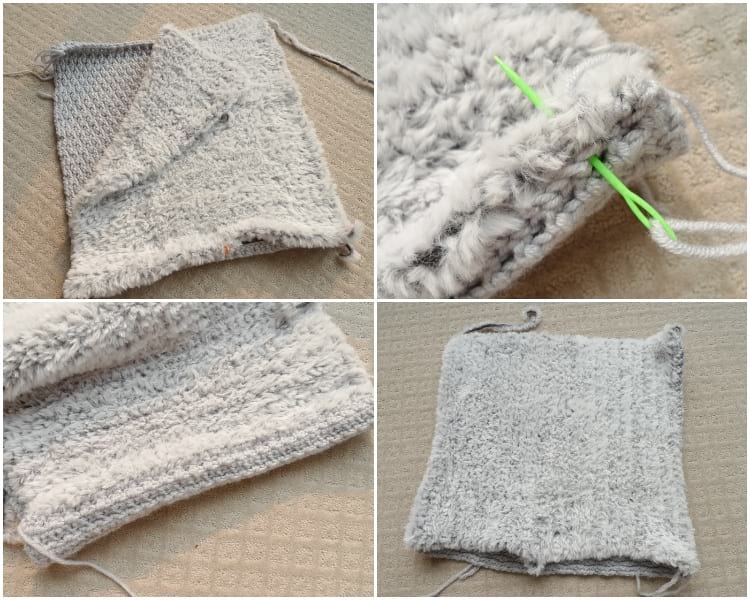
Once the three sides have been seamed together, flip it inside out so that now the right sides are on the outside. Insert your cushion and whip stitch the last side. Note that you can add a button or zipper closure if you want to be able to remove the cushion. If you are looking for an affordable pillow insert, I found ours at IKEA (called the “ULLKAKTUS“) and it comes in different shades!
***************************
Here is the free crochet pattern for the Luxe Faux Fur Cushion:
Crochet this gorgeous cushion that has two contrasting textures/sides! Display each side for a different look and add a luxurious touch to any room in your home!
Materials:
- 2 skeins of Go For Faux Yarn in “Chinchilla” (super bulky level 6 yarn); 116 g/75 yds
- 2 skeins of Color Made Easy in “Shade” (bulky level 5 yarn); 282 g/350 yds; you can substitute any bulky yarn such as “Hue + Me” or “Woolspun“
- 9 mm and 6 mm Clover Amour hooks
- 20″ x 20″ pillow insert (I used the “ULLKAKTUS” from IKEA); you can find pillow forms on Amazon HERE
- Lock ring stitch markers
- Bent tip tapestry needle
Notes:
- This luxurious cushion is composed of two separate squares that are crocheted in turned rows and then seamed together. One square is crocheted with Go For Faux yarn (super bulky level 6 yarn) while the other square is crocheted using Color Made Easy yarn (bulky level 5 yarn).
- The faux fur square is created by working single crochets in the front loops only (FLO). Since it can be hard to count the number of rows using faux fur yarn, you can write down your number of rows on your phone or a piece of paper to help keep track.
- When doing the initial chain stitches using faux fur yarn, you can use a stitch marker to indicate every 10th stitch (e.g. 10, 20, and 30) to serve as landmarks when you are crocheting back down the chain for the first row.
- The bulky square is crocheted using the Alpine Stitch which is worked over a 4 row repeat (the initial number of chains should be an odd number). The turning chain does not count as a stitch. Even rows are worked by single crocheting in each stitch across. The front post double crochets of the odd rows are worked around the posts of the double crochets from two rows back (e.g. the fpdc of Row 5 are working around the posts of the double crochets of Row 3). Please reference my blog post HERE for a detailed tutorial and video on how to work this stitch.
- Note that this cushion is sized to fit a 20″ x 20″ pillow form. The final dimensions are less than the pillow form so that the pillow can be stretched taut over the pillow form. The faux fur square can stretch quite a bit, so getting exact gauge is not crucial.
- You can adjust the dimensions of your squares if you have pillow forms of different sizes. Decrease the number of initial chains and rows to decrease the size of the squares. Increase the number of initial chains and rows to increase the size of the squares. Just remember that the side using the alpine stitch must have an odd number for the initial number of chains. You can use the gauge to calculate approximately how many stitches you will need.
- Once both squares are complete, they are seamed together using the whip stitch. If you would like to make the pillow form removable, you can add a zipper or buttons to one side.
- FLO: front loops only
- Fpdc (front post double crochet): Yarn over, insert hook from front to back to front around the post of the next st two rows below. YO, pull up a loop, YO, pull through 2 loops on hook, YO, pull through remaining two loops on hook.
Gauge:
- Faux Fur Side – 8 sts and 8.5 rows = 4″ (10 cm) in single crochet in front loop only
- Bulky Alpine Side – 12 sts and 12 rows = 4″ (10 cm) in alpine stitch
Finished Measurements: 20″/51 cm x 20″/51 cm (dimensions before inserting pillow form are: 18″/46 cm x 18″/46 cm)
PATTERN:
***Faux Fur Square
Using 9 mm hook
Chain 36
Row 1: Starting in second chain from hook, single crochet in front loops only across. (35 sts)
Row 2: Chain 1, turn. Starting in second st from hook, sc in FLO. (35 sts)
R3-39: Repeat R2 (or until square is 18″ long or to desired length).
Fasten off and weave in end.
***Bulky Alpine Square
Using 6 mm hook,
Chain 55
Row 1: Starting in 3rd chain from hook, dc across. (53 sts)
Row 2: Chain 1, turn. Starting in second st from hook, sc in each st across. (53 sts)
Row 3: Chain 2, turn. Dc in first st. *Fpdc around the dc below the next st, dc in next st*, repeat from * till end. (53 sts)
Row 4: Chain 1, turn. Starting in second st from hook, sc in each st across. (53 sts)
Row 5: Chain 2, turn. Dc in first 2 sts. *Fpdc around dc below next st, dc in next st*, repeat from * til last st. Dc in last st. (53 sts)
Row 6-53: Repeat Rows 2-5 or until desired length is achieved.
Fasten off and leave long end for sewing (you will use this end to seam together the entire cushion).
Please reference this video below to see how to crochet the alpine stitch:
Assembly
- Lay both squares on top of each other with right sides touching and facing each other and wrong sides facing outwards (there is no right or wrong side of the faux fur square). Using bulky yarn tail, whip stitch 3 sides together. Whip stitching the wrong sides together makes the seam less visible.
- Flip pillow inside out so right sides are now on the outside and insert the pillow form. Whip stitch the last side together and weave in end.
***************************
I adore how my Luxe Faux Fur Cushion turned out! Both sides are stunning, and I love cuddling this faux fur side since it is so soft.
Doesn’t the alpine stitch side look amazing? This stitch adds so much visual interest and texture. I hope you have fun coming up with different color combinations to match with your homes!
This cushion is a wonderful way to add a touch of crochet to any room, and I love how it is such a versatile design since you can display the different sides for different looks. It is such a beautiful cushion to lean on and cuddle, and it adds such a sophisticated look to your space!
Since we spend so much time at home, I have loved adding more crochet and knit home decor items to our rooms. I have a “Home Decor Crochet Pattern Bundle” that you can check out as there are numerous basket, blanket, carry-all tray, and cushion designs. Crochet items add so much warmth and comfort, and it fills me with such a sense of accomplishment when I see these items in my home. I hope you enjoy filling your homes with beautiful handmade items as well! Once again, you can purchase the concise PDF HERE in my Etsy shop if you are interested in crocheting this cushion (includes all the step-by-step pictures and detailed alpine stitch tutorial). Thanks for your support, everyone!
Note: Thank you to Lion Brand Yarn for providing the yarn for this design!
This pattern is an original pattern by Stephanie Lau of All About Ami. Please do not claim this pattern as your own. If you wish to share this pattern, you may link to this pattern but please do not reprint it on your site. You may keep a copy for your own personal use but please DO NOT sell the pattern or distribute it.
You may sell products made from this pattern but please clearly credit the design to me, Stephanie Lau of All About Ami, and provide a link to my blog www.AllAboutAmi.com. Permission is NOT granted for mass production or factory manufacturing of any kind. Thank you for being respectful and for your understanding!