***You can purchase an INEXPENSIVE AD-FREE PDF of this pattern on Etsy HERE and on LoveCrochet HERE! This beautifully formatted PDF includes ALL the step-by-step cabling pictures and pattern, and is a total of 7 pages including the cover page!
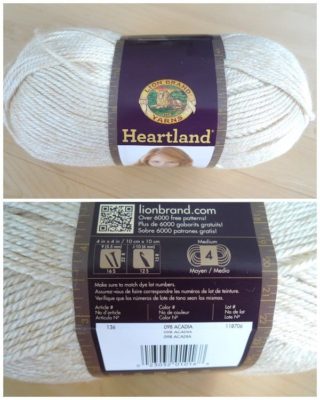
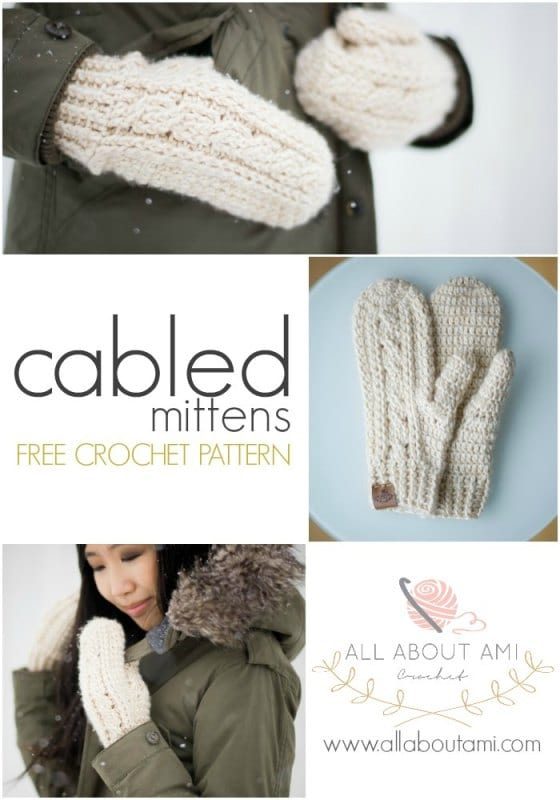
After designing my Cabled Slouchy Beanie, Cabled Legwarmers, and Chunky Braided Cabled Blanket, I wanted to crochet some elegant and classic cabled mittens! I had followed Julee Reeves’ free pattern to make Cabled Wristwarmers HERE, but I wanted to work in rounds (the wristwarmers were worked in turned rows) and make some mittens that would fully cover my fingertips as well. I had no doubt which yarn I wanted to use for this project: Lion Brand Yarn’s Heartland, my favourite acrylic yarn ever! It is so incredibly soft with beautiful drape, and I love the range of colours available. I used Heartland for previous projects such as my Cabled Slouchy Beanie and Granite Cape! As a reminder, Heartland is a worsted weight (level 4) yarn, and I went with the colour “Acadia”.
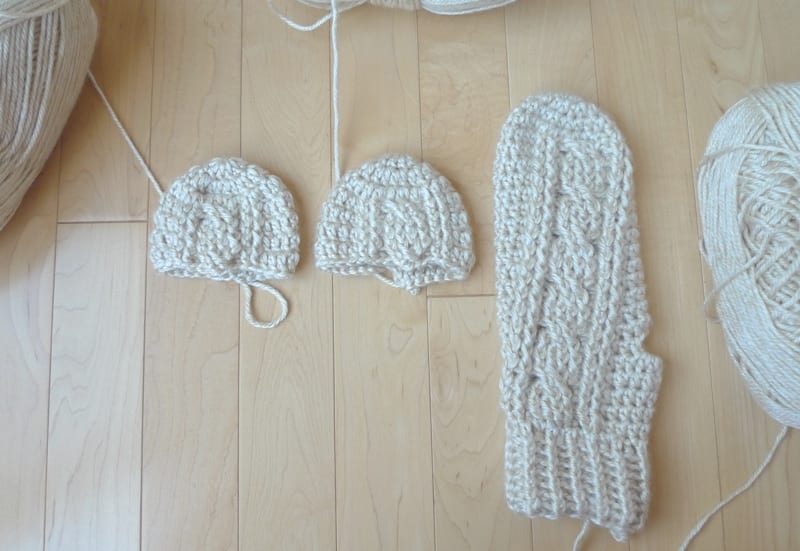
I actually went through A LOT of trials before I settled upon a design that I was happy with. I started off using half double crochets as the main stitch but I forgot about the inherent nature of half double crochets to slant, particularly when worked in a round. This resulted in the cabling design completely slanting on the mitten as seen below- haha this was definitely not the look I was going for! I tried using different hook sizes and ended up going with double crochets and a 4 mm hook to get the sizing that I wanted!
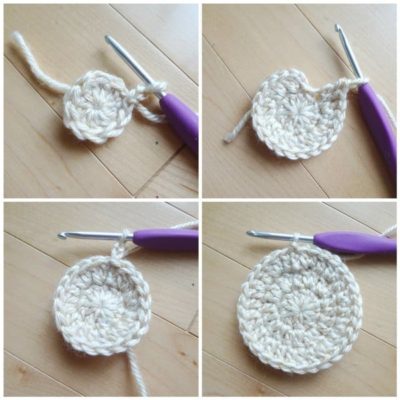
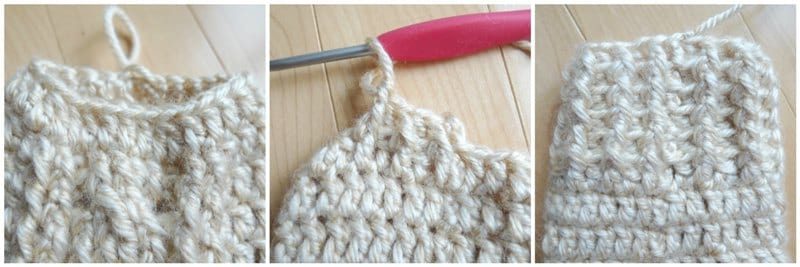
Let’s begin the tutorial to crochet your very own Cabled Mittens! Start off with a magic circle (see how to do this HERE) and increase in subsequent rounds. It’s important to note that you should slip stitch to the first double crochet to close off the round rather than the initial Chain 2! This helps give a nice straight seam!
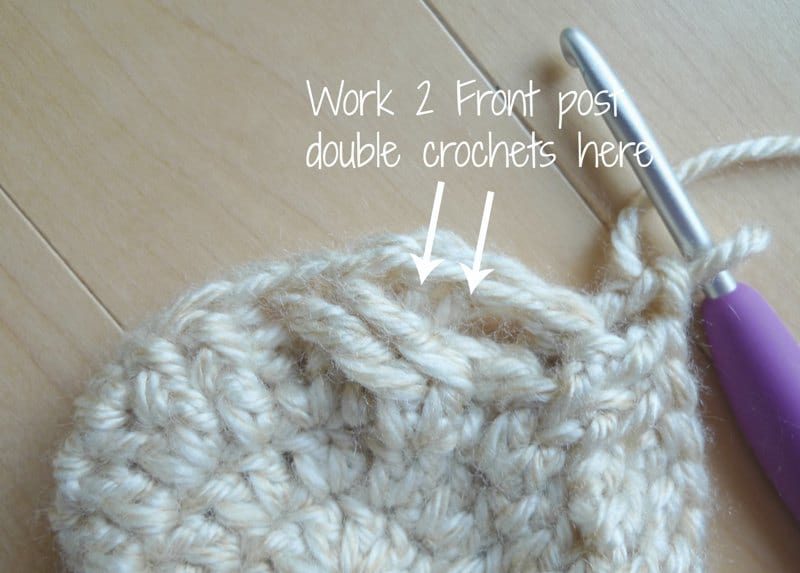
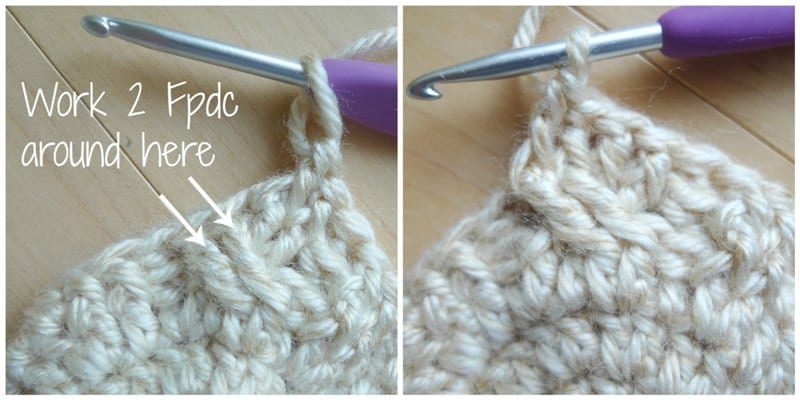
You will begin the cabling in Round 4! To help frame the cable, work 2 Front post double crochets.
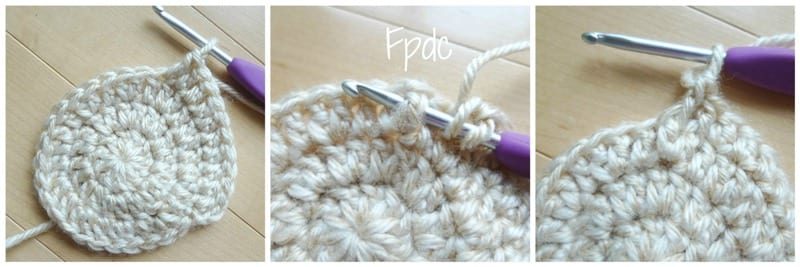
Then, work 1 Back post double crochet.
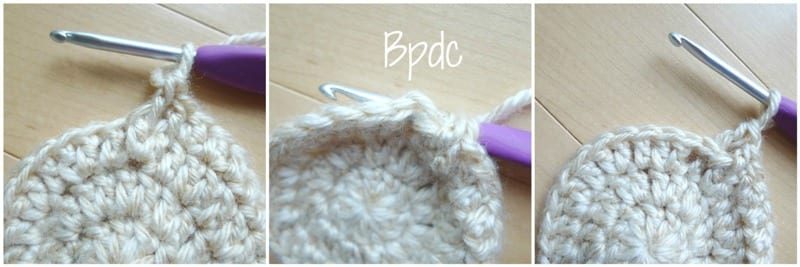
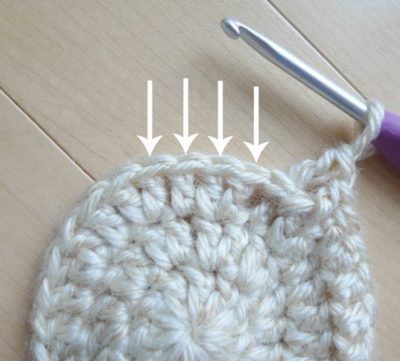
The cable will be worked upon these next four stitches indicated below.
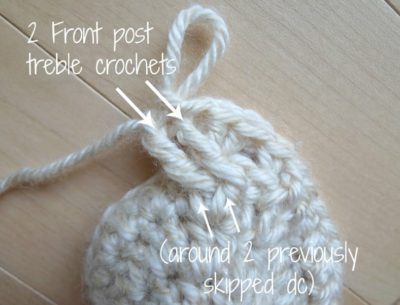
Skip the next two double crochets and work two front post treble crochets around the next two stitches.
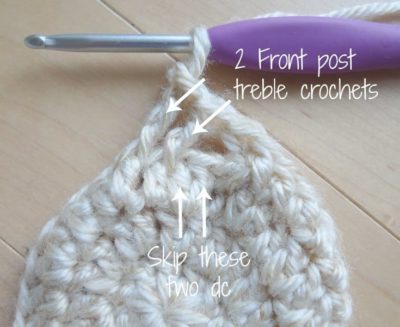
Then you work two front post treble crochets around the previously skipped double crochets. They will cross over the other 2 fptc’s that you just completed which gives the cabling effect!
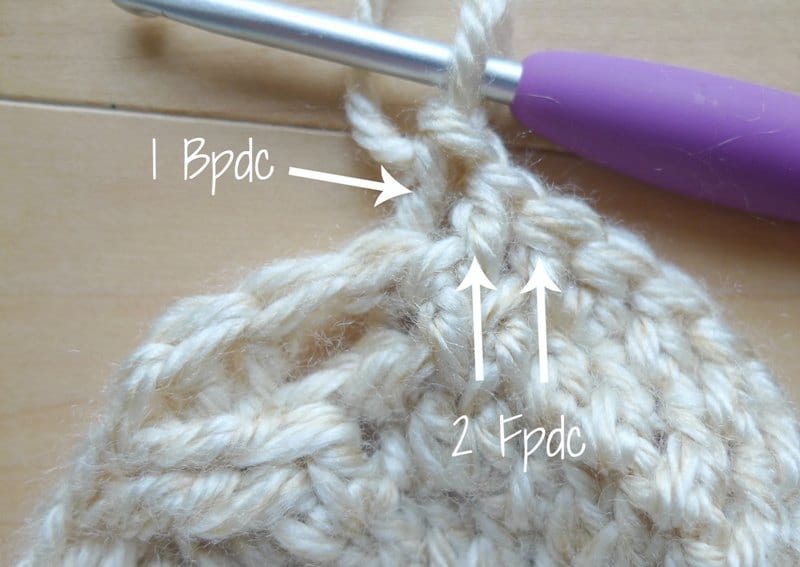
Next, you work 1 Bpdc and 2 Fpdc’s, just as you did on the other side of the cable to make it symmetrical. These Bpdc’s and Fpdc’s frame the cable!
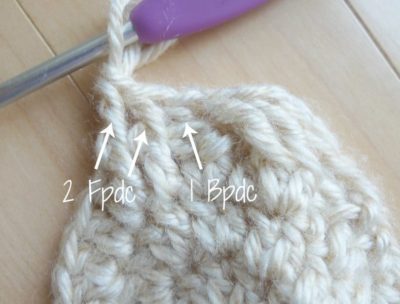
On Round 5 once again you work 2 Fpdc’s and 1 Bpdc as you approach the cable.
Work two Fpdc’s around the two stitches that are UNDERNEATH the cable. Be careful not to accidentally work them around the wrong stitches (i.e. the ones that cross over) as this will undo the cabling!
Then you work two Fpdc’s around the two stitches that cross over the cable. This step helps solidify or lock the cabling from the previous round into place!
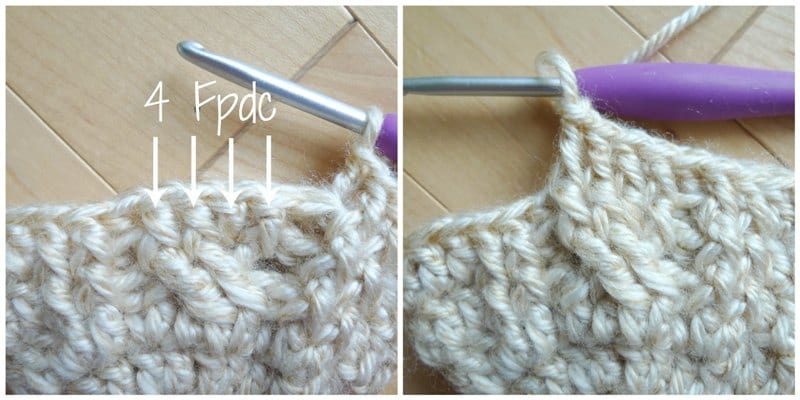
On Round 6 of the cable, you simply work 4 Fpdc’s across! Each cable is worked over three rounds (Rounds 4-6 in this case). It is very important to note that the first round of cabling has Front post TREBLE crochets while the next two rounds of cabling have Front post DOUBLE crochets. Sometimes that can be easy to miss when you are looking at the abbreviations in the pattern!
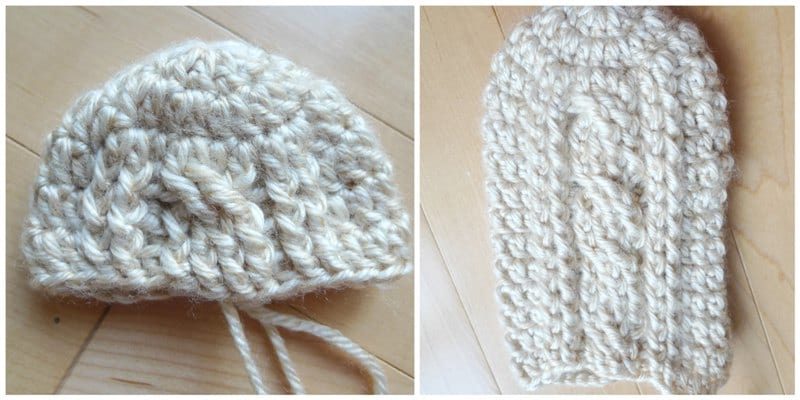
You keep working the cabling pattern for the body of the mittens! I love seeing that cabling pattern build up!
On Round 15 it is time to create the thumb hole! Work as normal, but rather than working double crochets towards the end, chain 7 and skip 4 stitches.
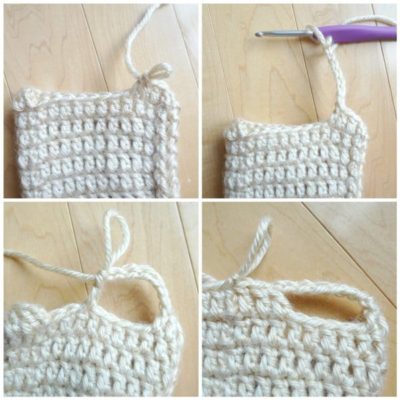
On the next round, work 10 double crochets in the CHAIN SPACE (see what this means HERE).
The thumb hole has been created! Pictured below is the left mitten, so the thumb hole is on the right side. When working the thumb hole for the right mitten, do the pattern for those rounds in reverse (written out formally below).
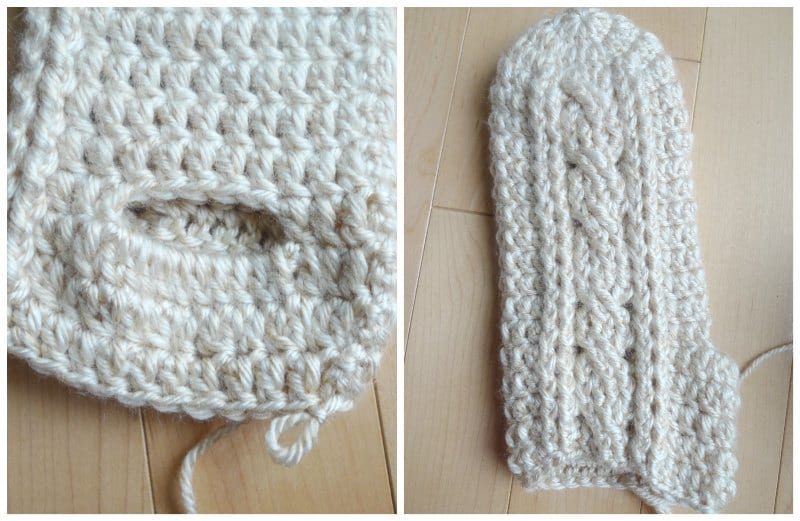
To create the ribbed cuff at the bottom of the mitten, switch to a 3.5 mm hook and decrease the number of double crochets to taper the cuff. Alternate front and back post double crochets in subsequent rounds to get that gorgeous ribbed effect!
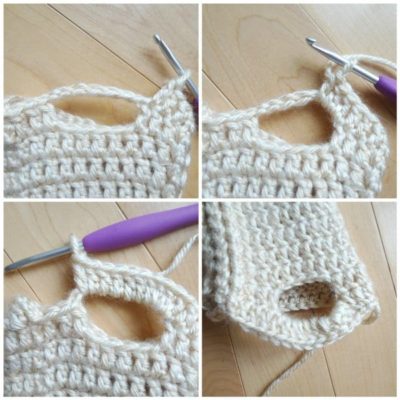
Now it is time to crochet the thumb around the thumb hole! Note that I am working the thumb for the right mitten in the pictures below. First we need to pick up stitches. Insert your crochet hook into any space around the hole. Add a slip knot to the crochet hook and pull it through the hole. Chain 2 and then work 16 double crochets as evenly as you can around the hole. Since the bottom of the hole does not have actual stitches with front and back loops (whereas the top of the hole does), just insert your hook between the stitches. When you are halfway around the hole, you should have completed about 8 dc’s.
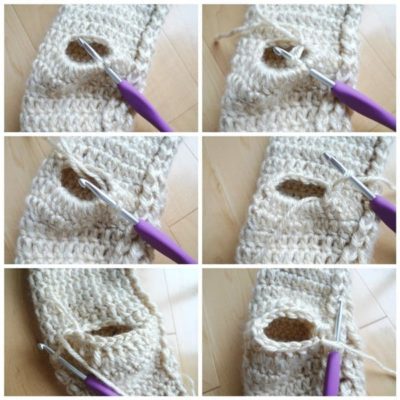
As you build up the thumb, you will slowly decrease and close up the hole at the top!
***************************
Here is the FREE PATTERN for my “Crochet Cabled Mittens“!
***You can purchase an INEXPENSIVE AD-FREE PDF of this pattern on Etsy HERE and on Craftsy HERE! This beautifully formatted PDF includes ALL the step-by-step cabling pictures and pattern, and is a total of 7 pages including the cover page!
Materials:
- 4 mm Clover Amour crochet hook & 3.5 mm Clover Amour hook
- Medium worsted weight yarn: I used Lion Brand’s Heartland in “Acadia”, ~98 grams (less than 1 skein required) – available on the Lion Brand site HERE
- Optional: Clover lock ring stitch markers, Yarn needle, Garment tag (mine are ultraleather tags by BrickBubble)
Special stitches:
- Front Post Treble Crochet (Fptc): Yarn Over (YO) twice, insert hook from front to back around post of stitch indicated. YO and pull up a loop, [YO and draw through 2 loops on hook] 3 times.
- Back Post Double Crochet (Bpdc): YO, insert hook in front of post of stitch (insert hook from back to front of stitch), YO, pull up a loop, YO, (pull through 2 loops) twice.
- Front Post Double Crochet (Fpdc): YO, insert hook behind post of stitch (insert hook from front to back of stitch), YO, pull up a loop, YO, (pull through 2 loops) twice.
- Double crochet 2 together decrease (dc2tog): YO, insert hook into next stitch of round. YO, pull up a loop, YO, pull through first 2 sts on hook (2 sts remain). Insert crochet hook into next stitch of round, YO, pull up a loop (3 sts remain). YO, pull through 3 remaining stitches on hook.
Notes:
- In each round, the Ch 2 does not count as a stitch. When joining at the end of each round, join to the first double crochet (NOT the Ch 2) to make an invisible seam.
- To increase the size of the mittens, use a thicker yarn (e.g. heavier worsted weight or bulky yarn) and a larger crochet hook (e.g. 5 mm).
Sizing:
- 10″/25.4 cm long (entire length from tip of fingers to bottom of ribbed cuff)
- 3.5″/8.9 cm across (one side)
- 7-7.5″/17.8-19 cm in circumference (narrower towards top of fingers compared to bottom of hand)
Gauge: Using 4 mm hook, 17 dc and 8 rows = 4″
Left Mitten Pattern:
Using 4 mm hook,
Round 1: Ch 2, 10 dc in Magic Ring. Join with sl st to first dc. (10 sts)
R2: Ch 2, *Inc* around. Join with sl st to first dc. (20 sts)
R3: Ch 2, *Dc 1, Inc*, rep 10 times. Join with sl st to first dc (30 sts).
R4: Ch 2, Dc 10, Fpdc 2, Bpdc 1. Work cabling: {Skip next two dc, 2 Fptc around next 2 dc. Fptc around first skipped dc and next dc}. Bpdc 1, Fpdc 2, Dc 10 Join with sl st to first dc. (30 sts).
R5: Ch 2, Dc 10, Fpdc 2, Bpdc 1. Fpdc 4 (around center cable from previous round). Bpdc 1, Fpdc 2, Dc 10. Join with sl st to first dc. (30 sts).
R6: Repeat R5.
With R4-6, one set of cables is complete!
Rounds 7-9: Repeat Rounds 4-6.
Rounds 10-12: Repeat Rounds 4-6.
Rounds 13-14: Repeat Rounds 4-5.
We will now begin creating the thumb hole towards the right side of the mitten.
Round 15: Ch 2, Dc 10, Fpdc 2, Bpdc 1. Fpdc 4 (around center cable from previous round). Bpdc 1, Fpdc 2, Dc 3, Ch 7, Sk 4, Dc 3. Join with sl st to first dc.
R16: Ch 2, Dc 10, Fpdc 2, Bpdc 1. Work cabling: {Skip next two dc, 2 Fptc around next 2 dc, Fptc around first skipped dc and next dc}. Bpdc 1, Fpdc 2, Dc 3, Dc 10 in chain space, Dc 3. Join with sl st to first dc. (36 sts).
R17: Ch 2, Dc 10, Fpdc 2, Bpdc 1. Fpdc 4 (around center cable from previous round). Bpdc 1, Fpdc 2, dc2tog. *Dc2tog, Dc 1*, rep 4 times, dc2tog. Join with sl st to first dc. (30 sts).
R18: Repeat R5.
Rounds 13-15 and Rounds 16-18 just completed two more sets of cables.
R19: Repeat Round 4.
R20: Repeat Round 5.
We will now begin the ribbed cuff! Switch to 3.5 mm hook,
Round 21: Ch 2, *Dc 5, Dc2tog*, rep 4 times, Sc 2. Join with sl st to first dc. (26 sts).
R22: Ch 2, *Fpdc, Bpdc* around. Join with sl st to first Fpdc. (26 sts).
R23-26: Repeat R22.
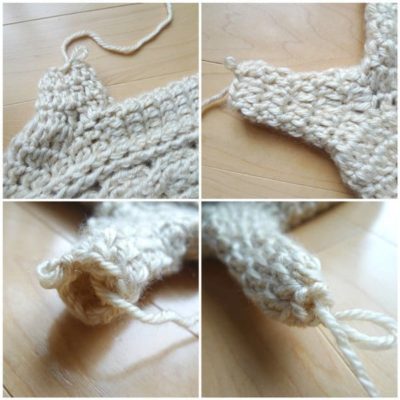
Fasten off and weave in ends.
Thumb Pattern:
Using 4 mm hook,
Join working yarn anywhere along thumb hole. Be sure to work clockwise.
Round 1: Ch 2, Dc 16. Slip st to first dc. (16 sts)
R2: Ch 2, *Dc 2, dc2tog*, rep 4 times. Sl st to first dc. (12 sts)
R3: Ch 2, *Dc 4, dc2tog*, rep 2 times. Sl st to first dc. (10 sts).
R4-5: Ch 2, Dc 10. Sl st to first dc. (10 sts).
R6: Ch 2, *Dc2tog*, rep 5 times. Sl st to first dc. (5 sts)
Fasten off and weave yarn end through back loops of remaining stitches. Pull tight and hide end.
Right Mitten Pattern:
Repeat Rounds 1-14 of Left Mitten Pattern up till the point when we need to create the thumb hole. Now we will need to create the thumb hole on the left side of the mitten. We will reverse the pattern we worked up for the left mitten from Rounds 15-17.
Round 15: Ch 2, Dc 3, Sk 4, Chain 7. Dc 3, Fpdc 2, Bpdc 1. Fpdc 4 (around center cable from previous round). Bpdc 1, Fpdc 2, Dc 10. Join with sl st to first dc.
Round 16: Ch 2, Dc 3, Dc 10 in chain space. Dc 3, Fpdc 2, Bpdc 1. Work cabling: {Skip next two dc, 2 Fptc around next 2 dc, Fptc around first skipped dc and next dc}. Bpdc 1, Fpdc 2, Dc 10. Join with sl st to first dc. (36 sts)
Round 17: Ch 2, dc2tog. *Dc 1, dc2tog*, rep 4 times. Dc2tog, Fpdc 2, Bpdc 1. Fpdc 4 (around center cable from previous round). Bpdc 1, Fpdc 2, Dc 10. Join with sl st to first dc. (30 sts)
Rounds 18-26: Repeat Rounds 18-26 of Left Mitten
Work thumb pattern for right mitten.
*****************************************
I love my new Crochet Cabled Mittens and how elegant they are!
![]()
There is something so classic and timeless about cables with their beautiful twists and turns.
![]()
If you’ve been looking for a mittens pattern, I hope you’ll try out these cabled ones! They work up quickly and the result is so beautiful! Who doesn’t love one skein projects? If you would like a simple pair of mittens without the cabling pattern, be sure to check out my “Cozy Crochet Mittens” pattern HERE as well!
![]()
We actually snapped these photos on Christmas Day! After opening presents, some snow started gently drifting down, and we ran outside to take advantage of the beautiful snowfall!
![]()
I will be sharing one more cabled project (this time knitted) with you this month as well as a few more cold weather projects before Spring officially arrives towards the end of March! We most likely will be experiencing continued cold weather well into April, so I always put my crocheted and knitted items to good use! Keep up to date with my work through social media {Facebook page, Twitter (@AllAboutAmi) or Instagram (@AllAboutAmi)} and get e-mails HERE whenever I publish a post! Happy crochet cabling, everyone!
This post is sponsored by Lion Brand Yarn! I’ve loved working with their yarn throughout the years and I’m thrilled that I get to collaborate with them every month!}
This pattern is an original pattern by Stephanie Lau of All About Ami. Please do not claim this pattern as your own. If you wish to share this pattern, you may link to this pattern but please do not reprint it on your site. You may keep a copy for your own personal use but please DO NOT sell the pattern or distribute it.
You may sell products made from this pattern but please clearly credit the design to me, Stephanie Lau of All About Ami, and provide a link to my blog www.AllAboutAmi.com. Permission is NOT granted for mass production or factory manufacturing of any kind. Thank you for being respectful and for your understanding!