***You can purchase an INEXPENSIVE AD-FREE PDF of this pattern on Etsy HERE and on LoveCrochet HERE! This beautifully formatted PDF includes the step-by-step pictures and is a total of 4 pages including the cover page!
I had always wanted to crochet a pair of mittens for myself and I remember very vividly looking up patterns on Ravelry the weekend before Myla was born two years ago. I couldn’t find exactly what I was looking for as some mittens were crocheted row by row or others began at the cuff and were worked upwards. I was looking for a simple pattern that began with the magic circle and was worked downwards from the fingertips with ribbed cuffing and minimal attaching. I never ended up crocheting any mittens as I felt the contractions coming on a few short days later and picking up my crochet hook and designing patterns was at the back of my mind as we welcomed Myla into the world and adjusted to our new life as parents!
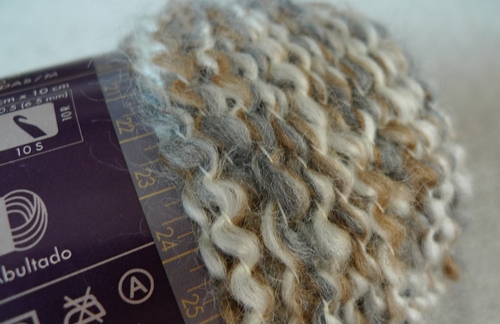
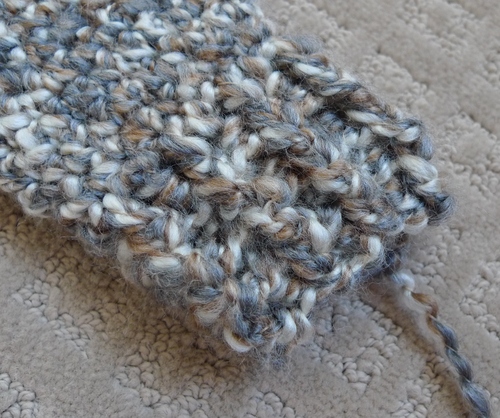
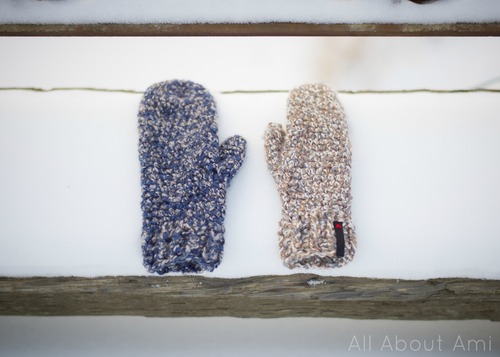
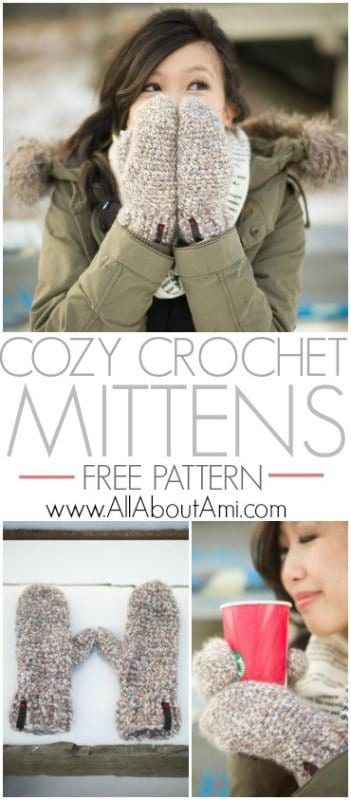
Fast forward two years later and I decided to revisit my crocheted mittens idea! Lion Brand Yarn was very generous in sending me some sample products to try in the summer, giving me a chance to work with yarn that I might have previously overlooked or were not sold in local craft stores. One of these yarns was “Homespun” which I had never really noticed or worked with before. When I picked up the yarn, I was impressed with how incredibly soft it was and also by its unique “squiggly” texture (see pic below). As I thought about what design I could use this yarn for, mittens jumped to mind as I knew they would be incredibly soft and I thought they would have a rich and luxurious look to them.
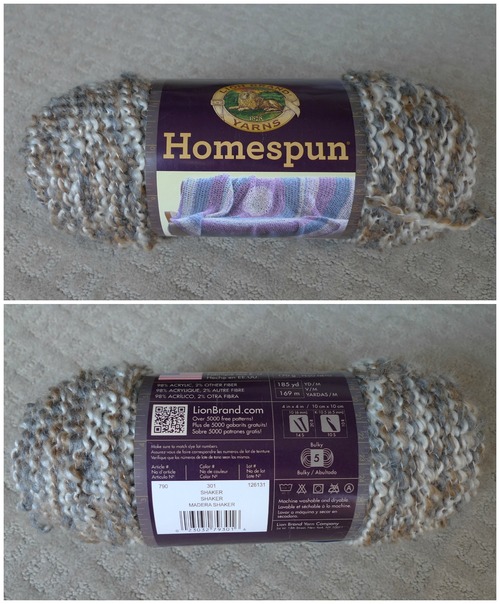
I was sent the colour “Blue Moon”, but I went out and bought “Shaker” for my own mittens. “Shaker“ is described as a tweed muted camel, cream and medium gray yarn. It’s a bulky level 5 yarn that is 98% acrylic and 2% other fiber (haha sounds suspicious I know :P) with a net weight of 6 oz. I managed to crochet 2 pairs of mittens with one skein of Homespun (I ended up making a LOT of mittens in the summer as I tried out different sizing and made them for various family members). I also ended up using the ”Blue Moon“ I was sent as you’ll see later on in this post!
Before we jump into this project, I should mention that ”Homespun“ is a very polarizing yarn. I asked my readers what their opinions were about Homespun on my Facebook and Instagram, and the replies were very interesting- people either love it or hate it! People loved the softness but many said they had difficulty working with the yarn as the stitches were hard to see, it got caught on the hook, and that it easily frayed and split because of the nature of the yarn. People also said it was easier to knit with which I thought was interesting. I really appreciate your feedback and am so glad that we can all engage in these discussions and share opinions!
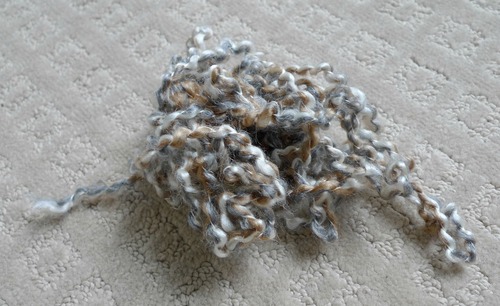
Homespun is definitely more challenging to work with compared to other yarns, but I did not find it too overwhelming. This is probably because I have worked with eyelash yarn in the past for my amigurumi (see the Fluff Bears). It really is impossible to see your stitches when working with eyelash yarn as you stick your crochet hook into the next stitch by feeling it, so working with Homespun did not seem that bad since you can still see the “v’s”. I did notice that the yarn had a tendency to bunch or coil up if I held it too tightly and that the ends became wispy when being pulled through a yarn needle (see pic below). Thus, I crocheted rather loosely (especially compared to my tight tension with amigurumi), never holding or pulling the yarn too tightly, and thankfully very minimal attaching or sewing is required. The increased difficulty in seeing the stitches also means that it’s more forgiving as well since you won’t be able to easily notice mistakes with the texture of this yarn!
Let’s begin the project! I started off with a Magic Circle or Magic Ring just like in my amigurumi! If you are unfamiliar with this special technique, please check out my blog post HERE as it is an amazing way to start off circular projects since there is no visible hole (vs. the Chain 2 method). I worked in continuous rounds so that there was no visible seam. Using a stitch marker is key with this project so you can see where each round ends (I’ve been putting my Clover stitch markers to good use)!
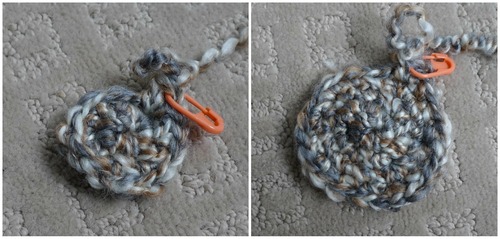
After some increasing rounds, I then did the same number of stitches so that the piece started to fold on itself and continue downwards. I kept slipping my fingers inside to make sure the sizing was good, also keeping in mind that it would probably stretch with repeated wears. Be sure to constantly check that you are liking how the sizing is going earlier on so you can adjust your numbers or crochet hook during this part instead of at the very end! I should also mention that there are two different sides and looks when crocheting in a round (see “The Right Side of Amigurumi” to read more about what I mean). I prefer the look of the stitches of the “right side” for these mittens, but see what you prefer!
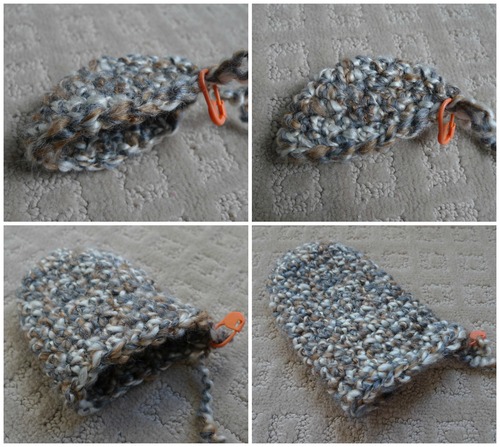
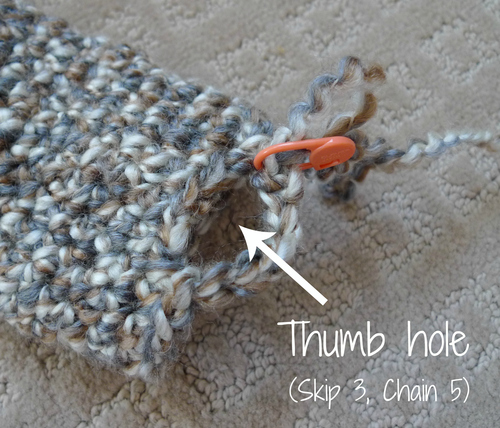
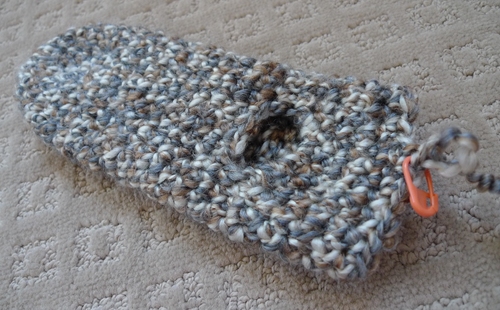
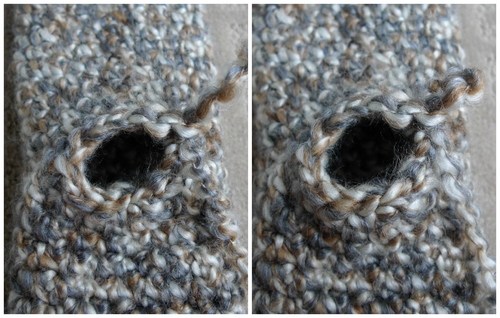
After 19 rounds, I slipped my fingers through the piece and determined that it was time to make the thumb hole (adjust your numbers depending on how long or short your fingers are). I made the thumb hole by skipping 3 stitches and chaining 5.
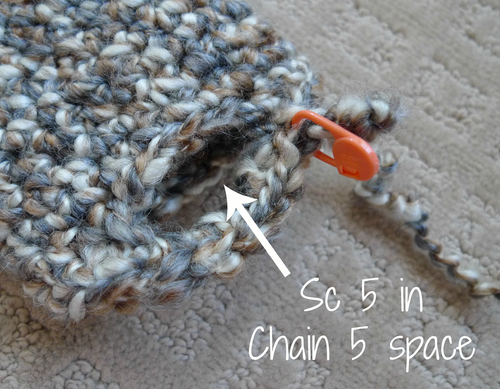
On the subsequent round, I then did 5 single crochets in the Chain 5 space.
I then continued crocheting around as before…
Then I began working the ribbed cuff. I did this by alternating front post double crochets with back post double crochets (similar to the collar of my “Easy Chunky Crochet Sweater” and the stitches in my “Cabled Slouchy Beanie”).
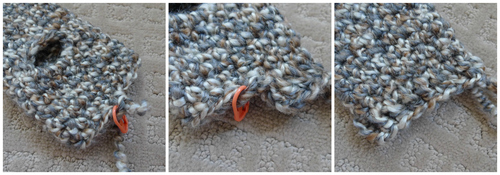
Here is the ribbed cuff!
If you want more of the ribbing, you could begin the cuff earlier on or make it longer by doing more rounds. This pattern is easily adjustable as it is a very basic mitten pattern with simple construction! I should mention that the ribbing stretched after repeated wears- if you want more delicate ribbing, you could try moving down a hook size to accommodate for this. You could also try using a different yarn or a different colour for a neat look!
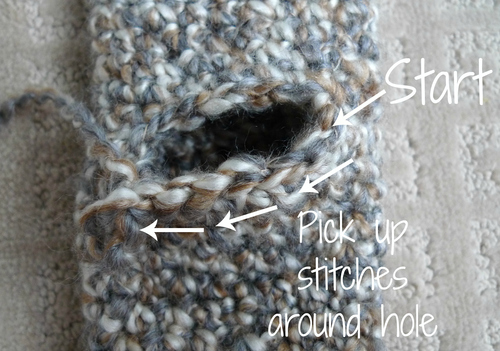
Now it was time to add the thumb! Start at any point around the hole and pick up 12 stitches going clockwise, trying to evenly space them around.
After a couple rounds of crocheting around the hole…
The thumb is taking shape! I slowly decreased towards the tip.
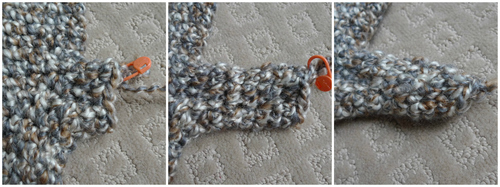
I sewed the end completely shut with a yarn needle to ensure there was no opening at all.
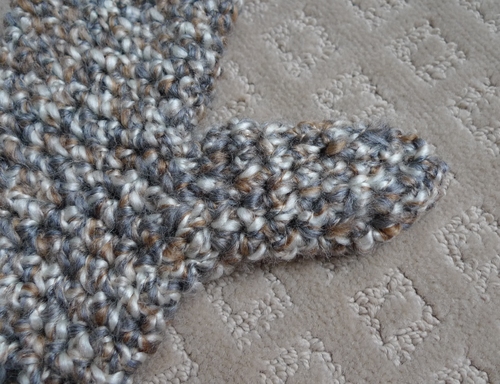
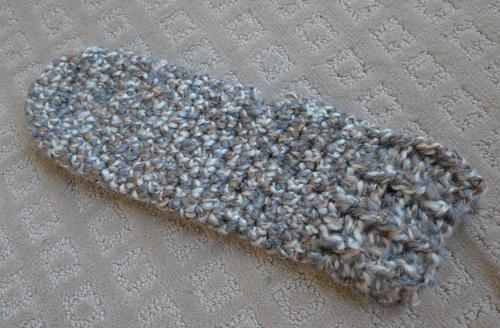
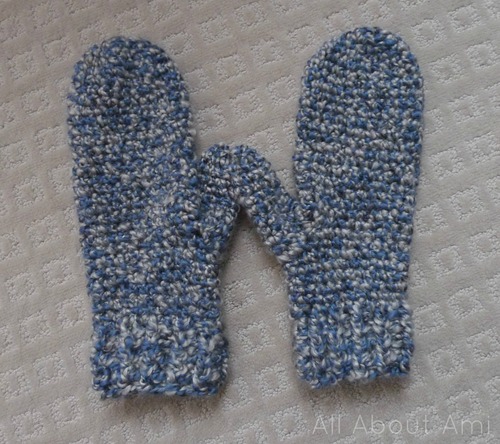
Here is one completed mitten!

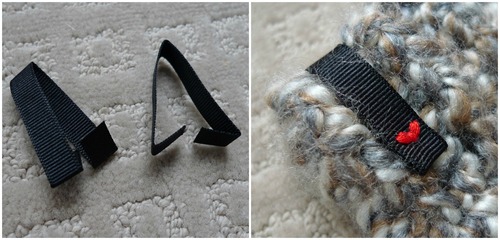
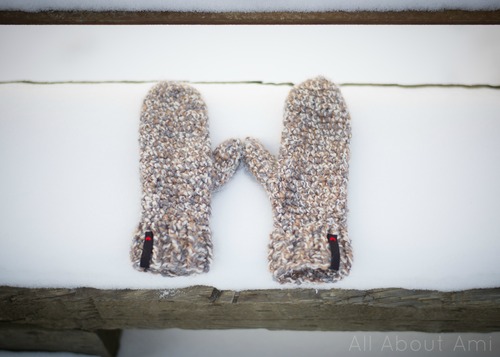
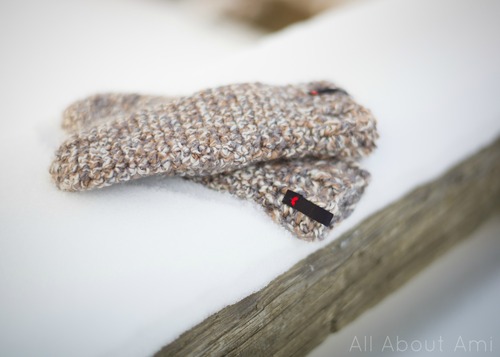
The right and left mittens are worked exactly the same. To add a special touch to these mittens and to help identify right from left, we added a ribbon label! We cut two pieces of ribbon out (4.25″ or 11 cm long), folded them in half, folded the ends, and then ironed them. Ryan embroidered these pretty little hearts using red embroidery floss and then sewed the ribbon labels to the mittens. I think they add such a beautiful and unexpected pop to them! You could also try and embroider a special letter or other designs to personalize your mittens!
Since everybody’s hand sizes are so different, I tried to work up a bigger size to make this pattern more versatile. I used the “Blue Moon” I was sent to crochet my brother some mittens! Thus, I wrote up two different patterns, and you can move up or down a hook size to make each one bigger or smaller. If you have longer or shorter fingers, you could increase or decrease the number of rounds before working the thumb hole. If your thumb is larger or smaller, you could make a bigger or smaller thumb hole by crocheting a larger or smaller chain space. Hopefully you will be able to find the perfect mitten size!
*****************
Here is the official pattern for my “Cozy Crochet Mittens”!
Materials:
- 5.5 mm Clover Amour crochet hook (move up or down a hook size to adjust sizing, i.e. 5 mm for smaller size, 6 mm for larger)
- Bulky yarn (5)- I used ½ skein of Lion Brand Yarn’s “Homespun“ in the colour ”Shaker” (~85 grams to make 1 pair of mittens)
Two sizes are provided with the following dimensions:
– Size 1:
- 10″/25.5 cm long (entire length from tip of fingers to bottom of ribbed cuff)
- 3.25″/8 cm wide (across one side of mitten)
- 7″/18 cm around (across both sides of mitten)
– Size 2:
- 11″/28 cm long (entire length from tip of fingers to bottom of ribbed cuff)
- 4″/10 cm wide (across one side of mitten)
- 8.5″/21.5 cm around (across both sides of mitten)
******SIZE 1
Upper mitten:
R1: 6 sc in magic ring. (6 sts)
R2: 2 sc in each sc around. (12 sts)
R3: *Sc 3, Inc*, rep 3 times. (15 sts)
R4: *Sc 2, Inc*, rep 5 times. (20 sts)
R5-19: Sc 20
We will now begin the thumbhole.
R20: Sc 16, skip 3 stitches, Chain 5 loosely, Sc 1 (to where stitch marker is).
R21: Sc 6, Dec 1, Sc 6, Dec 1, Sc 5 in Chain 5 space, Sc 1 (20 sts).
R22-26: Sc 20
R27: *Sc 3, Dec 1*, rep 4 times (16 sts).
Ribbed Cuff:
R28: Slip stitch to next st. Chain 3, dc in same st. Dc around, slip stitch to first dc [not chain 3] (16 sts).
R29: Chain 3, *Fpdc, Bpdc* around, slip stitch to top of first Fpdc (16 sts).
R30-31: Repeat R29.
Fasten off and weave in end.
Thumb:
R1: Begin at any point around thumb hole and pick up 12 stitches, going clockwise.
R2-3: Sc 12
R4: *Sc 4, Dec 1*, rep 2 times (10 sts)
R5-8: Sc 10
R9: *Dec around* (5 sts)
Slip stitch to next stitch. Fasten off and weave in end. Sew hole shut.
******SIZE 2
Upper mitten:
R1: 6 sc in magic ring. (6 sts)
R2: 2 sc in each sc around. (12 sts)
R3: *Sc 1, Inc*, rep 6 times. (18 sts)
R4: *Sc 2, Inc*, rep 6 times. (24 sts)
R5-21: Sc 24
We will now begin the thumbhole.
R22: Sc 20, skip 3 stitches, Chain 5 loosely, Sc 1 (to where stitch marker is).
R23: Sc 6, Dec 1, Sc 6, Dec 1, Sc 4, Sc 5 in Chain 5 space, Sc 1 (24 sts).
R24-28: Sc 24
R29: *Sc 4, Dec 1*, rep 4 times (20 sts).
Ribbed Cuff:
R30: Slip stitch to next st. Chain 3, dc in same st. Dc around, slip stitch to first dc [not chain 3] (20 sts).
R31: Chain 3, *Fpdc, Bpdc* around, slip stitch to top of first Fpdc (20 sts).
R32-33: Repeat R31.
Fasten off and weave in end.
Thumb:
R1: Begin at any point around thumb hole and pick up 14 stitches, going clockwise.
R2: Sc 14
R3: *Sc 5, Dec 1*, rep 2 times (12 sts)
R4-6: Sc 12
R7: *Sc 4, Dec 1*, rep 2 times (10 sts)
R8-9: Sc 10
R9: *Dec around* (5 sts)
Slip stitch to next stitch. Fasten off and weave in end. Sew hole shut.
Sizing Notes:
- Add more rounds before working thumb hole if you have longer fingers.
- Decrease number of rounds before working thumb hole if you have shorter fingers.
- To make a larger thumb hole, make a greater chain space (chain more than 5) and/or pick up more stitches when working the thumb.
- To make a smaller thumb hole, make a smaller chain space (chain less than 5) and/or pick up fewer stitches when working the thumb.
*****************
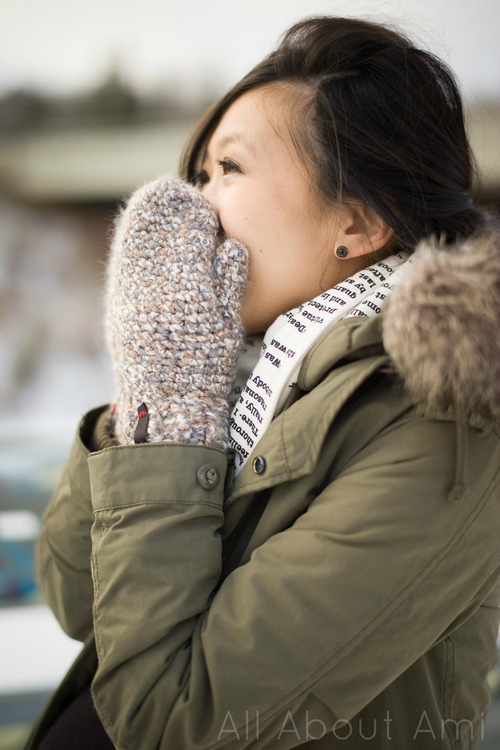
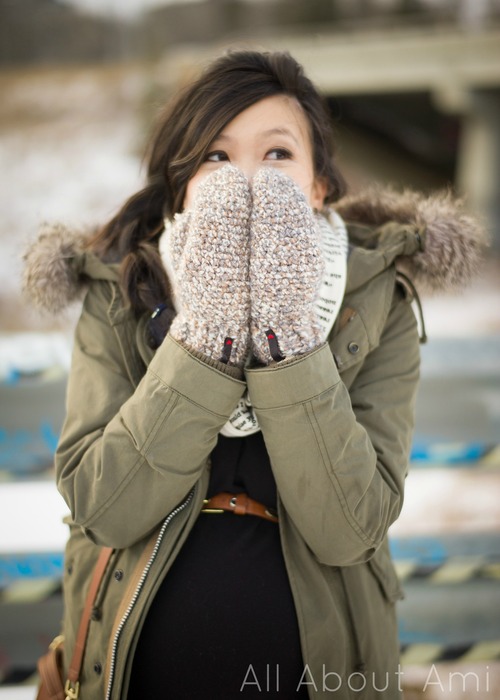
I am very happy with how my mittens came out and I am glad I went with the Homespun yarn for this project. These mittens have a gorgeous texture to them and the colour variegation is beautiful! Needless to say, they are also incredibly soft and comfortable to wear!
I tried to provide a basic mitten pattern that you can easily modify by increasing or decreasing the number of rounds and moving up or down a hook size with the two sizes available. It’s really nice being able to crochet yourself a pair of mittens that are customized to your exact hand and finger measurements! I have not tried this pattern out with different yarns or yarn weights (e.g. worsted weight), so I do not know how the sizing would turn out. You’ll have to let me know if you decide to try out this pattern with a different yarn!
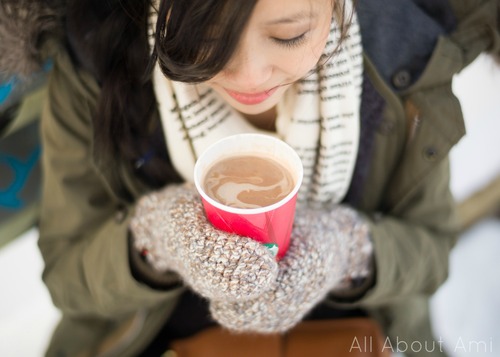
Mittens are a winter staple to keep my hands warm when I’m driving and running errands. I hate that feeling of touching an icy cold door handle with my bare hands if I’ve forgotten to bring mittens!
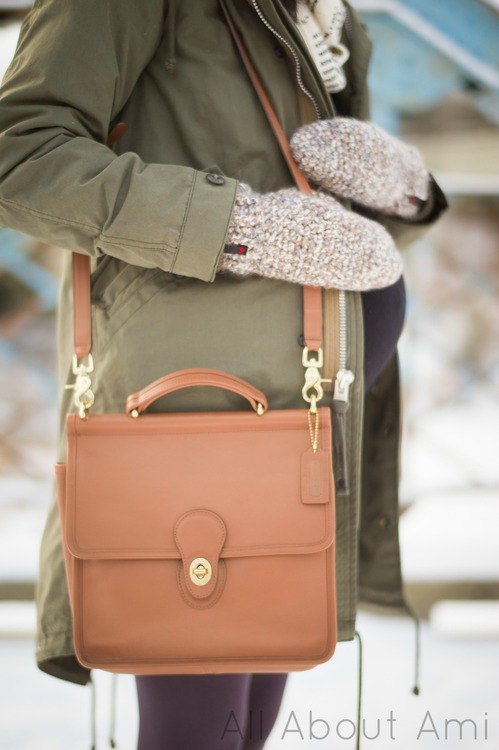
I keep these mittens in my purse and it feels so special whenever I whip them out and wear them. It really is such a joy being able to crochet items that you wear all the time and get so much use out of, especially since they were custom made to fit my hands and fingers!
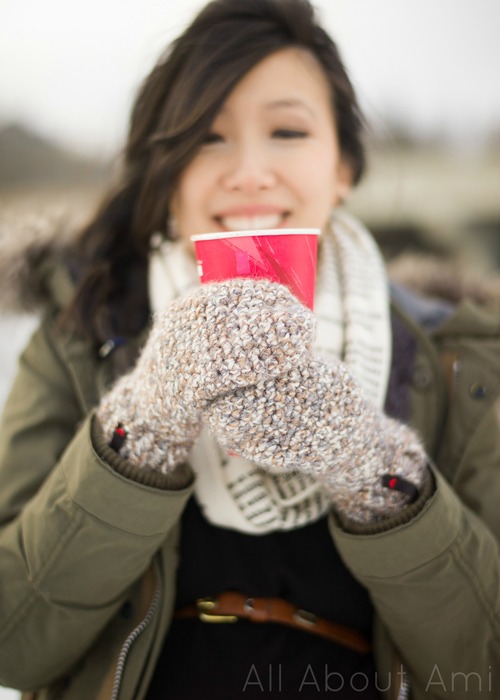
This was our first cold weather photoshoot, and this peppermint mocha definitely helped keep us warm!
These cozy mittens have a fuzziness to them that I think adds to its rustic charm. I don’t mind stuffing them in my purse and having them rub up against my other items and getting more fuzzy (whereas it might be annoying if this happened to other crocheted pieces or amigurumi)!
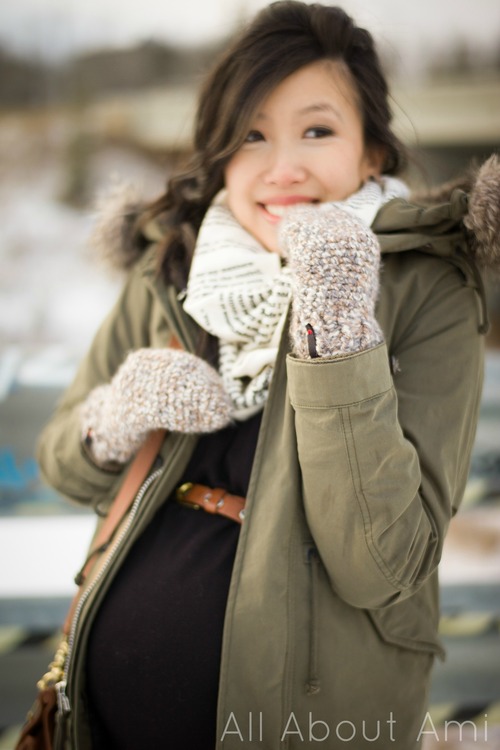
The baby bump! I am now 36 weeks pregnant!
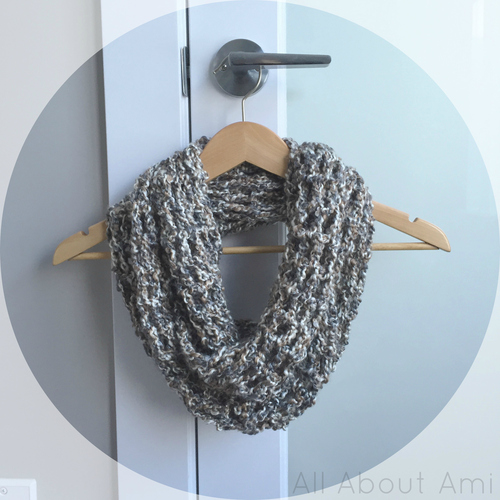
You may have noticed the beautiful scarf that I am wearing with my mittens! Are you curious what the text says? It’s actually a passage from one of my favourite books, “Pride & Prejudice”! This is a “Pride & Prejudice Book Scarf” from an Etsy store called “Storiarts”. I featured Storiarts in a “Craft Chat” post HERE, so check it out to learn more about these beautiful designs, the creator behind them, and whether your favourite novel is available as a scarf!

[Parka: Aritzia; Long black tunic: Old Navy; Fleece Leggings: Simons; Purse: Coach; Stud Earrings: Urban Outfitters; Pride & Prejudice Book Scarf: Storiarts; Mittens: Me]
I hope you enjoyed reading about the making of my “Cozy Crochet Mittens”! I’m so happy that I could finally design and crochet a pair of mittens after searching for the perfect pattern years ago. I hope you enjoy playing around with this pattern and figuring out what sizing works for you! I think a pair of handmade crocheted mittens would make a perfect gift as well- they work up pretty quickly! Don’t forget to keep up with all my projects through my Facebook, Twitter & Instagram– I love hearing from you and seeing you all bring my patterns to life! May your hands and fingers stay warm and toasty this winter ❤
Amazon affiliate link:
[Update: I crocheted my mom a cowl to match her mittens using “Homespun” yarn and my “Long Double Crochet Cowl” pattern! Read about it HERE!]
This pattern is an original pattern by Stephanie Lau of All About Ami. Please do not claim this pattern as your own. If you wish to share this pattern, you may link to this pattern but please do not reprint it on your site. You may keep a copy for your own personal use but please DO NOT sell the pattern or distribute it.
You may sell products made from this pattern but please clearly credit the design to me, Stephanie Lau of All About Ami, and provide a link to my blog www.AllAboutAmi.com. Permission is NOT granted for mass production or factory manufacturing of any kind. Thank you for being respectful and for your understanding!