***You can purchase an INEXPENSIVE AD-FREE PDF of this pattern on Etsy HERE and on LoveKnitting HERE! This beautifully formatted PDF includes BOTH the Simple Garter Stitch Blanket Pattern and the Chunky Ribbed Knit Blanket Pattern, as well as the step-by-step pictures. It is a total of 7 pages including the cover page! You can also find both patterns in my Easy & Modern Knits Pattern Bundle found HERE (includes over 10 of my knit patterns at a discounted price)! You can also purchase a convenient kit HERE on the Lion Brand Yarn website (currently 20% OFF) that includes the pattern and all the luxurious Wool-Ease Thick & Quick and Homespun yarn needed to make this beautiful blanket!
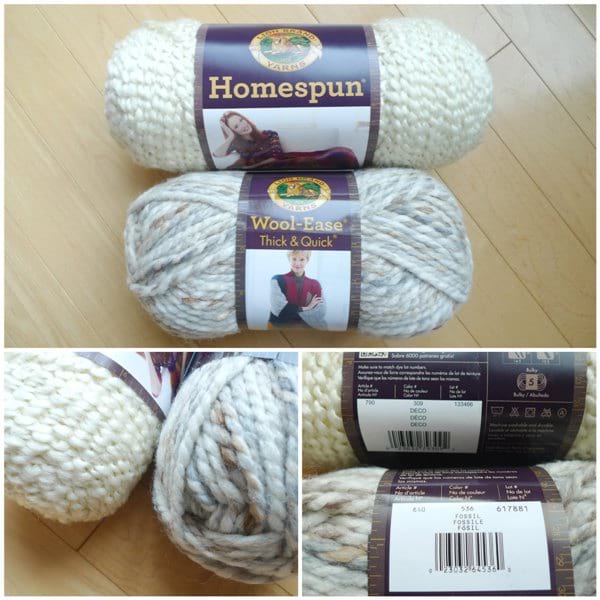
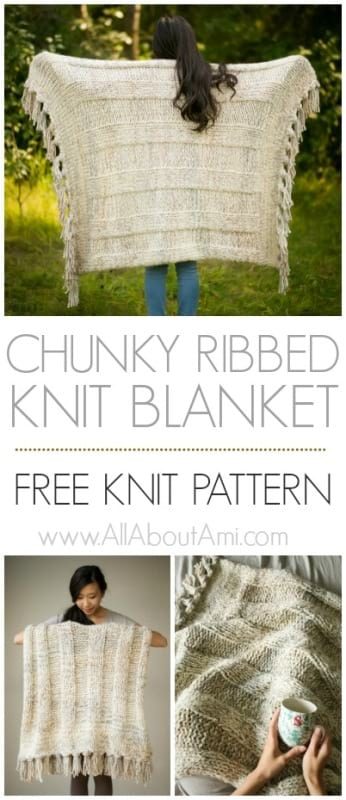
In my Simple Knit Series that I created for complete beginners, I designed three modern projects that walk you through three basic stitches: garter, stockinette, and seed stitch. With my Simple Garter Stitch Scarf, I created gorgeous texture by holding two strands of yarn together: Lion Brand Yarn’s Homespun and Wool-Ease Thick & Quick. I wanted to design a knitted blanket using these same two yarns as I knew that it would work up quickly and provide a beautiful overall look. I chose Homespun Yarn in “Deco” (a soft cream) and Wool-Ease Thick & Quick in “Fossil” (Fisherman base with subtle stripes of camel, taupe, oxford and silver), which is perfect for lovers of neutral palettes like myself!
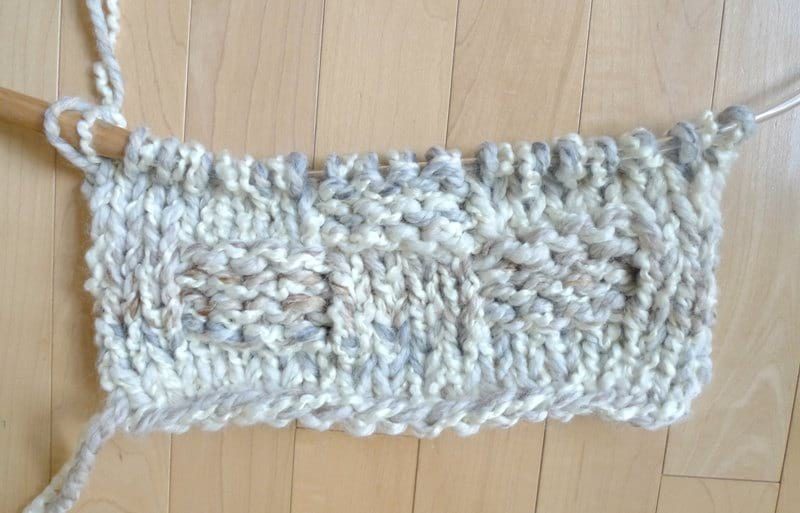
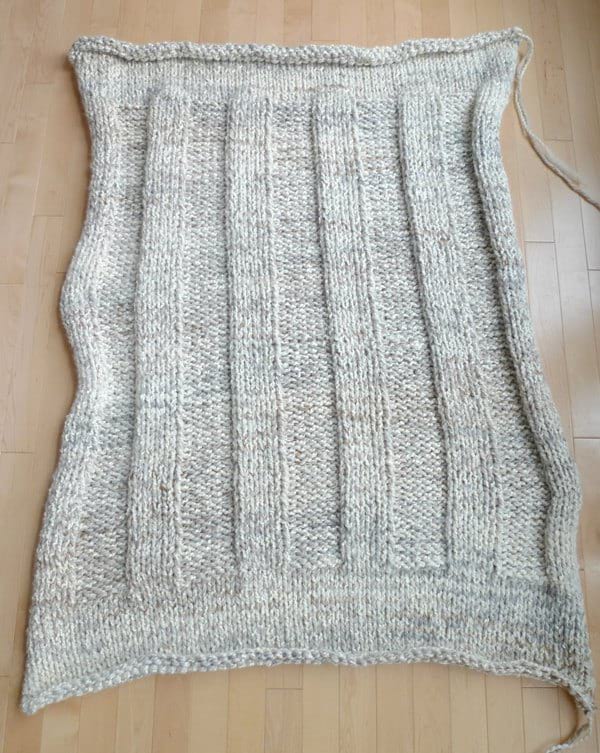
I wanted this blanket to use basic stitches so that beginners could make it. I worked up a swatch using knit and purl stitches only and determined how much ribbing and stockinette border I wanted.
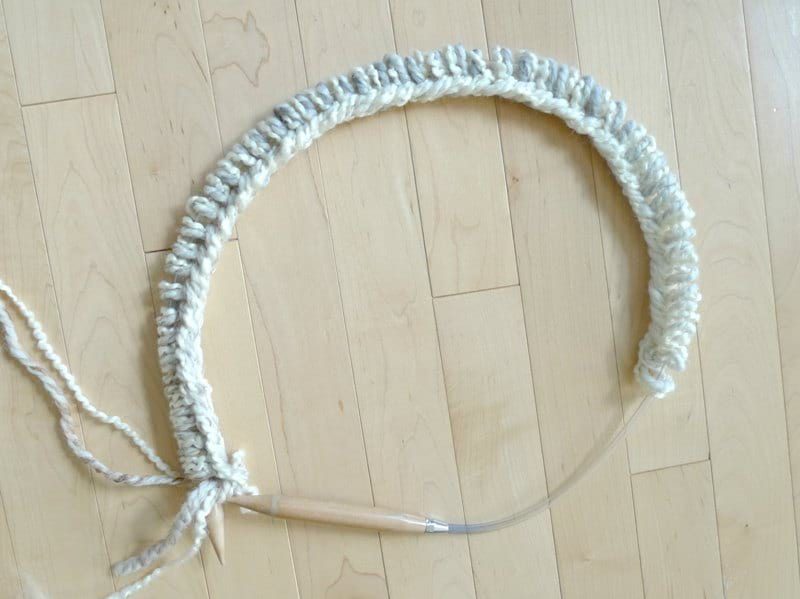
I casted on my stitches using my smooth 15 mm circular needles. By holding two strands of yarn together, you treat them as one!
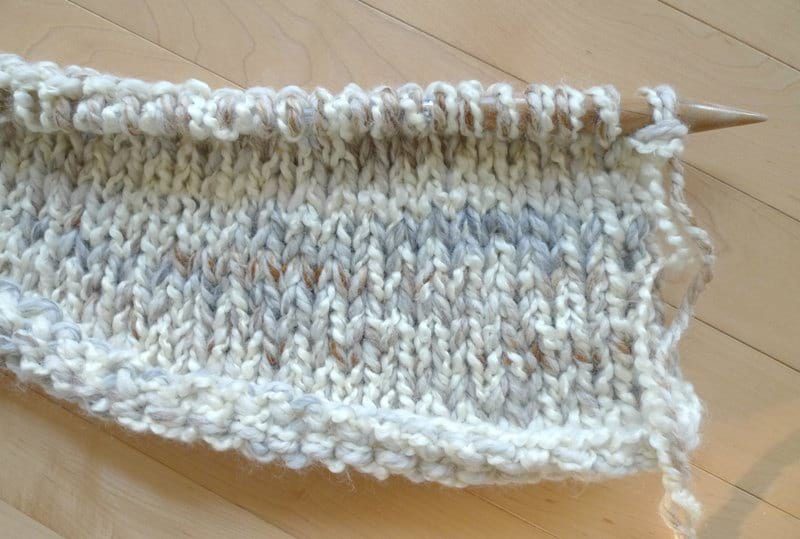
After completing the stockinette border, it was time to start the ribbing!
I love the look of the chunky ribbing that somewhat resembles cables without the intertwining. Once you establish the ribbing pattern in the first few rows, it is easy to keep building upon it as it becomes very clear when you are supposed to knit or purl.
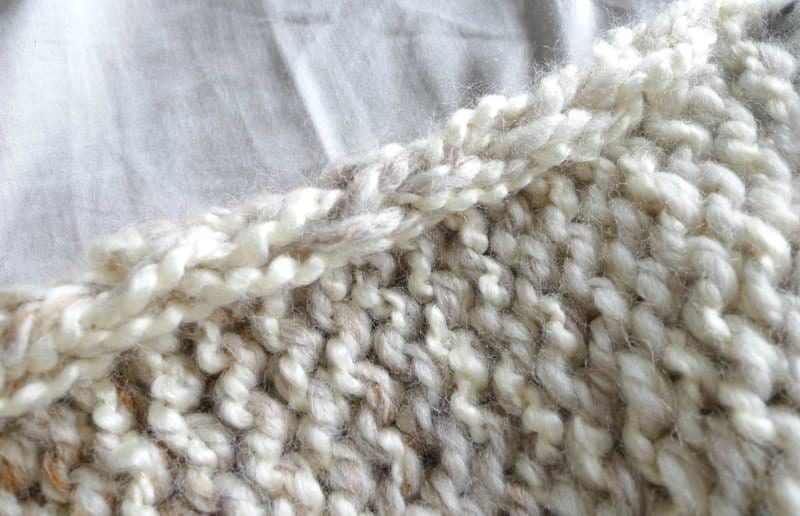
When researching how to achieve a smoother edge for stockinette, I discovered the chain edge technique. To give a nice clean edge, you begin and end your right side and wrong side rows differently. For right side rows, you slip the first and last stitch purl-wise with the yarn in front. For wrong side rows, you knit the first stitch of the row through the back loop only, and you knit the last stitch of the row. You can read more about this technque HERE on the Craftsy blog.
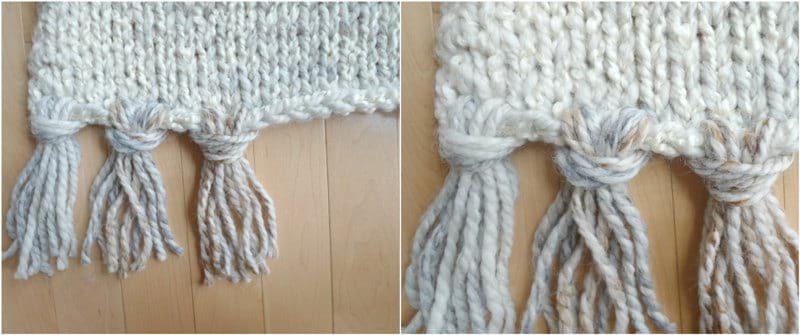
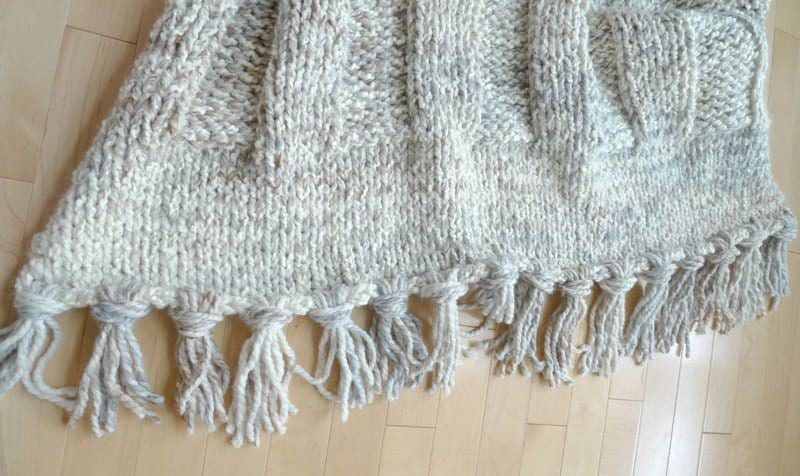
I wanted to add some decorative edging to the top and bottom of the blanket with some fringe! This also helps eliminate the curling of these edges since the fringe pulls it down. I chose to add some thick fringe that resembles a heart shape at the point of attachment.
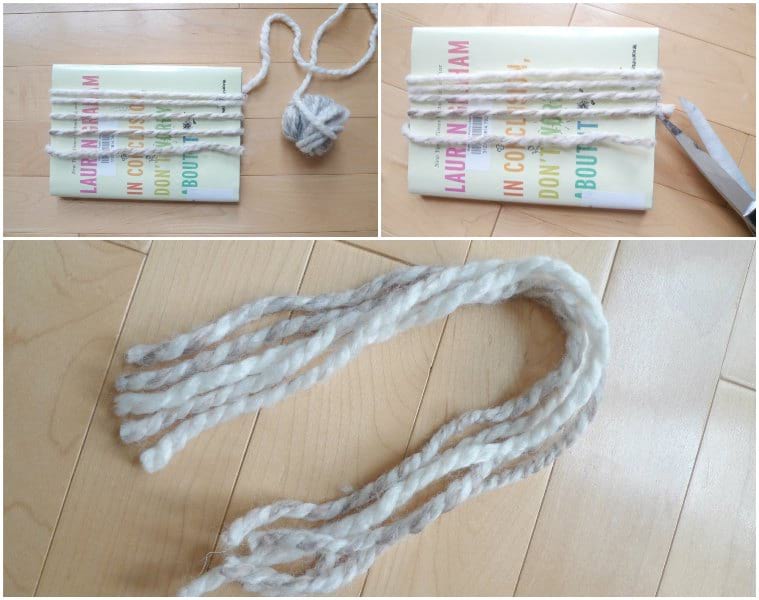
I cut strands of yarn by wrapping Wool-Ease Thick & Quick around a book of a suitable length and then snipped along the bottom edge.
I then insert my crochet hook into a stitch and pulled up one side of the yarn. I counted two stitches over and then pulled up the other side of the yarn. I then pulled both ends of yarn through the loop created and continued pulling down.
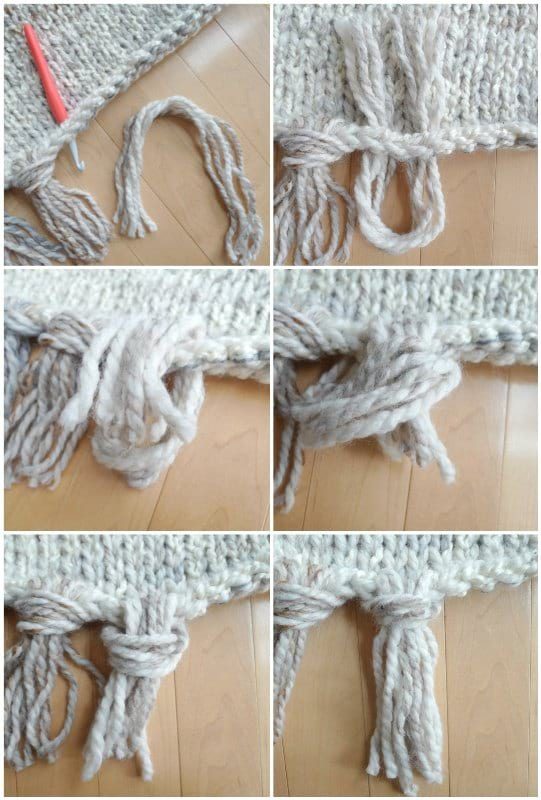
I spaced each fringe two stitches apart. Doesn’t the edge look beautiful with the decorative fringe? If you do not want the fringe, you could always use that yarn in the body of the blanket rather than saving it for the fringe edging.
I lay my blanket on a mattress covered with towels, pinned it into place, and then blocked it with water! This also helps the fringe lay more straight and flat.

I have put together a video in which I demonstrate the knit and purl stitches, how to work the chained edges, and how to add the fringe (note that the exact numbers are slightly different than the pattern as I reworked the sizing later on). Have a watch here:
************************************
Here is the free pattern for my “Chunky Ribbed Knit Blanket“:
![]()
Materials:
- 6 skeins of Lion Brand Yarn’s Wool-Ease Thick & Quick in Fossil (super bulky, level 6 yarn)
- 3 skeins of Lion Brand Yarn’s Homespun Yarn (bulky, level 5 yarn) in “Hepplewhite” (true white) or “Deco” (soft cream)– pictured in this pattern is “Deco“
- 15 mm 40″ long Chiaogoo Circular Needles (size 19)
- Clover Felting Needle Tool (optional for felting Wool-Ease Thick & Quick yarn ends together)
Notes:
- Hold both strands of yarn together at the same time and treat them as one when knitting.
- To create chained edges, do the following:
- For right side rows, slip the first and last stitch purl-wise with the yarn in front.
- For wrong side rows, knit the first stitch of the row through the back loop. Knit the last stitch of the row.
- If you do not want to create chained edges, you can omit these steps for the first and last stitches of each row.
- The bold ribbing is framed by stockinette stitches at the top and bottom, and on the left and right. 15 rows of stockinette stitches are knitted at the top and bottom- adjust as necessary depending on how much framing you want.
- When adding a new ball of Wool-Ease Thick & Quick, you can felt the yarn ends together with a felting needle tool since it contains wool. You will need to tie knots when adding a new skein of Homespun since this yarn cannot be felted.
- If you would like to add fringe with Wool-Ease Thick & Quick, leave about 3 grams of yarn for each bundle of fringe (the pattern as written below leaves about 90 grams of Wool-Ease Thick & Quick Yarn). Homespun yarn tends to fuzz up and fray if left as a single strand, so it is recommended that you use Wool-Ease Thick & Quick for the fringe.
- Optional: Block the blanket to help reduce some of the curling. Adding fringe along the top and bottom edges eliminates the curling.
Gauge: 7 sts and 9 rows = 4″ (10 cm) in stockinette stitch
Pattern:
Cast on 64 stitches using long tail cast-on (leave 100″ tail).
Row 1 (wrong side): Knit first stitch through back loop only. Purl across. Knit last stitch of the row (through front loop as normal).
Row 2 (right side): Slip first stitch purl wise with yarn in front. Move yarn to back. Knit across. Slip last stitch purl wise with yarn in front.
Row 3-15: Repeat Rows 1 and 2.
Row 16 (right side): Slip first stitch purl wise with yarn in front. Move yarn to back. Knit 6, purl 6, knit 5, purl 6, knit 5, purl 6, knit 5, purl 6, knit 5, purl 6, knit 6. Slip last stitch purl wise with yarn in front.
Row 17 (wrong side): Knit first stitch through back loop only. Purl 6, knit 6, purl 5, knit 6, purl 5, knit 6, purl 5, knit 6, purl 5, knit 6, purl 6. Knit last stitch of the row (through front loop as normal).
Row 18-95: Repeat Rows 16 and 17.
Row 96-111: Repeat Rows 2 (even rows) and 1 (odd rows).
Cast off stitches.
Below is a graphic visually showing how the stitches are distributed between the stockinette (knit) and garter (purl) sections. Note that if you work the chained edges, the first and last stitches have special instructions (which is why there are 7 stitches on each end, but the pattern above shows “Knit 6” or “Purl 6”).

Add fringe:
Using Wool-Ease Thick & Quick yarn, cut strands of yarn about 14″ long (you can wrap yarn around a book that is 7″/18 cm long to get similar lengths). Take 4-5 strands and pull ends through space along bottom edge. Count two stitches away and pull other ends through. Pull ends through loop and continue pulling. Repeat across bottom and top edge, spacing each fringe two stitches away. I had 16 bundles of fringe along the top edge and 16 bundles of fringe along the bottom edge. Trim fringe as needed. You can opt to omit the fringe or use tassels as well.
Final Measurements: 38″/96.5 cm wide x 48″/122 cm long (without fringe)
![]()
******************************
The Chunky Ribbed Knit Blanket is such a luxurious blanket that is very simple to knit! The two yarns look so gorgeous together, and will match in any space!
![]()
We love having knit and crochet blankets around the home so that they are ready to be used whenever you need some extra warmth. They look like works of art on display at the home, but they are functional and practical as well!
![]()
Throw blankets are the perfect size for cuddling and they are very manageable. I actually knitted this blanket within a span of 3-4 days, and there is an interesting story behind this quick time period! I initially knitted my “Simple Garter Stitch Blanket” found HERE and wanted to make a ribbed version approximately the same size. Not thinking too much about it, I casted on the same number of stitches that I did for my garter stitch blanket not knowing that the final dimensions would turn out drastically differently! I later discovered that stockinette stitches are more narrow and taller than garter stitches- thus, my final blanket ended up being very narrow and very long! I kept thinking that the final blanket would stretch and be okay with blocking but this was not the case. This design is actually part of Lion Brand Yarn’s 12 Weeks of Christmas, so I ended up frogging the entire blanket with only one more week to go before I needed to hand in the final pattern and photos. I quickly figured out the new sizing and managed to knit the blanket within 3-4 days (targeting about 30 rows per day). I was so relieved when we took final photos and handed in the project to Lion Brand Yarn!
![]()
Adding fringe really elevates the blanket and gives such a polished finishing touch!
![]()
How stunning does the ribbing look? Simple knit and purl stitches can be combined in such an elegant way!
![]()
If you have been wanting to try knitting a blanket, I hope you will give this luxurious design a try!
![]()
It is so soothing getting into the rhythm of knit and purl stitches, and you will love seeing your blanket grow and grow as it drapes upon your lap as you continue working on it!
![]()
I adore my new Chunky Ribbed Knit Blanket and hope you love it as much as I do! The concise PDF of this pattern can be found in my Etsy shop HERE, and it also contains the “Simple Garter Stitch Blanket” pattern which can be found HERE. Both blanket designs use the exact same amount of yarn, so if you would like a very simple blanket using only the garter stitch, check out the Simple Garter Stitch Blanket. Lion Brand Yarn has also put together a kit for this blanket that contains all the Wool-Ease Thick & Quick and Homespun yarn you need, and it is currently 20% off HERE! I am so honoured that this design is part of Lion Brand Yarn’s 12 Weeks of Christmas, and you can check out the rest of the designs HERE to get ready for your holiday crafting! Stay cozy, my friends! Keep challenging yourself to create projects you never dreamed of making, whether that be sweaters, amiguurmi, or large-scale projects such as blankets!
{This post is sponsored by Lion Brand Yarn! I’ve loved working with their yarn throughout the years and I’m thrilled that I get to collaborate with them every month!}
This pattern is an original pattern by Stephanie Lau of All About Ami. Please do not claim this pattern as your own. If you wish to share this pattern, you may link to this pattern but please do not reprint it on your site. You may keep a copy for your own personal use but please DO NOT sell the pattern or distribute it.
You may sell products made from this pattern but please clearly credit the design to me, Stephanie Lau of All About Ami, and provide a link to my blog www.AllAboutAmi.com. Permission is NOT granted for mass production or factory manufacturing of any kind. Thank you for being respectful and for your understanding!