***You can purchase an INEXPENSIVE AD-FREE PDF of this pattern on Etsy HERE! This beautifully formatted PDF includes the stitch tutorial, step-by-step pictures and pattern, and is a total of 11 pages including the cover page! You can also purchase a convenient kit on the Lion Brand Yarn site HERE! It contains all the yarn you need to crochet this project as well as a copy of the pattern!
I’ve adored being able to crochet my own clothing items in recent years as my crochet skills have developed. Two years ago, I modified a pattern I found online to make my “Easy Chunky Crochet Sweater”. Last year, I designed my very first sweater called “The Granite Cape” which is a great transitional piece for the fall and winter. This year I knew I wanted to try my hand at designing another sweater, this time with long sleeves! People love cozying up with long-sleeved sweaters as the temperatures plummet!
At the beginning of the year, I started an exciting collaboration with Lion Brand Yarn, and I am so honoured that I get to do monthly projects with them! Sometimes they send me new yarns to try, and one such yarn was their “Shawl in Ball”! I was very intrigued by this yarn as it was not available in stores at the time, and they said that you could create a shawl with just one ball of yarn, hence the name!
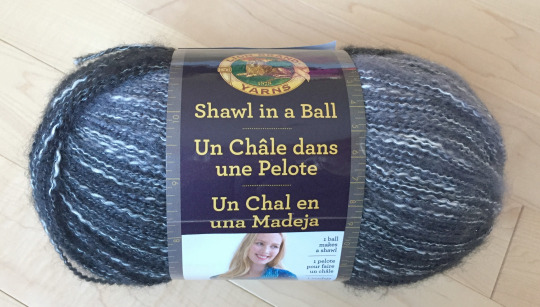
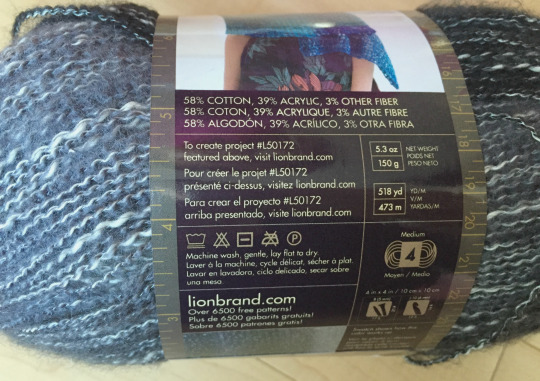
The construction of this yarn is unlike any I’ve worked with before. As described on the website, “the self-striping brushed acrylic, run with a 100% cotton slub, has the look and feel of silk mohair”. Thus, the acrylic has cotton wrapped around it, and it has a definite “halo” around the yarn because of its fuzziness. This is a good choice of yarn for people who are allergic to wool since it has a beautiful texture but no actual wool in it. It is also classified as a level 4 (medium) yarn but, as I’ll show you below, I think it’s closer to a lightweight/DK level 3 yarn.
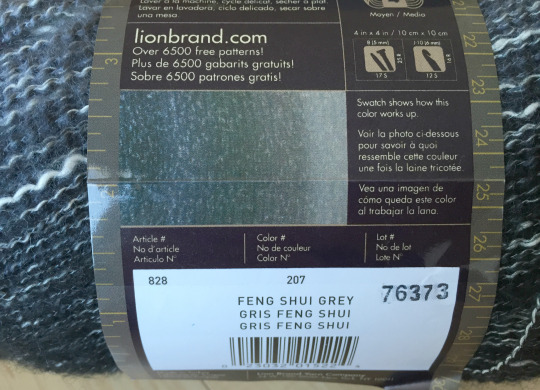
There are 8 colourways currently available, and since I love my neutrals, I went with the “Feng Shui Grey”! I knew it would work up beautifully with the blacks, whites, and greys. You can see the different colourways available HERE.
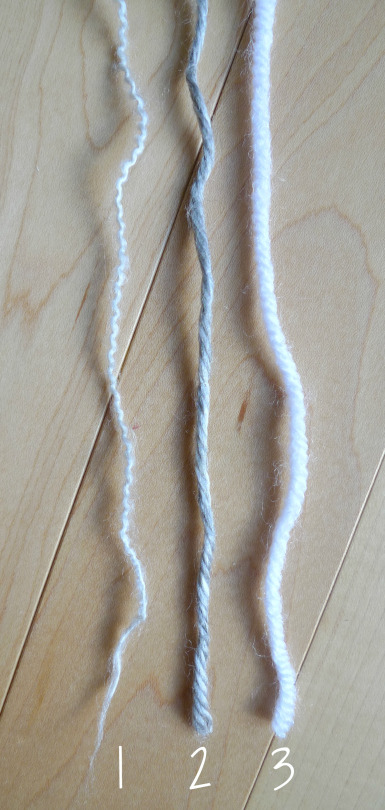
Below you’ll see a side-by-side comparison of Shawl in a Ball to other level 4 (medium) yarns. Number 1 is Shawl in a Ball, Number 2 is Heartland (which I used for my Granite Cape), and Number 3 is Vanna’s Choice. As you can see, Shawl in a Ball looks much thinner than the other two!
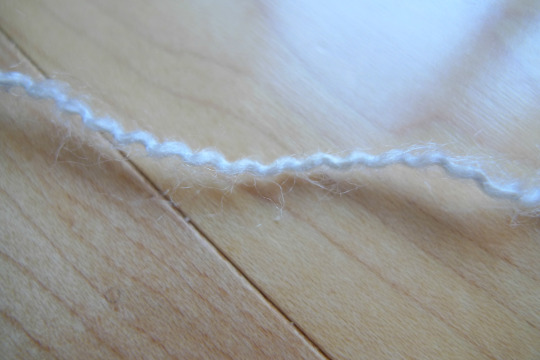
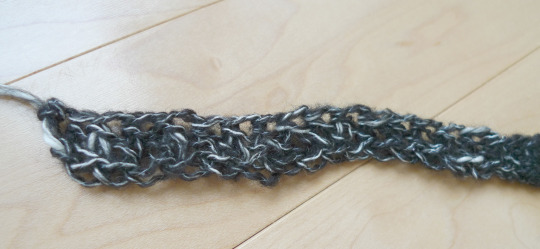
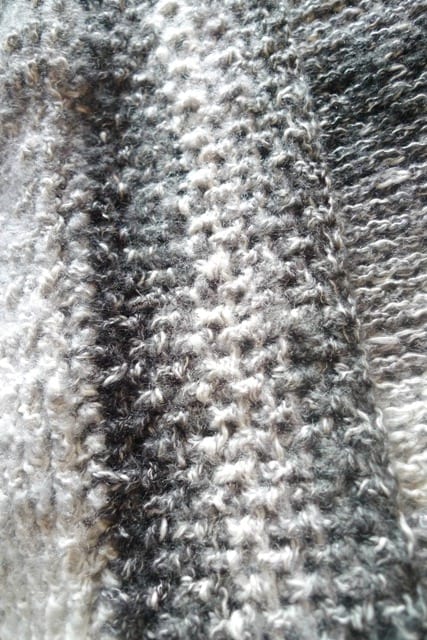
Here is a close-up of a strand of Shawl in a Ball. You can see some of the fuzziness which can make it a bit difficult to see your stitches when knitting or crocheting with this yarn. I kept this in mind when designing my sweater and used stitches that would be easy to locate. It is also important to note that the thickness of this yarn is variable: some areas are quite thin while others are much thicker where it becomes very fuzzy. I think this adds a lot of character and visual interest to the piece, so don’t be alarmed if you come across a very thick and fuzzy section of yarn- just keep crocheting along!
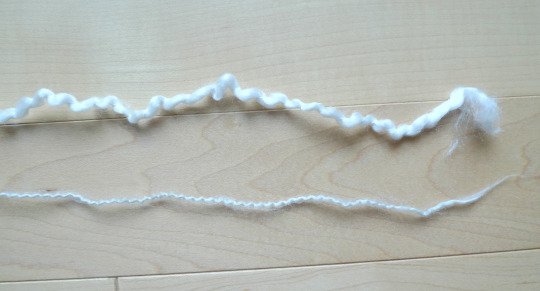
Shawl in a Ball reminded me a little bit of Homespun yarn (see my Cozy Crochet Mittens made with this yarn HERE) as they both have a boucle texture with their looped/curled ply. As you can see below, Homespun is much thicker (bulky level 5) compared to Shawl in a Ball though.
Last week I was delighted to see Shawl in a Ball at my local Michaels! They had all the colours available, making this yarn much more accessible for everyone. You can also find it on Amazon HERE. I personally don’t know of any yarn alternatives to Shawl in a Ball with its thinness and unique composition. If you have any suggestions, leave a comment below as you now know its relative thickness compared to other yarns and what it looks like close-up! If you would like more information about this yarn, you can also see a great video review of Shawl in a Ball by Brittany of BHooked HERE! There are many beautiful shawl patterns out there for this yarn, but I thought it would be neat to design a sweater with it as I knew it would be gorgeous!
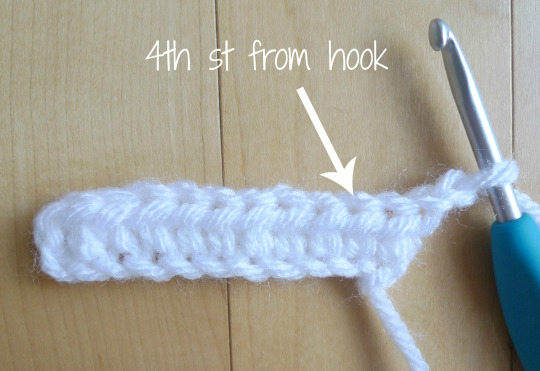
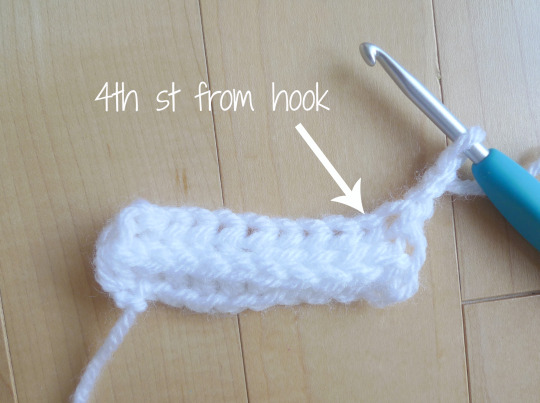
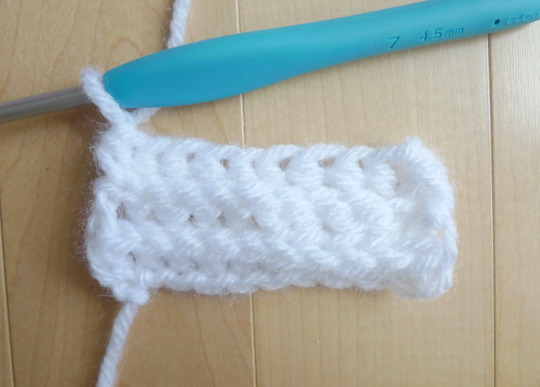
Now we will begin the tutorial showing you the basic stitches you’ll need to know in order to crochet this sweater. I decided to use white worsted yarn (Vanna’s Choice) for this part so you can see the stitches more easily! After doing a row of foundation half double crochets (see how to do this HERE), you chain 2 and turn. In this pattern, the Chain 2 counts as a stitch. You then need to locate the 4th stitch from your hook as you will be working around the post of that stitch.
We will be working a row of Front post half double crochets. This means that you will be inserting your hook behind the post of the stitch (insert hook from front to back of stitch) and working a half double crochet.
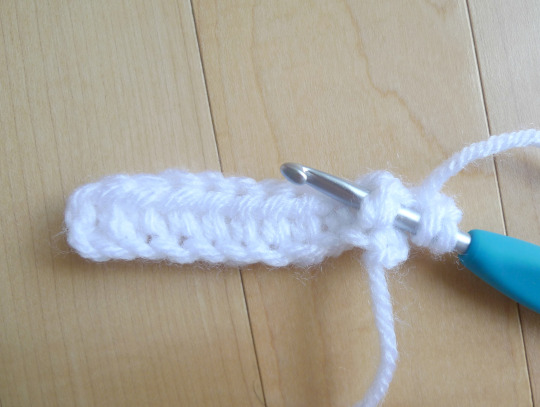
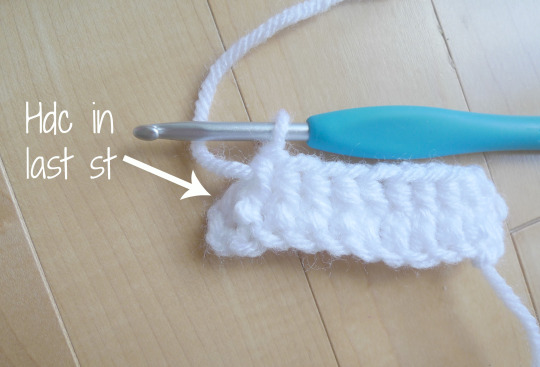
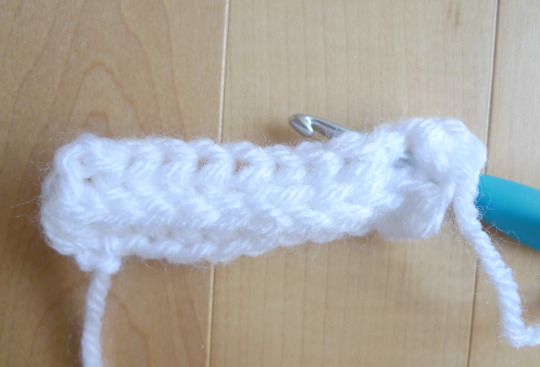
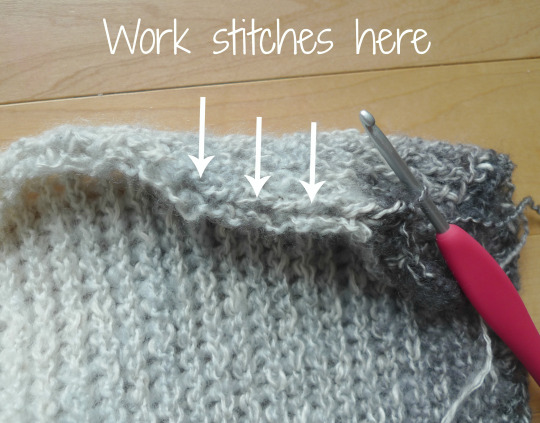
You keep working front post half double crochets until you reach the last stitch, the Chain 2 from the beginning of the previous row. Here you will work a normal half double crochet (not a front post half double crochet).
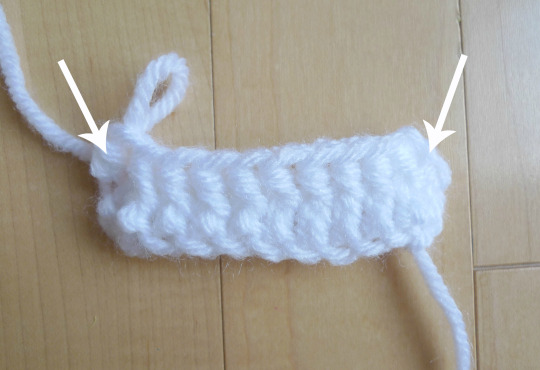
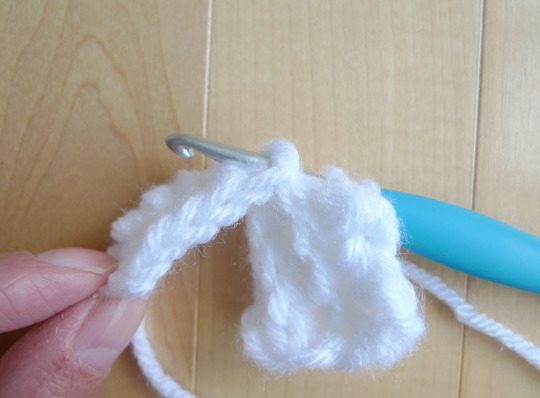
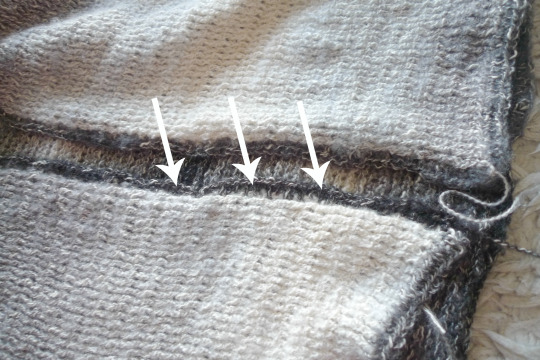
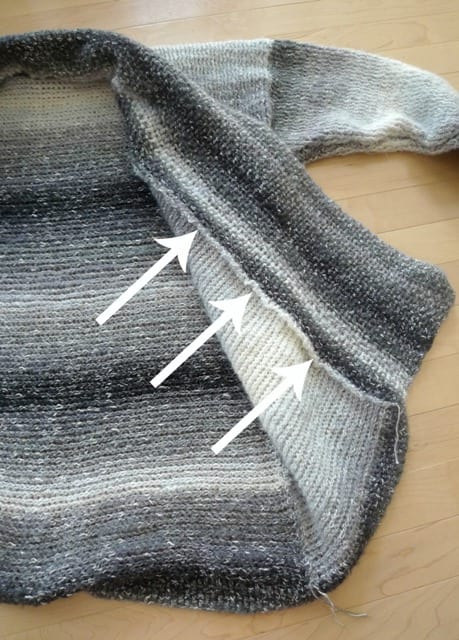
As your piece builds, you’ll see the middle section of front or back post half double crochets and two defined edges on each side (where the arrows are located) consisting of normal half double crochets and chain 2′s.
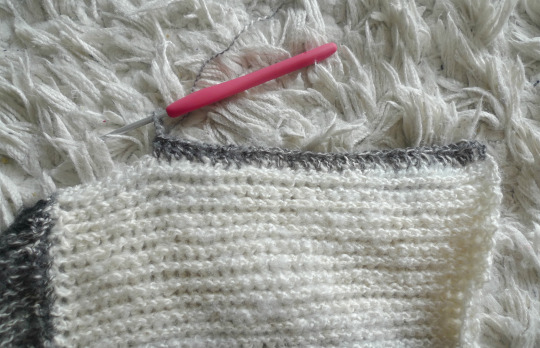
After completing your row of front post half double crochets, you Chain 2 and turn your work. You’ll see a ridge of stitches protruding outwards as they are the front and back loops from the previous row (created when we worked around the posts). Once again, you locate the 4th stitch from the hook as you will be working around the post of that stitch.
Now we need to work our Back post half double crochets. Thus, you insert your hook in front of the post of the stitch (insert hook from back to front of stitch) and complete your half double crochet. You can check out Sarah of Repeat Crafter Me’s video on how to do front and back post half double crochets HERE if you want some extra help!
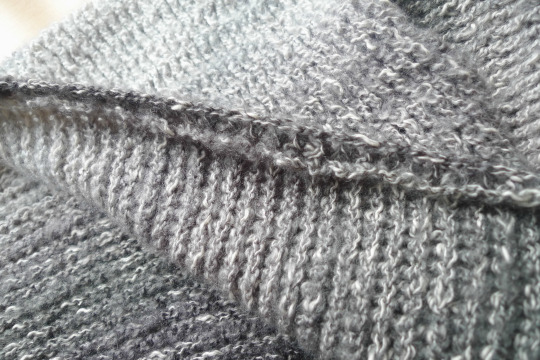
Here you can see this from a better angle at the top. Working around the posts of the stitches makes it much easier when working with fuzzier yarn when it’s hard to locate the front and back loops of the stitches. It also creates a beautiful texture and almost knitted look!
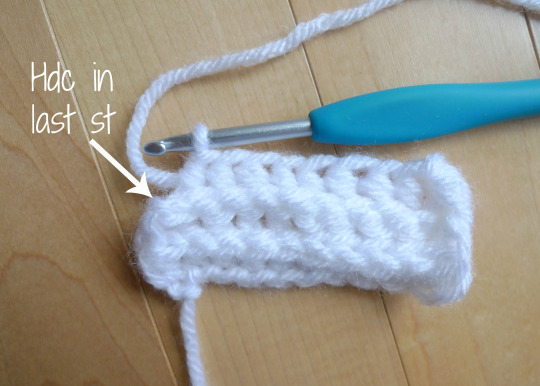
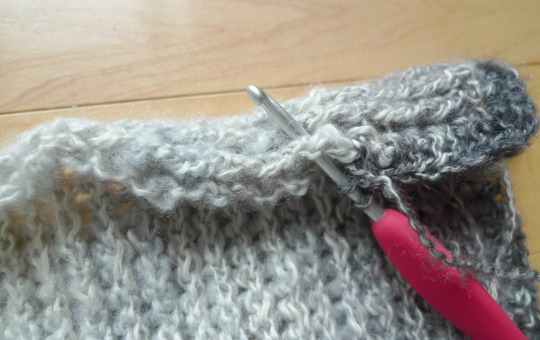
Once you’ve worked your row of back post half double crochets, remember to do a normal half double crochet in that last stitch (the chain 2 of the previous row).
You keep alternating rows of front post half double crochets and back post double crochets for this pattern! Pretty simple, right?
The only other concept we need to go through is working a Front post half double crochet Increase (Fphdc Inc). We will be working many increases when we shape the sleeves of the sweater. In the picture below, we will be working a Fphdc Inc in the next stitch.
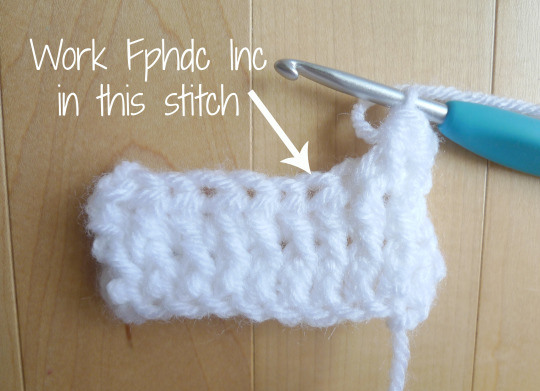
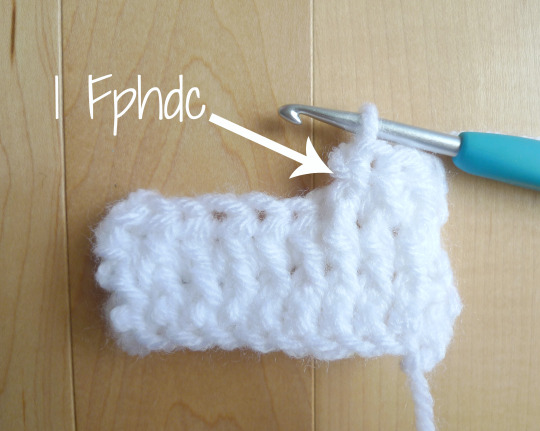
First you complete a Fphdc as normal around the post of the stitch.
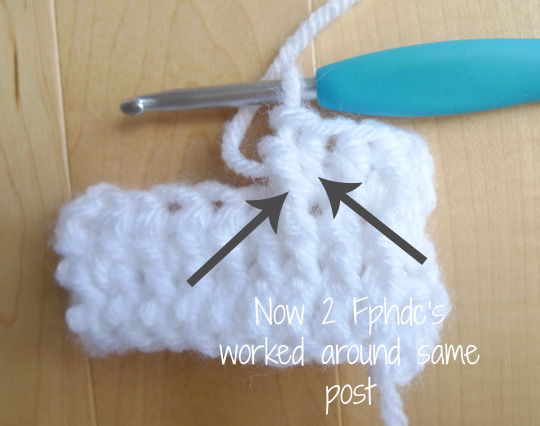
Next, you work a second Fphdc around the post of the same stitch. There will be two Fphdc’s protruding from the post of the stitch below! In the sleeve pattern, these increases are always worked along the edges only. Remember where you work these increases as you crochet along the following row as they sometimes might be hard to see with Shawl in a Ball yarn. When working Back post half double crochet Increases (Bphdc Inc), you do the same thing by working two Bphdc’s around the same post!
Now that we know how to do the stitches, we will begin crocheting our sweater with Shawl in a Ball! Here I started doing my row of foundation half double crochets with a 4.5 mm hook.
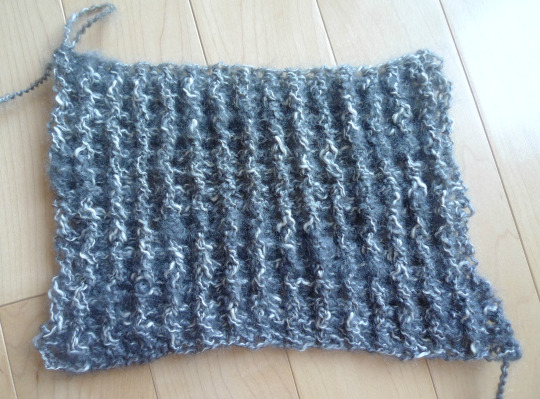
I started off with 102 foundation half double crochets, measuring 24″/61 cm long.
Then I chained 2 and worked the first front post half double crochet around the post of the 4th stitch from the hook. Then I completed Row 2 consisting of front post half double crochets (and don’t forget that last half double crochet in the last stitch).
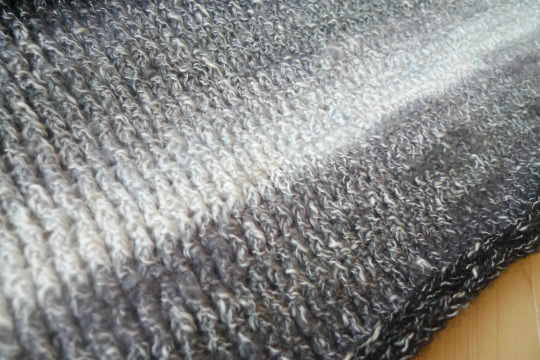
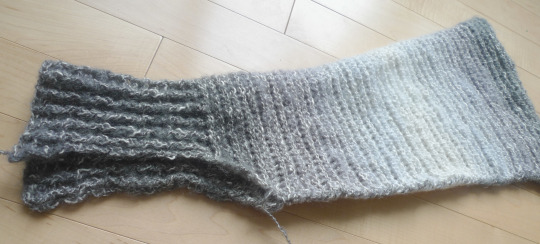
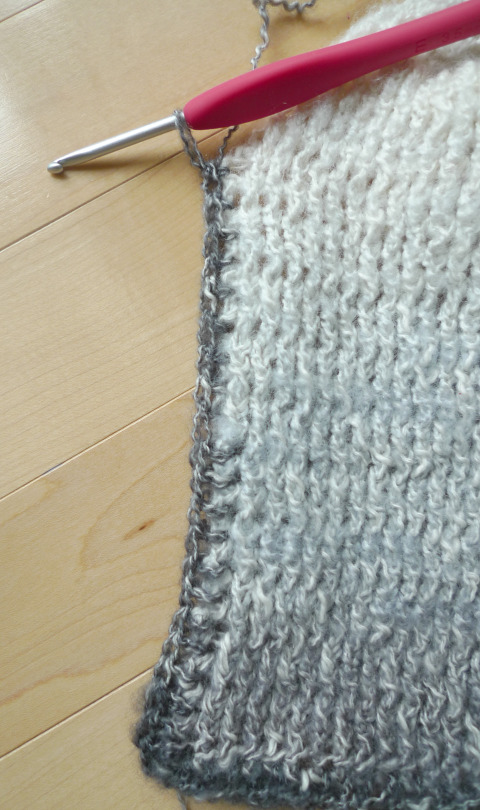
I kept alternating rows of front and back post half double crochets and my piece was building up gorgeously. I LOVE how the colour changes so seamlessly, and it was very fun to work with this yarn because of the gorgeous self-striping. This side shows the back post half double crochets. You’ll notice that the sides tend to curl a lot, but we will be seaming the sides later on and you won’t notice it at all. This is technically the “wrong side” of the sweater, but I love this look and texture too- I’ll have to keep it in mind for a future design!

This side shows the front post half double crochets!
The raised stitches create such a gorgeous effect!
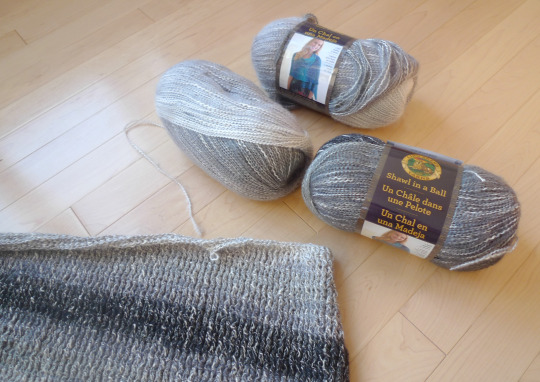
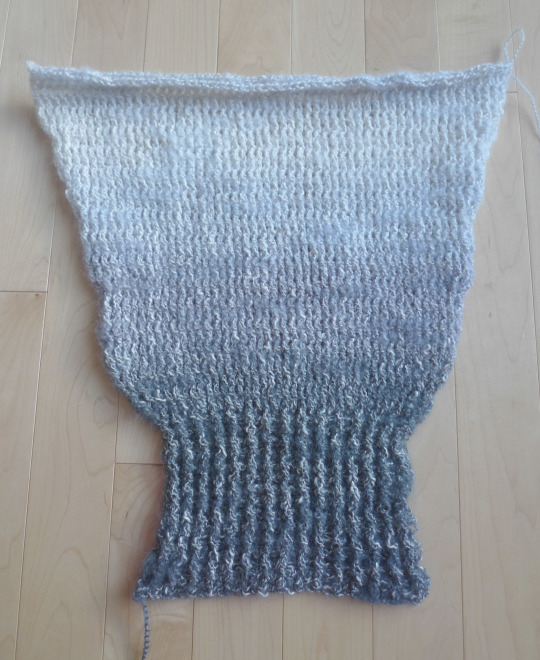
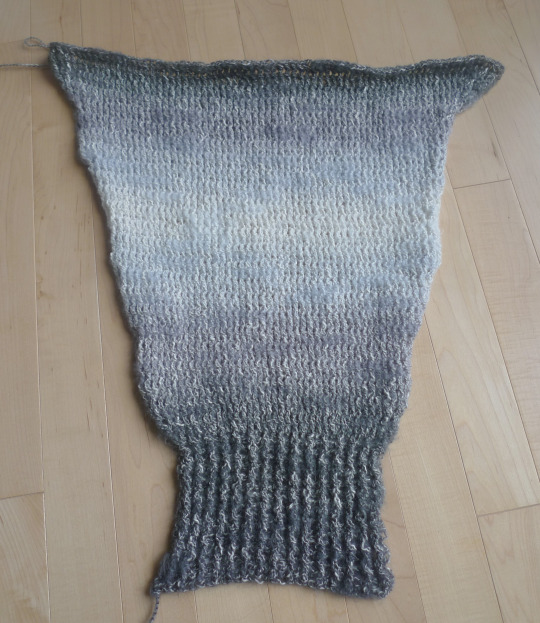
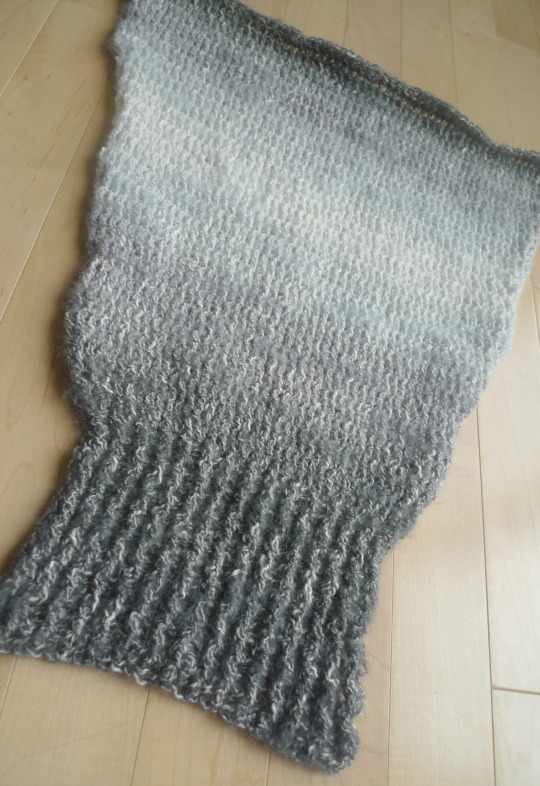
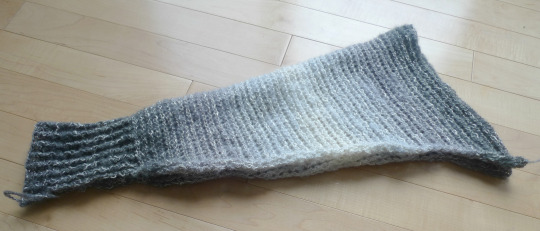
This was how much I completed after using up 1 skein of Shawl in a Ball!
When it was time to join a new skein, I tried my best to match the colour with the skein that I had just used up. For example, since I had left off with a white/light grey section, I tried to find a new skein that began with a white/light grey section to help continue the seamless colour change!
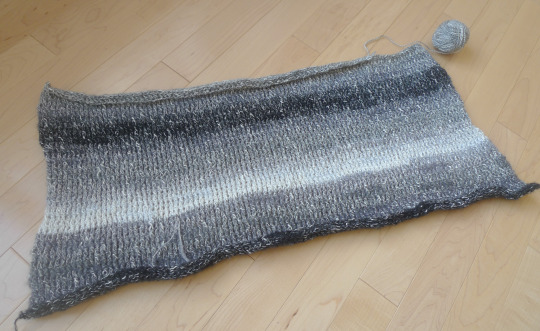
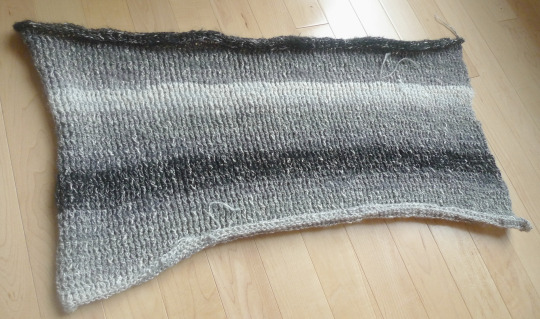
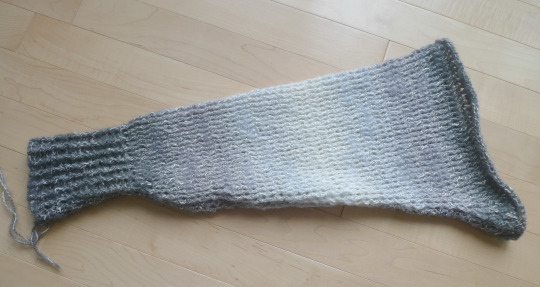
After completing 95 rows, my body rectangle was complete! This body rectangle measured 24″/61 cm across and 30.5″/77 cm in height.
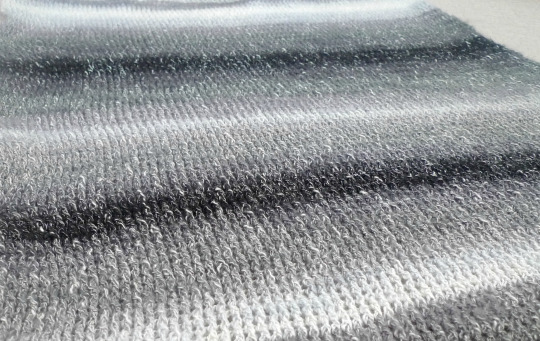
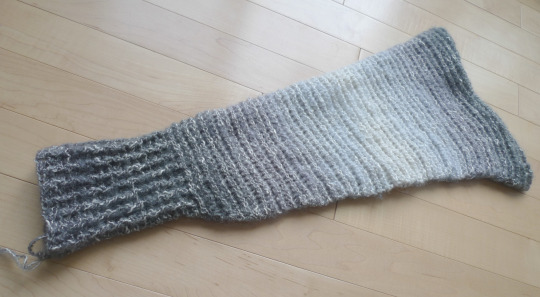
Here’s another look at these gorgeous colour changes and beautiful texture…
I then began working my first panel by alternating rows of 40 Fphdc’s and Bphdc’s. I continued this pattern until I completed 95 rows (to match with the body rectangle).
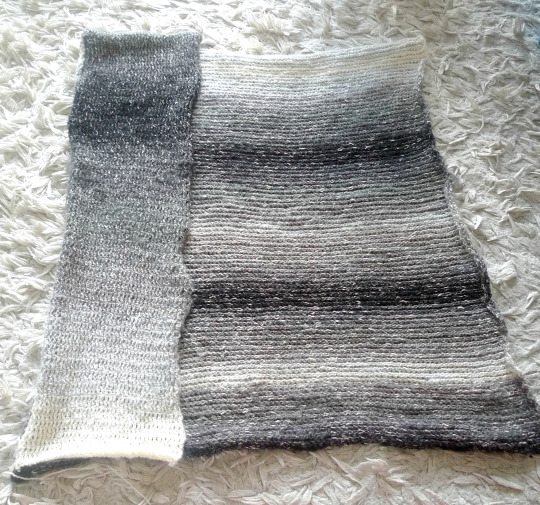
Then I rejoined my working yarn on the far right side and began working the second panel the same way.
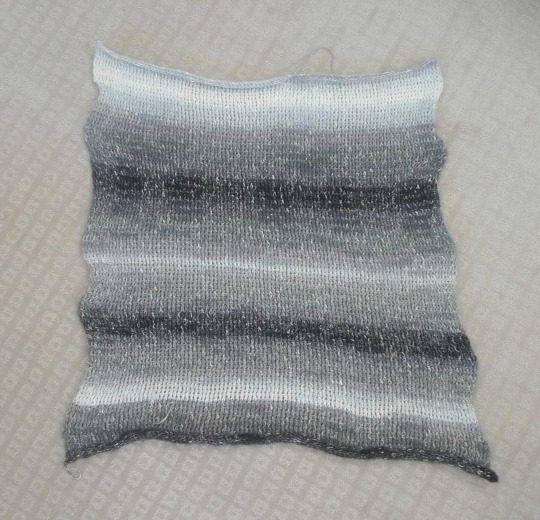
Both panels are complete! My middle gap had 22 stitches (102 – 40 – 40).
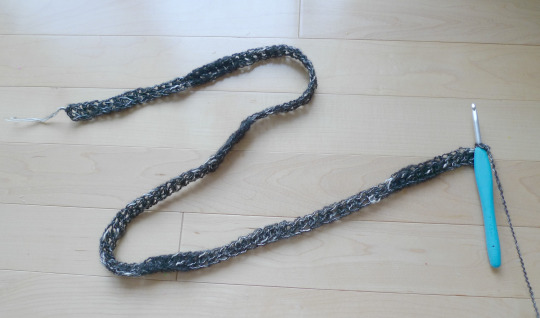
Now it was time to construct the sleeves! I did a row of 31 foundation half double crochets. The sleeves are constructed from the bottom up, so I measured it around my wrist and hand to see how big I wanted it to be. To create a beautiful ribbed effect, I alternated Fphdc’s and Bphdc’s for Row 2. I then alternated Bphdc’s and Fphdc’s for Row 3, causing every other stitch to either be raised forward or pushed back.

After 15 rows, my ribbing was complete!
I learned how to shape sweater sleeves by knitting my Bahia Sweater! I love learning new skills and techniques and adding them to my repertoire so I can use them for future projects. I systematically worked my increases after completing every 6 rows. When doing the increases, I worked two increases on each side so that each increase row was adding four stitches (see written pattern below for further details). This pattern makes it easy to adapt if you’re making larger or smaller sleeves since the increases are only worked towards the sides.
Towards the end I increased more rapidly to get a sort of “batwing” effect for the sleeves as I knew it would drape beautifully.
When I determined the length of my sleeve, I had to keep in mind that part of the front panels and body rectangle would fold downwards past my shoulders to become part of the sleeves (you will see more pictures further on). Thus, the sleeve did not have to measure the whole length of my arm (just approximately before the deltoid muscle). I was so excited to see how the sleeve would look attached to the body rectangle and panels!
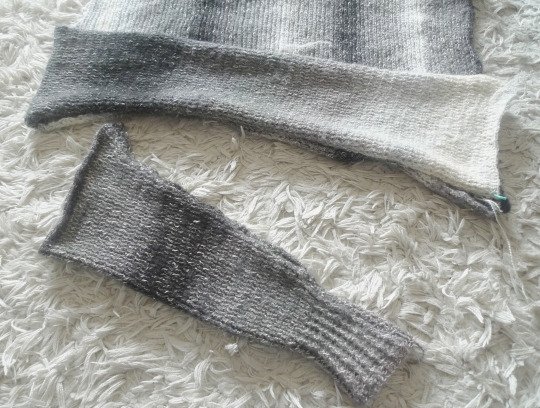
First I flipped the sleeve inside-out.
Next, I began whip stitching the edges shut.
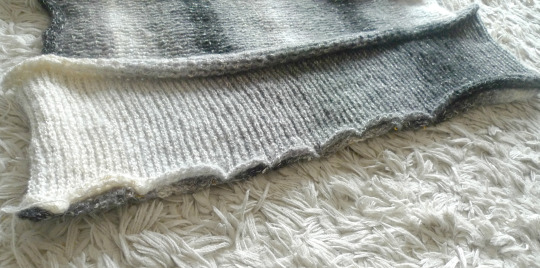
The seaming is complete!
This is what the right side facing outwards looks like!
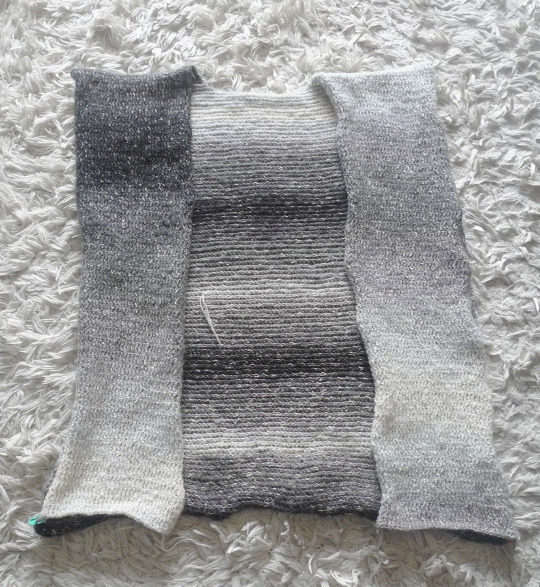
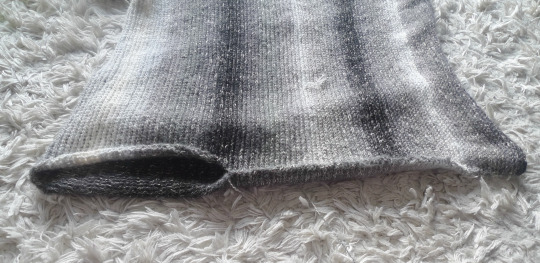
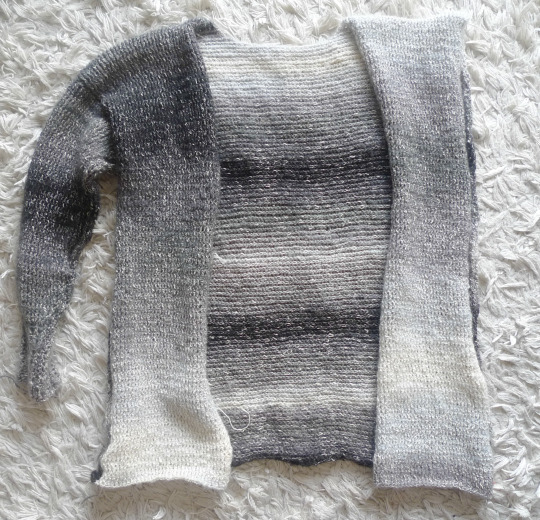
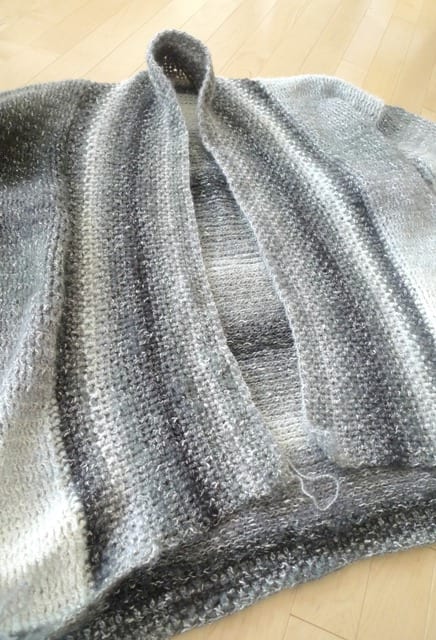
It was time to assemble my sweater!
I then flipped the body rectangle and front panels inside out and used safety pins to help close the edges, leaving the arm hole open.
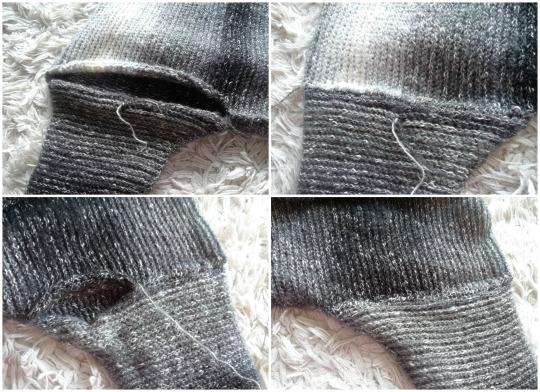
I whip stitched the edges together, removing the safety pins as I went along. For reference, I sewed 19.5″/50 cm of the side and had an arm hole of about 10″/25 cm long.
I measured the opening of the sleeve to the arm hole to make sure I left the appropriate size. I also made sure the slanted edge of the sleeve was facing downwards when I attached it to the arm hole!

Making sure the sleeve was also inside-out, I then whip stitched the sleeve to the arm hole!
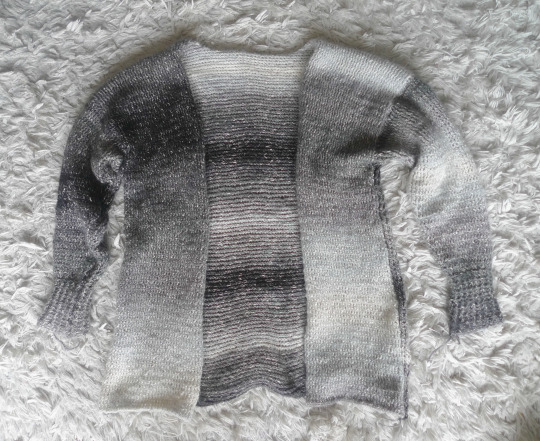
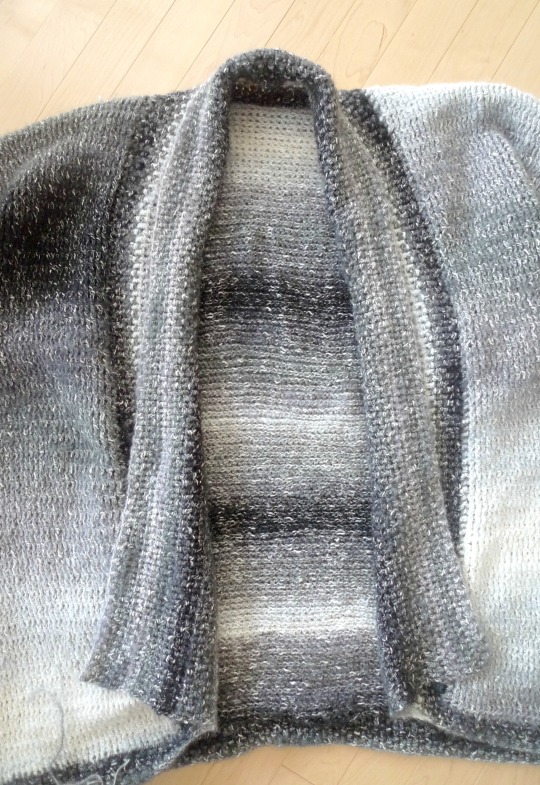
One sleeve is attached! You’ll notice that the body rectangle and front panels curve downwards past the shoulders in this sweater design. This helps create beautiful drape and a very soft look.
I repeated the same process on the other side so that both sleeves were attached!
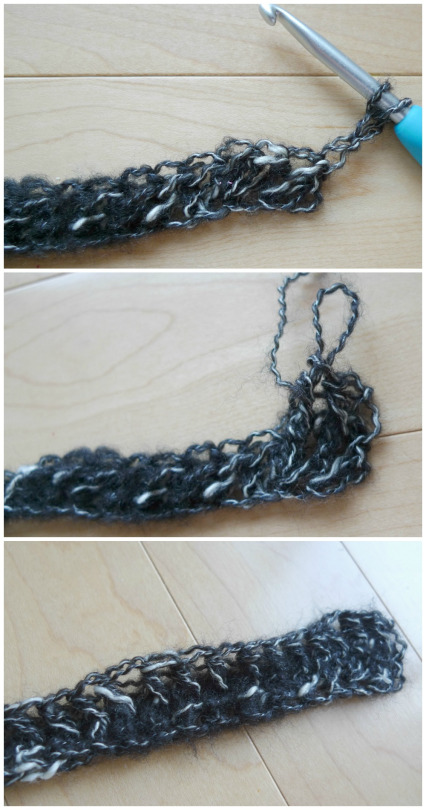
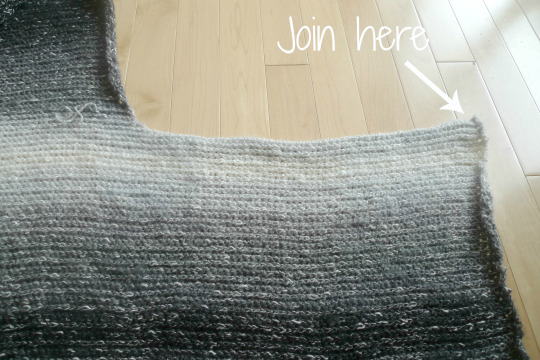
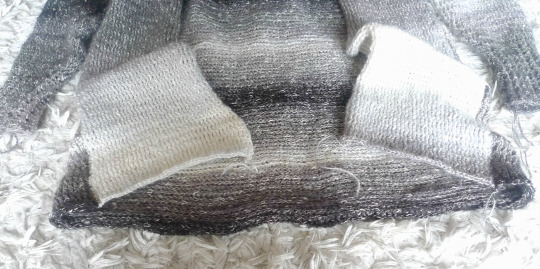
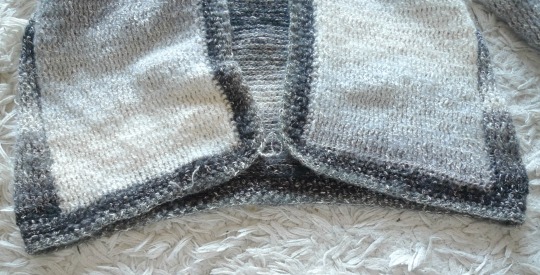
The bottom and collar were looking a little rough, so I needed to add some edging!
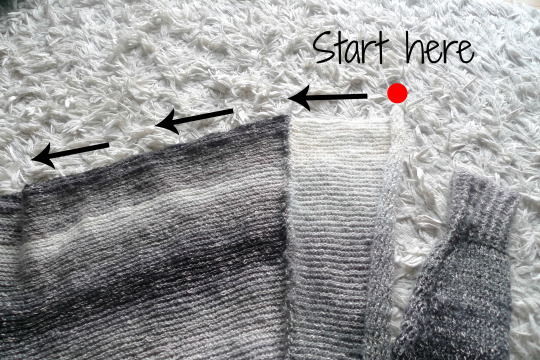
I flipped my sweater upside down and opened it up so that the wrong side was facing me. I joined my yarn at the top right corner of one of the front panels as indicated below and began working in joined rounds across the bottom of the sweater and around the collar.
I moved down a whole hook size and used my 3.5 mm hook to get tighter and denser stitches. I began working half double crochets along the bottom.
After working half double crochets along the whole bottom, it was time to work around the collar.

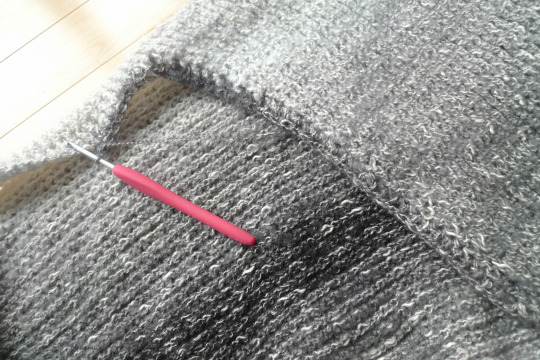
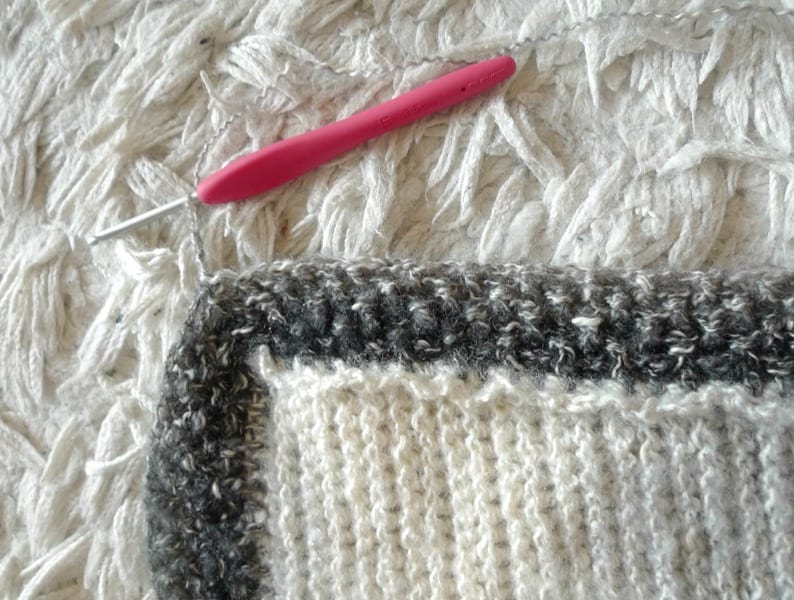
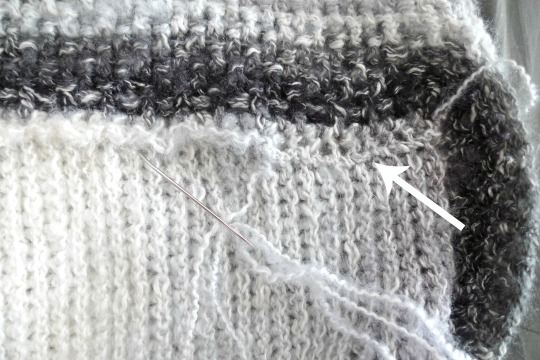
I decided to work my half double crochets around the post stitches of the collar sides as it seemed like a sturdier base compared to the lower chain 2/hdc edge.
This is where I inserted my hook when working my hdc’s.
The transition seemed more seamless as I worked these stitches along the posts.
You can compare this to the picture below when I first worked the hdc’s along the Chain 2/hdc edge. It seemed to be a more flimsy attachment and there was a more noticeable decrease in height/depth. In the end it did not matter too much though since I made the collar very large, so it actually splayed open and this edge was not visible. It is up to you where you want to attach your hdc’s around the collar!
If you work your hdc’s around the posts of the stitch, this raised edge of stitches will be created on the inside of the sweater. Once again, it’s not a big deal, but I ended up sewing this edge down as you’ll see later on.
After working hdc’s around one side of the collar, I went across the top of the collar.
I worked my hdc’s as normal.
Remember that for this part, you will be working in joined rounds, across the bottom of the sweater and around the collar. For the edging, I alternated Fphdc’s and Bphdc’s to create a neat seed stitch/crosshatched effect. I wanted to use the same stitches but in a different way to create a unique look for the edging.

After completing five rounds, I was happy with the width of the bottom edging which measured about 1.25″/3 cm.
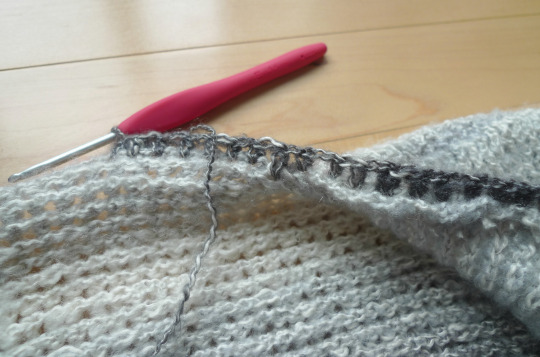
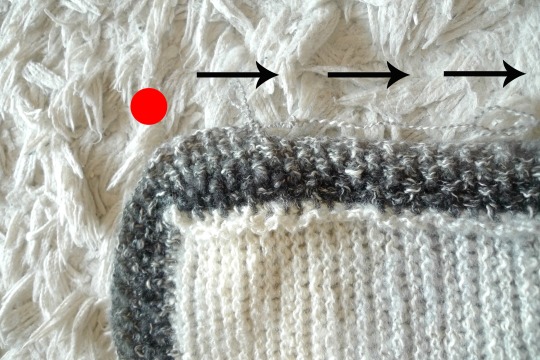
Thus, I stopped at the end of Round 5 and instead of continuing on in a round, I turned my work and began working the other way in turned rows.
The beginning of the row is indicated by the circle below and the arrows show you which direction you will be working!
I then kept building upon the collar, working in turned rows and alternating Fphdc’s and Bphdc’s. The two circles below show you the beginning and end of each turned row as you keep going back and forth.
It was fun building up the width of this collar!

Here is a close-up of the gorgeous texture created by these stitches! It is a very simple pattern to work through since if your next stitch is a raised stitch, work a Bphdc around it. If your next stitch is pushed back, work a Fphdc around it. This creates that staggered effect!
I ended up going until Row 27 and ended up using most of my 6th skein of Shawl in a Ball! My collar edging was 7″/18 cm wide. The wide collar actually helps to push the front panels down towards the sleeves when you wear it.
I love how the collar can be folded so that it drapes and hangs outwards. The right and wrong side of the collar look exactly the same, so it looks gorgeous no matter which side is showing!
Once again, here is that raised inner edge that was created when I crocheted the hdc’s to the posts of the collar. It was bugging me, so I sewed this edge flat.
I did this by simply sewing the raised edge to the front and back loops found on the inside of the sweater.
Here is a close-up showing where I attached this raised edge.
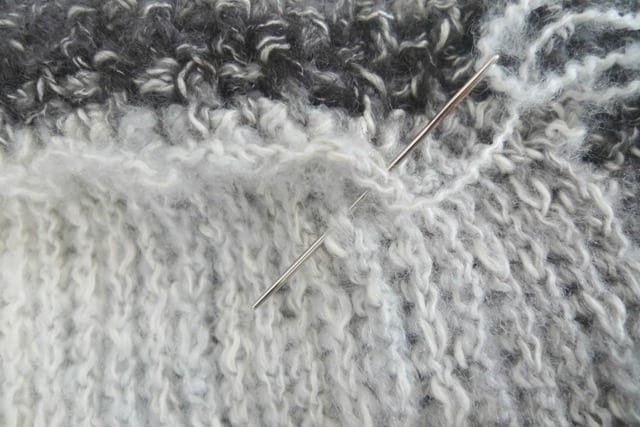
Doesn’t that look much better?

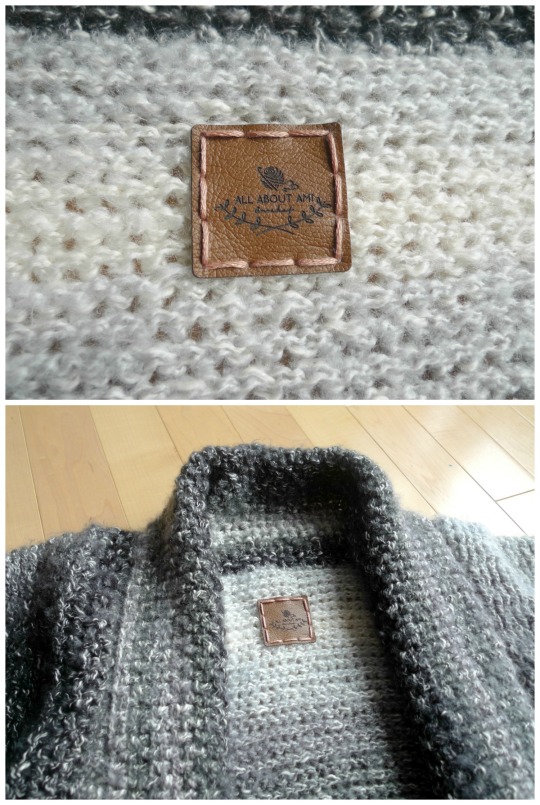
As a finishing touch, I sewed two ultraleather garment tags to my sweater (I got mine from BrickBubble)! I sewed the first square tag to the inner top part of my sweater- it’s so neat having my own label and “brand”!
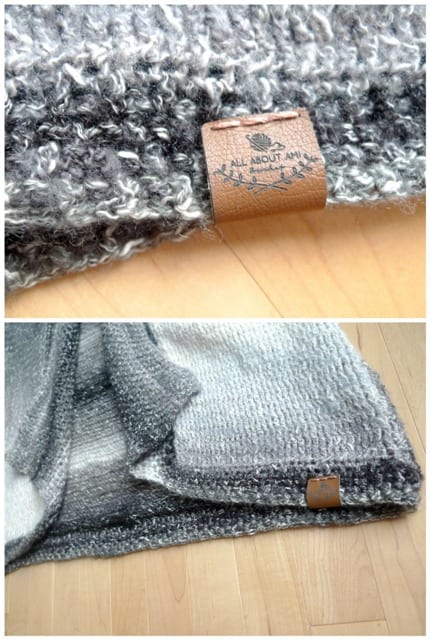
I sewed the second foldover tag to the bottom edging of my sweater so that it would be visible when I wore it! My sweater was now complete!
***************************************
Here is the free pattern for our second original sweater, “The Cascade Cardigan”!
***You can purchase an INEXPENSIVE AD-FREE PDF of this pattern on Etsy HERE ! This beautifully formatted PDF includes the stitch tutorial, step-by-step pictures and pattern, and is a total of 11 pages including the cover page! You can also purchase a convenient kit on the Lion Brand Yarn site HERE! It contains all the yarn you need to crochet this project as well as a copy of the pattern!
Note:
- The Chain 2 at the beginning of each row counts as a stitch.
- Do not worry if your pieces seem to be curling as it will be not be noticeable once you seam the pieces together.
- Whenever it says to seam two pieces together, always flip them inside out and whip stitch them together to get a cleaner look.
- When joining a new skein of yarn, try to match the colours. For example, if you ended off with a white/light grey section, try to find a new skein that begins with a white/light grey section to help continue the seamless colour change!
- For sizing suggestions, see end of pattern.
Special stitches & Abbreviations:
- Front post half double crochet (Fphdc): YO, insert hook behind post of stitch (insert hook from front to back of stitch), YO, pull up a loop, YO, pull through 3 loops.
- Back post half double crochets (Bphdc): YO, insert hook in front of post of stitch (insert hook from back to front of stitch), YO, pull up a loop, YO, pull through 3 loops.
- Front post half double crochet increase (Fphdc Inc): Work two Fphdc’s around post of next stitch.
- Back post half double crochet increase (Bphdc Inc): Work two Bphdc’s around post of next stitch.
- Stitch = st
- Stitches = sts
- Half double crochet = hdc
Materials:
- 4.5 mm Clover Amour hook and 3.5 mm hook (for the edging and ribbing)
- DK or Light Worsted yarn, level 3 (I used Lion Brand Yarn’s Shawl in a Ball in “Feng Shui Grey”, 6 skeins- total yardage: 3108 yards). Note that this yarn is classified as a level 4 yarn on the label, but appears to be level 3.
- Yarn needle
- Garment tags (optional)
Gauge:
10 stitches and 7 rows in alternating front post and back post half double crochets = 2.5 inches (6.35 cm)
BODY RECTANGLE:
Using 4.5 mm hook,
Row 1: Foundation half double crochet 102. (102 sts)
R2: Ch 2, turn. Starting from 4th st from hook, Fphdc across. Hdc in last st. (102 sts)
R3: Ch 2, turn. Starting from 4th st from hook, Bphdc across. Hdc in last st. (102 sts)
Repeat Rows 2 and 3 until Row 95.
After Row 95, split off into 2 front panels.
Body panel dimensions: 24″/61 cm wide, 30.5″/77 cm long.
PANEL 1:
R1: Ch 2, turn. Starting from 4th st from hook, Fphdc across. Hdc in last st. (40 sts)
R2: Ch 2, turn. Starting from 4th st from hook, Bphdc across. Hdc in last st. (40 sts)
Repeat Rows 1 and 2 until Row 95. Fasten off.
PANEL 2:
Flip piece, join working yarn on far right side.
R1: Ch 2 in Chain 2 from previous row. Bphdc across. Hdc in last st. (40 sts)
R2: Ch 2, turn. Starting from 4th st from hook, Fphdc across. Hdc in last st. (40 sts)
R3: Ch 2, turn. Starting from 4th st from hook, Bphdc across. Hdc in last st. (40 sts)
Repeat Rows 2 and 3 until Row 95.
SLEEVES (make 2)
Using 4.5 mm hook,
First we will crochet the ribbing of the sleeve, working from the bottom up:
R1: Foundation half double crochet 31. (31 sts)
R2: Ch 2, turn. Starting from 4th st from hook, *Fphdc, Bphdc* till end. Hdc in last st. (31 sts) [Note your 2nd last stitch will be a Fphdc and your last stitch will be a Hdc]
R3: Ch 2, turn. Starting from 4th st from hook, *Bphdc, Fphdc* till end. Hdc in last st. (31 sts)
Repeat Rows 2 and 3 until Row 15.
[Note that whether you do a Fpdc or a Bphdc may vary depending on your numbers if you adapt the pattern. If your next stitch is a raised stitch, work a Fphdc. If your next stitch is a pushed-back stitch, do a Bphdc to continue the ribbing. For example, if you do an even number of foundation hdc’s in R1, you will be doing *Fphdc, Bphdc* for Row 3!]
The ribbing is complete. We will now begin the increases to shape the sleeves.
R16: Ch 2, *Fphdc 3, Inc*, repeat 7 times. Fphdc 1. Hdc in last st. (38 sts)
R17: Ch 2, turn. Starting from 4th st from hook, Bphdc across. Hdc in last st. (38 sts)
R18: Chain 2, turn. Starting from 4th st from hook, *Fphdc Inc*, repeat 2 times. Fphdc 32. *Fphdc Inc*, rep 2 times. Hdc in last st. (42 sts)
R19: Ch 2, turn. Starting from 4th st from hook, Bphdc across. Hdc in last st. (42 sts)
R20: Ch 2, turn. Starting from 4th st from hook, *Fphdc Inc*, repeat 2 times. Fphdc 36. *Fphdc Inc*, rep 2 times. Hdc in last st. (46 sts)
R21: Ch 2, turn. Starting from 4th st from hook, Bphdc across. Hdc in last st. (46 sts)
R22: Ch 2, turn. Starting from 4th st from hook, Fphdc across. Hdc in last st. (46 sts)
R23: Repeat R21.
R24: Repeat R22.
R25: Repeat R21.
R26: Repeat R22.
R27: Ch 2, turn. Starting from 4th st from hook, *Bphdc Inc*, repeat 2 times. Bphdc 40. *Bphdc Inc*, rep 2 times. Hdc in last st. (50 sts)
R28: Ch 2, turn. Starting from 4th st from hook, Fphdc across. Hdc in last st. (50 sts)
R29: Ch 2, turn. Starting from 4th st from hook, Bphdc across. Hdc in last st. (50 sts)
R30: Repeat R28.
R31: Repeat R29.
R32: Repeat R28.
R33: Repeat R29.
R34: Ch 2, turn. Starting from 4th st from hook, *Fphdc Inc*, repeat 2 times. Fphdc 44. *Fphdc Inc*, rep 2 times. Hdc in last st. (54 sts)
R35: Ch 2, turn. Starting from 4th st from hook, Bphdc across. Hdc in last st. (54 sts)
R36: Ch 2, turn. Starting from 4th st from hook, Fphdc across. Hdc in last st. (54 sts)
R37: Repeat R35.
R38: Repeat R36.
R39: Repeat R35.
R40: Repeat R36.
R41: Ch 2, turn. Starting from 4th st from hook, *Bphdc Inc*, repeat 2 times. Bphdc 48. *Bphdc Inc*, rep 2 times. Hdc in last st. (58 sts)
R42: Ch 2, turn. Starting from 4th st from hook, Fphdc across. Hdc in last st. (58 sts)
R43: Ch 2, turn. Starting from 4th st from hook, Bphdc across. Hdc in last st. (58 sts)
R44: Repeat R42.
R45: Repeat R43.
R46: Repeat R42.
R47: Repeat R43.
R48: Ch 2, turn. Starting from 4th st from hook, *Fphdc Inc*, repeat 2 times. Fphdc 52. *Fphdc Inc*, rep 2 times. Hdc in last st. (62 sts)
R49: Ch 2, turn. Starting from 4th st from hook, Bphdc across. Hdc in last st. (62 sts)
R50: Ch 2, turn. Starting from 4th st from hook, Fphdc across. Hdc in last st. (62 sts)
R51: Repeat R49.
R52: Repeat R50.
R53: Repeat R49.
R54: Repeat R50.
R55: Ch 2, turn. Starting from 4th st from hook, *Bphdc Inc*, repeat 2 times. Bphdc 56. *Bphdc Inc*, rep 2 times. Hdc in last st. (66 sts)
R56: Ch 2, turn. Starting from 4th st from hook, Fphdc across. Hdc in last st. (66 sts)
R57: Ch 2, turn. Starting from 4th st from hook, *Bphdc Inc*, repeat 2 times. Bphdc 60. *Bphdc Inc*, rep 2 times. Hdc in last st. (70 sts)
R58: Ch 2, turn. Starting from 4th st from hook, Fphdc across. Hdc in last st. (70 sts)
R59: Ch 2, turn. Starting from 4th st from hook, *Bphdc Inc*, repeat 2 times. Bphdc 64. *Bphdc Inc*, rep 2 times. Hdc in last st. (74 sts)
R60: Ch 2, turn. Starting from 4th st from hook, Fphdc across. Hdc in last st. (74 sts)
R61: Ch 2, turn. Starting from 4th st from hook, *Bphdc Inc*, repeat 2 times. Bphdc 68. *Bphdc Inc*, rep 2 times. Hdc in last st. (78 sts)
R62: Ch 2, turn. Starting from 4th st from hook, Fphdc across. Hdc in last st. (78 sts)
Fasten off and leave long end for sewing.
Sleeve dimensions:
- Sleeve hole circumference at wrist (ribbed band): 8.5″/22 cm
- Sleeve hole circumference at widest part (where attaches to panels): 10″/25 cm
- Sleeve length: 19.5″/49.5 cm
Assembly:
Flip sleeve inside out and sew sides together.
Flip body and panels of cardigan inside out and sew sides together (approximately 19.5″/50 cm), leaving arm hole.
With slanted edge of sleeve facing downwards, sew sleeve to arm hole (all inside out).
COLLAR & BOTTOM EDGING
With 3.5 mm hook,
Position piece upside-down with inside (wrong side) facing you. Join working yarn to right corner of panel. We will begin working in joined rounds. The front and back post half double crochets should be staggered every round to create a crosshatched, criss-cross pattern (not ribbing like the sleeve).
Round 1: Chain 2. Hdc around bottom and collar of piece. Sl st to first chain 2.
[Note: When I crocheted Round 1, I worked my half double crochets along the post stitches of the collar sides (rather than the Chain 2 edges) so that they had a sturdier base. After I completed my sweater, I was left with an inner raised edge, so I sewed this raised edge down.]
Round 2: Chain 2. *Fphdc, Bphdc* around. Sl st to first chain 2.
Round 3: Chain 2, *Bphdc, Fphdc* around. Sl st to first chain 2.
Round 4: Rep Round 2.
Round 5: Rep Round 3.
We will now begin working in turned rows and working ONLY around the collar (no longer on the bottom of the sweater). Note that whether you work a Fphdc or a Bphdc will vary depending on your numbers. Whenever you see a raised stitch, work a Bphdc, and whenever you see a pushed-back stitch, work a Fphdc since we are staggering them!
Row 6: Chain 2, turn. Starting from 4th st from hook, *Fphdc, Bphdc* across. Hdc in last st.
Row 7: Chain 2, turn. Starting from 4th st from hook, *Bphdc, Fphdc* across. Hdc in last st.
Repeat Rows 6 and 7 to desired length. More rows will create more drape in the front. I went until Row 27.
Fasten off and weave in end. If needed, sew down inner raised edge created by Round 1 of collar edging.
My bottom edging measured 1.25″ wide and my collar edging measured 7″ wide.
Optional: Sew square garment tag on inner top of sweater and fold-over garment tag on bottom edging.
Final measurements:
Height of Sweater: 30.5″/77 cm
Width of Sweater: 24.5″/62 cm across body
Guidelines for Size Adaptations:
- I sized this cardigan for myself! For reference, I am 5′6. This cardigan is meant to be loose and oversized with beautiful drape so that it is not too tight. With that being said, you can modify the general pattern to make a larger or smaller cardigan to fit your needs. If you have a cardigan in your wardrobe that you love, you can try and size this cardigan to match it!
- To make your cardigan wider, increase your initial foundation chain of half double crochets (more than 102). Measure your width a little bit past shoulder to shoulder. The width of the collar will naturally push down the front panels and body rectangle to become part of the sleeve.
- To make your cape longer, increase the number of rows in the body rectangle (more than 95) and panels (more than 95). Make sure that the total number of rows of the body rectangle matches the total number of rows of the front panels.
- To increase the size of the sleeves, increase your initial foundation chain of half double crochets (more than 31).
- For Row 16 of the sleeves, do a general increase (I increased by 7- you could also increase by the same number or more).
- From then on, all increases are worked along the edges of the sleeve: two on one side and two on the other. Follow the same pattern- the only difference will be the Fphdc and Bphdc numbers in the middle (e.g. the Fphdc 32 of R18- if increasing, you will have a higher number).
- Each increase row adds 4 stitches.
- Between Rows 20-54, increase after every 6 rows.
- Row 55-62 increases more steeply as the increase rounds are every other row. If you want to make your sleeves longer, you can continue on with this pattern.
- When determining the length of your sleeve, keep in mind that part of the body rectangle and front panels will curve downwards past your shoulders to become the sleeves. Thus, the length of the sleeve does not need to be your full arm length (measure from wrist to just before deltoid muscle).
- Edging of bottom and collar is worked the same.
- Keep measuring and trying on piece as you work along.
***************************************
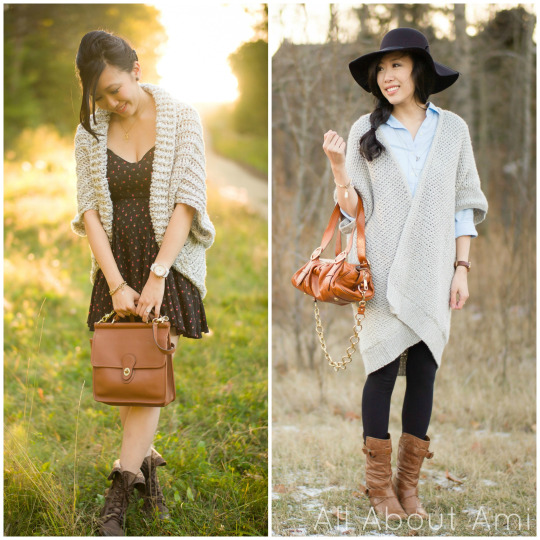
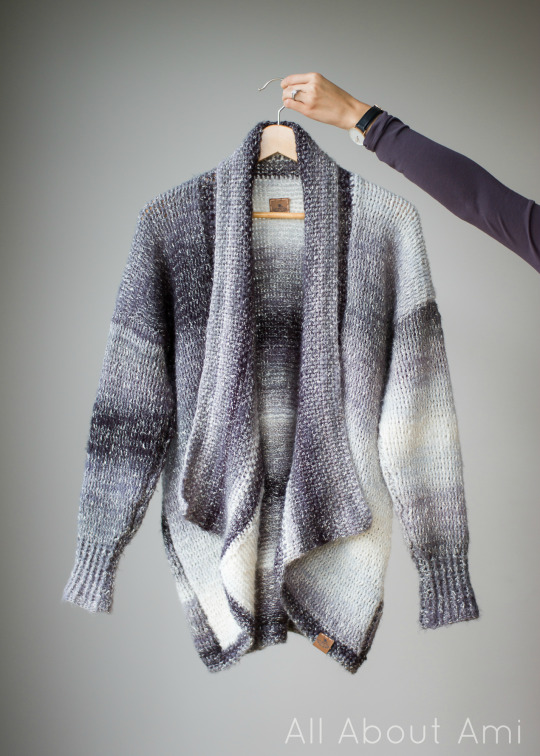
I periodically tried on my sweater throughout the process (e.g. when I was done the first sleeve, working the edging etc) and was incredibly excited to try it on at the very end with the thick and luxurious collar! I am overjoyed with how it turned out!
![]()
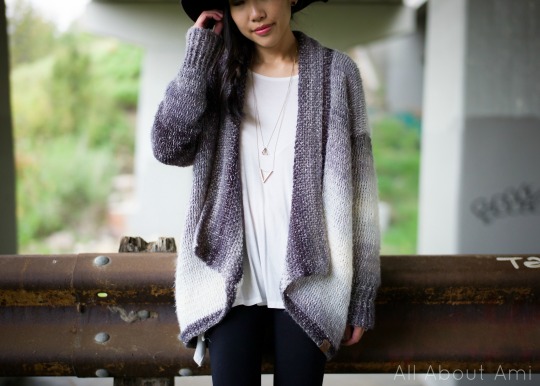
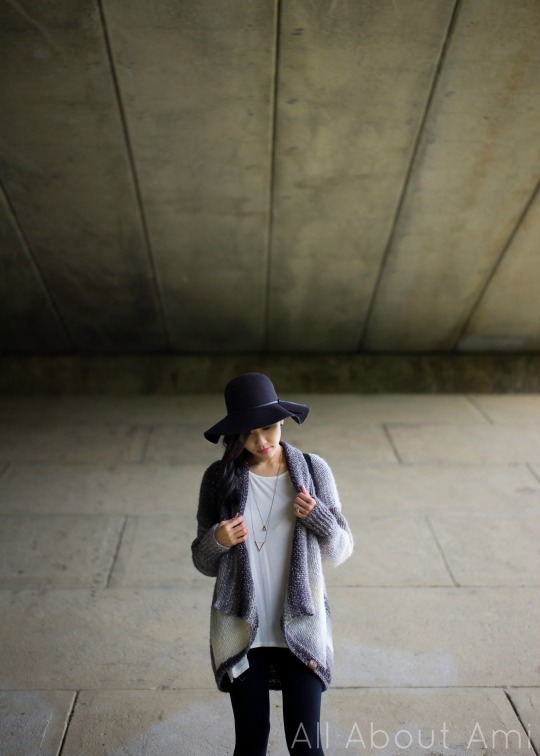
It has such incredible drape and a flowy, romantic feel to it. It hangs off the body gorgeously and is so flattering!
I am in love with the beautiful blend of colours as it has an ombre effect! I am usually not a huge fan of variegated yarn, but this colourway is so elegant and contemporary. You can’t go wrong with black, grey, and white! The fuzziness and halo around the yarn helps to blur the stitches, giving it such a soft and seamless look.
Sometimes it can be hard naming pieces, and I’m so glad that I could ask YOU my readers to help give suggestions! A couple of you included the word “cascade” which I love since it is a small waterfall. I wanted to highlight the gorgeous drape of the piece, and the word “cascade” evokes a sense of peace and elegance for me. Thus, I decided to name my sweater “The Cascade Cardigan”- I also love the alliteration!
The ultraleather garment tag adds such a beautiful finishing touch to this handmade piece!
This is my new favourite sweater and the crochet design that I’m most proud of aside from my amigurumi. It is the perfect cardigan to cozy up in and is such a beautiful piece in my wardrobe! Isn’t it amazing how we can crochet our own clothing?
I am delighted I learned how to shape sleeves for sweaters! The long sleeves really make it perfect for any weather and are just so cozy!
Self-striping yarn is so neat! It really was a lot of fun working with it since you never knew what section of colour was coming next!
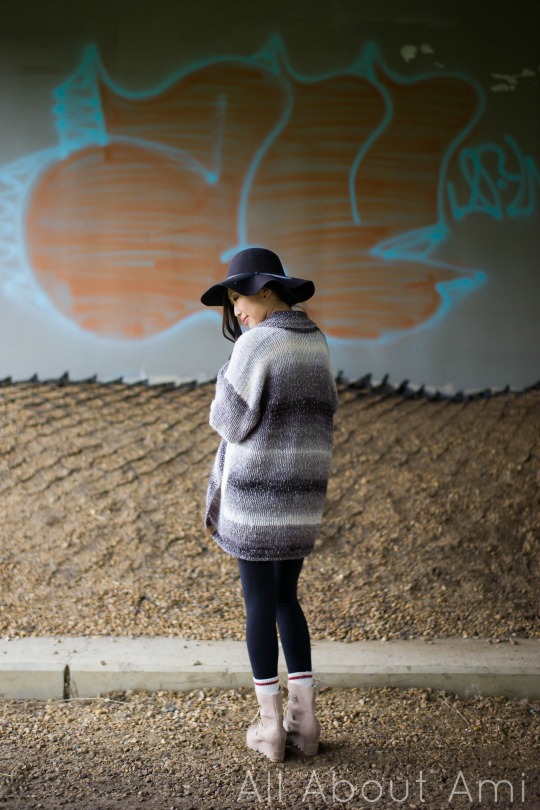
Here is the back! I love the length of the sweater and the oversized look of it!
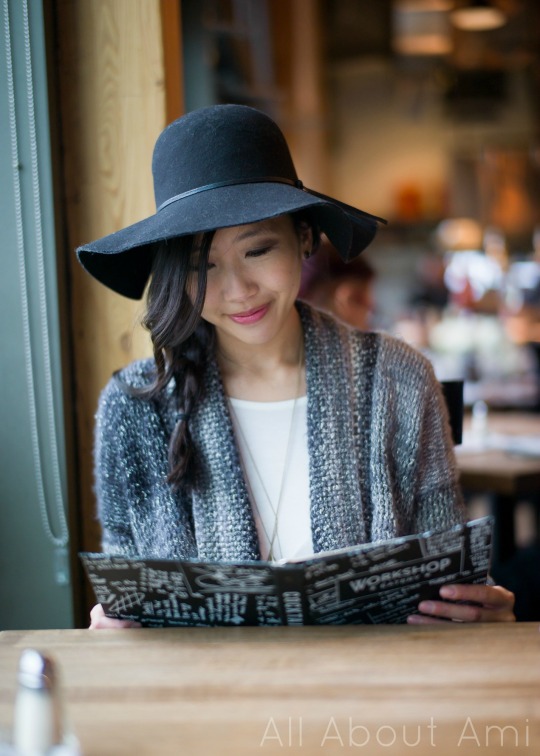
In case you’re curious, I am wearing: Joan of Arctic Mid Wedges in “Oxford Tan” by Sorel, Preston Leather Backpack by Fossil, Floppy Black Hat by Simons, Camper Socks by Garage Clothing.
Ryan thought it would be fun to do a jumping shot! This was easier said than done since I was wearing wedge heels. I also had to hold onto my hat as it flew off a couple times! I love this dynamic shot! Haha don’t I look like the White Rabbit from Alice in Wonderland who’s late for a very important date?
![]()
We also filmed some videos of me wearing the Cascade Cardigan so you can really see how it moves and flows! Doesn’t it look beautiful?
This Cascade Cardigan photoshoot was very memorable for Ryan and I as we actually took these photos on our 6th wedding anniversary! We took advantage of the fact that Ryan’s parents were taking care of the girls for the evening, so we snapped some photos before heading to our anniversary dinner! We tried out a new restaurant and were reminiscing over our 6 wonderful years of marriage and how surreal it is that we have two daughters now!
I am delighted to share that Lion Brand Yarn loved my cardigan so much that they made a fabulous Crochet Kit for it! The kit contains a copy of this pattern and 6 balls of Shawl in a Ball. Keep in mind that this project also requires a 4.5 mm hook (Lion Brand does not have this size available, which is why a 5 mm is listed), a 3.5 mm hook, and a yarn needle. I am honoured to have one of my designs as a part of a kit on their website, ready for purchase- you can check it out HERE! Kits are so convenient!
I hope you enjoyed seeing the design process behind my “Cascade Cardigan”! People tend to like knitted garments better for their drape and look, but I’m delighted that I could provide this crochet alternative that has a knitted look! I am so excited to see your Cascade Cardigans as it is such a perfect piece to work on as fall and winter approach! Don’t forget to visit my Etsy store HERE for a concise PDF of this detailed tutorial and pattern! I would LOVE to see your in-progress and final pictures, so feel free to share them with me on my blog and social media here: Facebook page, Twitter (@AllAboutAmi) or Instagram (@AllAboutAmi). You can also use the hashtags #cascadecardigan and #allaboutami on social media to show everyone your work too! Have fun making your own clothes and cuddling up with your Cascade Cardigans, everyone!
{This post is sponsored by Lion Brand Yarn! I’ve loved working with their yarn throughout the years and I’m thrilled that I get to collaborate with them every month!}
This pattern is an original pattern by Stephanie Lau of All About Ami. Please do not claim this pattern as your own. If you wish to share this pattern, you may link to this pattern but please do not reprint it on your site. You may keep a copy for your own personal use but please DO NOT sell the pattern or distribute it.
You may sell products made from this pattern but please clearly credit the design to me, Stephanie Lau of All About Ami, and provide a link to my blog www.AllAboutAmi.com. Permission is NOT granted for mass production or factory manufacturing of any kind. Thank you for being respectful and for your understanding!