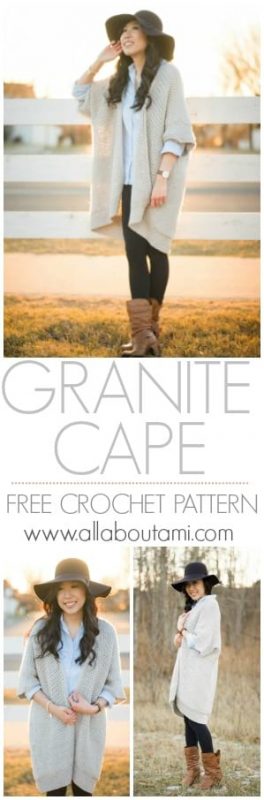
***You can purchase an INEXPENSIVE AD-FREE PDF of the Granite Cape pattern on Etsy HERE and on LoveCrochet HERE! This beautifully formatted PDF includes the step-by-step pictures and pattern, and is a total of 9 pages including the cover page! Lion Brand Yarn has also created this design into a kit which you can purchase HERE! It includes all of the yarn you need as well as a pattern copy of the Granite Cape!
Last fall I had so much fun crocheting my “Easy Chunky Crochet Sweater” as prior to that, I had only made small wearable items such as cowls and beanies. I loved the simplicity of Lion Brand Yarn’s “Simple Crochet Shrug” pattern since it was essentially a large rectangle folded in half with the sides seamed up to form arm holes. I added my own collar detailing and was delighted with how quick and easy it was to crochet a beautiful, chunky, ribbed sweater. I know many of you loved the result too and made your own sweaters! A common issue with this sweater was the “bum bunching” as the piece tended to fold awkwardly towards the bottom because of its construction. Ever since we made this very first sweater, we always wanted to design our own from scratch! We wanted to make a modern design since I found it difficult to find contemporary, non-frumpy crocheted sweater patterns!
As we were trying to figure out the construction for our sweater design, we looked in stores for inspiration as they started rolling out their winter collections with plenty of oversized, drapey sweaters and cardigans. We wanted a basic, uncomplicated design that did not involve too much shaping, increasing, or decreasing for our first sweater pattern. There were a number of times when Ryan and I would unfold a sweater in a store, stretch its sleeves apart, and examine the inside closely to see where the seams were located and how many panels were used to make it. Needless to say, I’m sure the sales associates were wondering what we were doing!
We decided to base the construction on one of my absolute favorite sweaters/cardigans that I’ve owned for a number of years: the “Ionic Cape” from Aritzia. It is lightweight, comfortable, and has a beautiful drape to it. I’ve worn it throughout many of my blog photoshoots such as my Easy Ribbed Pom Pom Beanie, Crocheted Toddler Loop Boots with Suede Soles, and Cabled Slouchy Beanies. As you’ll see later on in this blog post, this cape is constructed by creating a large rectangle which splits off into two panels. The sides are seamed up with delicate ribbing along the bottom, around the arm holes, and along the collar.
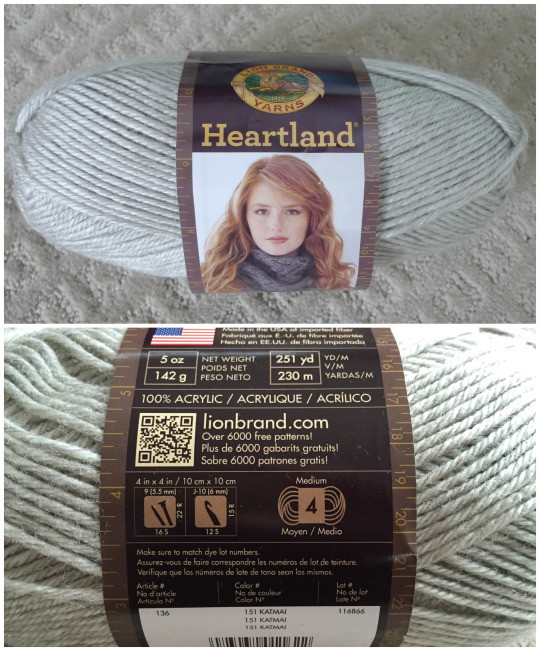
Finding the perfect yarn for this project was very important! We wanted a finer, less chunky yarn so that the stitches would be more delicate. Furthermore, we needed to find a yarn that was soft and “squishy” (i.e. not stiff) so that our sweater would drape beautifully. After perusing and feeling all the different yarns available at Michaels, we were happy to choose Lion Brand Yarn’s “Heartland”, which is a medium (level 4) 100% acrylic yarn that is incredibly soft and offered in some gorgeous rich hues. We loved the colour “Katmai” which is described as a “heathered light grey”. I had previously worked with Heartland in my “Cabled Slouchy Beanie” last year, and I was excited that I could work with it again, this time on a much larger scale!
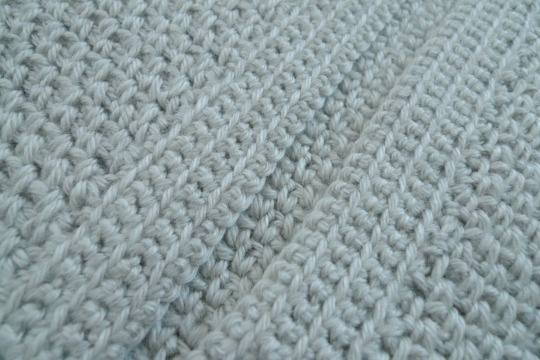
Once we had determined our yarn, it was then time to figure out which stitch to use and what size hook! We wanted a stitch that was not too dense so that the sweater would drape and move well. On the other hand, we did not want a stitch that was too loose as the sweater might stretch too much and end up being too “hole-y” or mesh-like. After working up a sample with rows of single crochets, half double crochets, and double crochets using all different hook sizes, we decided upon using our 6.5 mm Clover Amour hook with the “Granite/Moss Stitch” (you can read more about it and see it in action HERE). This stitch is very simple as it is staggered single crochets with chain 1′s in between. The result is a very interesting and beautifully textured effect with little “v’s” interspersed throughout. Crocheting in the chain spaces is always fun too since it goes by quickly!
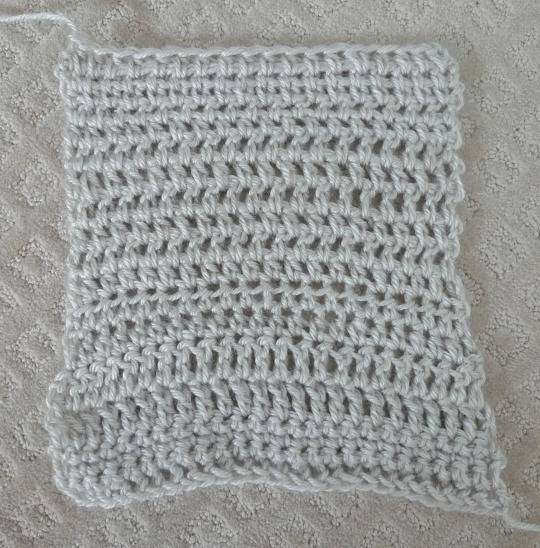
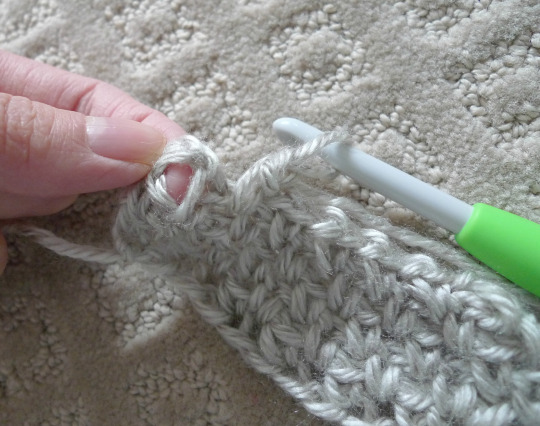
I practiced the Granite/Moss stitch to make sure I knew how to do it with a small swatch before beginning my huge sweater, and I would recommend that you do the same! Start with an odd number of chains- here I chained 15. Starting from the 3rd chain from the hook, I single crocheted 1 then skipped one stitch, chaining 1 in between. [Note that other tutorials for the granite/moss stitch sometimes start with an even number of chains and begin crocheting in the 4th chain from the hook. I opted to go with an odd number, and it does not make a huge difference overall.]
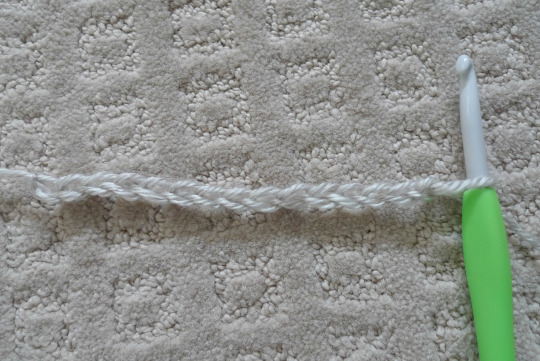
After the first row was complete, I had 8 single crochets with 7 spaces (those initial chains/turning chain count as 1 sc). Thus, there were 15 stitches, the same number as my initial chain.
Make sure you always work your last single crochet in the chain space at the end of the row as it is sometimes easy to forget!
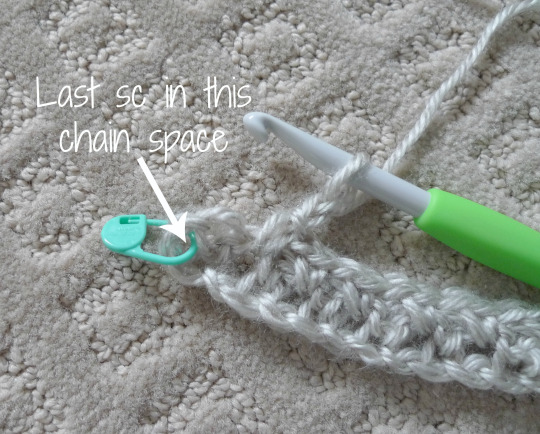
The last sc has been worked in that chain space…

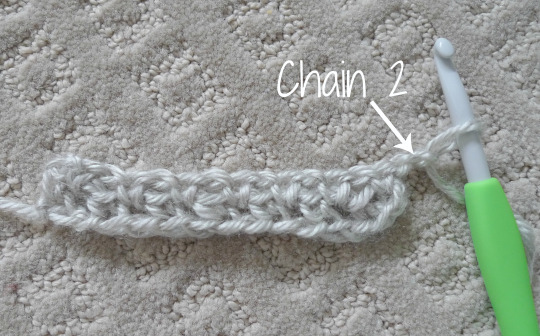
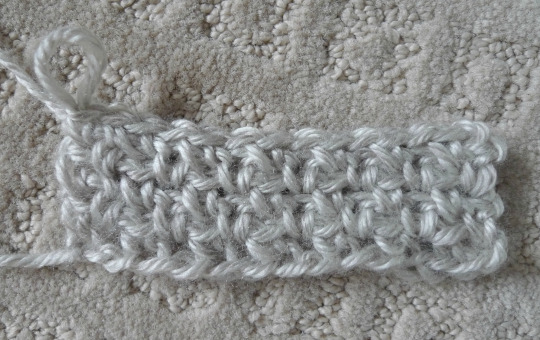
Always chain 2 at the beginning of your next row as your turning chain. Then you work single crochets in all the chain spaces across, chaining 1 in between!
Once again, this is where you work your last single crochet- I usually use my fingers to enlarge the hole so that I can insert my crochet hook in here! As a reminder, you are working in the CHAIN SPACES rather than the actual front and back loops of the stitch. See this video HERE if you need a refresher on how to work into the chain space. I love working in the chain spaces as it goes by very quickly since you simply insert your crochet hook into the gap rather than having to find the loops!
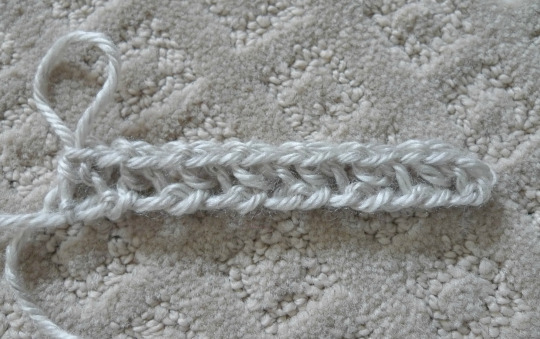
Here are five rows complete! As a gauge reference, my swatch measured 4″/10 cm across and 1.4″/3.5 cm high. Once you have practiced doing this stitch and you can see that your swatch is not inadvertently shrinking or getting bigger, you are ready to begin your sweater!
I used an initial chain of 117 (which meant I had 117 sts composed of single crochets and chain 1′s in each row) and did 108 rows of the granite/moss stitch. My resulting rectangle was 70 cm/27.5″ by 72 cm/28.3″.
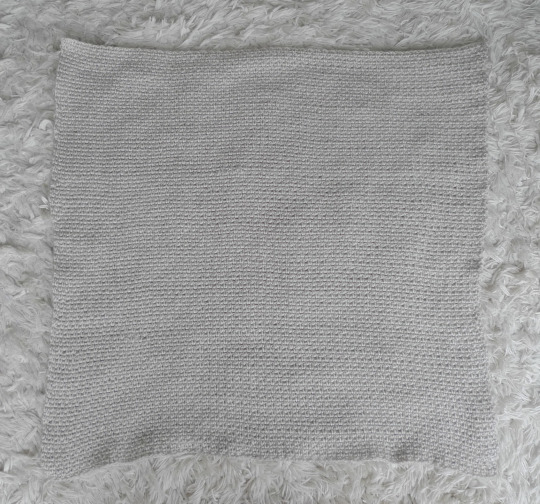
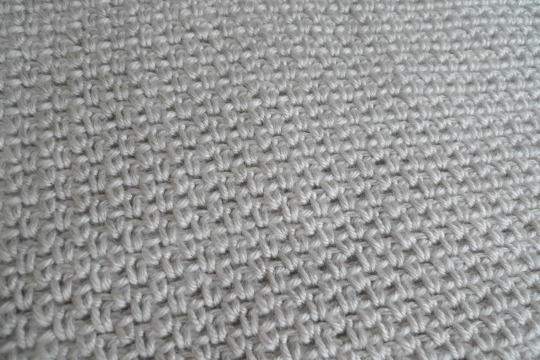
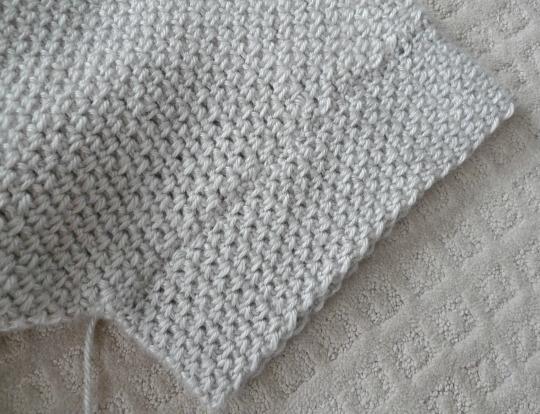
Here is a close-up of the staggered single crochets. I LOVE the look of the granite/moss stitch as it has such a delicate and unique look to it!
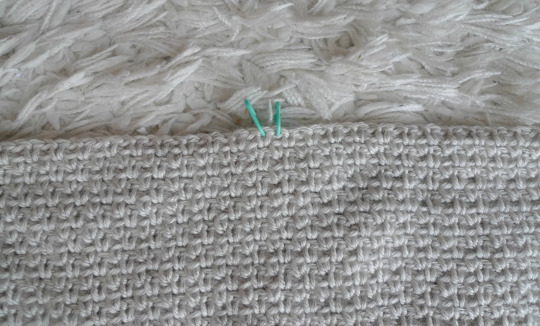
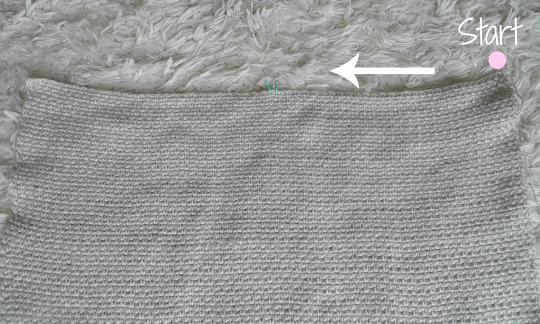
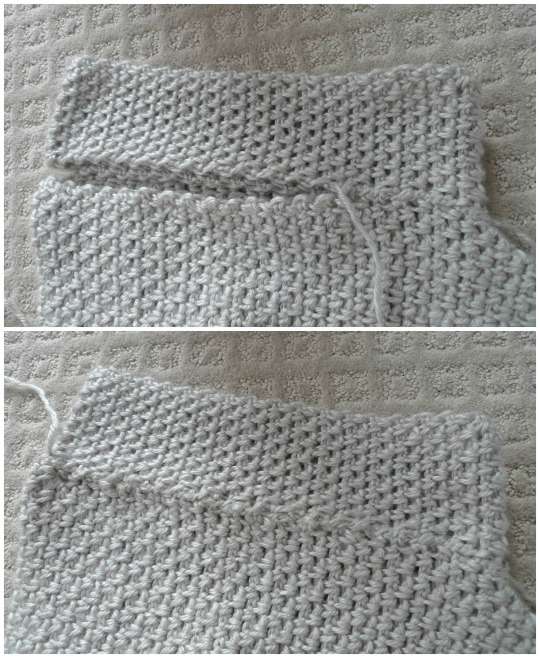
Next I needed to divide this rectangle in half and begin the two panels. Thus, I located the middle two stitches (one will be a sc and one will be a chain) and marked them with stitch markers!
With my working yarn on the right side, I began working the same pattern across towards the midway points (towards the left).
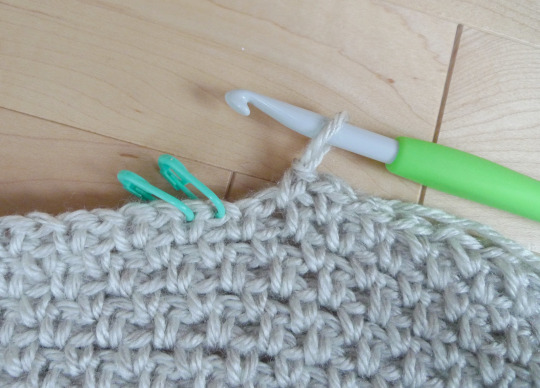
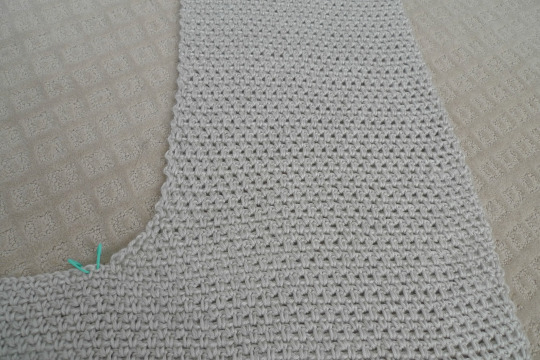
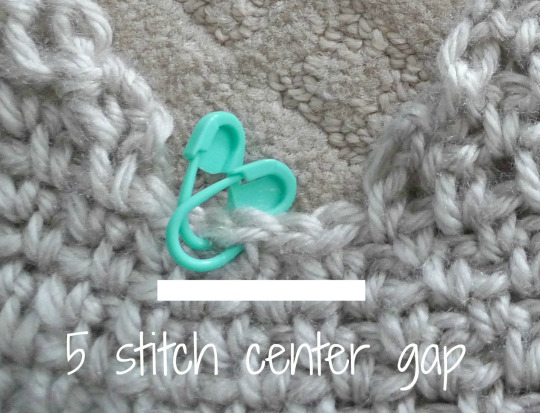
I stopped this row before I actually hit the stitch markers so that there would be a center gap of 5 stitches. You can see below that my last single crochet was worked two stitches to the right of the nearest stitch marker.
Rather than having the two panels jut out of the rectangle at a sharp 90 degree angle, we wanted them to grow more gradually in almost a U-shape. Thus, I worked one decrease at the beginning of the first five rows on the side closest to the stitch markers.
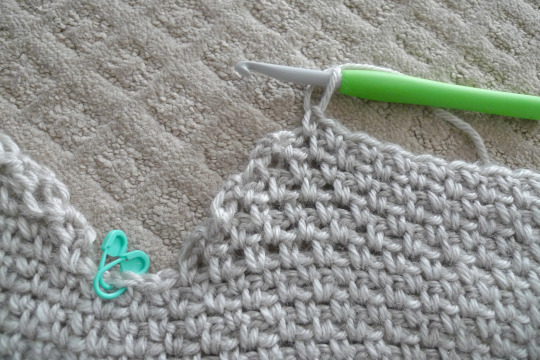
Then I simply continued on with the typical granite/moss stitch pattern. You can see the smooth curve formed rather than a sharp angle as the right panel grows out of the rectangle.
After 97 rows, one panel was complete!
Next it was time to crochet the left panel! Since the granite/moss stitch looks exactly the same on both sides, I simply flipped the piece (to form its mirror image) so that I could follow the exact same pattern, which made it a lot easier!
I joined my yarn on the right side and once again began working the same pattern towards the midway points (towards the left).

Here you can see it in action as I single crocheted and chained 1 across!
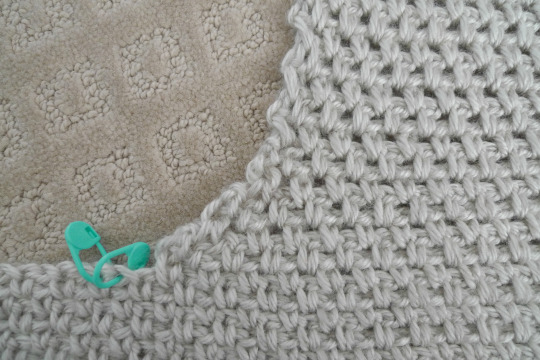
I worked my last sc three stitches to the right of the nearest stitch marker. Thus, I left a center gap of 5 stitches in total. Since I had an odd number of stitches at the very beginning (117), my middle gap has to be an odd number of stitches too. This 5 stitch gap is a good size for the collar.
I again decreased along the one side closest to the stitch markers to get a gradual tapering. Do not worry if it looks a little jagged as we will be single crocheting along this edge to smooth it out later on.
To work the decreases, I always decreased across the last two stitches, which would be a single crochet and a chain space.
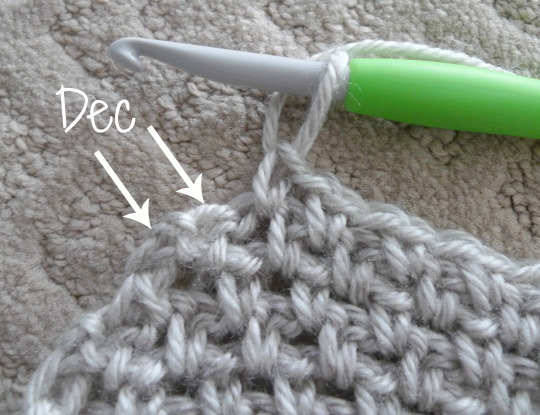
Decrease complete…
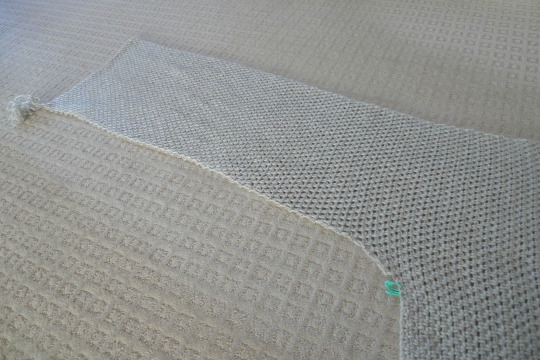
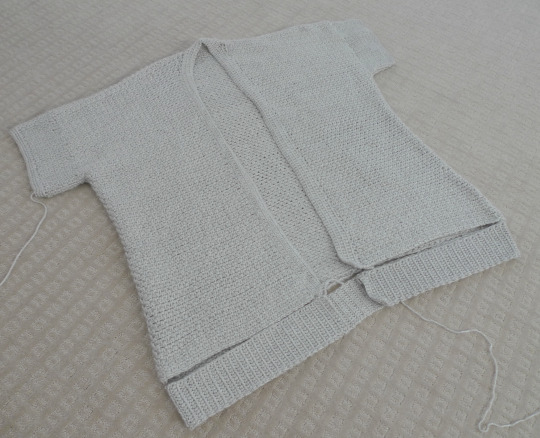
Both left and right panels were now complete- look at that gradual tapered “U” in the middle! If you are following along with this tutorial, the majority of the crocheting is now done! Give yourself a pat on the back if you’ve made it this far as the rest is easy peasy from here!
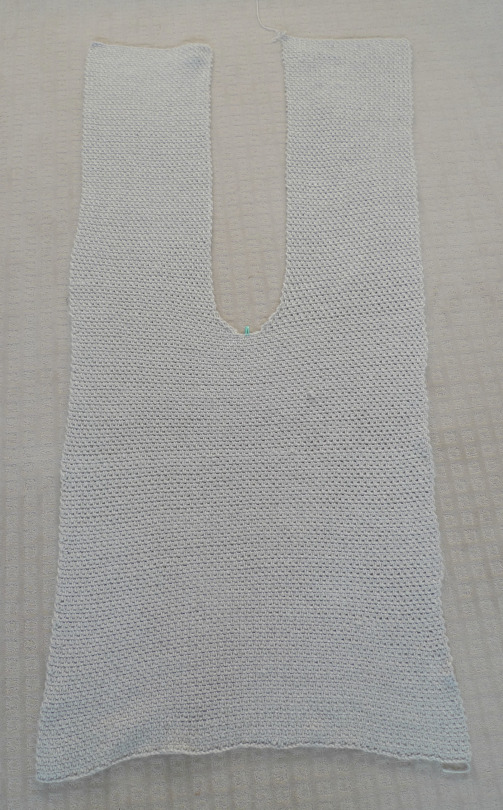
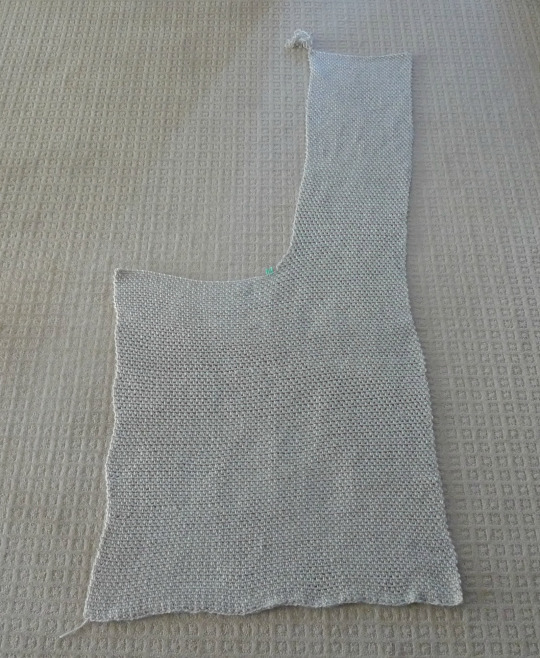
I flipped the left and right panels down towards the bottom.
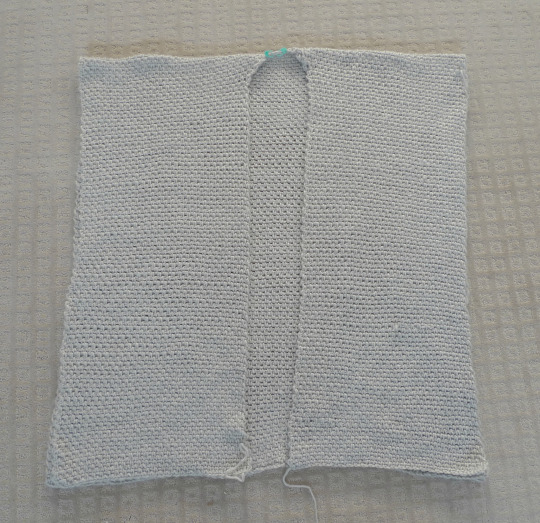
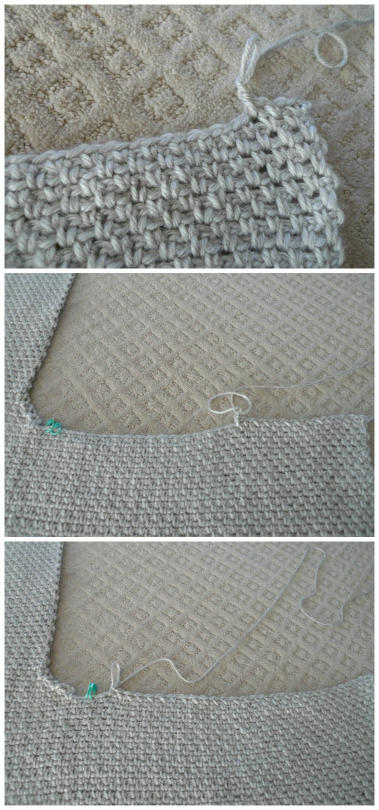
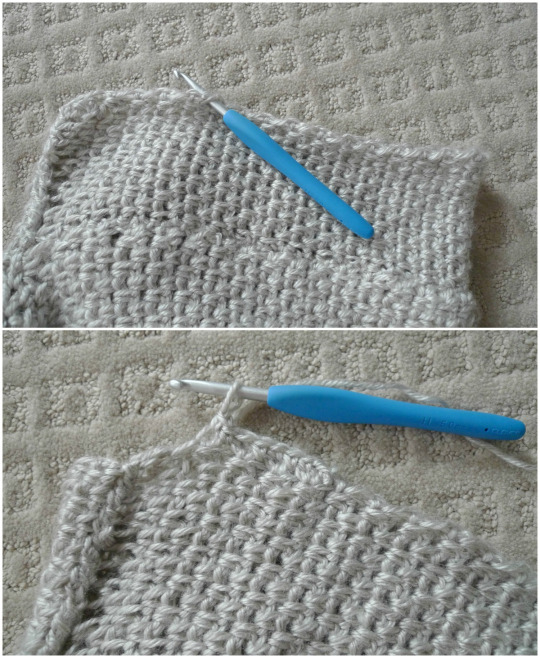
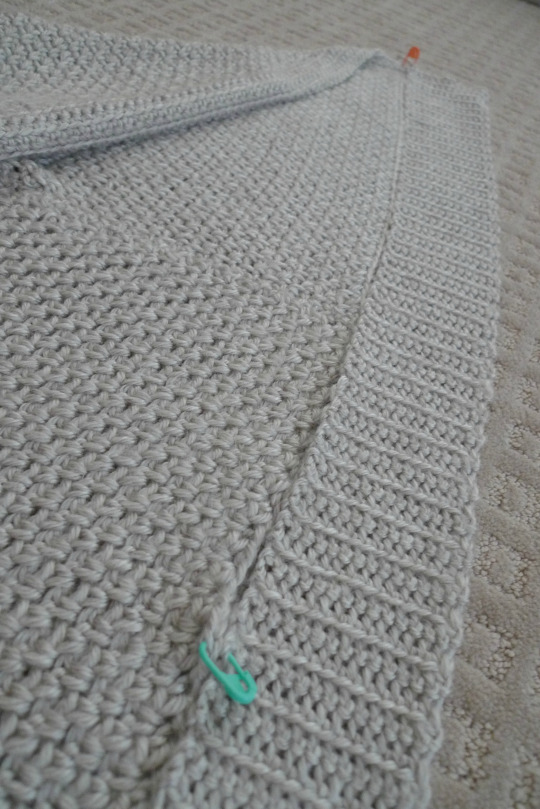
Next I began crocheting the collar with a 5 mm hook (all of the fine detailing on the collar, sleeve and bottom ribbing is crocheted with this 5 mm hook). I single crocheted around the “U”, picking up stitches along the way. I did 6 rows of single crochets (turning after each row) and alternated working in the front loops only to give a slight ribbed look.
After the completion of 6 rows! It’s already beginning to look more polished!
A close-up of the alternating rows in the front loops only which give the ribbed effect:
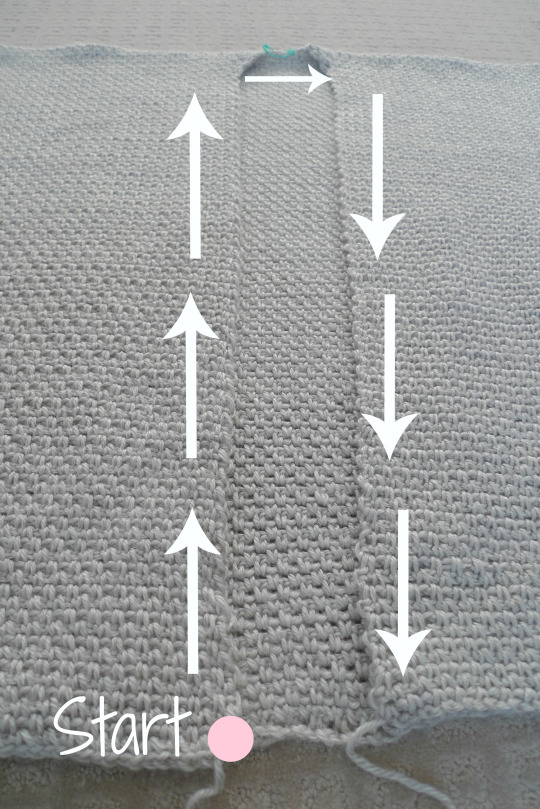
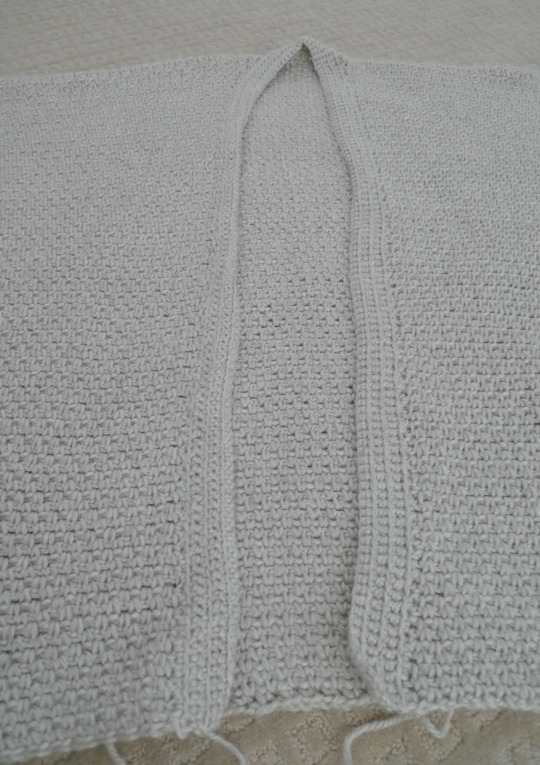
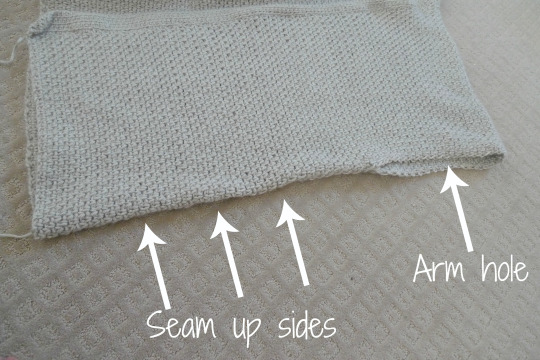
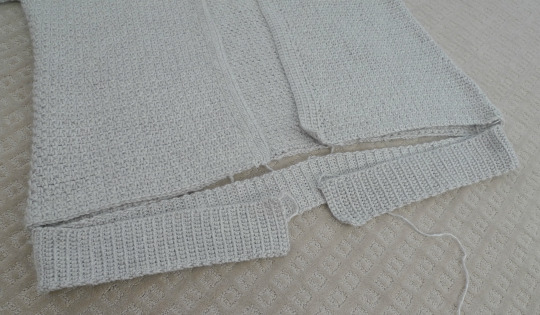
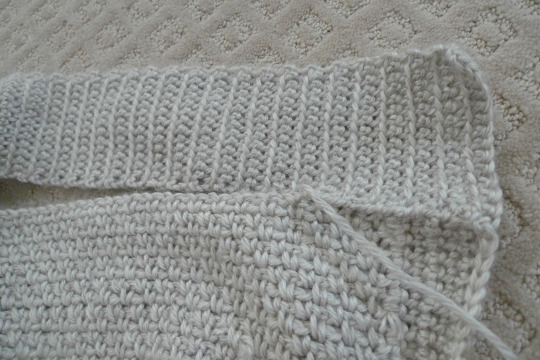
Next it was time to seam up the sides to leave an arm hole. It is imperative to note that whenever I needed to seam pieces together, I flipped the piece inside-out and whip stitched them together. I found that this gave a cleaner look to the piece after I flipped it right side out! I seamed up 19.5″/49.5 cm along the sides to leave an arm hole of about 9.5″/24 cm (diameter).
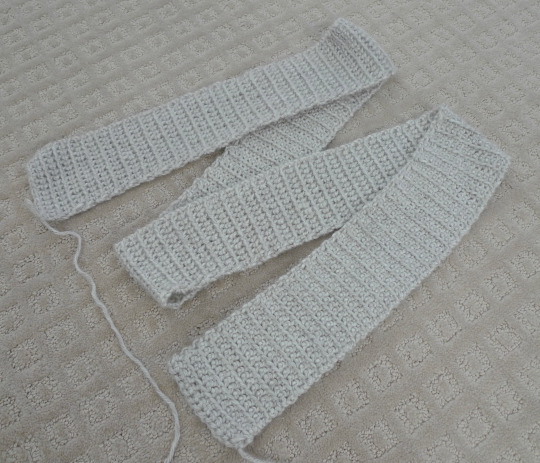
Then I made a strip of granite stitches that I could attach to the arm holes to help lengthen the sleeves a bit. After crocheting this strip, I then folded it in half and sewed the ends together to form a circular piece.
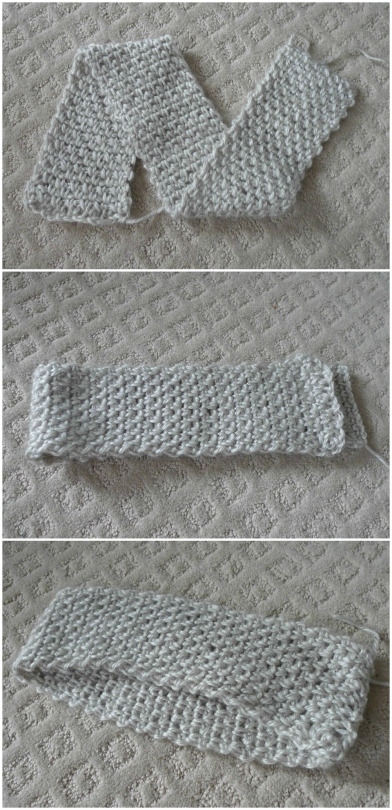
This 20″ piece matched with the circumference of the arm hole!
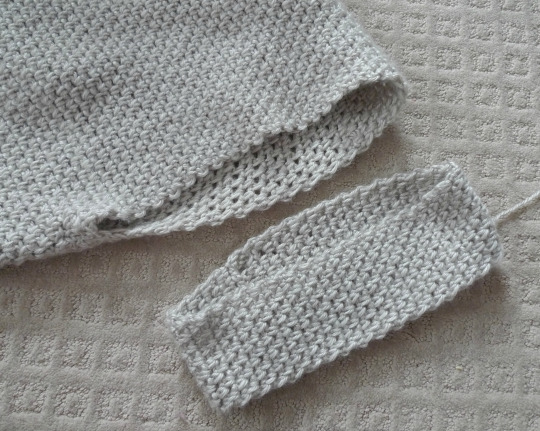
I then sewed the sleeve to the arm hole, trying to match the rows as I went along. Once again, I folded the cape inside out so that this was the inside of the cape.
The sleeve fully attached to the arm hole!
Next, I began picking up stitches along the sleeve and single crocheting around. I did three rows of single crocheting in the back loops only to give a delicate ribbed look on the sleeves.
The sleeves were now complete!
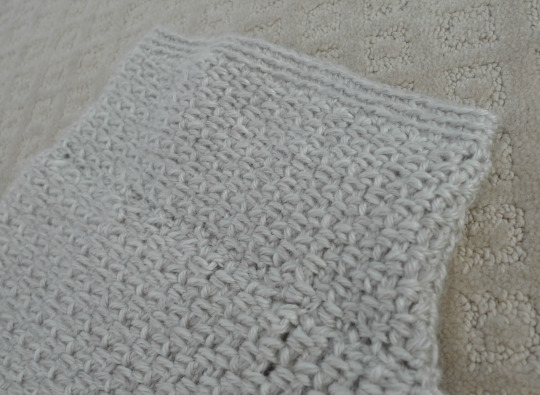
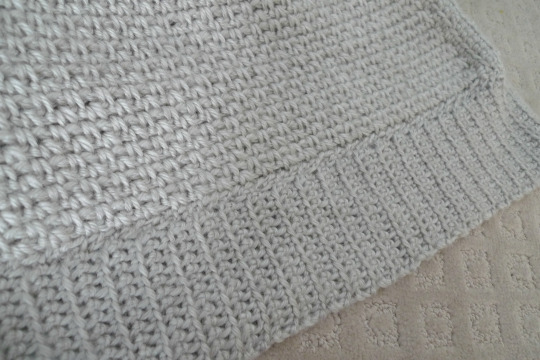
There was only one last part to work on to complete the sweater: the bottom ribbing! This was crocheted easily by making a long ribbed strip by single crocheting in the back loops only.
I made sure my piece was long enough to cover the bottom (the bottom of the rectangle and the bottom of the two panels).
Once my piece was long enough, it was ready to be attached!
I used stitch markers to hold the long piece in place so that I wouldn’t accidentally stretch it too much.
I flipped the cape inside out and started whip stitching the bottom ribbing to it!
The bottom ribbing gives such a polished and beautiful finishing touch to this sweater!
After all these little details, my beautiful Granite Cape was complete! We wanted a relatively simple name that reflected the stitch that we used to crochet it. It’s a strong name that is unexpected too since granite rock is usually hard, durable and firm while this cape is soft, delicate, and flowy!
Here is a video of me demonstrating the Granite Stitch so you can see it in action (I made this video for my Granite Cardigan design found HERE)!
***************************************
Here is the free pattern for our first original sweater, “The Granite Cape”!
***You can purchase an INEXPENSIVE AD-FREE PDF of this pattern on Etsy HERE and on Craftsy HERE! This beautifully formatted PDF includes the step-by-step pictures and pattern, and is a total of 9 pages including the cover page! Lion Brand Yarn has also created this design into a kit which you can purchase HERE! It includes all of the yarn you need as well as a pattern copy of the Granite Cape!
Note:
- I sized this cape for myself! For reference, I am 5′6. This cape is meant to be oversized so that it drapes beautifully and is not too tight. With that being said, now that you know the general construction of this cape, it is easy to adapt the pattern to make it larger or smaller to fit you! Use my numbers as general guidelines, but figure out your own numbers to personalize this cape for yourself! If you have a sweater or cardigan in your wardrobe that you love, you can try and size this cape to match it!
- To make your cape wider, increase your initial chains (an odd number higher than 117). To make your cape longer, increase the number of rows in the body rectangle (more than 108) and panels (more than 97).
- The turning chain at the end of reach row counts as 1 sc.
- Whenever it says to seam two pieces together, always flip them inside out and whip stitch them together to get a cleaner look.
Materials:
- 6.5 mm Clover Amour hook and 5 mm hook (for the edging and ribbing)
- Medium worsted weight yarn (I used Lion Brand Yarn’s Heartland in “Katmai”, 7 skeins)
- Yarn needle
- Stitch markers
BODY RECTANGLE:
Using 6.5 mm hook, chain 117 (use an odd number of stitches).
Row 1: Sc in the 3rd ch from the hook, *ch 1, skip 1 ch, sc in the next ch* until end. (59 sc and 58 chain 1 spaces)
R2: Ch 2, turn. Sc in the next ch 1 space. *Ch 1, sc in the next ch 1 sp* until end, finishing with a sc in the last chain sp at the start of previous row.
R3-108: Repeat Row 2.
My resultant rectangle measured 70 cm/27.5″ by 72 cm/28.3″.
We will now begin the two panels which will form the front of the sweater. Mark off the two middle stitches with stitch markers (one will be a single crochet and one will be a chain). We will be leaving a 5 stitch gap in the middle to form the opening of the front/collar.
PANEL 1:
With working yarn on the right side and crocheting towards the midpoints (towards the left),
R1: Ch 2, turn. Sc in the next ch 1 space. *Ch 1, sc in the next ch 1 sp* until you reach last chain space before stitch markers (do not crochet in the stitch markers). Your last sc will be worked two sts away from the nearest stitch marker. [56 sts including turning chain/space at end].
We will now begin a gradual decrease in order to form a U-shape at the collar by decreasing over the next five rows.
R2: Chain 1, decrease over 1 sc and next chain 1 space. *Ch 1, sc in the next ch 1 sp* until end. (55 sts)
R3: Ch 2, turn. Sc in the next ch 1 space. *Ch 1, sc in the next ch 1 sp* until three stitches remain. Chain 1, decrease over last two sts. (54 sts)
R4: Rep Row 2 (53 sts)
R5: Rep Row 3 (52 sts)
R6: Rep Row 2 (51 sts)
Decreases are now complete!
R7: Ch 2, turn. Sc in the next ch 1 space. *Ch 1, sc in the next ch 1 sp* until one st remains. Chain 1 and sc into last st (52 sts -> we added an extra chain here which is why the stitch count goes up by 1 despite all the decreases).
Now, carry on as normal…
R8-97:
Ch 2, turn. Sc in the next ch 1 space. *Ch 1, sc in the next ch 1 sp* until end, finishing with a sc in the last chain sp at the start of previous row.
One panel is complete! Now cut the yarn and flip the piece so that it is the mirror image.
PANEL 2:
Join the working yarn on the right side and crochet towards the midpoints (towards the left) once again.
R1: Join in chain space. Chain 2 and sc 1 in this chain sp.
*Ch 1, sc in the next ch 1 sp* until you are approaching the stitch markers (do not crochet in the stitch markers). Your last sc will be worked three sts away from the nearest stitch marker so that there is a middle 5 stitch gap. [56 sts including turning chain/space at end].
We will now begin a gradual decrease in order to form a U-shape at the collar by decreasing over the next five rows.
R2: Chain 1, decrease over 1 sc and next chain 1 space. *Ch 1, sc in the next ch 1 sp* until end. (55 sts)
R3: Ch 2, turn. Sc in the next ch 1 space. *Ch 1, sc in the next ch 1 sp* until three stitches remain. Chain 1, decrease over last two sts. (54 sts)
R4: Rep Row 2 (53 sts)
R5: Rep Row 3 (52 sts)
R6: Rep Row 2 (51 sts)
Decreases are now complete!
R7: Ch 2, turn. Sc in the next ch 1 space. *Ch 1, sc in the next ch 1 sp* until one st remains. Chain 1 and sc into last st (52 sts -> we added an extra chain here which is why the stitch count goes up by 1 despite all the decreases).
Now, carry on as normal…
R8-97: Ch 2, turn. Sc in the next ch 1 space. *Ch 1, sc in the next ch 1 sp* until end, finishing with a sc in the last chain sp at the start of previous row.
The two panels are now complete!
COLLAR RIBBING:
With 5 mm hook and starting from left side,
Row 1: Single crochet around, picking up stitches along the U-shape created (I had 215 sc).
R2: Chain 1, turn. Starting in second st from hook, sc in front loops only till end.
R3: Chain 1, turn. Sc around.
R4: Repeat R2.
R5: Repeat R3.
R6: Repeat R2
Fasten off and weave in end.
To create the arm hole, seam up the sides (don’t forget to flip the piece inside out). I seamed up 19.5″/49.5 cm of each side to to leave an arm hole of about 9.5″/24 cm.
SLEEVES (make 2):
Using a 6.5 mm hook, chain 15.
Row 1: Sc in the 3rd ch from the hook, *ch 1, skip 1 ch, sc in the next ch* until end.
R2: Ch 2, turn. Sc in the next ch 1 space. *Ch 1, sc in the next ch 1 sp* until end, finishing with a sc in the last chain sp at the start of previous row.
R3-72: Repeat Row 2.
Sew ends together and attach to arm hole, trying to match the rows of the sweater body with the rows of the sleeve.
SLEEVE EDGING:
Using a 5 mm hook,
Round 1: Join yarn on sleeve towards the bottom/back and single crochet around. Slip st to first sc. (I had 67 sc)
Round 2: Chain 1 and sc in same st. Single crochet in back loops only around. Sl st to first sc.
Round 3: Rep Round 2.
Fasten off and weave in end.
BOTTOM RIBBING:
Using a 5 mm hook,
Chain 15
Round 1: In back loops only, Sc 1 in second chain from hook and in each chain across (14 sc).
R2-102: Chain 1, turn. In back loops only, Sc 1 in second chain from hook and in each chain across (14 sc).
Measure your bottom ribbing against your sweater to make sure that the length matches (my final piece was 3″/7.6 cm wide and 55″/140 cm long. Sew the ribbing onto the bottom of the sweater (once again, whip stitch from the inside).
Your sweater is now complete! Congratulations 🙂
Final measurements:
Height of Sweater: 32-33″/81-84 cm (varies in height from bottom of ribbing to top of shoulder vs. top of collar)
Width of Sweater: 27.5″/70 cm across body, 36″/91 cm from sleeve to sleeve
***You can also purchase a kit to make The Granite Cape HERE on the Lion Brand Yarn website! It contains all the yarn you need as well as a copy of this pattern!
***************************************
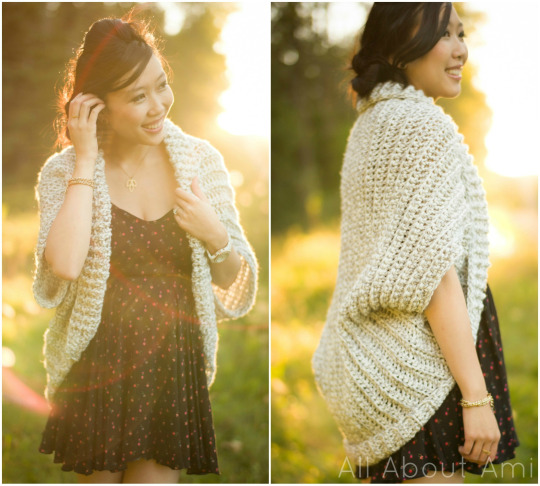
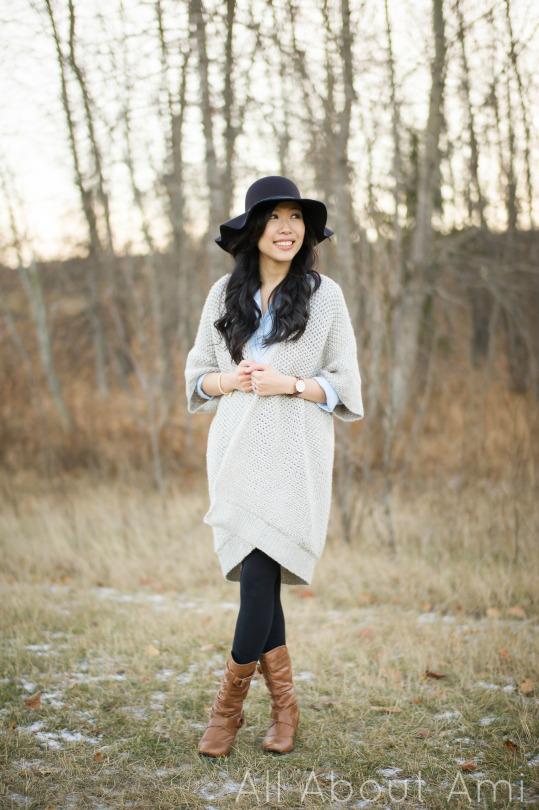
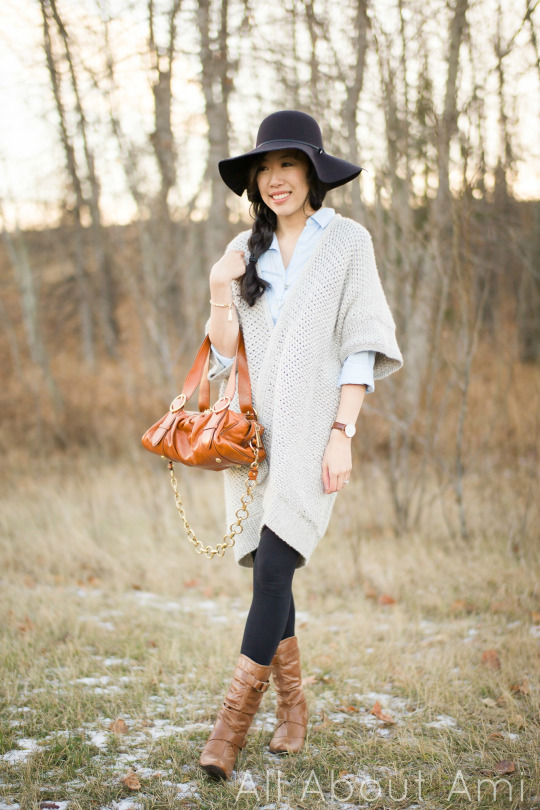
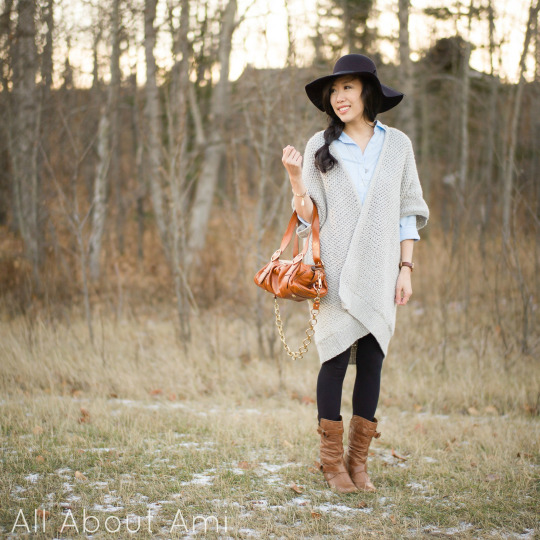
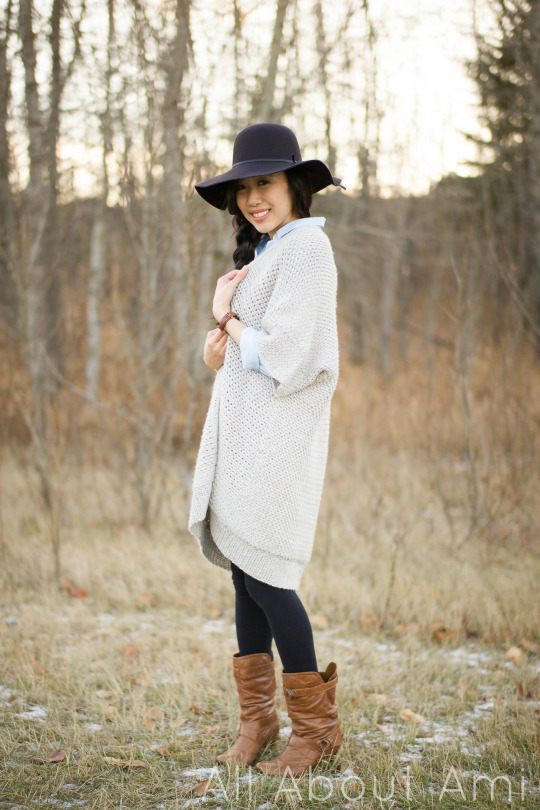
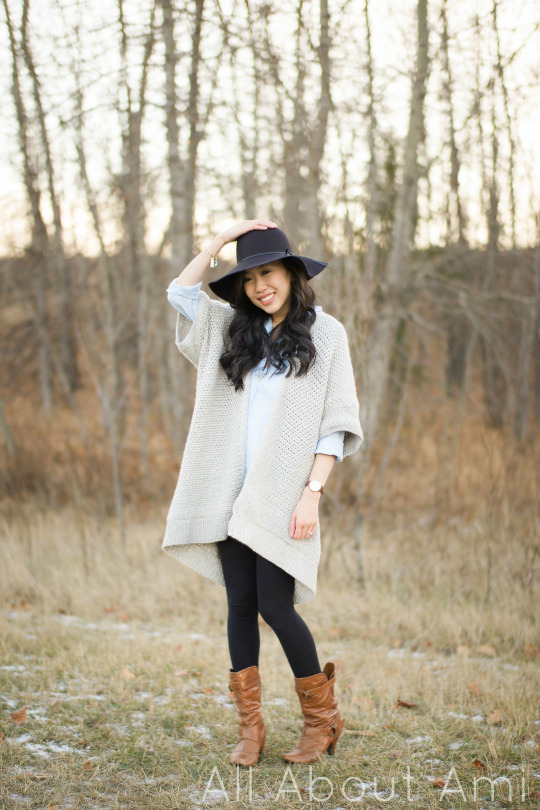
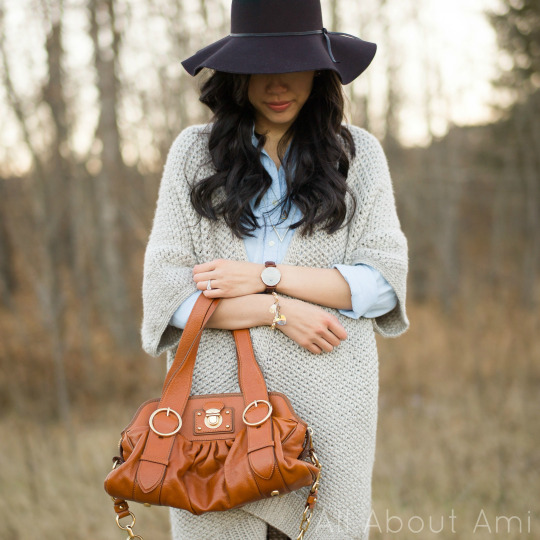
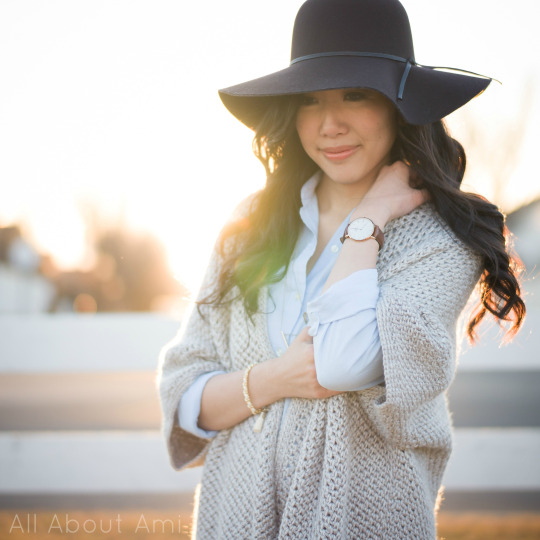
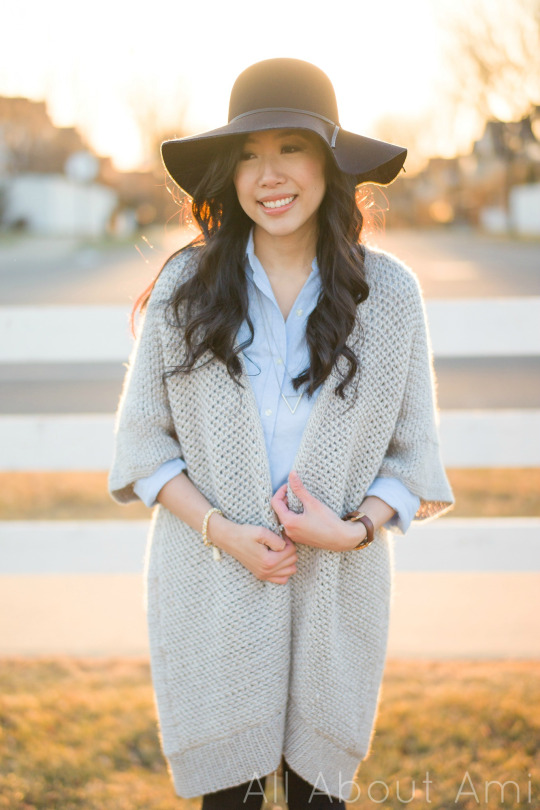
Be prepared to be bombarded with tons of pictures of this cape so that you can see it from slightly different angles! Nowadays it’s hard to take these photoshoots with two kiddos, so we made the most out of this little outing and took a lot of pictures! This was also the day right before the snow came, and we are thankful that we managed to sneak these photos in before it got colder! Doesn’t this cape look so stylish?
I love how the cape folds and how the corners overlap!
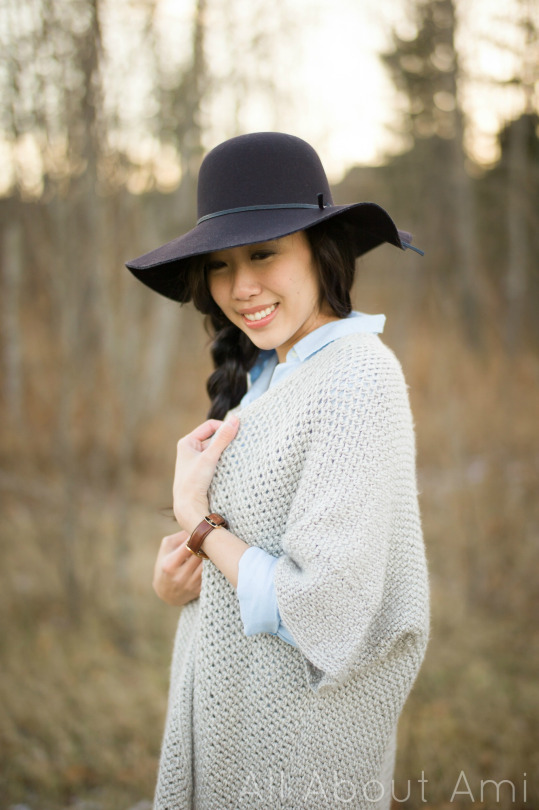
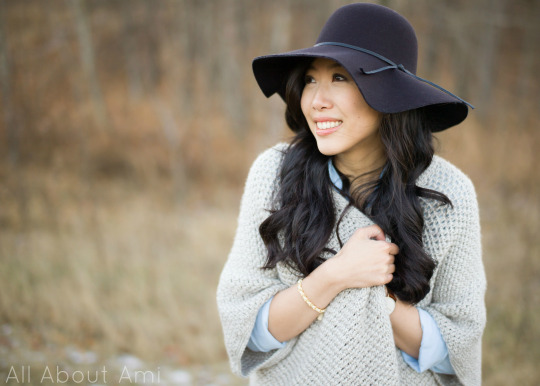
I am so happy we went with this beautiful Heartland yarn- you can see how soft and delicate it looks!
We spent a couple of months working on this sweater and we tried many different sleeve and collar options. There was a lot of frogging, but I’m glad we kept trying to get the look we were going for. We tried crocheting directly onto the arm sleeve but there was a noticeable change in pattern which was why we went with the separate circular sleeve. Those little details make all the difference!
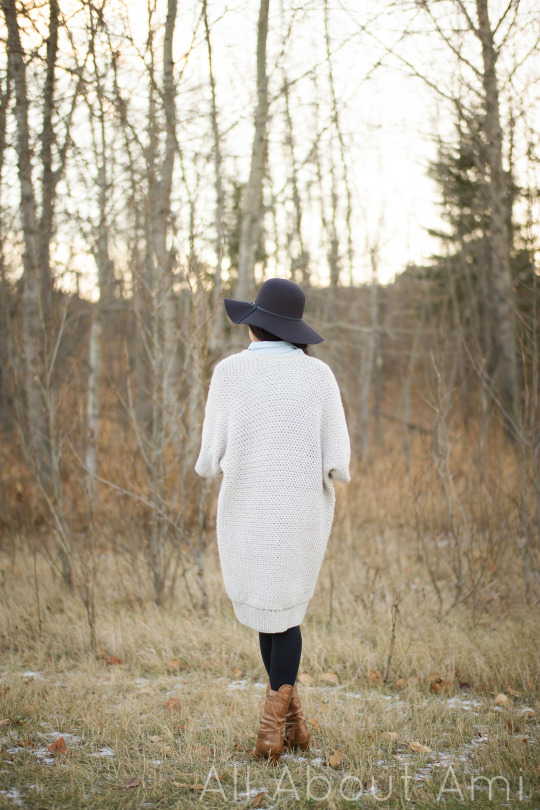
And here is the beautiful back…with no bum bunching! I love how it drapes as one long piece with no awkward pulling or ruching.
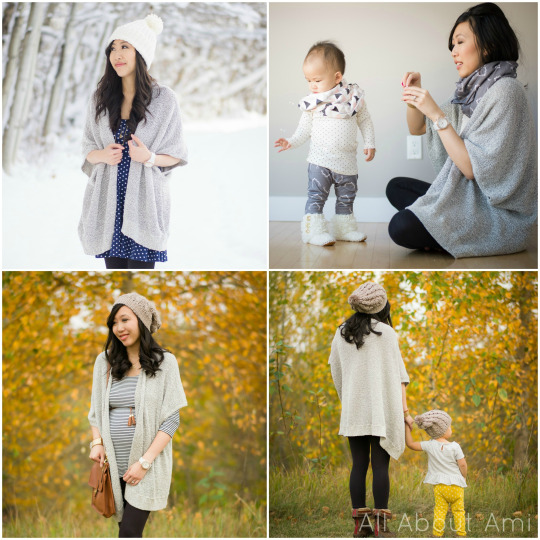
This cape is one of those versatile pieces that you can wear over dresses and shirts or with leggings and jeans. It will become a staple in your wardrobe- and how special will it be since you made it yourself?
My wardrobe is full of cardigans and sweaters as they are a must for our Canadian winters. I just love cuddling up in these oversized soft pieces!
As I write this blog post, I am actually wearing this cape as a blanket with my arms through the sleeves and the back of the sweater draped over me on my computer chair hehe… So it’s essentially a wearable blanket too 😉
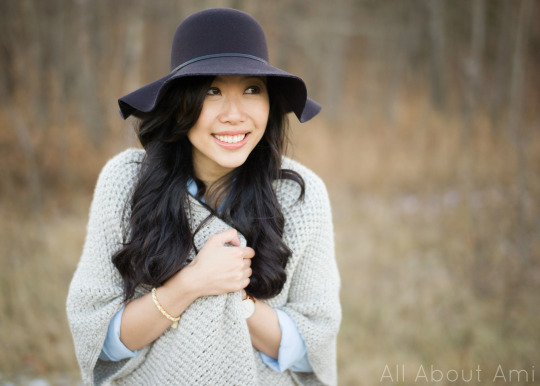
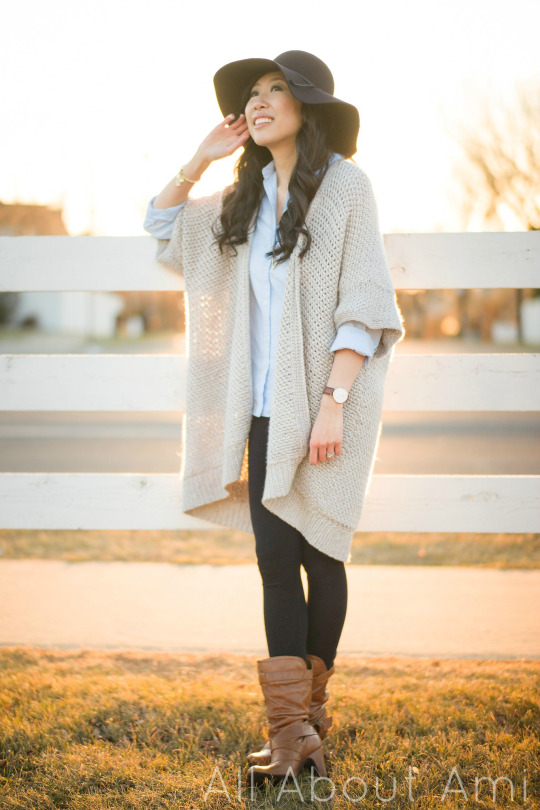
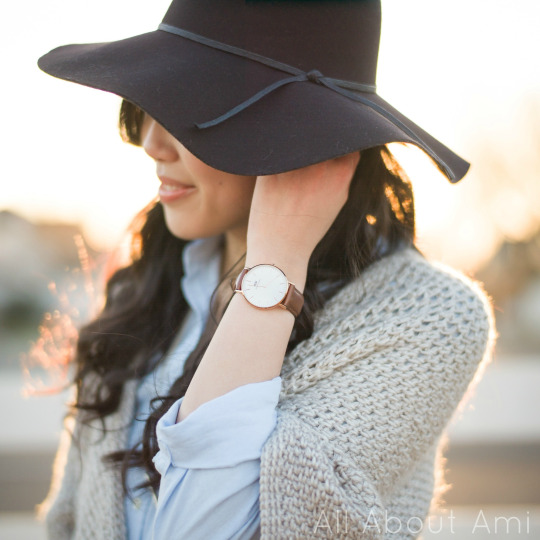
Another winter item that I’ve added to my wardrobe this year is this stylish floppy hat from Simons! I always thought of floppy hats as summer time accessories, but I love the look and feel of this black felt. It is gorgeous and adds such a sophisticated look to my outfit!
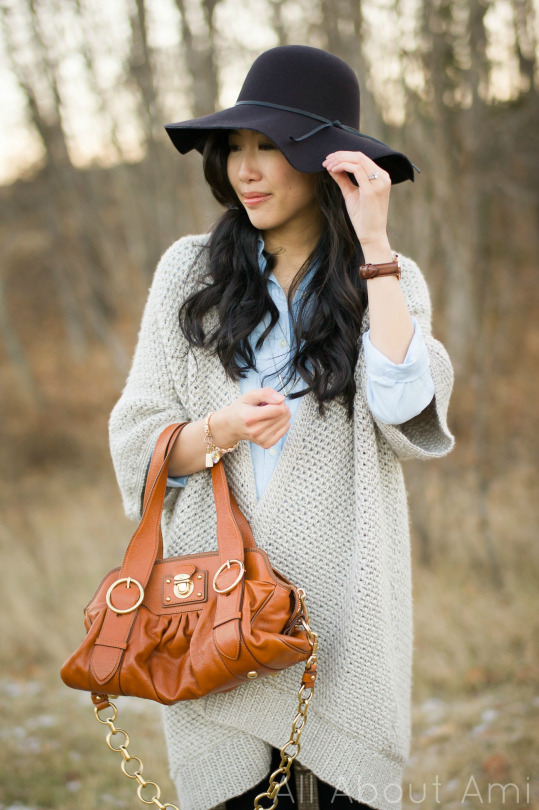
It certainly adds an air of mystery…
This is what the cape looks like with my arms out! The sleeves drape beautifully! I highly recommend trying to find a soft yarn that you know will drape well as a stiffer yarn will hang more awkwardly.
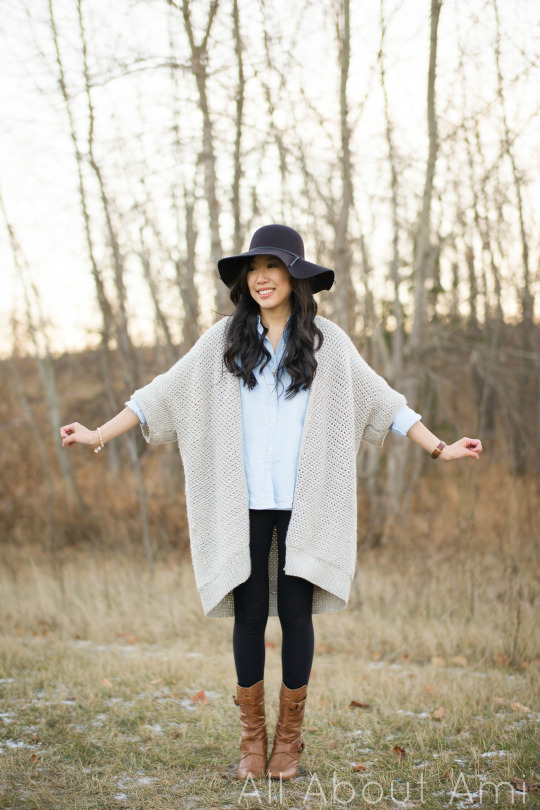
The collar flows beautifully and looks great splayed open too!
The Granite Cape is such a beautiful and classic layering piece!
The granite/moss stitch has such an intricate and beautiful look to it! I am so happy that we went with this stitch as it gives the cape some stretch with a slightly open look to it. I can’t get over how gorgeously the combination of this stitch and this yarn moves and folds.
I am very proud of this project since Ryan and I designed it from scratch and it was always on our to-do list! It’s been such a joy designing amigurumi, beanies, and cowls, and now I’m delighted that I can add a sweater to the list! It was a challenge, but I’m glad we took our time, tried out different edges and finishes, and came up with this design. It is amazing seeing it all come together and I hope that you will enjoy working on this project as much as we did!
I would LOVE to see your pictures, so please share them with me on my blog and social media here:
Facebook page, Twitter (@AllAboutAmi) or Instagram (@AllAboutAmi).
I would love to see your progress and I’m sure others who are working on this sweater would also love to see your progress too- you can use the hashtag #thegranitecape ! Thank you for following along with this very picture-heavy blog post! Keep warm and stylish in your Granite Capes, everyone!
[Update Oct 2017: I have now designed a long-sleeved cardigan using this same stitch! You can find the FREE PATTERN for the Granite Cardigan HERE and the step-by-step tutorial HERE!]
![]()
Note: Thank you to Lion Brand for providing me with the yarn for this project!
This pattern is an original pattern by Stephanie Lau of All About Ami. Please do not claim this pattern as your own. If you wish to share this pattern, you may link to this pattern but please do not reprint it on your site. You may keep a copy for your own personal use but please DO NOT sell the pattern or distribute it.
You may sell products made from this pattern but please clearly credit the design to me, Stephanie Lau of All About Ami, and provide a link to my blog www.AllAboutAmi.com. Permission is NOT granted for mass production or factory manufacturing of any kind. Thank you for being respectful and for your understanding!
Amazon affiliate link: