***You can purchase an INEXPENSIVE AD-FREE PDF of this pattern on Etsy HERE! This beautifully formatted PDF is a total of 11 pages including the cover page. It includes the step-by-step picture tutorial and FOUR patterns: the Adult Cabled Slouchy Beanie, Toddler Slouchy Beanie, Chunky Cabled Beanie, and Cabled Beanie version 2! You can also purchase a convenient kit on the Lion Brand site HERE that includes 2 skeins of Heartland and a copy of the pattern!
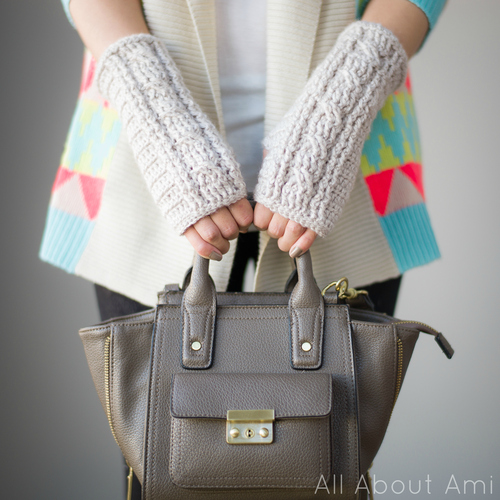
I love learning new crochet techniques, whether it be “The Invisible Decrease” for amigurumi or how to create a ribbed effect for sweaters. Last year, I discovered that the beautiful look of cabling could be achieved through crochet (not just through knitting!) when I followed Julee Reeves’ free pattern to make these gorgeous cabled wrist warmers pictured below (I blogged about them HERE). I vowed that I would apply this new cabling technique I learned for future projects, and in last year’s blog post, I even mentioned that I might try and make a cabled hat! Here we are today, and I am excited to show you the “Cabled Slouchy Beanie” that I designed!
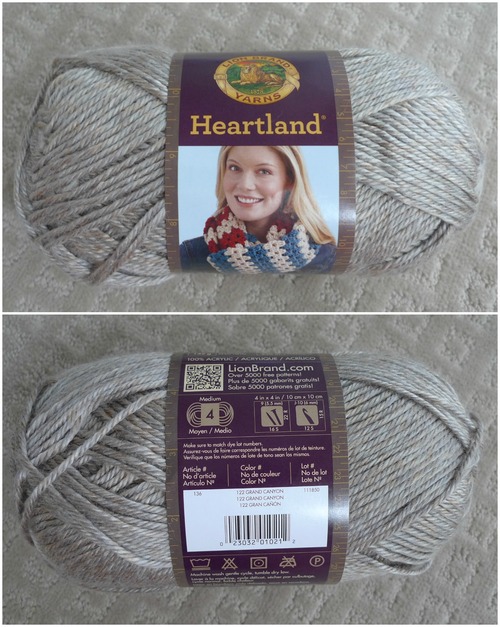
I used Lion Brand’s “Heartland” yarn in “Grand Canyon” which is a medium worsted weight (level 4) yarn. It’s a taupe and grey blend with hints of gold that is incredibly soft with a beautiful sheen to it- so perfect for fall! I used a 5 mm crochet hook with this yarn to make my cabled beanie.
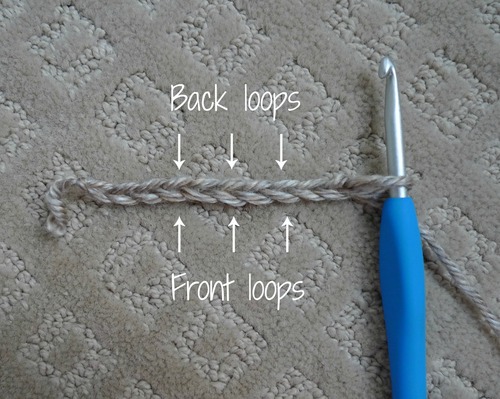
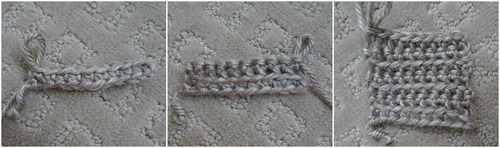
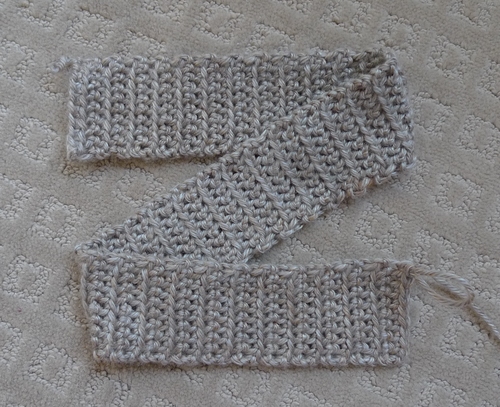
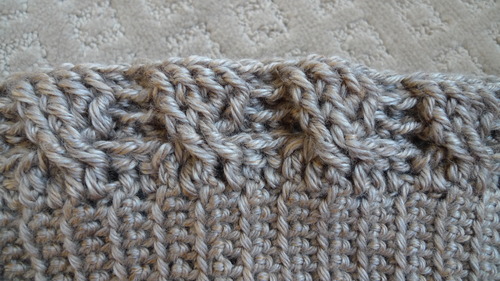
I started off by crocheting a ribbed band, similar to the ribbed band of the “Urban Jungle Slouchy Beanie”. I chained 10 and then worked single crochets in the back loops only to create the ribbed effect. The back loops are the loops that are further away from you as pictured below.
The ribbed band is starting to build up…
After 75 rows, my band measured about 21.5″ or 54 cm. You can measure your own head and adjust this number as necessary- keep in mind that this band will stretch over time with repeated wears!
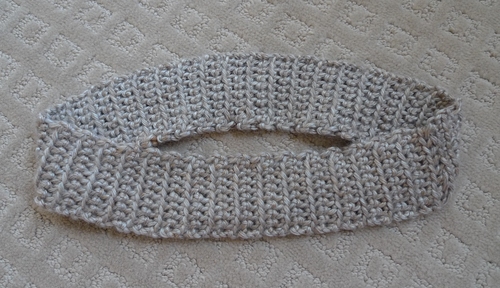
Next up, I sewed the short ends together to form the ribbed band! As a warning, this pattern is not for beginners as it is more technical and uses more complicated crochet stitches. I tried to be as detailed as possible with this next series of photos and with the pattern instructions- they may look and sound complicated, but once you get the hang of it, this project will work up quickly. Ryan was laughing as he helped me proofread this blog post as he did not understand the next part whatsoever as it was so technical!
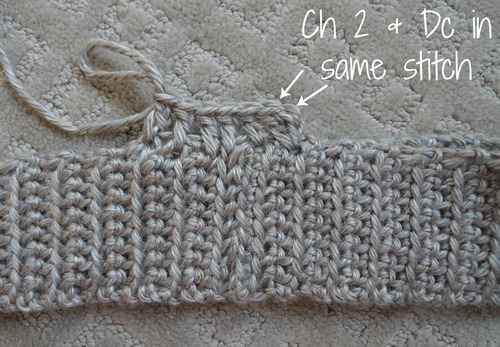
I began working double crochets around the edge of the band to create Round 1 of the cabled body of the beanie. First I chained 2 and then worked one double crochet in the same stitch. This is important for the invisible seam we will be creating whenever we join each round! The chain 2 does not count as a stitch in the final stitch count at the end of each round.
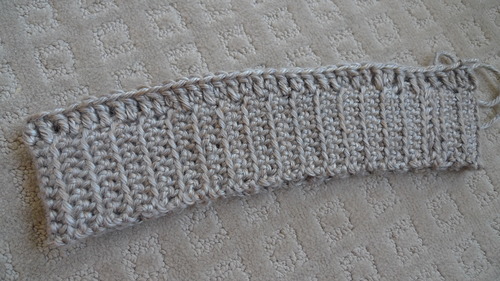
After working 72 double crochets around the band, this is what I was left with. If you are adjusting this pattern with your own numbers, you need to make sure that the total number of double crochets you are left with is a multiple of 6 (i.e. add or subtract multiples of 6). Try to space the double crochets as evenly as possible across the band, but it’s not a big deal if some are a little more bunched or spaced apart if you are trying to attain the right number- it will even out in subsequent rounds.
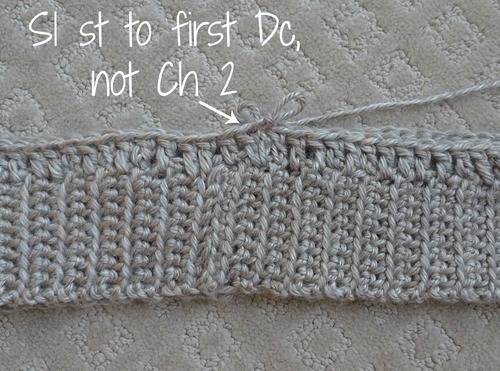
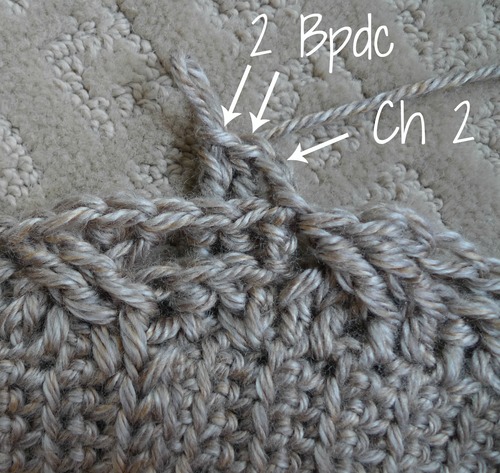
When closing up this round, it is important that you join with a slip stitch to the first double crochet and not the Chain 2 (you just ignore the Ch 2 like it’s not there).
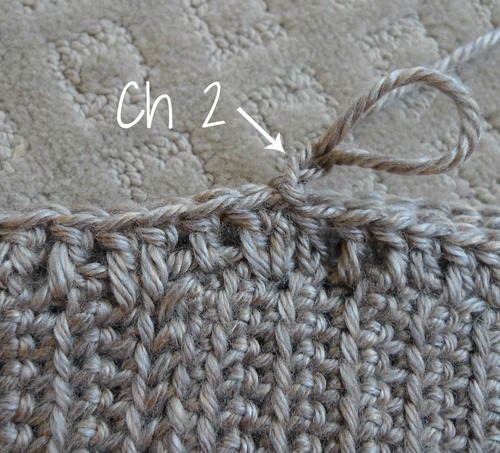
Next you Chain 2…
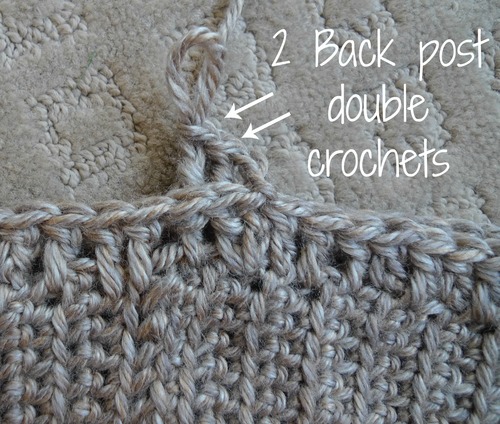
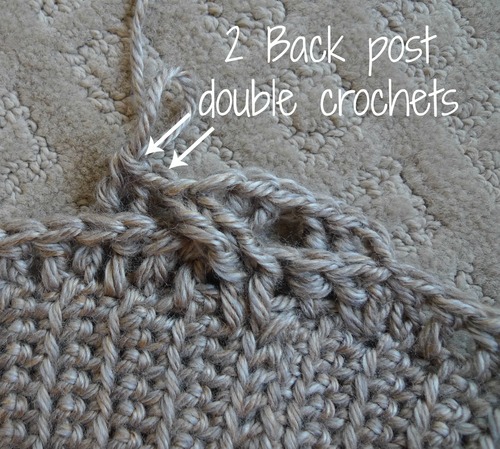
Then you work one back post double crochet around the same double crochet that you slip stitched to when you joined the round. Then you do another back post double crochet around the next double crochet.
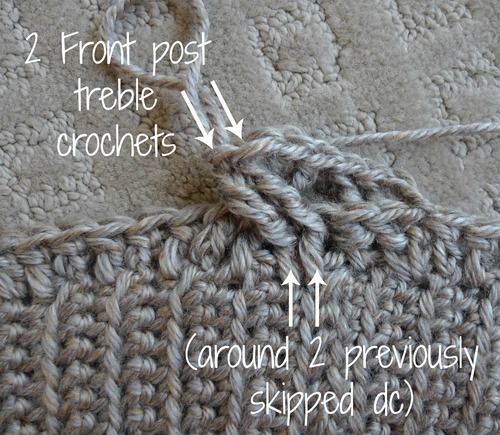
Then the cabling begins! You skip the next two double crochets and then work two front post treble crochets around the next two stitches.

Then you work two front post treble crochets around the previously skipped double crochets. They will cross over the other 2 fptc’s that you just did, which gives the cabling effect.
Next you work two back post double crochets around the next two stitches. You continue alternating with this pattern of doing two back post double crochets and working the cabling around the next four stitches. This is why you must work with multiples of six (two for the bpdc’s and four for the fptc’s).
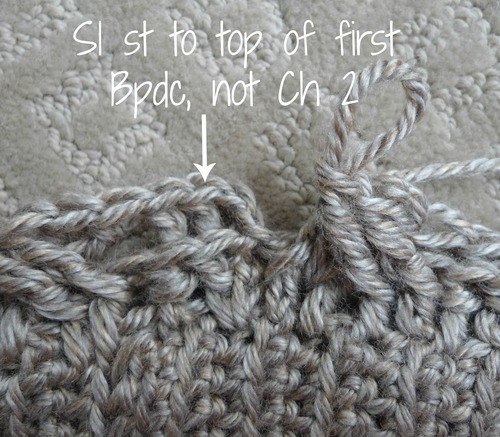
When it is time to close up this round and subsequent rounds, make sure you slip stitch to the top of the first Bpdc, not the Chain 2.
Round 2 is complete!
To begin Round 3, we chain 2, then do our two bpdc’s. These bpdc’s help push these stitches back which makes the cabling stand out even more.
Next we work two Fpdc’s around the two stitches that are underneath the cable. Make sure you do not accidentally do them around the wrong stitches (i.e. the ones that cross over) as this will undo your cabling!
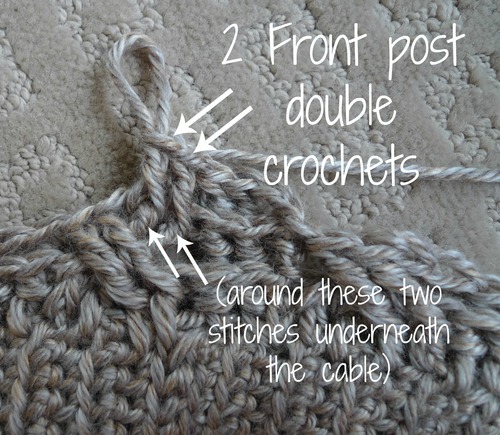
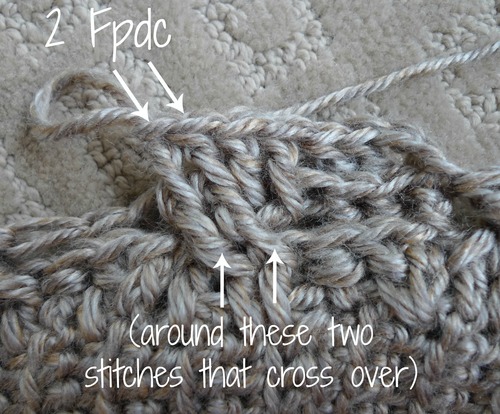
Then you work two Fpdc’s around the two stitches that cross over the cabling. This step helps solidify or lock your cabling from the previous round into place!
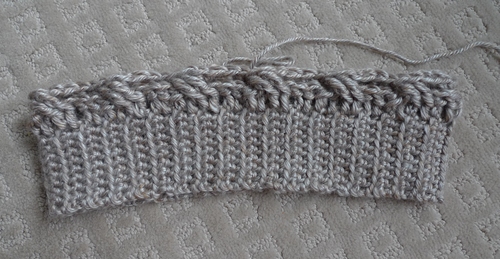
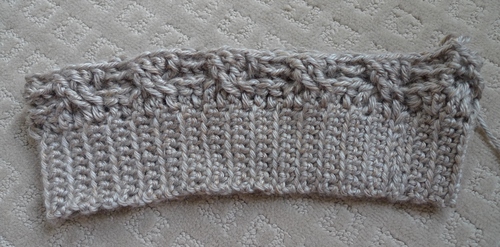
After continuing with this same pattern, here is what you are left with after completing Round 3. The cabling is really taking shape!
In Round 4, you do your 2 bpdc’s as normal and then work 4 Fpdc’s as indicated below.
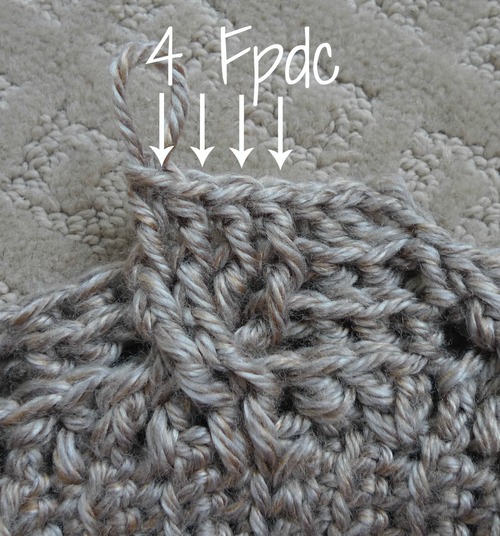
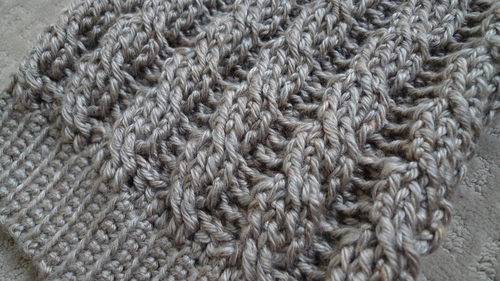
Our cabling is now complete! Each cable is worked over three rounds (Rounds 2-4 in this case) and you keep doing this pattern until you are happy with the height of your hat (the more rounds you work, the longer your hat, and the slouchier it will be)!
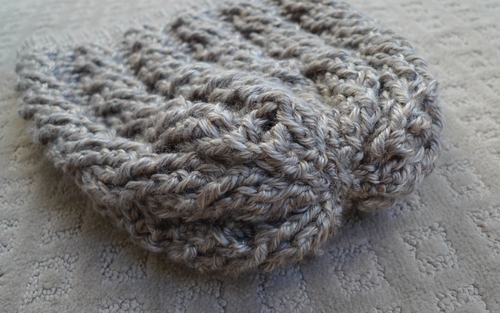
The look of cabling is so gorgeous and luxurious as it has such beautiful texture!
Did you know that cabling could be achieved through crochet? Once you get the hang of the pattern and how to work the different stitches, this project goes by quickly!

Using 1 skein of yarn, I was able to go up to Round 19 which resulted in 6 cables. My hat measured 10″ or 25.5 cm including the band. You could technically finish here if you want to only use one skein of yarn as I know sometimes it’s a hassle to buy another skein, especially if you are going to be using only a part of it. However, I bought another skein since I wanted my beanie to be slightly longer and I wanted to add a pom pom too…
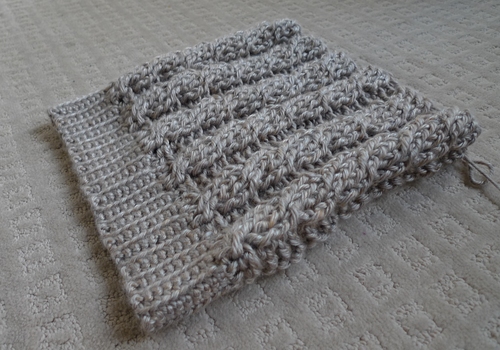
I added another 3 rounds to make 7 cables in total, and my hat now measured 11.25″ or 29 cm long. You can keep going if you want your hat to be even slouchier!

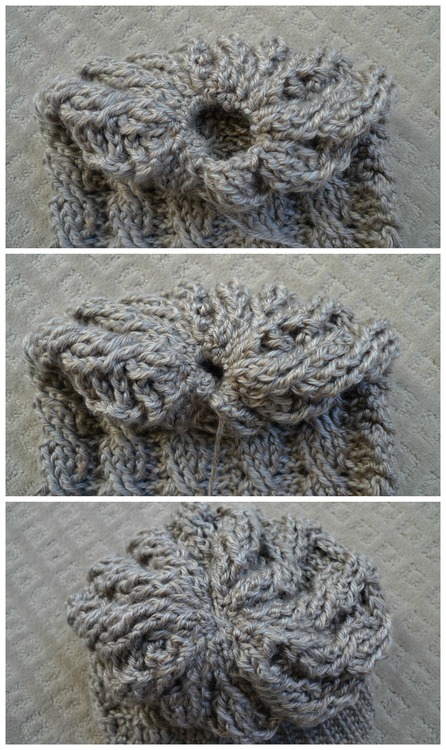
To seam up the top of the hat, I threaded yarn along the last round and pulled tightly to gather it together (similar to how I seamed up my “Easy Ribbed Pom Pom Beanie”).

After tightly pulling, I was left with a small hole, so I simply sewed it shut.
As an alternative, you could also seam up the beanie by pinching the edges and single crocheting or slip stitching them together in a star formation – see the video below (beanie in video is my “Braided Cabled Slouchy Beanie“)!
Here is a close-up of the invisible seam! It blends in so nicely and you would not notice it was there unless you were looking for it!

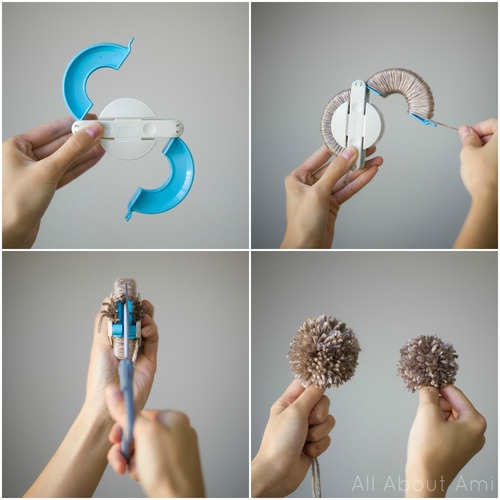
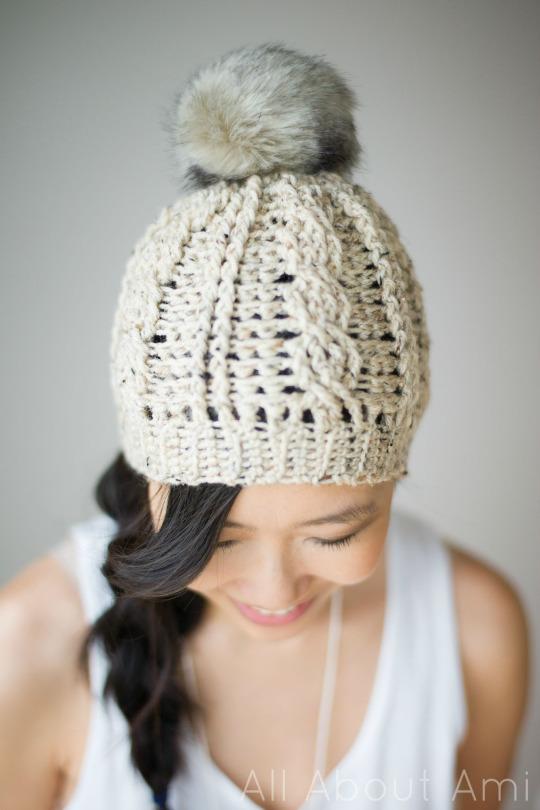
I wanted to add a pom pom to this cabled slouchy beanie, and I was excited to put my new Clover Pom Pom maker to use (see my review and step-by-step tutorial on how to use it HERE). I used the larger size to make the pom pom for my beanie!
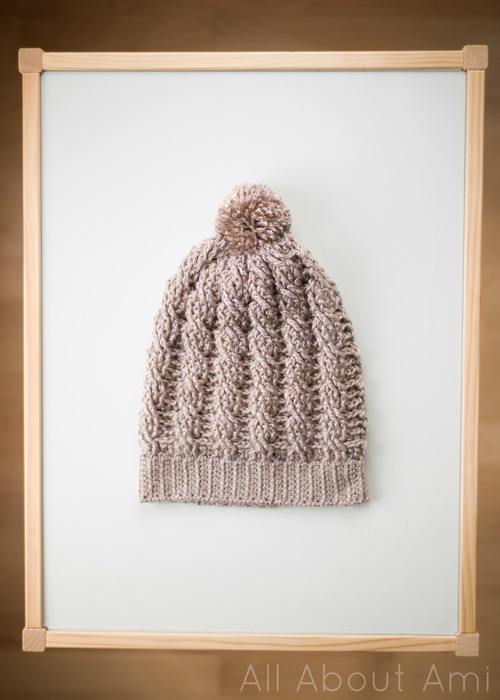
After attaching the pom pom, my “Cabled Slouchy Beanie” was complete! Isn’t it beautiful?
***************************************
Here is the free pattern for my “Cabled Slouchy Beanie” (adult size)!
***You can purchase an INEXPENSIVE AD-FREE PDF of this pattern on Etsy HERE! This beautifully formatted PDF is a total of 11 pages including the cover page. It includes the step-by-step picture tutorial and FOUR patterns: the Adult Cabled Slouchy Beanie, Toddler Slouchy Beanie, Chunky Cabled Beanie, and Cabled Beanie version 2! You can also purchase a convenient kit on the Lion Brand site HERE that includes 2 skeins of Heartland and a copy of the pattern!
– Be warned that this pattern looks complicated but once you get the hang of the technique and repetition, it goes by quickly. Hopefully the step-by-step pictures above will help make the technical pattern easier to understand as well. With that being said, this is not a beginner’s project as some crochet experience under your belt would greatly help!
Materials:
- 5 mm Clover Amour crochet hook
- Medium worsted weight yarn (I used Lion Brand’s Heartland in “Grand Canyon”, 1-2 skeins)
- Optional: yarn needle to seam up beanie; Clover Pom Pom Maker
Special stitches:
- Front Post Treble Crochet (Fptc): Yarn Over (YO) twice, insert hook from front to back around post of stitch indicated. YO and pull up a loop, [YO and draw through 2 loops on hook] 3 times.
- Back Post Double Crochet (Bpdc): YO, insert hook in front of post of stitch (insert hook from back to front of stitch), YO, pull up a loop, YO, (pull through 2 loops) twice.
- Front Post Double Crochet (Fpdc): YO, insert hook behind post of stitch (insert hook from front to back of stitch), YO, pull up a loop, YO, (pull through 2 loops) twice.
Ribbed Band:
Chain 10
R1: In back loops only, Sc 1 in second chain from hook and in each chain across (9 sc).
R2-75: Chain 1, turn. In back loops only, Sc 1 in second chain from hook and in each chain across (9 sc).
My ribbed band measured 21.5″ or 54 cm. Adjust this number based on your own head size. Fasten off and leave long end for sewing. Sew short ends together to form ribbed band.
Cabled Body:
***In each round, the Ch 2 does not count as a stitch. When joining at the end of each round, join to the stitch indicated (NOT the Ch 2) to make an invisible seam.
Join yarn with sl st at any point around edge of band.
Round 1: Chain 2, work one double crochet in same st as Chain 2. Work 71 dc as evenly as possible around edge of band. Join with sl st to first dc (72 dc). [If adapting the pattern, make sure your final number of dc’s is a multiple of 6.]
R2: Chain 2, Bpdc around first dc from previous round (same dc you joined to from Round 1). Bpdc around next st. Work cabling: {Skip next two dc, 2 Fptc around next 2 dc. Fptc around first skipped dc and next dc}. *2 bpdc in next two st. Work cabling: Sk next 2 st, 2 Fptc around next 2 st. Fptc around first skipped st and next st.*, rep 11 times. Join with sl st to first Bpdc. (12 cables around with 12 sets of Bpdc’s between)
R3: Chain 2, Bpdc around first Bpdc from previous round. Bpdc around next st. Fpdc 4. *Bpdc 2, Fpdc 4*, rep 11 times . Join with sl st to first Bpdc. (12 cables around with 12 sets of Bpdc’s between)
R4: Repeat Round 3.
With rounds 2-4, one set of cables is complete! Keep repeating Rounds 2-4 until desired length.
R5-7: same as Round 2-4
R8-10: same as Round 2-4
R11-13: same as Rounds 2-4
R14-16: same as Rounds 2-4
R17-19: same as Rounds 2-4
R20-22: same as Rounds 2-4
I completed 7 sets of cables with my beanie measuring 11.25″ or 29 cm (including ribbed band). Fasten off and leave long end for sewing. Weave yarn through ends of last round, pull tightly and sew hole shut. Alternatively, seam up beanie using this method shown in video above.
Optional: Add pom pom (I used my “Clover Pom Pom Maker”). Attach pom pom to beanie and you are DONE!
****Important Note: If you would like to adapt this pattern for a baby, child, teen, etc., please check out this very helpful post by Anne HERE that contains a chart with head circumference sizes (your ribbed band) as well as general hat height (the number of rounds or length of the beanie)!
***************************************

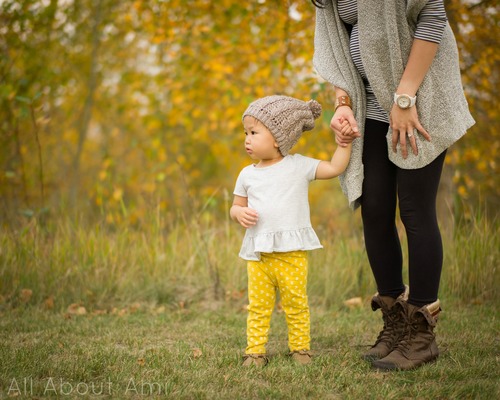
Slouchy beanies have such a cool, effortless look, and they are the perfect fall and winter accessory!

We enjoyed capturing the beautiful colours of fall with this photoshoot! I’ve entered my third trimester now and I practically live in leggings and sweaters 🙂

[Striped Tunic: Urban Outfitters, Cape Sweater: Aritzia, Boots: Steve Madden; Purse: Coach; Cabled Beanie: Me :D; Belt: Aldo Accessories; Gold Leather Bracelet Cuff: Mahina; Watch: Michael Kors]
I actually also crocheted a “Toddler Cabled Slouchy Beanie” for Myla! This pattern is really simple to adjust for different sizes as you simply make the ribbed band your desired length and then work the cabled body (see general sizing chart HERE)!
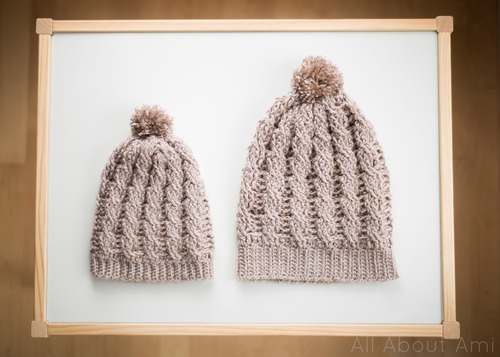
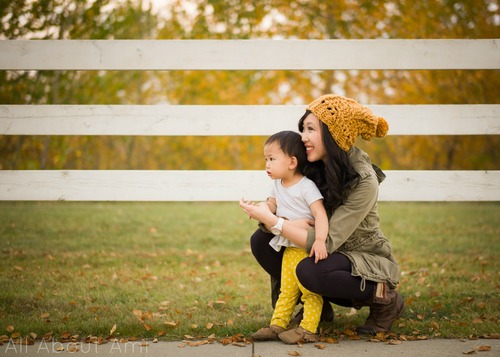
I adore matching with Myla, and she always loves being able to wear the same thing that I’m wearing too. Our pom poms look so cute from behind!

You can find the free pattern for Myla’s “Toddler Cabled Slouchy Beanie” HERE!
You can really see the gorgeous cabling in this photo below. I love how you can make this beanie as slouchy as you want by simply adding more cables and rounds!

There’s something about the beautiful and rich colours of fall and hearing the leaves crunch below you that makes this time of year very special. Myla and I had fun examining the leaves together!


We also had fun throwing the leaves too! I love her expression with her furrowed brows!


I am so glad I was able to design a cabled hat as that was something I had always wanted to do ever since making my “Cabled Wrist Warmers” and learning this new technique last year! Crocheting is such a fun learning process as you try out new patterns, learn new techniques, and apply them to future projects. I feel so thankful to have this blog where I can document these experiences and projects and share them with you all. I know that many of you have been learning right alongside with me the whole time as we all grow together and cheer each other on 🙂 We are constantly encouraged by your support and kind words and have so much fun sharing our projects and patterns with you!
Enjoy learning this new technique and have fun making your own “Cabled Slouchy Beanies”! The “Toddler Cabled Slouchy Beanie” can be found HERE so you can make matching beanies for your mini-me’s 🙂 I also actually worked up a “Chunky Cabled Slouchy Beanie” pictured below using super bulky (level 6) yarn, and you can now find the free pattern HERE! Follow me on Facebook, Twitter (@AllAboutAmi) & Instagram (@AllAboutAmi) to get all my updates! Enjoy this beautiful fall season ❤
[Update: To see another cabled beanie design, check out the free pattern for Version 2 HERE which features bars framing the cables and a furry pom pom!]
I’ve also designed a “Braided Cabled Slouchy Beanie” with a double brim, luscious braided cables, and the perfect amount of slouch! Free pattern found HERE!
![]()
This pattern is an original pattern by Stephanie Lau of All About Ami. Please do not claim this pattern as your own. If you wish to share this pattern, you may link to this pattern but please do not reprint it on your site. You may keep a copy for your own personal use but please DO NOT sell the pattern or distribute it.
You may sell products made from this pattern but please clearly credit the design to me, Stephanie Lau of All About Ami, and provide a link to my blog www.AllAboutAmi.com. Permission is NOT granted for mass production or factory manufacturing of any kind. Thank you for being respectful and for your understanding!