***You can purchase an INEXPENSIVE AD-FREE PDF of this pattern on Etsy HERE and on Craftsy HERE! This beautifully formatted PDF is a total of 11 pages including the cover page. It includes the step-by-step picture tutorial and pattern!
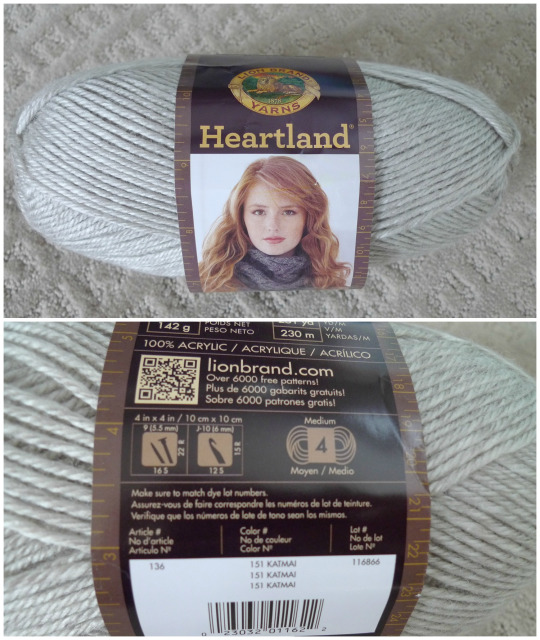
Last December I blogged about my first original sweater design, “The Granite Cape”! It used the gorgeous Heartland yarn by Lion Brand Yarn in the colour “Katmai”. I had some skeins of yarn leftover from that project and I knew just what I wanted to use them for: Cabled Legwarmers/Boot Cuffs! I’ve had requests for boot cuffs in the past, and I absolutely adore the look of crochet cables. I love wearing legwarmers both under and over my boots, so I thought this would be a great project to tackle next!
As a reminder, Heartland is a 100% acrylic level 4 worsted weight yarn. It is one of my favourite worsted weight yarns as it is incredibly soft and has a beautiful drape to it. I was excited to work with it again since I LOVE this colour too!
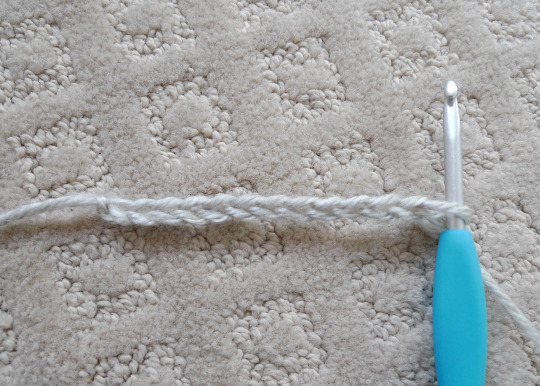
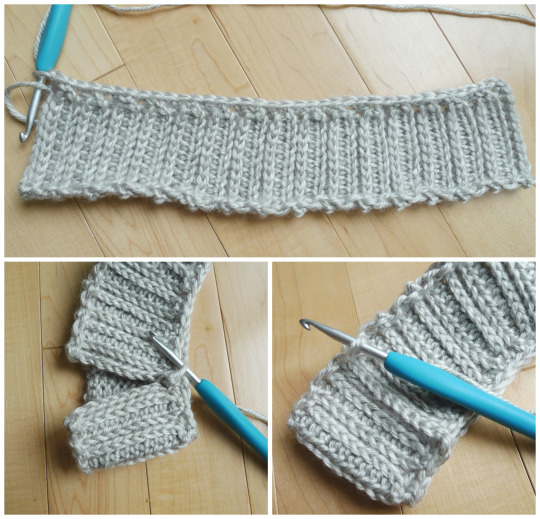
I started off by making a ribbed band. I decided to make this ribbed band differently compared to the ribbed band of my “Cabled Slouchy Beanie” (which used single crocheting in the back loops only). I began by chaining 12 with my 4.5 mm Clover Amour hook!
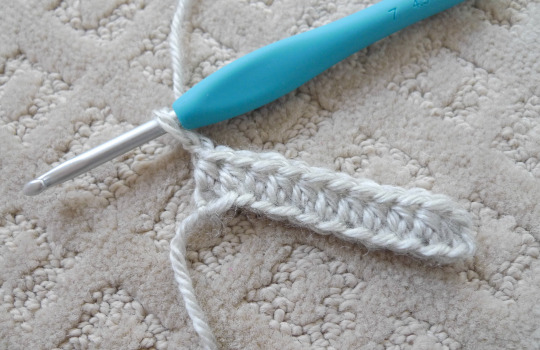
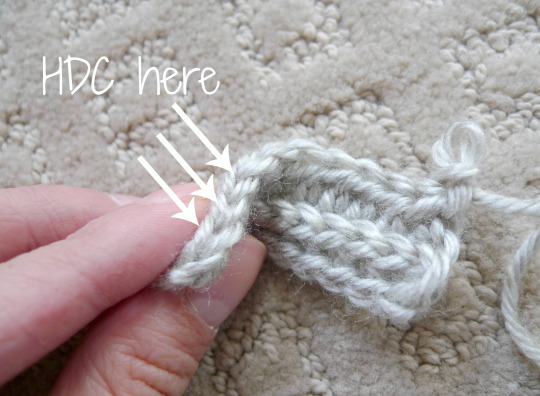
Next I worked half double crochets (hdc) across.
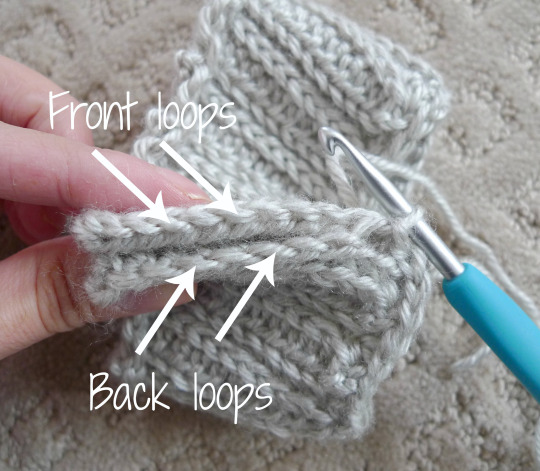
We are working in rows, so you turn your work after each row is completed. When working with half double crochets, a third loop is created (in addition to the front and back loops- read more about it HERE). I worked half double crochets in the third loops of the next row as indicated below.
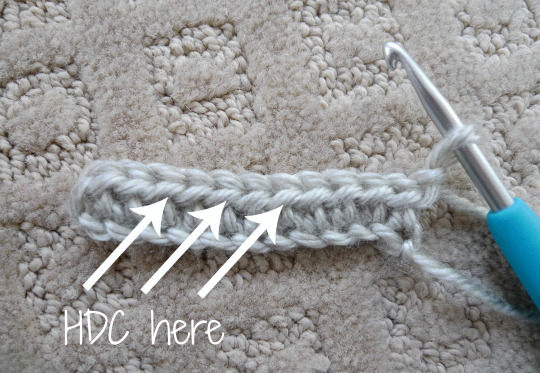
Here you can see the hdc’s being worked across…
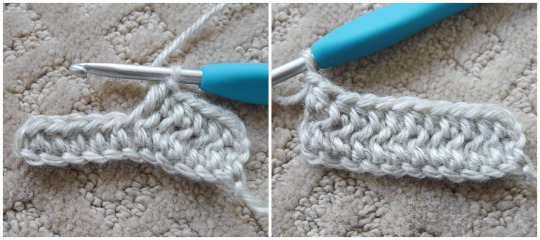
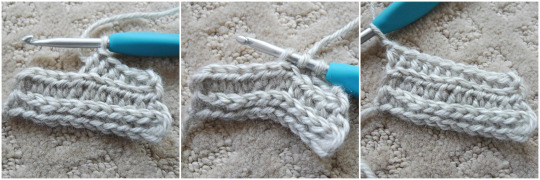
After turning your work, this is what the piece looks like. Note that a row of “v’s” has been pushed out between Row 1 and Row 2 since we worked in the third loops.
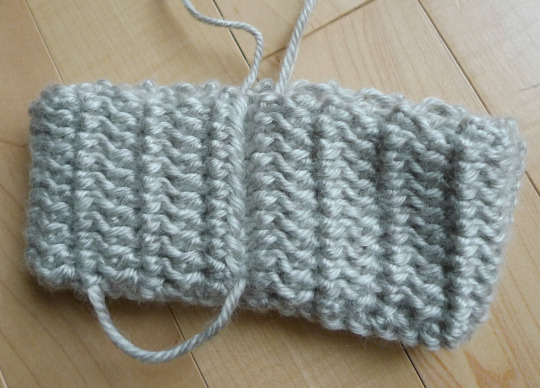
Furthermore, notice that some v’s are formed by the third loops and front loops of the row we just completed. We want to preserve these v’s by leaving them unworked so that we will get a beautiful ribbed “V” effect on one side of this ribbed band.
Thus, we want to half double crochet in the back loops as indicated below.

Here is another view: we are leaving the front and third loops untouched and working half double crochets in the back loops only.
Working hdc’s in the back loops across…
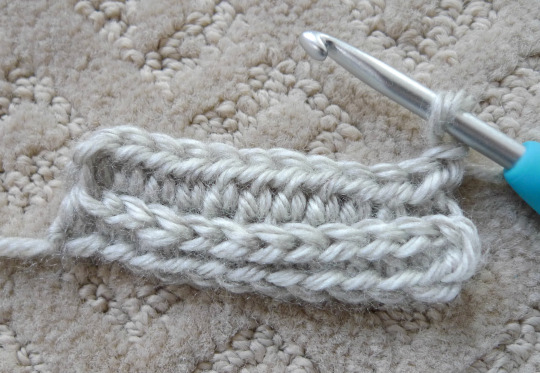
After alternating between the third loops and back loops of every other row, this is the beautiful look that we are achieving!
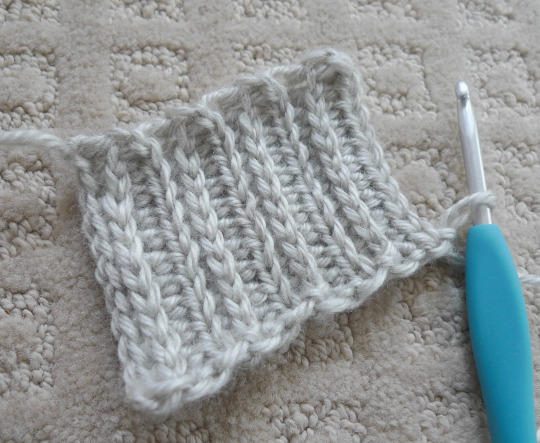
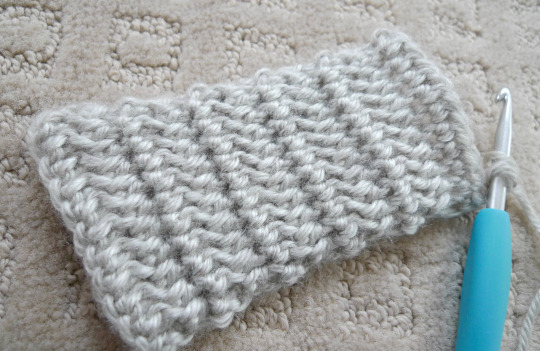
This is what the other side looks like! Very different, isn’t it?
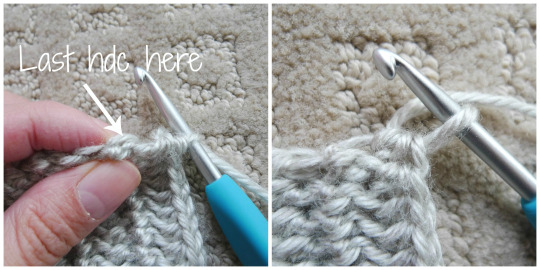
It’s easy to forget the last hdc when doing the rows where you are working in the third loops. Work that last hdc as indicated below and make sure you are keeping track of the number of stitches so that your piece does not inadvertently shrink!
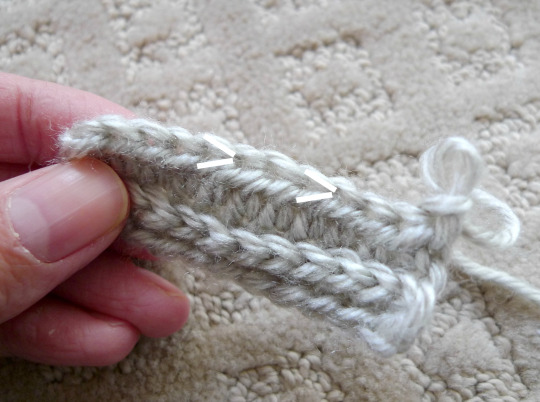
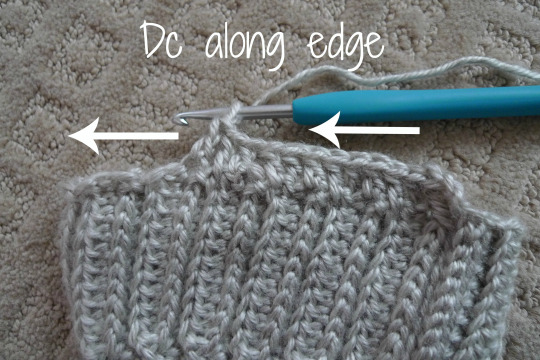
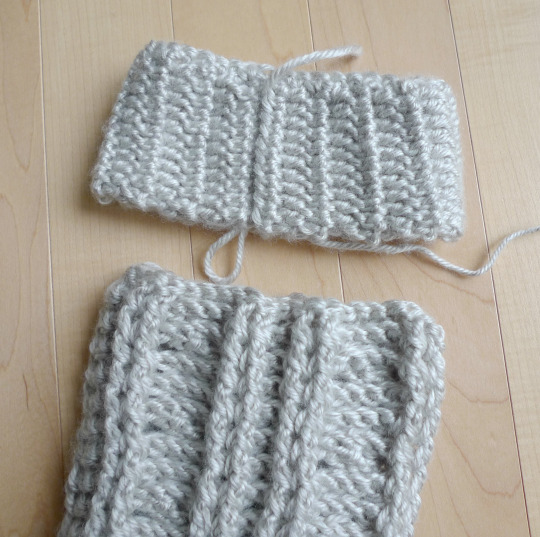
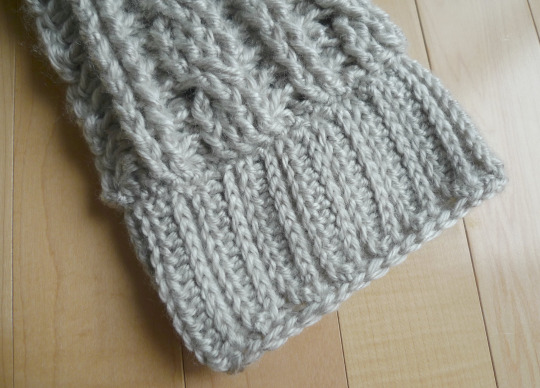
Keep crocheting row by row until you have achieved your desired length. You can measure the ribbed band around your calf/leg to get a custom fit. I would recommend making sure your ribbed band is quite snug as it will stretch over time with wear. You’ll also notice that because of the way this piece is constructed, the edges curl up and it does not lay flat easily. Don’t worry though as we will be working along the edges to give it a more polished look! Single crochet across the top of the ribbed band.
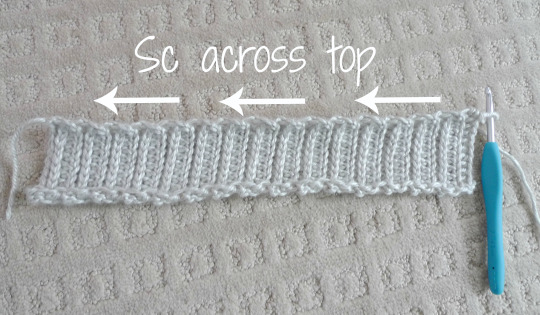
You pick up stitches along the way while working your single crochets…

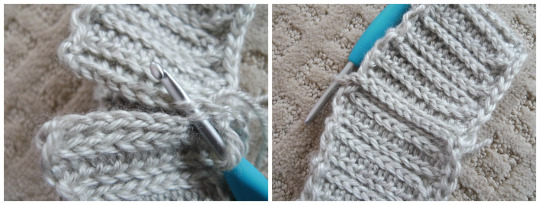
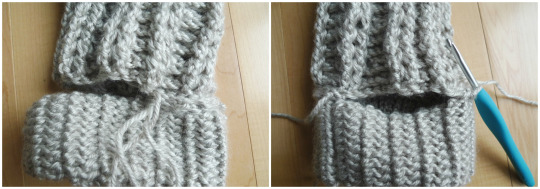
Next, you need to connect the sides of the ribbed band.
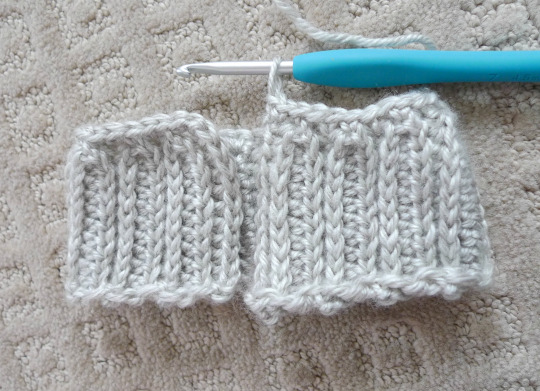
I connected the sides by slip stitching the front loops of the top part to the back loops of the bottom part.
This makes the seam blend right in!
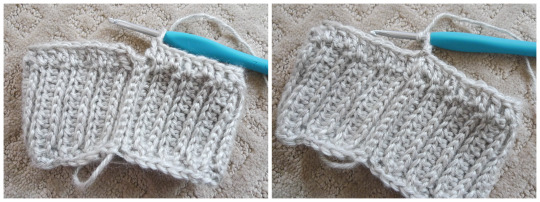
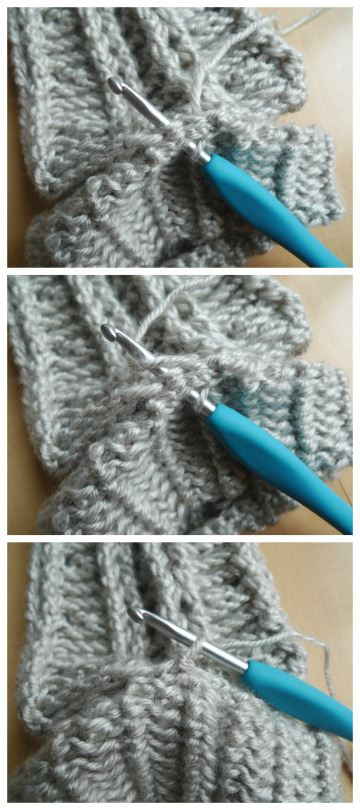
Then, I chained 2 and double crocheted along the other edge of the ribbed band. We are setting up the piece to get ready for cabling!
After completing one round of double crochets, we are ready to begin cabling!
Crocheting cables is not too difficult once you get the hang of it. I have posted a detailed step-by-step tutorial on how to work cables HERE! You can also check out this video by Bethintx1 to see it in action HERE! I put bars between the cables as in my “Cabled Slouchy Beanie, version 2″!

After working some cables, you could stop if you want to make shorter boot cuffs as shown below! I take any crocheting time I can get, including when Ryan is driving the car!
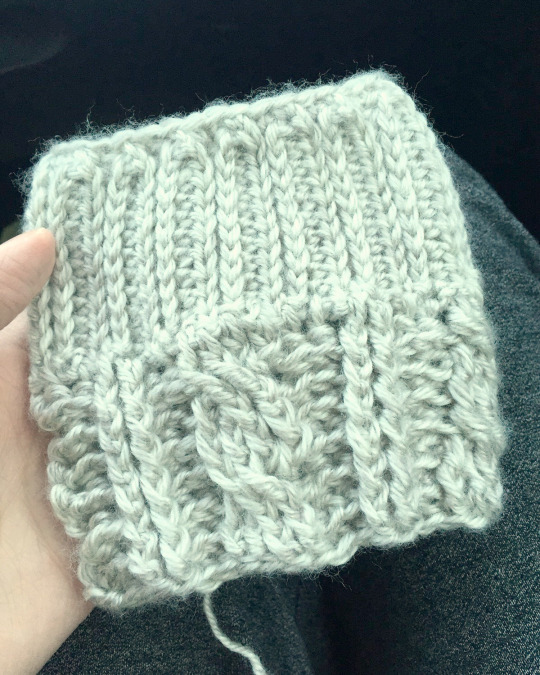
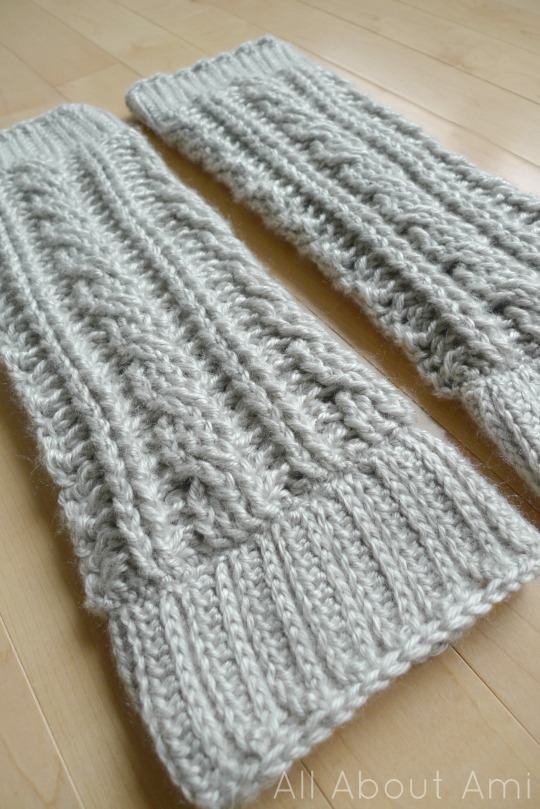
Don’t those cables look beautiful? After achieving my desired height, it was time to do the second ribbed band!

You work the second ribbed band exactly how you did the first one, single crocheting along the top and then slip stitching the edges together.
Then, you flip the ribbed band inside out so that the non-v ribbed side is facing you.
You also flip the cabled body inside out so that you can get ready to attach them together.
Pick up stitches along the ribbed band and the cabled body and slip stitch them together! Flipping the pieces inside out helps the seam be much less visible.
You slip stitch all the way around…
Then you flip the legwarmer right side out again! Doesn’t that join look seamless? I LOVE how there is no sewing or yarn needle required in this project!
Then you follow the exact same pattern to make the second legwarmer! Aren’t they beautiful?
***************************************
Here is the free pattern for my “Cabled Legwarmers/Boot Cuffs”! PLEASE check out my full blog post HERE to see detailed step-by-step instructions on how to work the cables!
Materials:
- 4.5 mm Clover Amour crochet hook
- Medium worsted weight yarn, level 4 (I used between 1-2 skeins of Lion Brand Yarn’s Heartland in “Katmai”– if you are making boot cuffs, you’ll only need 1 skein.)
Special stitches:
- Front Post Treble Crochet (Fptc): Yarn Over (YO) twice, insert hook from front to back around post of stitch indicated. YO and pull up a loop, [YO and draw through 2 loops on hook] 3 times.
- Back Post Double Crochet (Bpdc): YO, insert hook behind post of stitch (insert hook from back to front of stitch), YO, pull up a loop, YO, (pull through 2 loops) twice.
- Front Post Double Crochet (Fpdc): YO, insert hook behind post of stitch (insert hook from front to back of stitch), YO, pull up a loop, YO, (pull through 2 loops) twice.
Ribbed Band:
Chain 12
R1: Hdc 1 in second chain from hook and in each chain across (11 hdc).
R2: Chain 1, turn. Hdc in third loops across (11 hdc).
R3: Chain 1, turn. Hdc in back loops across (11 hdc).
Repeat R2 and R3 until you reach Row 31 (or until desired length). Measure it around your own calf/leg and make sure it is snug since it will stretch over time. My ribbed band measured 10″/25.4 cm.
Single crochet across top of ribbed band from right to left (with v’s facing towards you).
Attach ends together by slip stitching front loops of top edge to back loops of bottom edge.
Now we will begin the cabled body (DO NOT CUT THE YARN).
Cabled Body:
***In each round, the Ch 2 does not count as a stitch. When joining at the end of each round, join to the stitch indicated (NOT the Ch 2) to make an invisible seam.
Round 1: Chain 2, work one double crochet in same st as Chain 2. Work 40 dc as evenly as possible around edge of band. Join with sl st to first dc (40 dc). [If adapting the pattern, make sure your final number of dc’s is a multiple of 10.]
R2: Chain 2, Bpdc around first dc from previous round (same dc you joined to from Round 1). Bpdc around next st. Work cabling: {Skip next two dc, 2 Fptc around next 2 dc. Fptc around first skipped dc and next dc}. 2 bpdc in next 2 sts. 2 fpdc in next sts. *2 bpdc in next two sts. Work cabling: Sk next 2 st, 2 Fptc around next 2 st. Fptc around first skipped st and next st. 2 bpdc in next 2 sts. 2 fpdc in next 2 sts*, rep 3 times. Join with sl st to first Bpdc. (4 cables, 4 sets of Fpdc’s and 8 sets of Bpdc’s between each set of cables and Fpdc’s)
R3: Chain 2, Bpdc around first Bpdc from previous round. Bpdc around next st. Fpdc 4. Bpdc 2. Fpdc 2. *Bpdc 2, Fpdc 4, Bpdc 2, Fpdc 2*, rep 3 times. Join with sl st to first Bpdc.
R4: Repeat Round 3.
With rounds 2-4, one set of cables is complete! Keep repeating Rounds 2-4 until desired length.
I went up to Round 28 and completed 9 sets of cables. My cabled body measured 10″/25.4 cm. Fasten off.
Now it is time to make the second Ribbed Band!
Chain 12
R1: Hdc 1 in second chain from hook and in each chain across (11 hdc).
R2: Chain 1, turn. Hdc in third loops across (11 hdc).
R3: Chain 1, turn. Hdc in back loops across (11 hdc).
Repeat R2 and R3 until you reach Row 31 (or until desired length). My ribbed band measured 10″/25.4 cm.
Single crochet across top of ribbed band from right to left (with v’s facing towards you).
Attach ends together by slip stitching front loops of top edge to back loops of bottom edge.
Now we will attach the second ribbed band to the cabled body. Flip second ribbed band and cabled body inside out. Pick up stitches along the second ribbed band and cabled body and slip stitch them together all the way across. Fasten off and weave in end.
One legwarmer is complete! Now follow the exact same instructions to make the second legwarmer!
– If you want to make boot cuffs, I would recommend following the instructions for the first ribbed band and doing 1-2 cables of the cabled body (no need to do the second ribbed band)!
***************************************
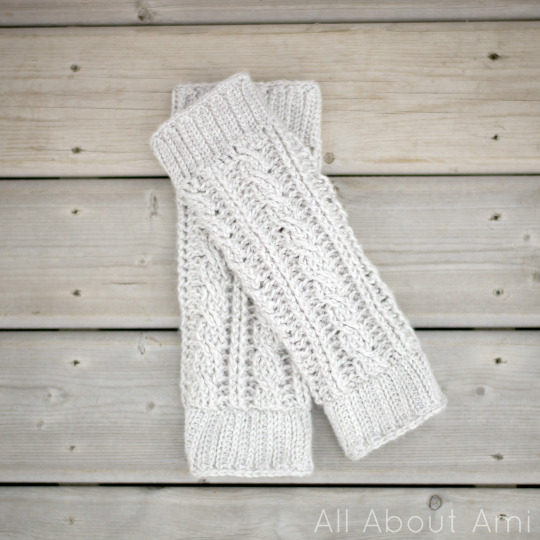
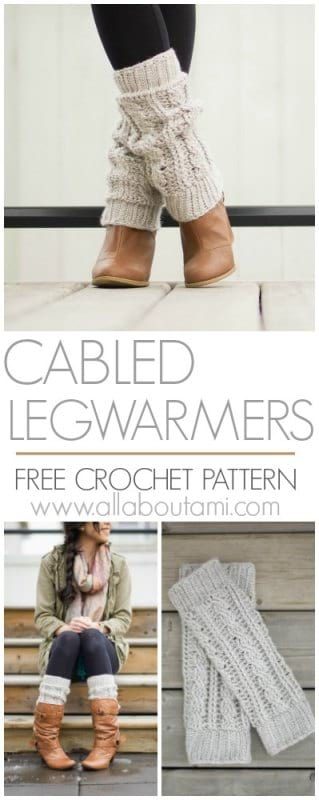
Here are the finished legwarmers! Crochet cables look so beautiful and delicate, and the ribbed bands frame them so nicely!
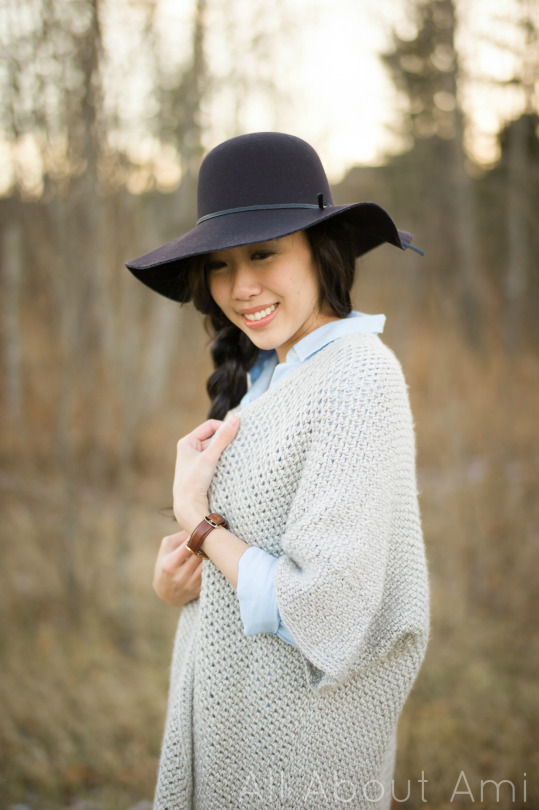
They look gorgeous when worn! For me, thinking of legwarmers brings up images of poised ballerinas and dancers! If you have any dancers in your life, you could whip them up a pair of handmade legwarmers!
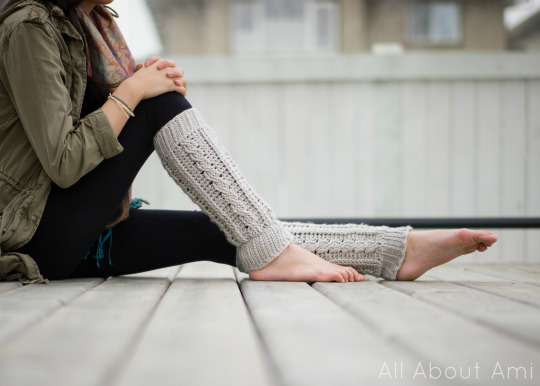
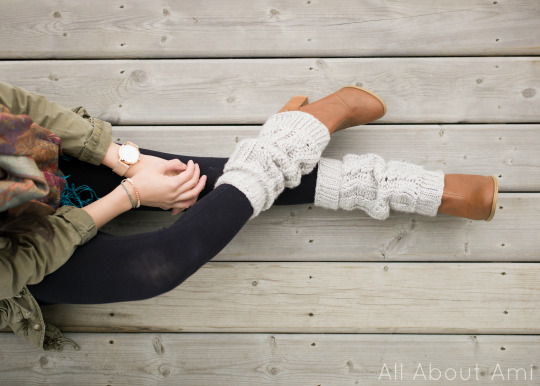
I had fun styling these legwarmers with different pairs of boots that I own! I wore the exact same outfit to show how you can achieve different looks by simply changing your boots and wearing the legwarmers differently. As shown below, you could wear the legwamers over ankle boots and scrunch them up to give a slouchy look! With repeated wears and pulling them over boots, these legwarmers will definitely stretch over time. Remember to keep this in mind when figuring out your sizing!
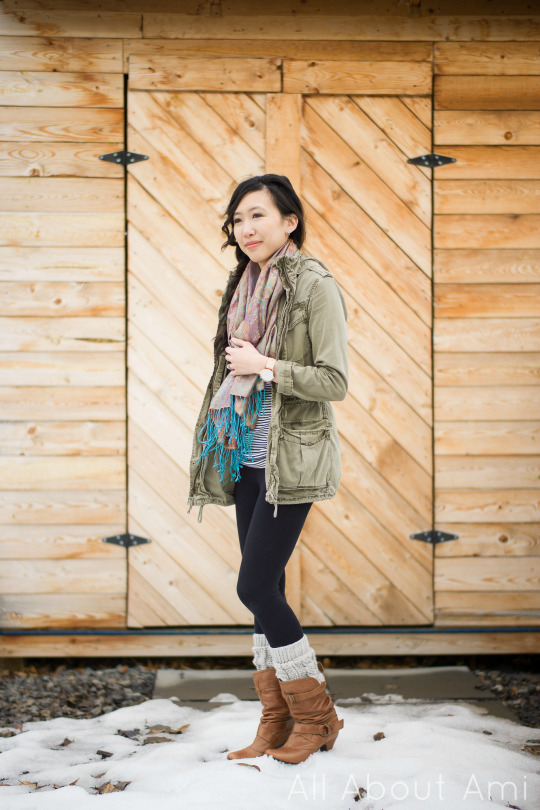
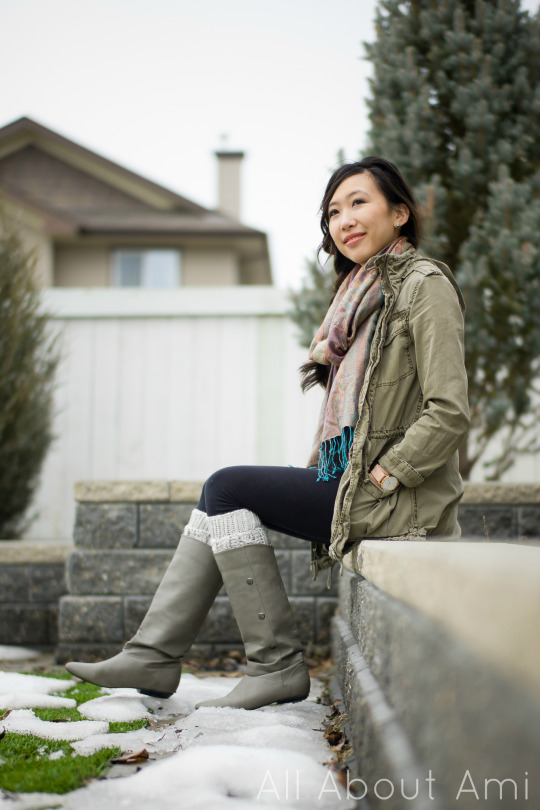
Here are the legwarmers paired under a pair of taller boots! I love that extra layer as it adds such a lovely texture and look to my overall outfit.
The snow is melting, and if it’s too warm to think about legwarmers where you live, then pin and save this blog post for later when the temperatures drop again!
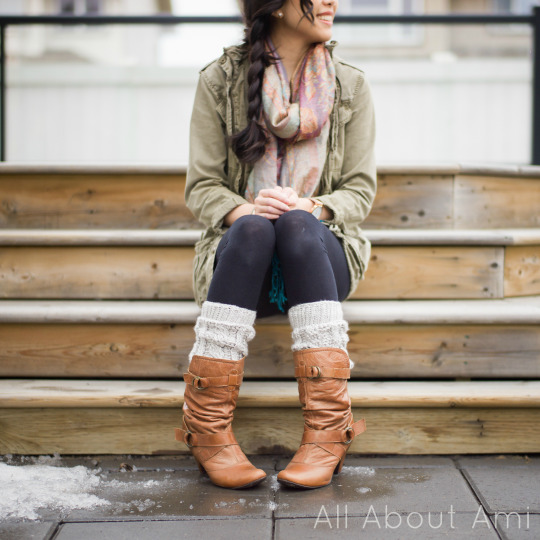
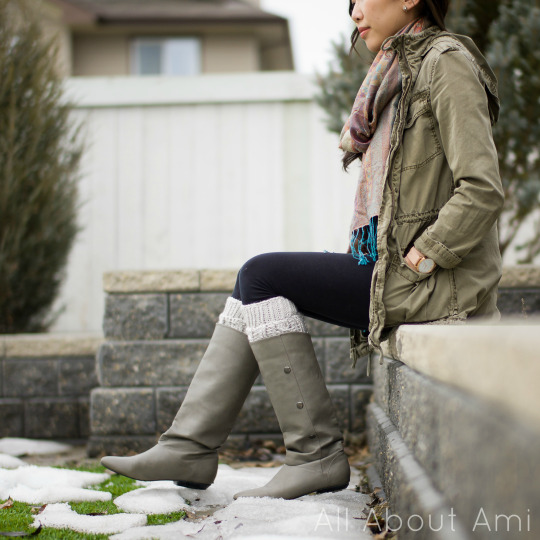
Here are the legwarmers paired underneath a pair of even taller boots! Now they look more like boot cuffs with just the ribbed band and a bit of the cabled body visible. These legwarmers are great for warmth since they are hugging my legs!
I think it’s so special having something crocheted/handmade in an outfit, whether it be a hat, a cowl, a necklace, or legwarmers and boot cuffs!
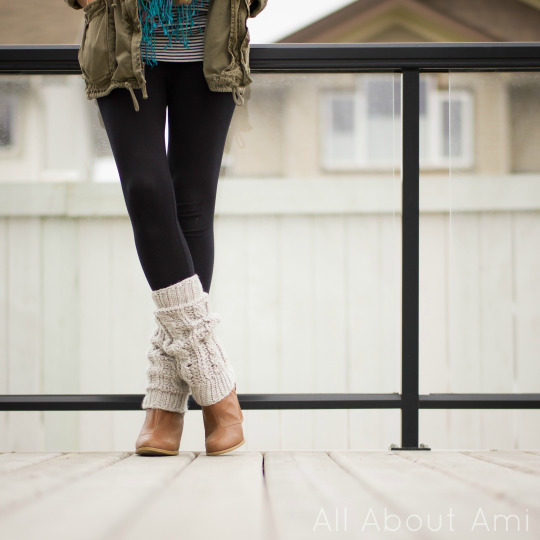
And here is one last image of the legwarmers worn over ankle boots again, one of my favourite ways! I think it looks so chic and adds such interest to the boots! This particular “Katmai” colour is very neutral and will match with any colour boots that you own. I’d also recommend shades of brown and tan (e.g. Heartland in “Acadia”, “Mammoth Cave” and “Grand Canyon”) which would look wonderful with boots of different shades as well. Since legwarmers add an extra layer to your calves and legs, I would suggest sticking with more fitted leggings, jeggings, tights or skinny jeans when pairing them together!
Let me know if you’ll be trying out this pattern or maybe saving it for later! Keep sharing your pics with me and using the hashtag #AllAboutAmi on social media! You can follow me on Facebook, Twitter and Instagram to keep up to date with my work! It’s been a fun season of designing and crocheting wearable winter items, and we will welcome the first day of Spring next week!
{This post is sponsored by Lion Brand Yarn! I’ve loved working with their yarn throughout the years and I’m thrilled that I get to collaborate with them every month!}
This pattern is an original pattern by Stephanie Lau of All About Ami. Please do not claim this pattern as your own. If you wish to share this pattern, you may link to this pattern but please do not reprint it on your site. You may keep a copy for your own personal use but please DO NOT sell the pattern or distribute it.
You may sell products made from this pattern but please clearly credit the design to me, Stephanie Lau of All About Ami, and provide a link to my blog www.AllAboutAmi.com. Permission is NOT granted for mass production or factory manufacturing of any kind. Thank you for being respectful and for your understanding!
Amazon Affiliate Link: