I am excited to kick off a series that I have been trying to develop ever since I picked up my knitting needles again! I first learned how to knit when I was 10 years old BEFORE I learned how to crochet. I have been building up my crochet repertoire and designing new projects for the past 6 years through this blog, and I started dabbling in knitting again exactly a year ago. When I shared some of my knitting works-in-progress, many of you expressed an interest in learning how to knit as well, but you did not know where to begin or what resources to turn to! I have put together a series of blog posts and videos called the “Simple Knit Series” that will walk you through the basics of knitting. Once you have learned the basics, you will be able to knit some gorgeous beginner-friendly projects that I have designed! Let’s begin Part 1: Learning how to Knit the Garter Stitch!
In this video and tutorial, you will learn:
- How to do the long tail cast-on
- How to do the knit stitch (knitting every stitch, row after row results in the garter stitch)
- How to cast off stitches
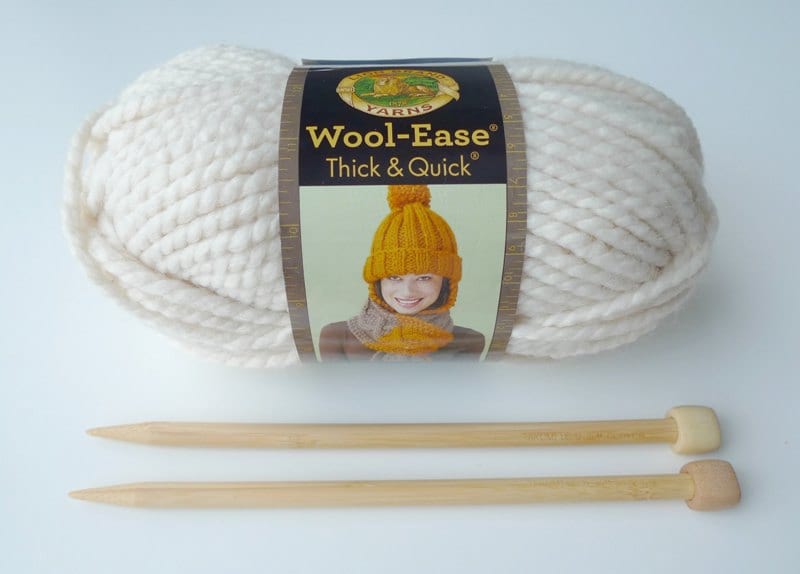
Let’s start off with what materials you will need! We are used to holding one tool (our hook) while crocheting, but with knitting we need to get used to holding two needles at the same time! I personally love using Clover Takumi bamboo needles as they provide excellent grip so that your yarn does not fly off the needles . Knitting needles have sizes just as crochet hooks do- I will be using 9 mm knitting needles for this tutorial (I have the 9″ long needles pictured below, but I would recommend the 14″ long needles so that you can hold more stitches on them). Throughout the whole Simple Knit Series, I will be using Lion Brand Yarn‘s Wool-Ease Thick & Quick yarn as it is a favourite among many knitters and crocheters and it is readily available in many stores (I’m sure many of you have some in your stash already)!
To begin, we need to learn how to place stitches on our knitting needles, which is called casting on. With crocheting, we are used to working a series of chain stitches or foundation stitches to begin, and our crochet hooks move along the piece. With knitting there is a big difference, because all our stitches REMAIN on the needles! There are many different ways to cast on stitches, and people say that the method you first learn will be your favourite method. I will be teaching you the “Long Tail Cast-On” which is a method that gives a neat and stretchy edge. It’s also great because using this special cast-on results in not only casting on stitches, but also the first knit row (kind of like how crocheting foundation stitches combines chain stitches and the first row all in one step)! You need to leave a long tail at the beginning as you will be using this tail to cast on.
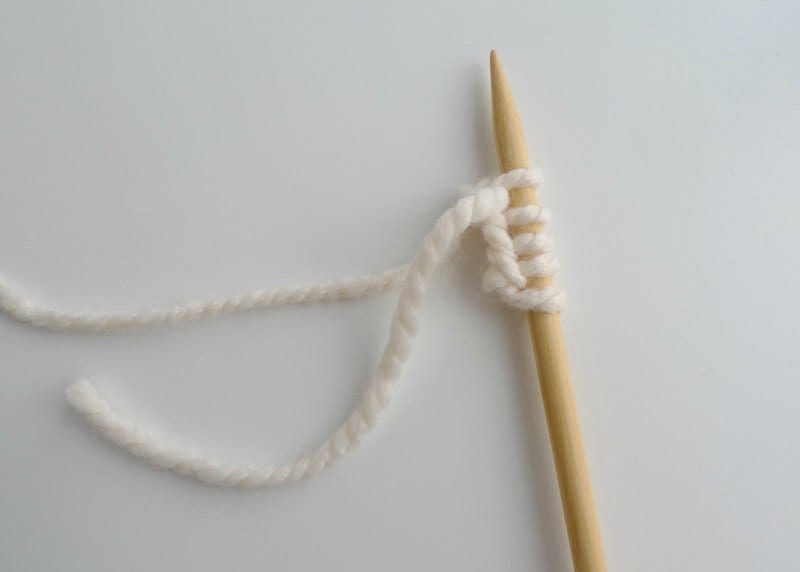
Begin by making a slip knot and place it on one knitting needle, leaving about a 10″ tail (we will be knitting a small sample to practice the basics).

Next, we need to cast on stitches by moving our knitting needle around the tail end of the yarn and the working end of the yarn to place stitches onto the needle. Rather than taking step-by-step pictures (which can be confusing using this cast-on method), I have filmed a video to show you it in action. I have casted five stitches onto one knitting needle! You can read more about the long tail cast-on in this helpful Craftsy blog post HERE!
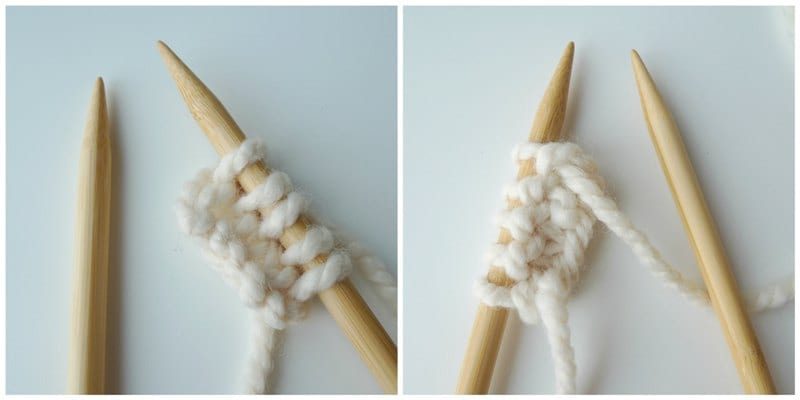
After you have casted on your stitches, you are ready to begin your next row! Remember that using this long tail cast-on method combines casting on stitches AND Row 1, so technically we are beginning Row 2 next! We will now work the “KNIT STITCH“, which is the most basic knitting stitch. When you do the knit stitch for every stitch in every row, the pattern created is called the “Garter Stitch“! We use both knitting needles to transfer the stitches from one knitting needle onto the other knitting needle by wrapping the working yarn around. Here you can see the stitches are being worked from the left needle onto the right needle.
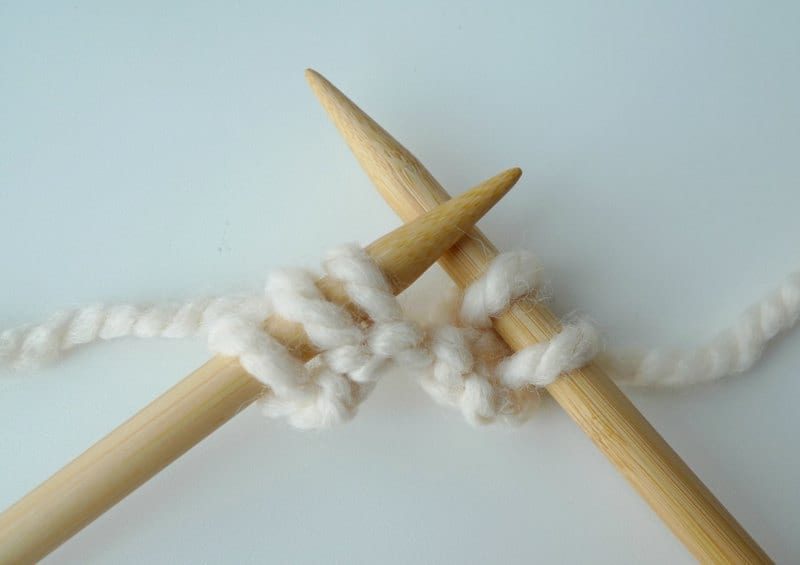
Once all the stitches have been transferred to the right needle, Row 2 is complete. Then you flip the needle and transfer it to your other hand so that all the stitches are once again on your left needle. Then you keep continuing this pattern, going back and forth for however many rows you want! There are different ways to hold the working yarn and knitting needles. I knit English-style where my working yarn is in my right hand and I “throw” the yarn, and this is what I demonstrate in the video below. Many crocheters prefer knitting Continental-style where the working yarn is in their left hand since this is similar to how you crochet. You can check out this video HERE if you want to learn how to knit Continental-style!
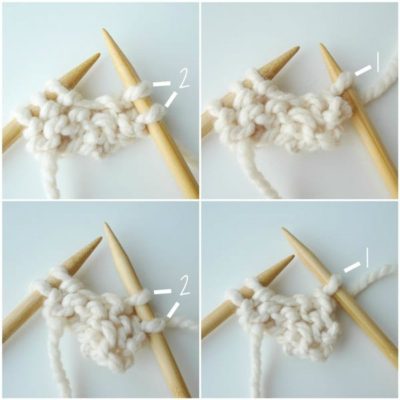
After you have practiced the knit stitch and worked subsequent rows, it is time to learn how to cast off the stitches! You work the knit stitch as usual until there are two stitches on the right knitting needle. You pull the bottom stitch over the top stitch so that there is only one stitch remaining on the right needle. Then, you knit another stitch so that once again there are two stitches on the right needle. You do the same process until eventually there is only one stitch remaining on the right needle and there are no stitches remaining on the left needle!
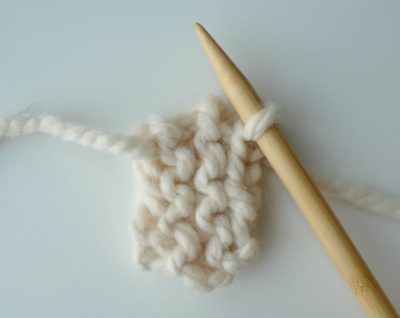
Your work is complete! You have learned how to cast on stitches, do the knit stitch repeatedly to create “the Garter Stitch”, and cast off stitches! Designs using the garter stitch results in these bumps and ridges as shown in the picture below- in case you’re curious about how to count your garter stitch rows, check out this helpful tutorial by Fresh Stitches HERE!
Without further ado, here is the first video of our Simple Knit Series in which I demonstrate how to do the long tail cast-on (0:27), the knit/garter stitch (1:22), and how to cast off stitches (3:03)! You can also view this video on YouTube HERE!
Now that you have learned how to do these techniques, you can try knitting my “Simple Garter Stitch Cowl/Scarf” that I designed! It is a beginner-friendly project with gorgeous results! The FREE PATTERN can be found HERE!
![]()
It takes some practice getting used to holding knitting needles and how to wrap the yarn. I find it easier to fix mistakes with crochet as you can easily frog your work, but if you make a mistake with knitting, you need to carefully place your stitches back onto the needle. Also, if you need a certain crochet hook size for another project (e.g. your 10 mm hook), it is easy to simply slip out your hook and use it elsewhere. However, if your knitting needles are being used in the middle or a project, it is more difficult to simply “slip out” your needle and use it elsewhere (you would have to thread the stitches onto another piece of yarn or another size needle to help hold them in place). It’s such a wonderful skill to know how to both crochet AND knit as it gives you more possibilities with yarn! Knitting in general consumes LESS yarn than crocheting for similar projects, and knitted pieces have a beautiful drape and flow to them. I love using crochet to create complex shapes for amigurumi, and crocheting is generally quicker than knitting. There are definitely pros and cons to both knitting and crocheting!
If you’ve always been interested in learning how to knit, I hope you’ll find this tutorial and series helpful! You can follow me on Facebook, Twitter and Instagram, and check out all my FREE crochet and knitting patterns HERE! Welcome to the wonderful world of knitting, everyone!
Note: Thank you to Lion Brand Yarn for sponsoring the yarn and Clover USA for sponsoring the knitting needles for this series!