***You can purchase an INEXPENSIVE AD-FREE PDF of the Two-Tone Scarf Wrap pattern on Etsy HERE and on LoveCrochet HERE! This beautifully formatted PDF includes all the step-by-step photos, and is a total of 6 pages including the cover page! This pattern is also available in the “Crochet Cowls & Scarves PATTERN BUNDLE” which includes over 20 beautiful designs at a discounted price – check out the bundle HERE! This pattern is also available as part of a kit HERE on the Lion Brand Yarn site which includes all the yarn and exact colours needed!
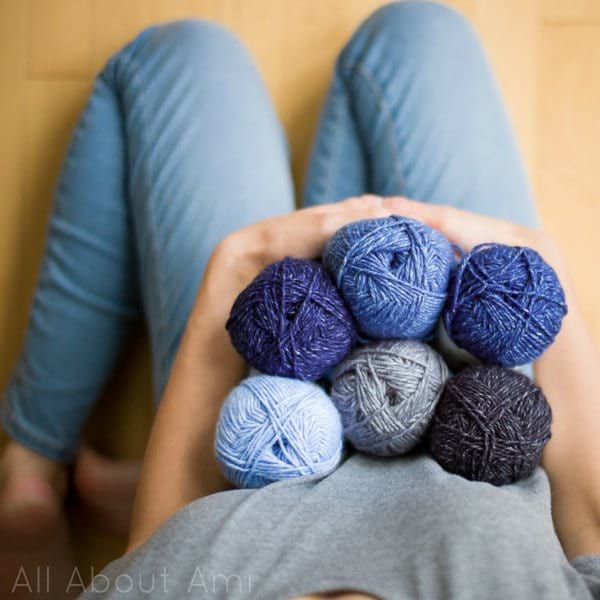
I love trying out new yarns and am so thankful that I have been collaborating with Lion Brand Yarn to bring you new projects each month! I was very excited when I got my hands on their new Jeans yarn as it is an incredibly soft acrylic worsted weight yarn (level 4) that is very easy to work with. Jeans are a classic staple in any wardrobe, and the Jeans yarn comes in some beautiful shades of blue that emulate denim, as well as some accent shades to complement denim. When I shared the photo below to social media, many of you expressed your love of Jeans yarn as well!
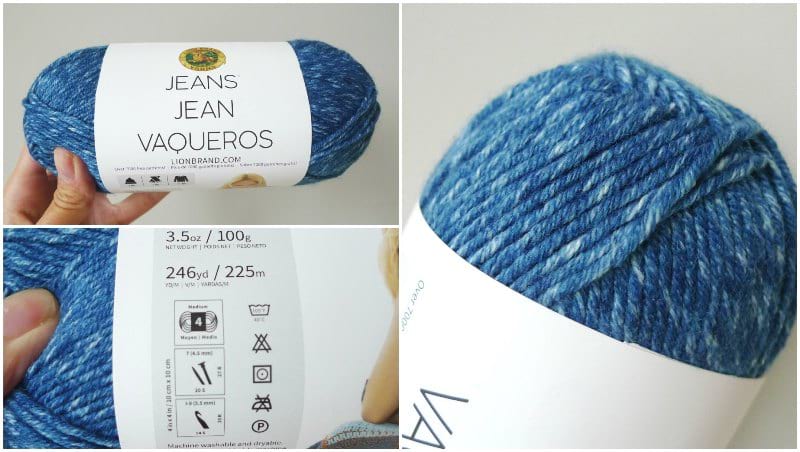
I decided to use this gorgeous “Stonewash” colourway to crochet the design I had in mind! I love how the blue blends harmoniously with white to create this beautiful wash!
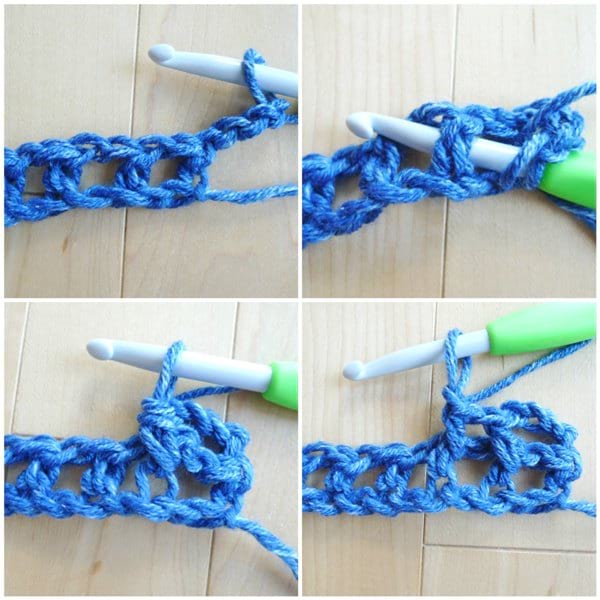
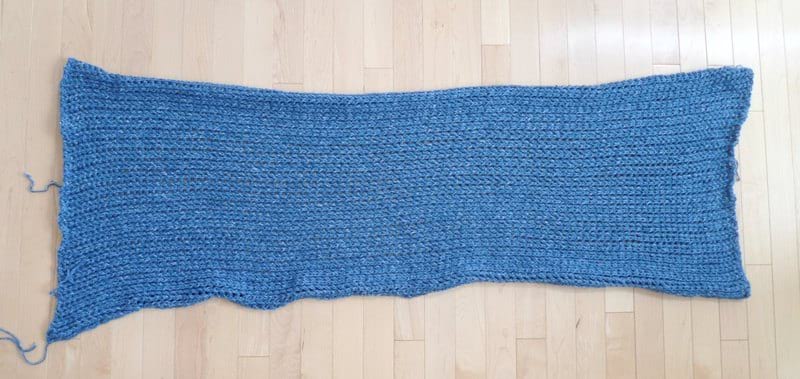
I wanted to try crocheting a large scarf wrap, almost like a blanket scarf! It could be snuggled in as the weather cooled down and also wrapped around the neck as a chic accessory. I had a stitch pattern in mind and I wanted to try implementing a new technique that I had learned in the Spring as I will show you later on! To begin, I worked a series of 208 chain stitches with my 6.5 mm hook. Then starting from the fourth chain from the hook, I worked one half double crochet, skipped 1 and chained 1, repeating this all the way across. This resulted in a series of half double crochets separated by chain 1 gaps!

Next, I chained 4 and turned my work. I then worked front post half double crochets around the posts of the previous row. Once again, I chained 1 in between to separate the front post half double crochets.
After completing the last front post half double crochet around the post, I came to the turning chain from the previous row. I worked one last half double crochet (not a front or back post) in the third chain from the bottom.
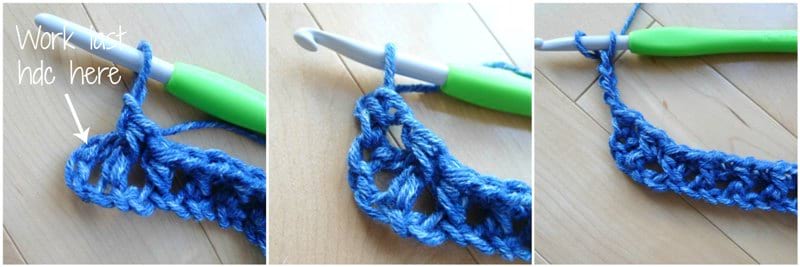
After chaining 4 and turning, I then worked back post half double crochets across, chaining 1 in between.

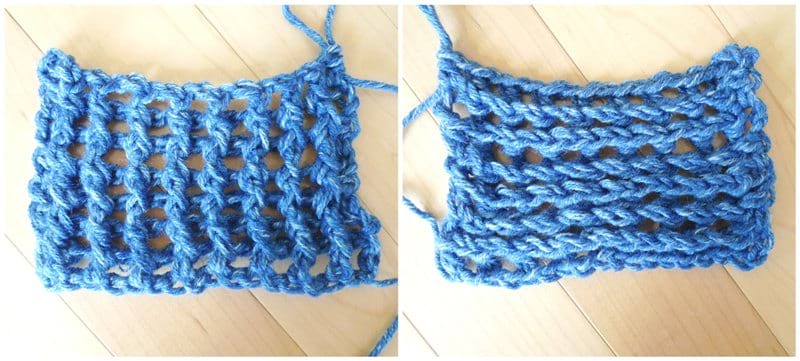
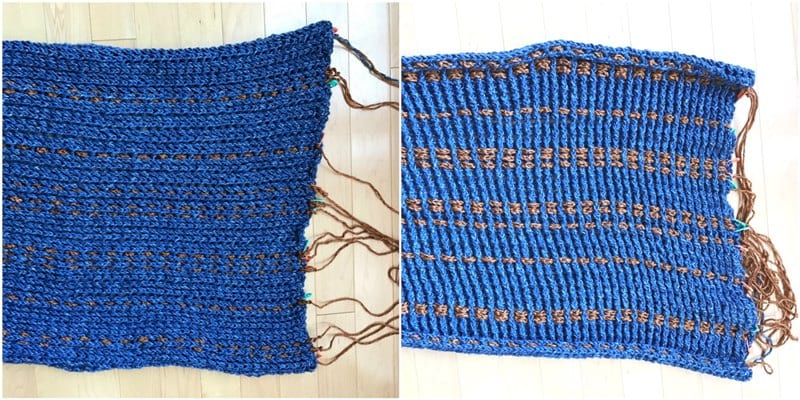
After alternating rows of front post half double crochets with rows of back post half double crochets, this is the beautiful texture that developed! Both sides are very different! Note that it is normal for the scarf to curl due to the nature of the stitches! The curling will resolve itself at the end with the weight of the scarf and will not be noticeable (you could also block your final piece too)!
Here is a close-up of the swatch I did to show you the different textures of each side! The front post half double crochet side (left) has these raised bars that run vertically. The back post half double crochet side (right) has an almost knitted stockinette look that runs horizontally. This is reminiscent of my Triple Luxe Cowl, in which that “knitted v” look was worked in rounds. Some people asked if this look could be achieved by working in turned rows for a long scarf rather than a cowl- this is how you would achieve it!
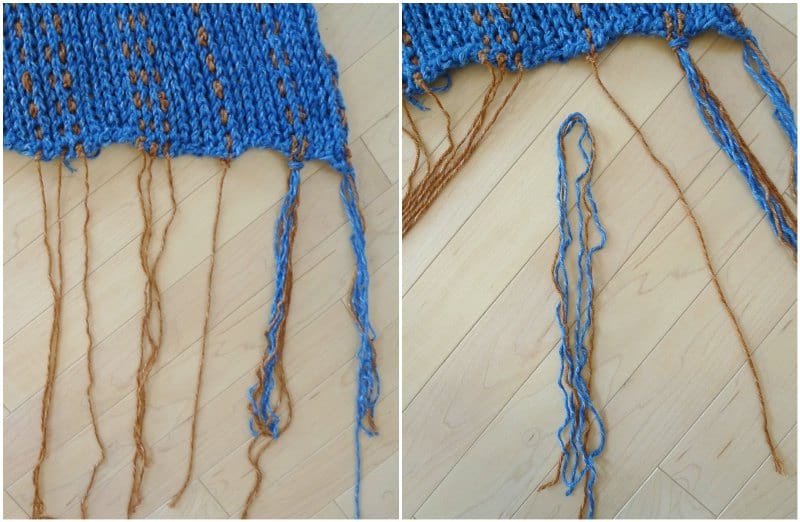
After I was happy with the width of my scarf wrap, it was time to add a contrast colour! I learned the technique of weaving a contrast colour in my knitted Dash Shawl HERE, and I wanted to try it in a crochet project! I knew the spaces left between the post stitches would be perfect for weaving! Thus, I used this “Topstitch” colourway to create long strands of chain stitches which I refer to as “Contrast Colour Stripes” in this design. I made sure to leave long initial and final ends for the Contrast Colour Stripes so that they could be incorporated into the fringe later on. After crocheting 14 Contrast Colour Stripes, I then placed each stripe ontop of my Scarf Wrap (with the front post half double crochet stitches facing you), generally determining the spacing of each stripe and how far/near I wanted each one to be.
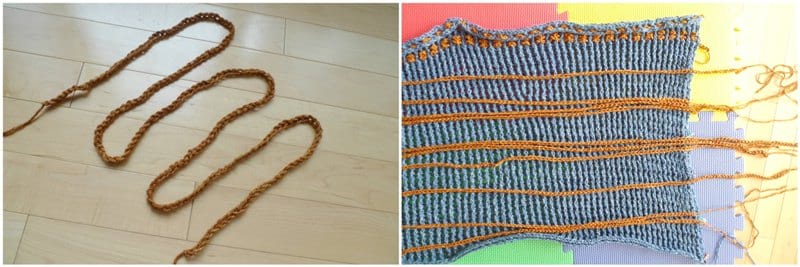
I then weaved the Contrast Colour Stripe in and out of the spaces of the row by hand!
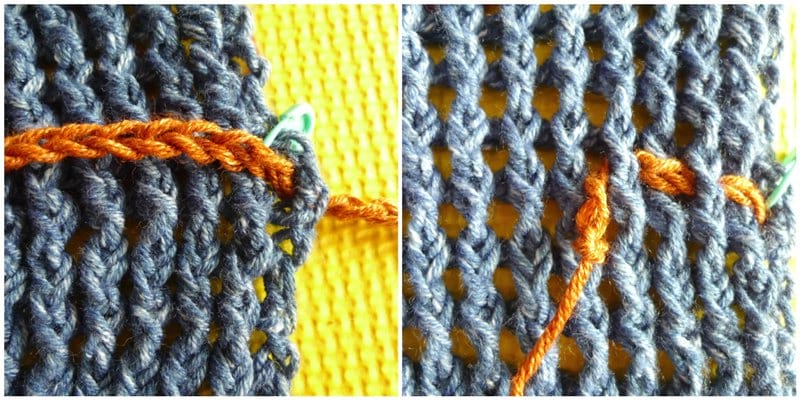
After weaving in the Contrast Colour Stripe, I tugged at the scarf wrap on both ends to stretch it out in order to help the stripe settle in. As you can see, the contrast colour shows up very differently on each side! On the back post half double crochet side (left in picture below), the contrast colour is more subtle. On the front post half double crochet side (right in picture below), the contrast colour pops out more and is more visible!
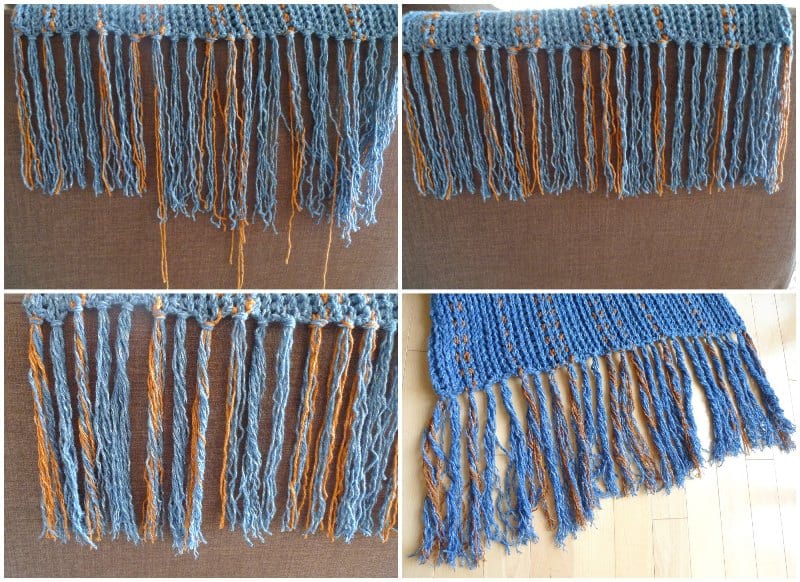
To secure the Contrast Colour Stripes in place, I tied a knot at each end. Next, I created the fringe by cutting strands of the main and contrast colour. I then folded the strands in half and got ready to add them to the ends of the scarf wrap!
I used my crochet hook to bring the folded loop through. Then I pulled the ends of the fringe through the loop and pulled tight.
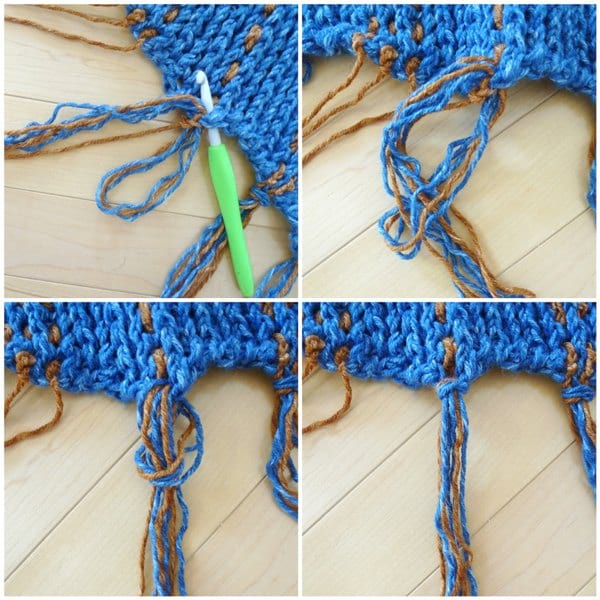
Wherever there was a contrast colour stripe, I added the contrast colour fringe. I then filled in the rest of the fringe using only the Main Colour.
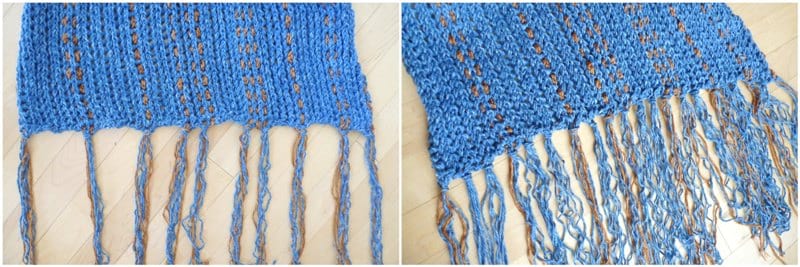
I trimmed the fringe and then used a fine tooth comb to fray the fringe, giving it more dimension and texture. I used this same technique with the Boho Crochet Wrap, and you can check out a video of me doing this in the blog post HERE!
For this project, I actually filmed some videos of me working on the scarf wrap so you can see it in action! I thought this would be helpful, particularly for the weaving portion as this is a new technique! Let me know what you think and if you find these videos helpful! (P.S. Note that you need to always Chain 4 as the turning chain, but in the video a Chain 2 turning chain is visible by mistake.)
***********************************
Here is the FREE PATTERN for my “Two-Tone Scarf Wrap“!

***You can purchase an INEXPENSIVE AD-FREE PDF of this pattern on Etsy HERE and on Craftsy HERE! This beautifully formatted PDF includes all the step-by-step photos, and is a total of 6 pages including the cover page! This pattern is also available as part of a kit HERE on the Lion Brand Yarn site which includes all the yarn and exact colours needed!
Materials:
- 6.5 mm Clover Amour hook
- Jeans Yarn by Lion Brand Yarn in the colours “Stonewash” (Main colour) and “Topstitch” (Contrast colour): 4 skeins of the MC and 1 skein of the CC [Worsted weight level 4 yarn]
- Optional: Clover lock ring stitch markers, Fine-tooth comb to separate and fray fringe
Special stitches:
- Front Post Half Double Crochet (Fphdc): YO, insert hook behind post of stitch (insert hook from front to back of stitch), YO, pull up a loop, YO, pull through 3 loops.
- Back Post Half Double Crochet (Bphdc): YO, insert hook in front of post of stitch (insert hook from back to front of stitch), YO, pull up a loop, YO, pull through 3 loops.
Notes:
- Using the main colour, a loose and stretchy scarf wrap is crocheted with different textures on each sides. Front and back post stitches are created with chain gaps in between.
- After the desired size is achieved, the contrast colour is used to crochet lengths of chain stitches or Contrast Colour Stripes. These Contrast Colour Stripes are then woven around the post stitches to create a subtle pop of colour on one side of the scarf and a bolder pop of colour on the other side.
- Fringe is added and then frayed to create a fuller look.
- If you wish to adjust the length of the scarf, decrease or add multiples of two stitches to the initial chains.
- If you wish to adjust the width of the scarf, decrease or add more rows.
Sizing:
- 52″ long and 19″ wide (unstretched without fringe)
- 54.5″ long and 21″ wide (stretched without fringe)
Gauge: If starting with Chain 16, 8 posts and 7 chain gaps with 9 rows of pattern = 4″ x 4″
Body of Scarf Wrap
With MC, Chain 208.
Row 1: In 4th chain from hook, Hdc. *Ch 1, Sk 1, Hdc* across. (104 posts, 103 spaces)
R2: Ch 4, turn. *Fphdc around next post, Ch 1* across. Hdc in last stitch (the turning chains from previous row – work the hdc in the third chain from the bottom). (104 posts, 103 spaces)
R3: Ch 4, turn. *Bphdc around next post, Ch 1* across. Hdc in last stitch (the turning chains from previous row – work the hdc in the third chain from the bottom). (104 posts, 103 spaces)
Rows 4-50: Repeat Rows 2 and 3 or until desired width.
Weaving In the Contrast Colour:
Using the CC, we will create lengths of chain stitches called Contrast Colour Stripes to weave around the post stitches of the scarf wrap.
- Leaving initial end of 10″ (if fringe is wanted), Chain 200 (or till desired length). Fasten off and leave long tail of 10″. Repeat this to create desired number of Contrast Colour Stripes (I crocheted 14 of these in total).
- Lay the Contrast Colour Stripes over different rows of the Scarf Wrap to determine desired pattern. Place stitch marker at end of each row where you would like Contrast Colour Stripe to be woven in.
- Since I had 50 rows, I also had 50 spaces (each space created by first stitch and chain gap). I placed my Contrast Colour Stripes on rows: 1, 5, 6, 12, 17, 18, 19, 25, 26, 28, 33, 41, 42 and 50).
- Position scarf wrap so that front post stitches are facing you (the stitches appear as though they are running vertically). Weave Contrast Colour Stripe along each desired row around the post stitches. Leave initial and final tails protruding outwards so that they can become part of the fringe later on. Pull and stretch the scarf to help Contrast Colour Stripe settle into the scarf in case excess chain length is protruding out. Keep in mind that the scarf wrap will stretch with repeated wear and gravity. To minimize stretch lengthwise, you can crochet shorter Contrast Colour Stripes. If you would like the Contrast Colour Stripes to stretch with the scarf, allow some slack (i.e. Chain 200 should suffice).
- With Contrast Colour Stripe end, tie a knot around the beginning and end of each row to help anchor it in place and to prevent Contrast Colour Stripe from sliding around.
Adding fringe:
Measure and cut lengths of 25″ of both the MC and CC for the fringe.
- For rows where Contrast Colour Stripe is emerging, gather 1 strand of CC and 2 strands of MC. Fold them in half and pull folded end through space at end of row. Pull ends (including Contrast Colour Stripe end) through loop and pull tightly. For some rows where Contrast Colour Stripes are adjacent, pull both Contrast Colour Stripe ends through and gather them together in the same fringe.
- For other rows where Contrast Colour Stripe is not emerging, gather 3 strands of MC. Fold them in half and pull folded end through space at end of row. Pull ends through loop and pull tightly.
- Add fringe every 2-3 rows or as desired.
- Trim the fringe ends to about 8.5-9″.
- Untwist and unravel the fringe ends using a fine toothed comb to achieve a fuller look.
********************************
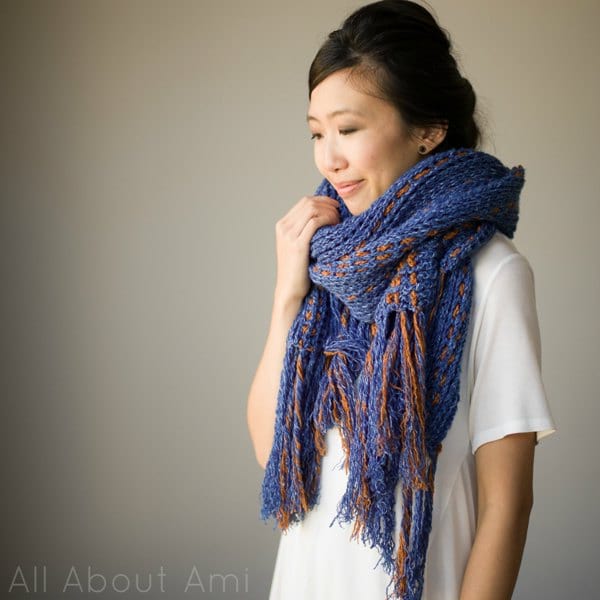
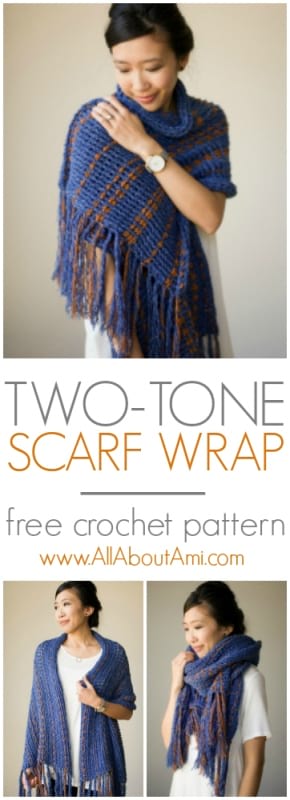
The Two-Tone Scarf Wrap is a very versatile and chic piece that is perfect for any Fall wardrobe!
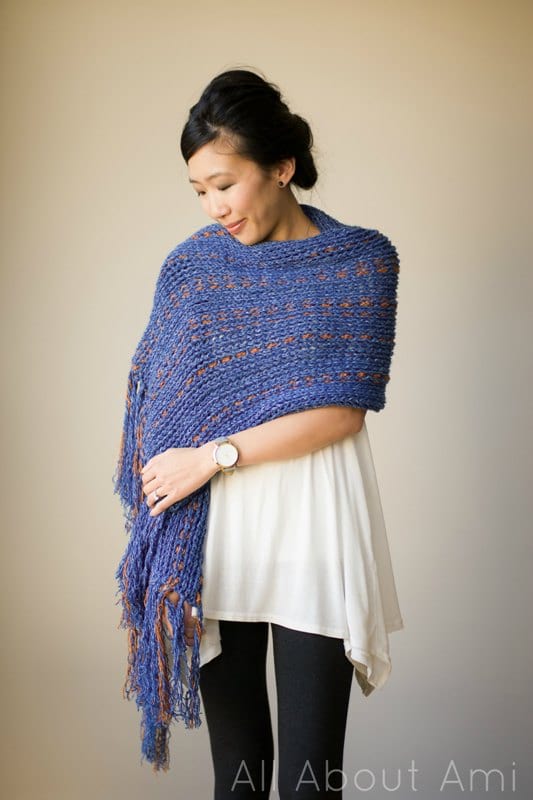
It looks so beautiful draped across the shoulders! This is the side with the more subtle contrast colour!

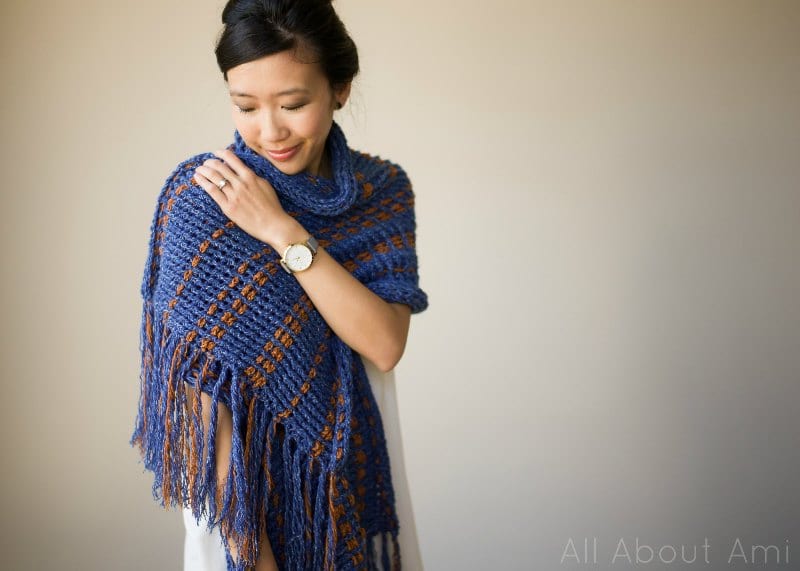
This is the side with the bolder contrast colour! I adore how the Topstitch colour really looks like the stitching that is seen on denim! With the way that the contrast colour is weaved in, it emulates the running stitch!
Each side gives a very different look when worn, so it is reversible!
![]()
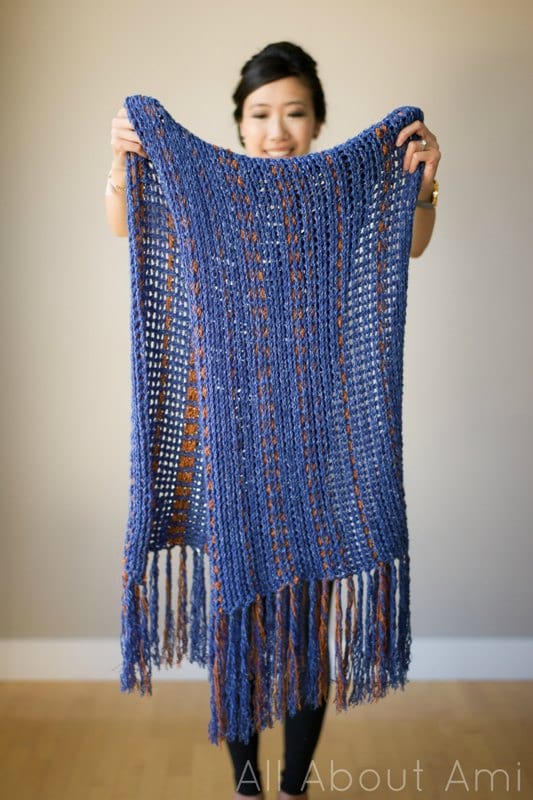
This scarf wrap is a great size as you can cuddle in it without it being too overbearing! The textured fringe also adds such a luxurious effect!
When wrapped around the neck, it is such a beautiful and full scarf. It gives a very urban vibe with the colours, and I can imagine how stylish and warm it will be worn with a fall coat!
You can have fun dreaming up different colour combinations with your favourite colours or colours that complement one another! Adding the weaving technique to a crochet project gives such a unique look and is a great way to incorporate another colour without having to switch yarn colours all the time.
The Two-Tone Scarf Wrap is actually a part of an exciting new campaign that is being launched by Lion Brand Yarn called the “12 Weeks of Christmas“! To gear up for holiday crafting, they’ve asked many of your favourite designers to each design a crochet or knit project that would be perfect for gift giving! You can find all 12 of the kits HERE and they are all on sale for 20% off until Christmas Eve! Once again, you can purchase the Two-Tone Scarf Wrap kit HERE on the Lion Brand Yarn site, and it’s a great way to get your hands on some beautifully soft acrylic yarn with a statement piece that can be worn all throughout the fall and winter!
Note: Thank you to Lion Brand Yarn for providing the yarn and sponsoring this post!