- The free knit pattern with exact written numbers and row/round counts can be found HERE.
- The beautifully-formatted, inexpensive PDF containing the written-out pattern and all the step-by-step pictures (total of 9 pages) can be found on Etsy HERE.
- The convenient Lion Brand Yarn KIT containing all the required Hue + Me Yarn can be found HERE (choose any color)!
- Join our Ridgeline Cardigan Knit-Along on Facebook HERE!
- Add this design to your Ravelry queue HERE!
I have always loved designing cardigans as they are such versatile pieces of clothing that can be layered over all your outfits! In the past, I have designed the Downtown Cardigan (bulky level 5 yarn), Dotty Cardigan (bulky level 5 yarn), Midtown Cardigan (lightweight level 3 yarn), Uptown Cardigan (lightweight level 3 yarn) and Daylight Cardigan (worsted weight level 4). In all of these designs, the construction is similar: the back panel, front panels and sleeves are all knit separately and then seamed together. I wanted to try some new techniques and attempt to make a seamless chunky cardigan – this was a fun challenge and I am excited to show you how I did this!
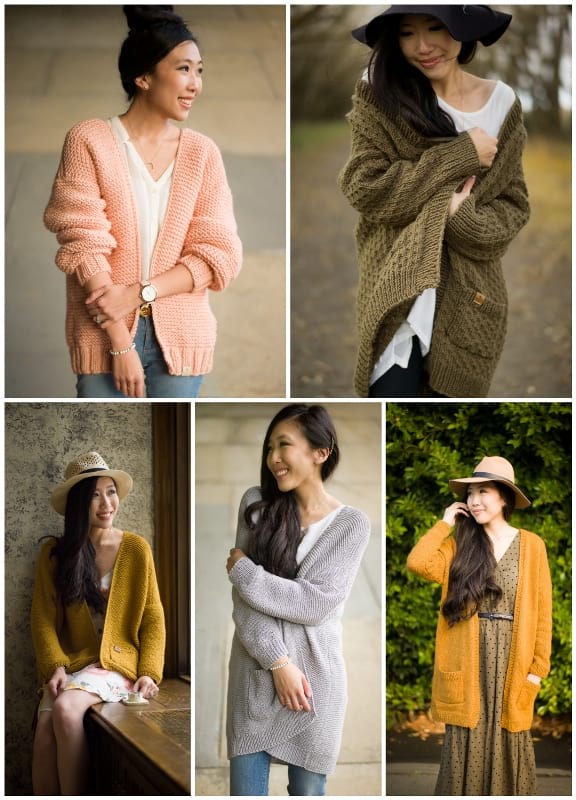
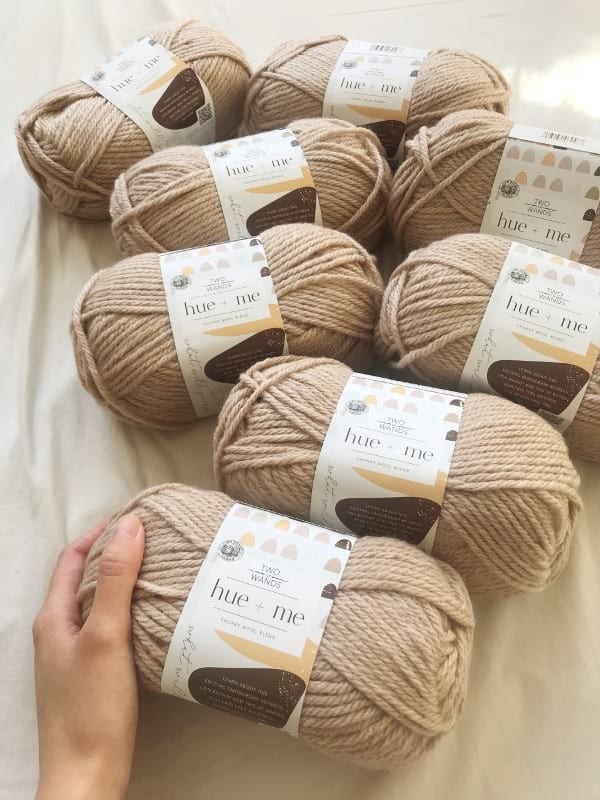
For this new cardigan, I used a brand new yarn called “Hue + Me” that is a collaboration by Lion Brand Yarn and my friend and fellow knit/crochet designer Alexi Tavel of Two of Wands! This level 5 bulky yarn is 80% acrylic/20% wool and comes in 18 gorgeous shades that Alexi personally picked. Each skein is 125 g/137 yds and this wool blend yarn knits up beautifully (has a slight fuzz) and is completely machine washable and dryable. I chose this stunning color called “Desert” which is such a lovely color that will match with everything (beautiful beige/light tan color with hints of pink). It is important to note that the yardage varies between this yarn and “Color Made Easy” and “Woolspun” in case you are thinking of using different bulky level 5 yarns (you cannot simply purchase the same number of skeins since the yardage is different).
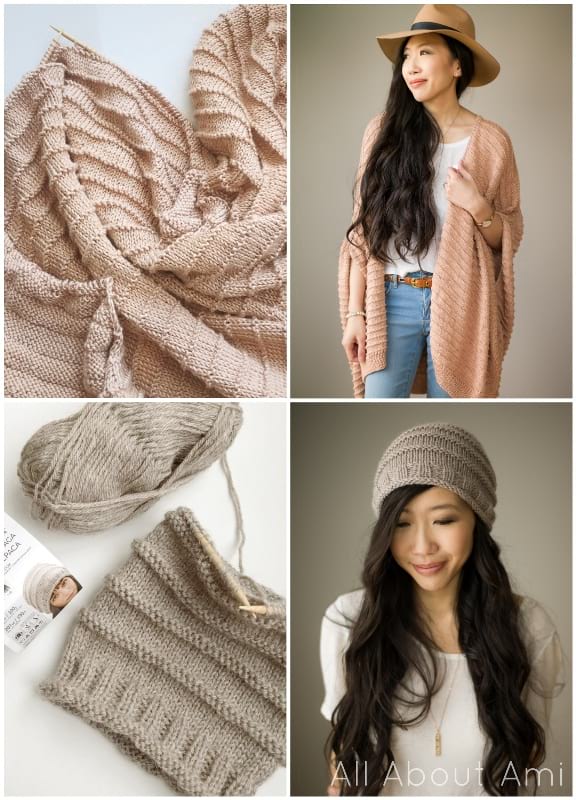
I used the same beautiful stitch pattern that I used for the Dawn Cape and Lima Super Slouch Hat: rows of stockinette interspersed with garter ridges. I love this stitch pattern because you only need to know how to knit and purl, and I love how changing up the order of the rows gives such a beautiful and varied texture. These garter ridges help to segment the design into “chunks” and make it easy to accomplish and get to the next goal (versus an endless sea of stockinette or the same stitch). Working with bulky yarn and 8 mm needles makes this cardigan design go by very quickly as well!
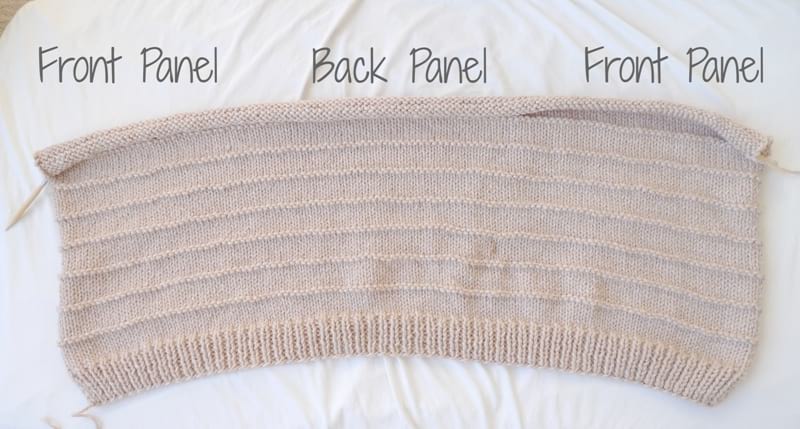
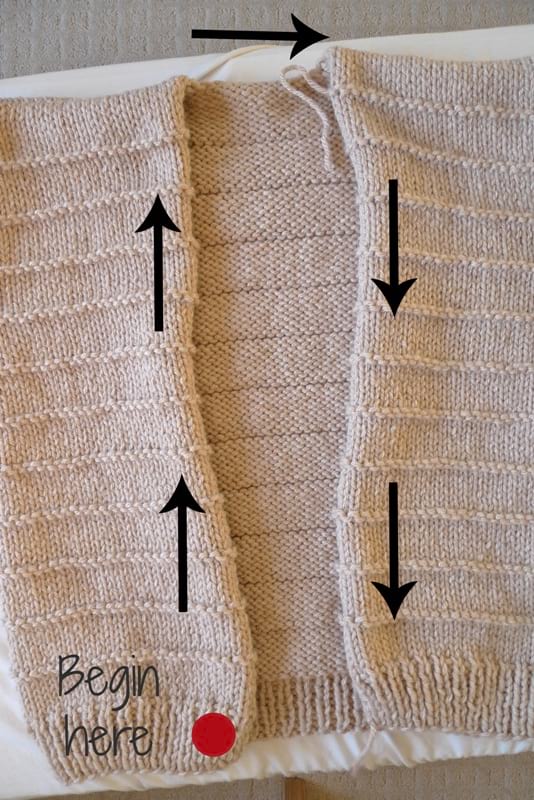
As you can see in the picture below, I casted on the total number of stitches of the back panel plus two front panels rather than knitting them in 3 separate panels. The height shown here is the height of the bottom of the cardigan up to the bottom of the arm hole. At this point, we will now split this piece into three separate pieces (front panel, back panel and front panel) to build up the height of the bottom of the arm hole to the top of the arm hole, or where the shoulder is. We need to do this to create the arm hole. If you want your cardigan to be longer, you would add more height to this section before splitting off into the three separate pieces. I designed the sizing using the popular Dotty Cardigan as my base (same amount of positive ease), so if you knitted the Dotty Cardigan in the past, you can choose the same size you used for the Dotty Cardigan.
To begin, start by building up the height of the far right front panel since this is where we left the yarn. You can put the other stitches on hold as we will not be working with them until later. You can either use scrap yarn or if you have an extra cord, you can begin working on this front panel using the extra cord (as I did in these pictures). It is important to note that we ended off with a wrong side row (odd number row) since we will begin each panel with a right side (even number row). Different arm hole heights need to be created for the various sizes, so be sure to follow the instructions for your particular size.
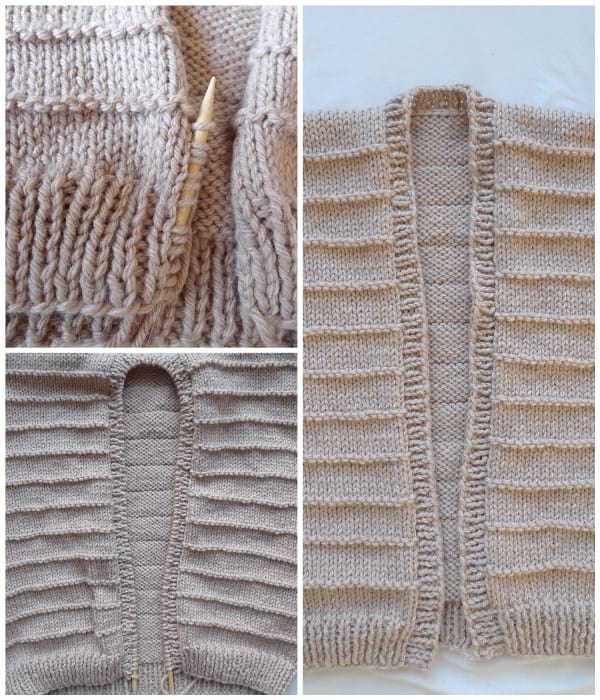
When you are finished the first front panel, you can cut the yarn but leave the stitches on hold (do not cast off these stitches). It is now time to work the second front panel – place the stitches of the other front panel (far left) that were originally on hold onto a cord so that you can begin working with them. Rejoin the yarn at the point indicated by the red circle in the collage below. You will work the exact same pattern that you followed for the first front panel to build up the same height. It is important to note that you should always be ending off on a right side row (even number row) for all 3 panels.
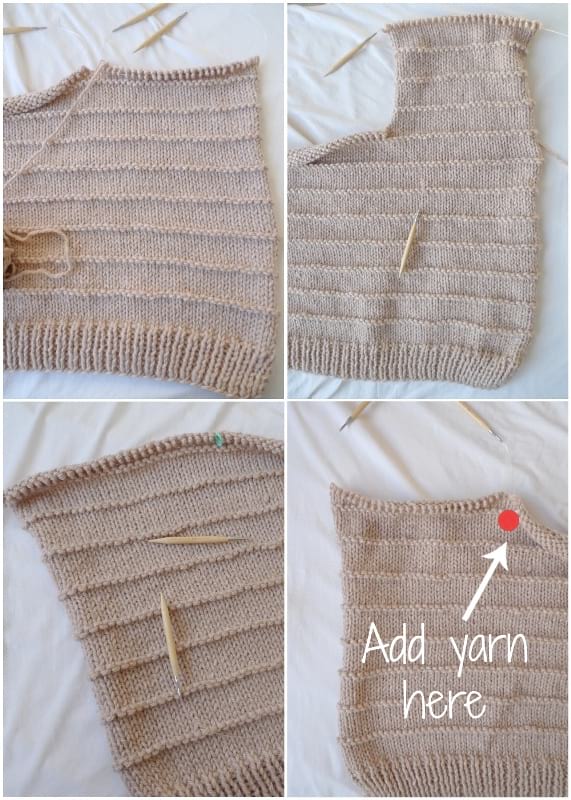
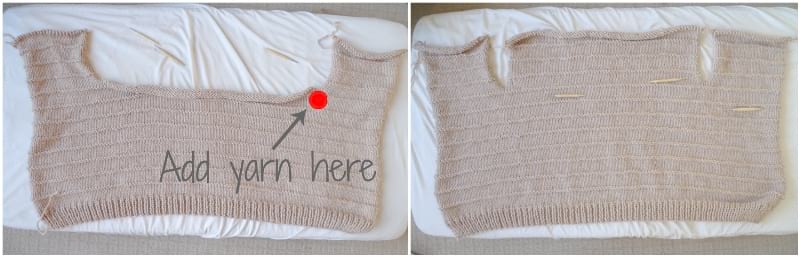
Once the height of both front panels has been worked, it will be time to begin working on the back panel. You will place these middle stitches onto a cord and add the yarn as indicated by the red circle in the picture below. Follow the same pattern to build up the height of the back panel. Once all three heights have been built up, it is now time to cast off the stitches and form the shoulder seams!
Fold each front panel onto the back panel so that the right sides are on the inside touching each other while the wrong sides are facing outwards (there should be a 10 stitch gap in the middle where we will be working the collar). We will be using a neat and handy technique called the 3 Needle Bind-Off to cast off the stitches while attaching these panels together at the same time. You can see how to work the 3 Needles Bind-Off HERE. You will be using the 3 needle bind-off to attach the first front panel to the back panel, then casting off 10 stitches using the regular bind-off, and then using the 3 needle bind-off once again to attach the second front panel to the back panel.
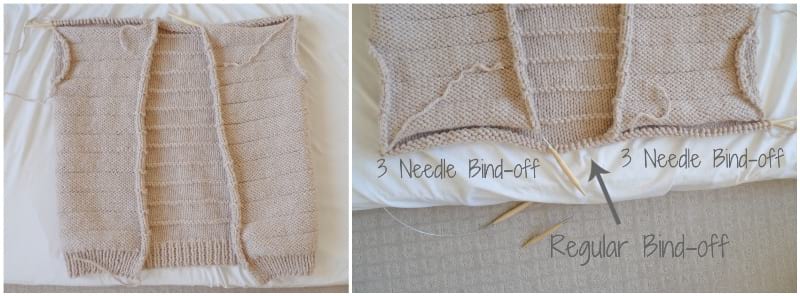
Since we ended each panel height with a right side (even) row, this cast off is happening on the wrong side. This is because the 3 needle bind-off leaves a visible ridge that we want to be seen only on the inside (not the right side). The 3 needle bind-off might feel awkward at first, but soon you will get the hang of it. It is so satisfying completing these steps all at once and you will love the sturdy seam that is created at the shoulders as the stitches perfectly line up. Once you have completed the bind-off, you can flip your piece right side out again and admire the strong and lovely seam at the shoulders!
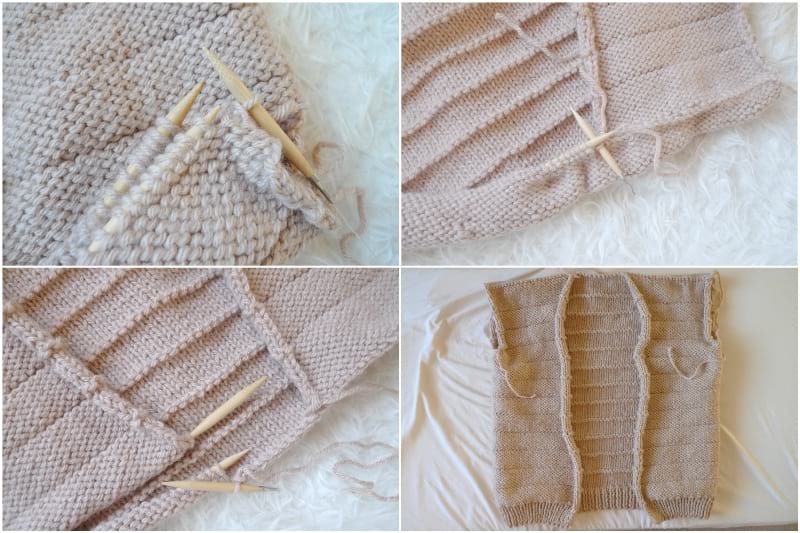
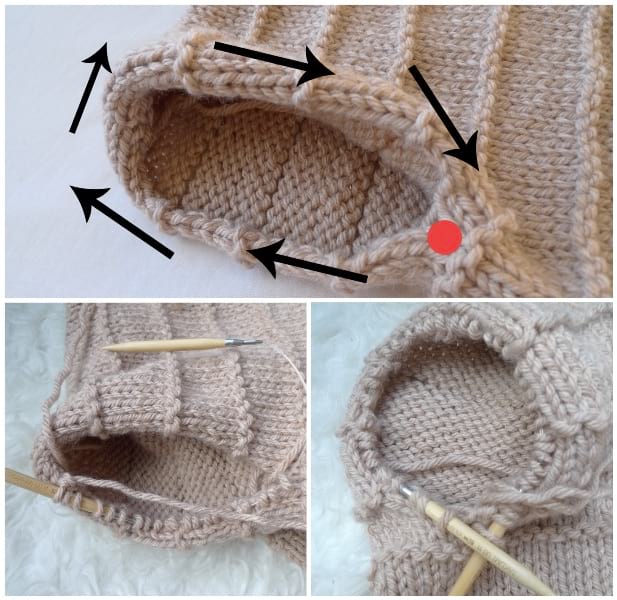
Next, it is time to pick up stitches for the collar. Begin at the bottom left corner as indicated by the red circle and pick up 3 out of every 4 stitches along the front panel, across the back panel (pick up every stitch for the back panel portion), and down the front panel. You can reference this video HERE to see how to do this.
Adding a ribbed collar gives such a polished look and helps to prevent the edges from curling too much. I added a thin ribbed collar, but you can choose how wide you want your ribbing to be. Keep in mind that how wide your collar is will effect how much your panels are pushed outwards as they bend past your shoulders to become the sleeves.
Once you are finished the ribbed collar, it is time to pick up stitches around the arm hole to begin the sleeves! Begin picking up stitches at the bottom of the arm hole as indicated by the red circle using your 8 mm 16″ cord. Work in a clockwise motion to pick up the number of stitches as indicated by your size. Note that we will now be working in continuous rounds for the sleeves using the 16″ cord. You can use a stitch marker to help indicate the end of the round and to help you keep track. It is so fun and addictive working in continuous rounds! We are following the same pattern for the sleeves: stockinette rows interspersed with garter ridges. It is also important to note that your gauge when knitting in turned rows is different compared to knitting in continuous rounds (since you do not need to do the purl stitches on the alternating rounds). I had to frog my work a couple of times and alter my number of sleeve stitches when designing this piece as it is different compared to if I were knitting the sleeves flat and then seaming them in later on.
With this construction method, you can try on your cardigan as you go to see how you are liking the sleeve shape and length and adjust as necessary. Towards the bottom of the sleeve, you will work two decrease rounds that form a beautiful cinched/ruched effect. These two decrease rounds occur right before the ribbing, so if you want to make your sleeves longer, you can add more rounds before working these decrease rounds.
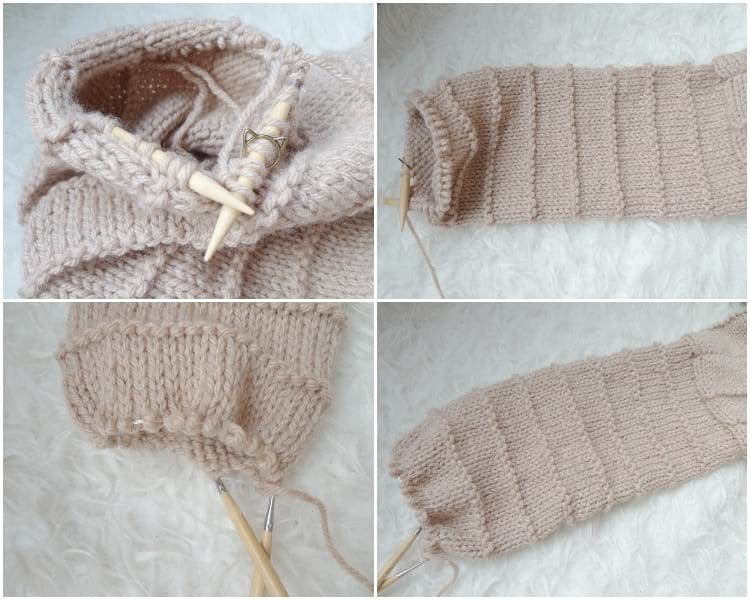
To get a more cinched ribbed cuff, I switched to 6.5 mm needles (if you want a looser cuff, you can continue using the 8 mm needles). It is tricky using the 16″ cord when you have fewer stitches, but it is still possible to methodically rotate your stitches around the cord and work them. However, you can also switch to a longer cord to use the magic circle method or switch to DPN’s if you own them. I love the shape of the sleeve at the bottom as it tapers towards the ribbed cuff!

When you are finished knitting the cardigan, you can steam block it to smooth out the stitches and relax the fibers! Isn’t this seamless construction so neat? You do not need to seam any panels or sleeves together with a yarn needle, and it is so fun building upon each section to knit your own gorgeous cardigan!
***Please watch this VIDEO below! I tried to take process videos along the way while I was knitting the Ridgeline Cardigan! Here are some important timestamps:
0:33 Splitting off into 3 sections
3:06 Three needle bind off at shoulder seams
5:40 Picking up collar stitches
6:33 Picking up sleeves around armhole
8:25 Trying on the cardigan with one sleeve (see how you are liking the sleeve length)
9:25 Ribbed band (sleeve cuff) on 16” circular needles
11:02 Closing up the last round of the sleeve
11:55 Steam blocking the cardigan
12:04 Final Ridgeline Cardigan try on
Thank you for reading the step-by-step blog post! Check out the free Ridgeline Cardigan pattern HERE with all the exact numbers and pattern written out for various sizes!