***You can purchase an INEXPENSIVE AD-FREE PDF of the Sea Breeze Sweater pattern on Etsy HERE and on LoveKnitting HERE! This beautifully formatted PDF includes the step-by-step pictures and is a total of 5 pages including the cover page! Lion Brand Yarn has made this sweater into a convenient kit! You can get all the yarn needed with SIX different colour combination options plus a copy of the pattern! Purchase the kit HERE!
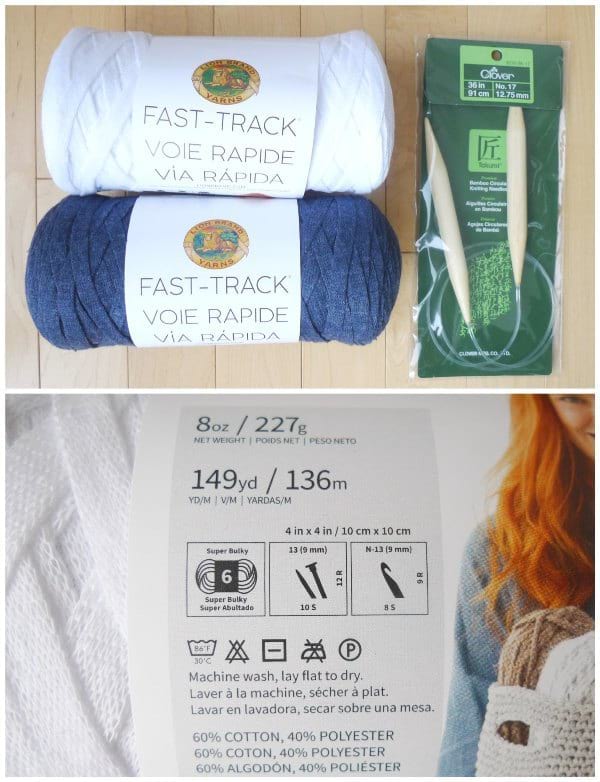
I love how versatile yarn can be as you can make everything from amigurumi to wearable items using the exact same yarn! Last month I showed you my “Snuggle Bunny Pillows” crochet design using Lion Brand Yarn’s new “Fast-Track” yarn, and now I am showing you my new knit design using the exact same yarn! I was inspired to try and knit a clothing item using this versatile t-shirt yarn when I saw Alexandra of Two of Wand‘s beautiful Oxford Cardigan (see free pattern HERE)! I wanted to make a nautical-inspired striped pull-over sweater as I had only previous designed open cardigans before! I used Fast-Track in the colours “Airstream White” and “Dune Buggy Denim” and my 12.75 mm (No. 17) circular Clover Takumi bamboo needles (either 29 or 36 inches would work). As a reminder, Fast-Track is classified as a super bulky (level 6) yarn that is 60% cotton and 40% polyester!
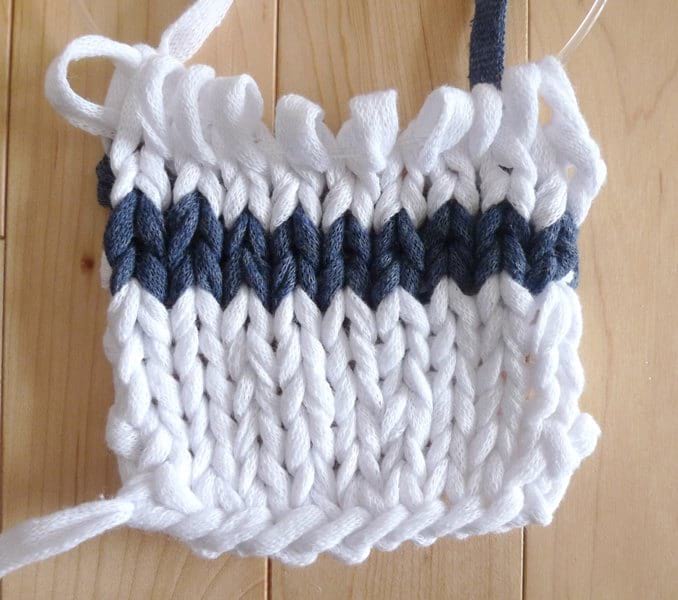
I knitted a test swatch to see how thick I wanted my stripe to be and to see if this needle size was appropriate to get a loose and light effect. I liked how it was looking as the stockinette stitches were so crisp and well-defined! If you are a beginner to knitting, I highly recommend you check out my “How to Knit the Stockinette Stitch” tutorial and video HERE!
If you’d like a refresher on how to knit the stockinette stitch (alternating one row of knit stitches with one row of purl stitches), check out my “How to Knit Stockinette” video below!
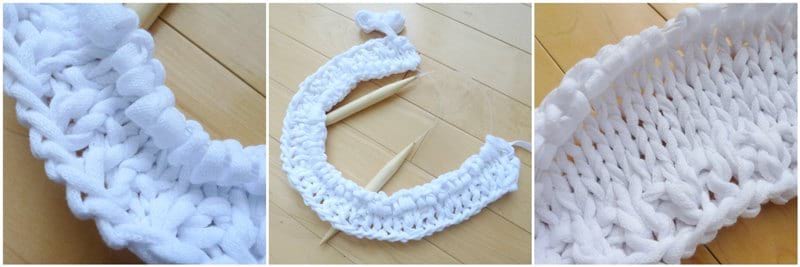
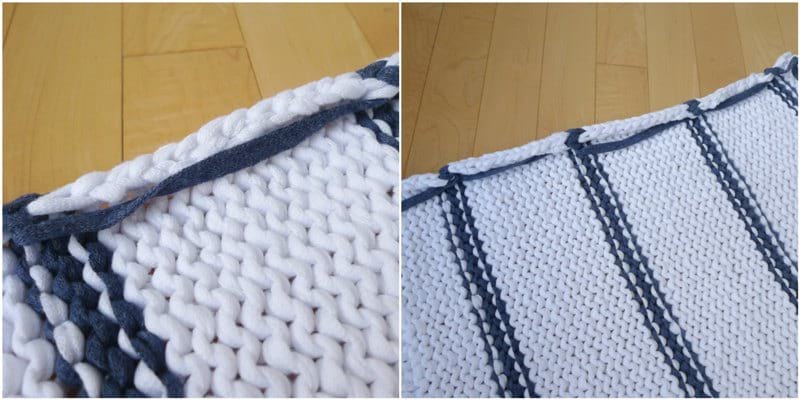
I was ready to start working on the front and back panels of my sweater! I decided to start off with two rows of loose ribbing to prevent the stockinette edges from curling upwards! I then switched to stockinette for the rest of the rows!
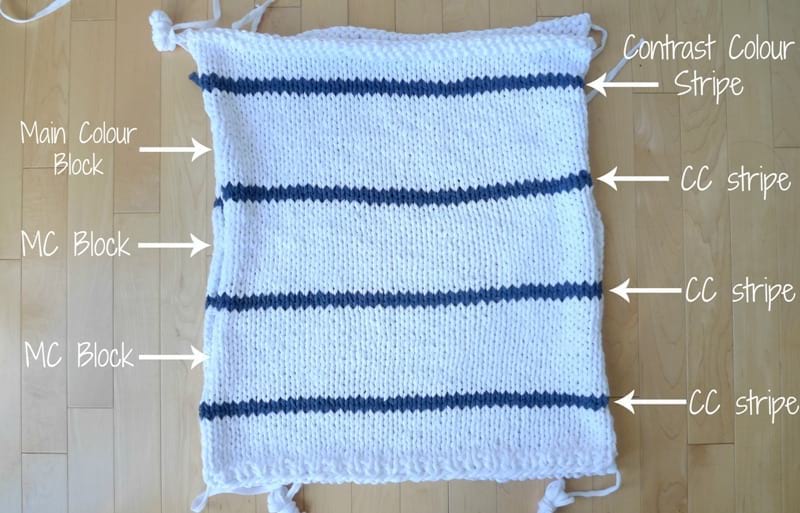
I ended up doing two rows of the contrast colour for each stripe and tried to evenly space out the white rows in between!
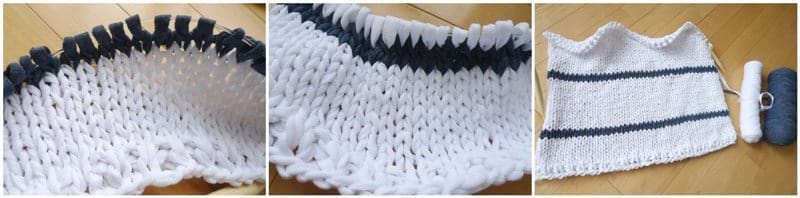
Rather than cutting the yarn each time I switched colours, I simply dropped the unused colour and picked it back up when I needed it. Thus, I let the yarn “float” across the rows as shown below. I made sure to leave enough slack so that the floats would not be too tight, allowing for my sweater to stretch!
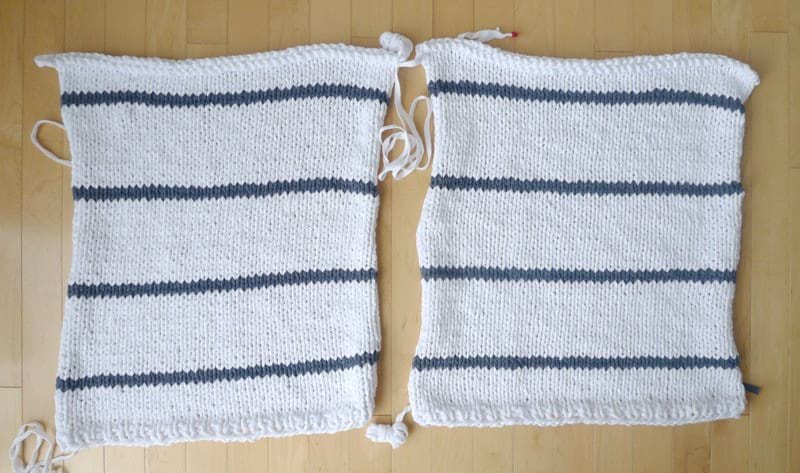
Both front and back panels worked up very quickly since there is no increasing or decreasing at all! They are simply two rectangles!
Next, it was time to figure out the sleeves! I once again began with two rows of ribbing and knitted the rest in stockinette. I slowly started increasing along the side edges towards the top of the sleeve.
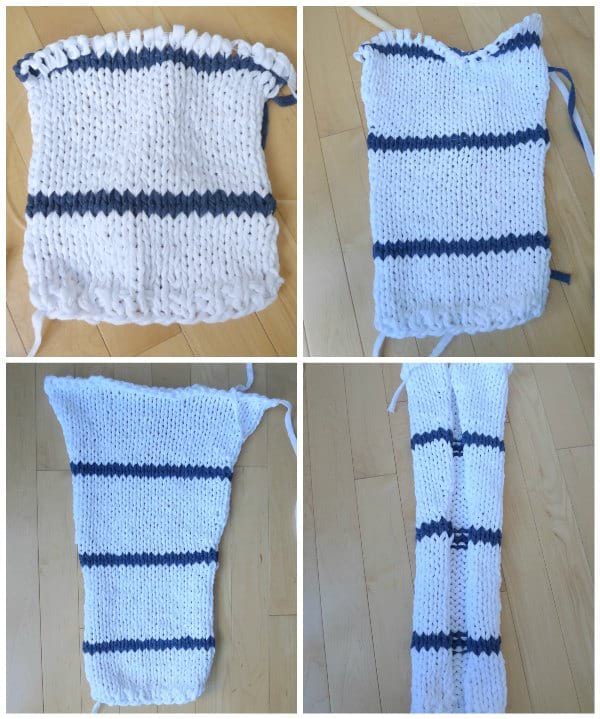
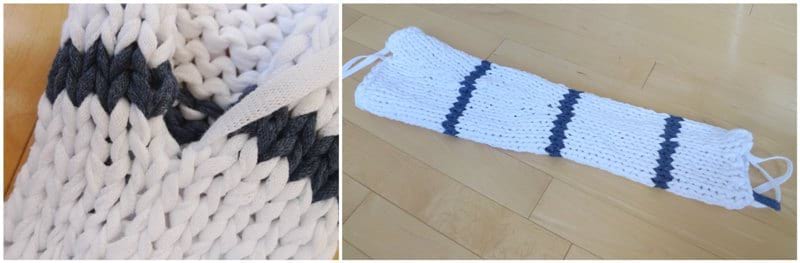
I then used the mattress stitch (see HERE) to seam the sides of the sleeve together. The mattress stitch is a brilliant vertical seaming technique that you must learn if you haven’t so already!
Then it was time to seam the front and back panels together! I placed both panels ontop of one another with the stockinette (correct) sides facing outwards. Once again, I used the mattress stitch to seam up the sides, leaving an arm hole towards the top (where we will attach the sleeve).

I measured the sleeve up against the sides of the front and back panels to see how much space to leave! Next, I flipped my sleeve and panels inside-out and whip stitched (see HERE) the sleeve to the arm hole!
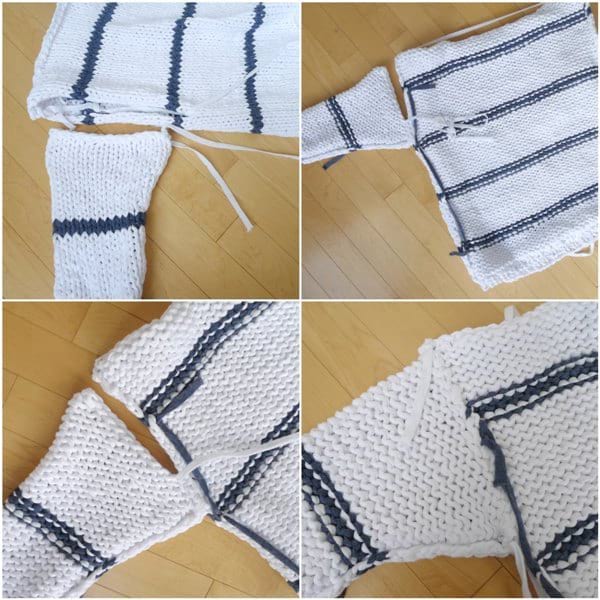
I then whip stitched the top of the panels together (where the shoulders are) and left a neck hole! If you want a more off-the-shoulder look, you could leave a wider neck hole. Note that I tried using some invisible horizontal seaming techniques for the shoulder part and for attaching the sleeves to the panels, but I found that they added too much bulk!
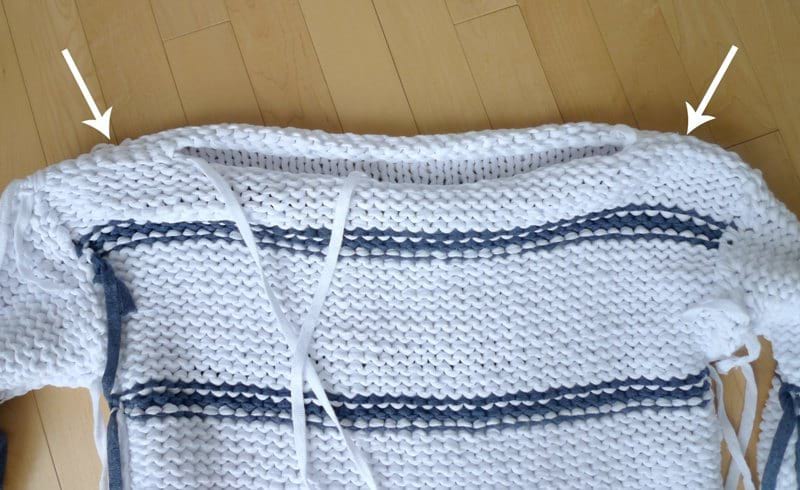
I was sooo excited to try on my new sweater after seaming everything together! I was delighted with the fit and how chic it looked! All that was left was to weave in the ends! I managed to weave in the ends a couple of days before we went on a family trip to California where I was able to sport my brand new design along the beach!
![]()
Everyone was very excited when I posted the above sneak peek to social media, and you helped me name this “Sea Breeze Sweater” as well! I am forever grateful for all your help and support! I am happy to announce that for the very first time, I have tried to figure out different sizes for this garment design! I want to give a big shout-out to Alexandra of Two of Wands for providing me with some guidance and advice!
**********************
Here is the FREE PATTERN for the Sea Breeze Sweater! ***You can purchase an INEXPENSIVE AD-FREE PDF of this pattern on Etsy HERE and on Craftsy HERE! This beautifully formatted PDF includes the step-by-step pictures and is a total of 5 pages including the cover page!
***Lion Brand Yarn has made this sweater into a convenient kit! You can get all the yarn needed with SIX different colour combination options plus a copy of the pattern! Purchase the kit HERE!
![]()
Materials:
- Super bulky yarn (level 6): I used Lion Brand Yarn’s Fast-Track (on the Lion Brand site HERE)
- 3 skeins of the main colour (MC) for Small size; 4 skeins needed for Medium, Large, and Extra Large sizes. I used Fast-Track in “Airstream White”.
- 1 skein of contract colour (CC) – I used Fast-Track in “Dune Buggy Denim”.
- Clover Takumi 29″ or 36″ 12.75 mm circular needles (No 17)
- Yarn needle
Gauge: 8 stitches and 12 rows = 4 inches
Final Measurements:
- Width across back: 19″/48 cm (S), 21″/53 cm (M), 23″/58 cm (L), 25″/63.5 cm (XL)
- Length: 21.5″/55 cm (S), 22.5″/57 cm (M), 23.5″/60 cm(L), 24.5″/62 cm (XL)
- Sleeves: 19″/48 cm
Notes:
- KFB = Knit Front and Back Increase: Step 1: Knit the first stitch on your main needle. Step 2: Before taking the stitch off the main needle, insert the tip of your working needle into the backside of the loop and knit it through the back loop. Then pull the stitch off the needle. See tutorial and video on how to do KFB HERE on New Stitch A Day.
- When switching colours, do not cut the yarn. Simply carry the unused yarn up the side and pick it back up again when it is time to knit with it. Leave enough slack so that the sweater can still stretch.
- Part of the front and back panels become part of the sleeve as they bend past the shoulders.
- I used up ALL 3 skeins of the MC for the small size. If you end up running out of MC yarn when seaming the sweater together, use the CC when using the mattress stitch to seam the sides of front and back panels together and sides of sleeves together.
- Optional: Using contrast colour, knit a small square/rectangle in stockinette and sew onto front of sweater (towards one corner) to be a pocket!
Sizing Notes:
- Increase the width of the top by casting on more stitches
- Increase the length of the top by knitting more rows.
- Each size increases by 2″ (or 4 stitches) in width and 1″ (or 3 rows) in length.
- I am wearing a size Small.
- When increasing the length of the Medium size front and back panels, three additional Main Colour (white) rows are added to the top. If you want the Contrast Colour stripe (blue) to be closer to the top, add one extra MC row to each of the three Main Colour Blocks positioned between the four Contrast Colour stripes.
- When increasing the length of the Large size front and back panels, six additional Main Colour (white) rows are added to the top. If you want the Contrast Colour stripe (blue) to be closer to the top, add two extra MC rows to each of the three MC blocks positioned between the four Contrast Colour stripes.
- The Extra Large size has a fifth Contrast Colour stripe towards the top written in the pattern below.
PATTERN:
Front and back panels (make 2)
Using MC,
Cast on 45 (49, 53, 57) stitches using long tail cast-on (leave ~65″ tail for 45 sts).
Row 1: *Knit 1, Purl 1* till end. (45, 49, 53, 57 sts)
Row 2: *P1, K1* till end.
Row 3: Purl all stitches.
Row 4: Knit all stitches.
Row 5: Purl all stitches.
Rows 6-9: Repeat Rows 4-5
Switch to CC,
Row 10: Knit all stitches.
Row 11: Purl all stitches.
Switch to MC,
Rows 12-25: Repeat Rows 4-5.
Switch to CC,
Row 26: Knit all stitches.
Row 27: Purl all stitches.
Switch to MC,
Rows 28-41: Repeat Rows 4-5.
Switch to CC,
Row 42: Knit all stitches.
Row 43: Purl all stitches.
Switch to MC,
Rows 44-57: Repeat Rows 4-5.
Switch to CC,
Row 58: Knit all stitches.
Row 59: Purl all stitches.
Switch to MC,
Rows 60-67: Repeat Rows 4-5.
Cast off stitches for Small size.
Row 68: Knit all stitches.
Row 69: Purl all stitches.
Row 70: Knit all stitches.
Cast off stitches for Medium size.
Row 71: Purl all stitches.
Row 72: Knit all stitches.
Row 73: Purl all stitches.
Cast off stitches for Large size.
Switch to CC,
Row 74: Knit all stitches.
Row 75: Purl all stitches.
Switch to MC,
Row 76: Knit all stitches.
Cast off stitches for XL size.
Sleeves (make 2)
Using MC,
Cast on 21 (25, 29, 33 sts) using long tail cast-on method (leave ~33″ tail for 21 sts).
Row 1: *K1, P1* till end. (21, 25, 29, 33 sts)
Row 2: *P1, K1* till end.
Row 3: Purl all stitches.
Row 4: Knit all stitches.
Row 5: Purl all stitches.
Row 6-9: Repeat Rows 4-5
Switch to CC,
Row 10: Knit all stitches.
Row 11: Purl all stitches.
Switch to MC,
Rows 12-25: Repeat Rows 4-5.
Switch to CC,
Row 26: Knit all stitches.
Row 27: Purl all stitches.
Switch to MC,
Row 28-29: Repeat Rows 4-5.
Row 30: K1, KFB, K17 (21, 25, 29), KFB, K1. (23, 27, 31, 35 sts)
Row 31: Purl all stitches.
Row 32: Knit all stitches.
Row 33: Purl all stitches.
Row 34: K1, KFB, K19 (23, 27, 31), KFB, K1. (25, 29, 33, 37 sts)
Row 35: Purl all stitches.
Row 36: Knit all stitches.
Row 37: Purl all stitches.
Rows 38-41: Repeat Rows 36-37.
Switch to CC,
Row 42: Knit all stitches.
Row 43: Purl all stitches.
Switch to MC,
Rows 44-45: Repeat Rows 36-37.
Row 46: K1, KFB, K21 (25, 29, 33), KFB, K1. (27, 31, 35, 39 sts)
Row 47: Purl all stitches.
Row 48: Knit all stitches.
Row 49: Purl all stitches.
Rows 50-51: Repeat Rows 48-49.
Row 52: K1, KFB, K23 (27, 31, 35), KFB, K1. (29, 33, 37, 41 sts)
Row 53: Purl all stitches.
Row 54: Knit all stitches.
Rows 55-58: Repeat Rows 53-54.
Cast off stitches and leave long end for seaming.
Dimensions: 19″ in length, 8″ across at cuff, 13.5″ at widest point for Small.
Assembly:
- Fold each sleeve in half lengthwise and use mattress stitch to seam sides together.
- Use mattress stitch to seam sides of front and back panels together. Place sleeve towards top of panels to see how much space is needed for arm holes. Seam approximately 14.5″ along sides and leave an arm hole for where we will attach the sleeves.
- Whip stitch top of front and back panels together approximately 5.5″-8.5″ depending on size on each side to leave space for neck/head hole (you can also use the horizontal invisible seaming technique but it adds bulk).
- Whip stitch top of sleeve to arm hole.
- Fasten off and weave in all ends.
**************************************
After our Disneyland days in California, we took a stroll along the Santa Monica Pier marking the end of Route 66! It was breezy by the ocean, and the perfect backdrop for my “Sea Breeze Sweater“!
![]()
Since this sweater is not made of wool, it is cool to the touch and I did not overheat at all! Some have asked if this sweater is very heavy since Fast-Track is a super bulky cotton/polyester blend. It is heavier than other sweaters, but I do not find it too heavy to wear at all.
![]()
We took some pictures under the pier as well! Thank you so much for helping me name the “Sea Breeze Sweater“! It perfectly captures that nautical, sea side spirit that this sweater evokes!
![]()
This is the perfect sweater to pull over during those summer nights or when the breeze picks up along the ocean. I imagine that many of you will have amazing opportunities to wear this classic sweater as summer approaches on your travels, visits to the beach, or soirées with friends!
![]()
The girls always ask me what I’m making when they see me crochet or knit. It was cute seeing Myla’s face light up when I tried on my sweater for the first time as I proudly showed her my finished design! The girls loved playing with their dolls in the sand in Santa Monica!
![]()
The Sea Breeze Sweater is a beginner-friendly design that has such a classic look to it! For those who are venturing into knitting or thinking of dabbling with making their first garment, I hope you have been inspired! I would love to see your finished Sea Breeze Sweaters and see what colour combinations you come up with: use the hashtag #seabreezesweater on social media for us to see! Don’t forget to sign up to my NEWSLETTER to get my latest designs and blog posts straight to your inbox HERE! Thank you for reading and following along on both my crocheting and knitting journey, everyone!
![]()
{This post is sponsored by Lion Brand Yarn! I’ve loved working with their yarn throughout the years and I’m thrilled that I get to collaborate with them every month!}
This pattern is an original pattern by Stephanie Lau of All About Ami. Please do not claim this pattern as your own. If you wish to share this pattern, you may link to this pattern but please do not reprint it on your site. You may keep a copy for your own personal use but please DO NOT sell the pattern or distribute it.
You may sell products made from this pattern but please clearly credit the design to me, Stephanie Lau of All About Ami, and provide a link to my blog www.AllAboutAmi.com. Permission is NOT granted for mass production or factory manufacturing of any kind. Thank you for being respectful and for your understanding!