***You can purchase an INEXPENSIVE AD-FREE PDF of this pattern on Etsy HERE and on LoveCrafts HERE! This beautifully formatted PDF includes the step-by-step pictures and is a total of 8 pages including the cover page. The Lion Brand Yarn kit HERE includes the pattern and all the Coboo yarn needed to make this cardigan (4 different colour options available)!
***The step-by-step tutorial with plenty of photos can be found HERE!
***Join the Rosewood Cardigan Crochet-Along HERE! Add this design to your Ravelry queue HERE!
The Rosewood Cardigan is a relaxed, long and slouchy cardigan that you can wear every single day! This wardrobe staple is made with lightweight cotton/bamboo yarn that drapes beautifully. This cardigan has cozy pockets and a gorgeous collar, and is perfect for beginners since it uses the simple single crochet!
Materials:
- 3.5, 4, and 6 mm mm Clover Amour hooks
- Coboo Yarn– level 3 DK lightweight yarn (see below for yardage) – 50% cotton/50% rayon from bamboo; I used the colour “Mauve” – purchase the convenient KIT HERE that contains all the yarn you need!
- Yarn needle
- Lock Ring Stitch Markers
- Cork garment tag by Brickbubble (optional)
Gauge: 23 sts and 19 rows = 4″ (single crochet worked in FLO)
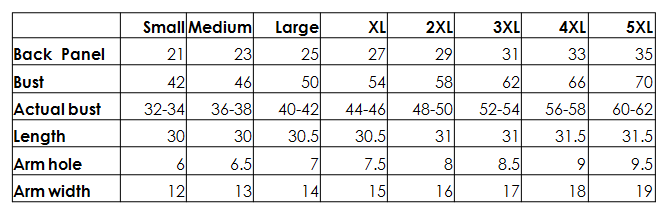
Final Measurements (in inches):
Approximate Yardage/Number of Skeins Required:
Small: 8 skeins, ~800 g/1856 yards (I would purchase 9 skeins to be on the safe side since I entirely used up that 8th skein)
Medium: 9 skeins, ~880 g/2035 yards
Large: 10 skeins, ~960 g/2230yards
Extra Large: 11 skeins, ~1040 g/2410yards
2XL: 12 skeins, ~1140 g/2640yards
3XL: 13 skeins, ~1230 g/2850 yards
4XL: 14 skeins, ~1330 g/3085 yards
5XL: 15 skeins, ~11420 g/3300 yards
Notes:
- This cardigan primarily uses single crochets worked in the front loop only (FLO). Each stitch is composed of a front loop and a back loop (looks like a V together). The front loop is the loop closest to you, while the back loop is the loop farthest from you. The delicate edgings along the bottom, sleeves, and collar are created by working slip stitches in either the front or back loops only.
- One back panel and two front panels are crocheted from the bottom up by single crocheting in the front loops only. They are seamed together at the top and sides, leaving space for the arm holes.
- Stitches are picked up along the bottom of the back and front panels with a smaller crochet hook to help cinch in the bottom with slip stitches. The bottom edging adds about 0.25″.
- The sleeves are worked from the bottom up, whip stitched along the edge, and then attached to the arm holes.
- The only increases are worked during the sleeves. Please note that an increase is worked as described below and results in the addition of two stitches (e.g. from 45 to 47, or 47 to 49). The increases are worked in the second and second to last stitches of the increase row.
- INCREASE ROW: {all in FRONT LOOPS ONLY} Chain 1, turn. Starting in second st from hook, sc 1. Work 2 sc in next st. Sc across until two stitches remain. Work 2 sc in next st. Sc in last stitch.
- Stitches are picked up along the bottom of the sleeves with a larger crochet hook to provide a simple slip stitch edging. Slip stitches can get very tight, so a larger crochet hook with looser gauge is used to ensure the stitches are not too tight.
- Stitches are picked up along the collar with a larger crochet hook to provide a beautiful slip stitch edging. Add more rows of slip stitches if a thicker collar is desired (as written, collar is about 1.75″ wide).
- Two optional pockets are crocheted and attached to each front panel.
- When seaming pieces together, always join wrong sides together using the whip stitch to make the seams less visible, then flip inside out at the end.
Sizing Notes:
- This drop sleeve cardigan is relaxed and slouchy. If you would like your cardigan to be more fitted, move down a size. If you would like your cardigan to be even more oversized, move up a size.
- It is designed with 8-10″ of positive ease.
- Part of the front and back panels become part of the sleeve as they bend past the shoulders. The sleeve length remains the same for all sizes, but the increased width in the front and back panels help lengthen the sleeves of the larger sizes. The width of the sleeve varies by size. If you would like to lengthen the sleeves, add more rows to the last section (keep adding rows beyond Rows 66-72).
- If you would like the cardigan to be wider, increase the initial number of chains for the front and back panels. If you would like the cardigan to be narrower, decrease the number of initial chains for the front and back panels.
- If you would like the cardigan to be longer, increase the number of rows for the back and front panels. If you would like the cardigan to be shorter, decrease the number of rows for the back and front panels.
- I am wearing a size Small, and I am 5’6 for height reference.
- This pattern is written for the following sizes (I would recommend highlighting or circling the numbers for your size throughout the pattern): Small (Medium, Large, XL)(2XL, 3XL, 4XL, 5XL). Please note that for the stitch counts at the end of each row, the sizes are listed as follows (small is first size after bracket): (Small, Medium, Large, XL)(2XL, 3XL, 4XL, 5XL).
- Cuff and roll up the sleeves of this cardigan for a more relaxed, laid-back look.
PATTERN
- Back Panel
Using 4 mm hook, chain 122 (134, 145, 157)(168, 180, 191, 203)
Row 1: Starting in second chain from hook, sc across. (121, 133, 144, 156)(167, 179, 190, 202)
Row 2: Chain 1, turn. Starting in second st from hook, sc in front loops only. (121, 133, 144, 156)(167, 179, 190, 202)
R3-145: Repeat Row 2.
For Sizes Small and Medium, fasten off and leave long end for sewing.
R146-147: Repeat Row 2.
For Sizes Large and XL, fasten off and leave long end for sewing.
R148-150: Repeat Row 2.
For Sizes 2XL and 3XL, fasten off and leave long end for sewing.
R151-152: Repeat Row 2.
For Sizes 4XL and 5XL, fasten off and leave long end for sewing.
- Front Panels (make 2)
Using 4 mm hook, chain 46 (52, 58, 63)(69, 75, 81, 86)
Row 1: Starting in second chain from hook, sc across. (45, 51, 57, 62)(68, 74, 80, 85)
Row 2: Chain 1, turn. Starting in second st from hook, sc in front loops only. (45, 51, 57, 62)(68, 74, 80, 85)
R3-145: Repeat Row 2.
For Sizes Small and Medium, fasten off and leave long end for sewing.
R146-147: Repeat Row 2.
For Sizes Large and XL, fasten off and leave long end for sewing.
R148-150: Repeat Row 2.
For Sizes 2XL and 3XL, fasten off and leave long end for sewing.
R151-152: Repeat Row 2.
For Sizes 4XL and 5XL, fasten off and leave long end for sewing.
Whip stitch tops of front panels to back panel, going through both front and back loops. Whip stitch sides of front panels to back panel, making sure to leave an arm hole.
Fasten off and leave long end for sewing.
- Bottom Edging
We will now be picking up stitches along the bottom of the front and back panels to cinch it in and to create a delicate edging.
Using 3.5 mm hook,
Row 1: While holding the piece upside down with front panels facing you, start in left corner (where opening is) and pick up 211 sts (235, 258, 280)(303, 327, 350, 372) in the back loops only, going along one front panel, the back panel, and then the other front panel. To do so, make a slip knot. Insert your crochet hook into the back loop of the stitch. Add the slip knot and pull through. Yarn over and chain 1. Insert your hook into the back loop of the next st, yarn over, pull through the work and loop on hook, creating a slip stitch. Keep repeating this process to pick up stitches along the bottom. (211, 235, 258, 280)(303, 327, 350, 372)
Row 2: Chain 1, turn. Slip stitch in FLO across. (211, 235, 258, 280)(303, 327, 350, 372)
Fasten off and weave in end.
- Sleeves (make 2)
Using 4 mm hook, chain 46 (52, 58, 63)(69, 75, 81, 86) and leave long initial end for seaming sleeve.
Row 1: Starting in second chain from hook, sc across (45, 51, 57, 62)(68, 74, 80, 85)
Row 2: Chain 1, turn. Starting in second st from hook, sc in front loops only. (45, 51, 57, 62)(68, 74, 80, 85)
R3-8: Repeat Row 2.
R9: INCREASE ROW (47, 53, 59, 64)(70, 76, 82, 87)
R10-12: Chain 1, turn. Starting in second st from hook, sc in FLO. (47, 53, 59, 64)(70, 76, 82, 87)
R13: INCREASE ROW (49, 55, 61, 66)(72, 78, 84, 89)
R14-16: Chain 1, turn. Starting in second st from hook, sc in FLO. (49, 55, 61, 66)(72, 78, 84, 89)
R17: INCREASE ROW (51, 57, 63, 68)(74, 80, 86, 91)
R18-20: Chain 1, turn. Starting in second st from hook, sc in FLO. (51, 57, 63, 68)(74, 80, 86, 91)
R21: INCREASE ROW (53, 59, 65, 70)(76, 82, 88, 93)
R22-24: Chain 1, turn. Starting in second st from hook, sc in FLO. (53, 59, 65, 70)(76, 82, 88, 93)
R25: INCREASE ROW (55, 61, 67, 72)(78, 84, 90, 95)
R26-34: Chain 1, turn. Starting in second st from hook, sc in FLO. (55, 61, 67, 72)(78, 84, 90, 95)
R35: INCREASE ROW (57, 63, 69, 74)(80, 86, 92, 97)
R36-38: Chain 1, turn. Starting in second st from hook, sc in FLO. (57, 63, 69, 74)(80, 86, 92, 97)
R39: INCREASE ROW (59, 65, 71, 76)(82, 88, 94, 99)
R40-44: Chain 1, turn. Starting in second st from hook, sc in FLO. (59, 65, 71, 76)(82, 88, 94, 99)
R45: INCREASE ROW (61, 67, 73, 78)(84, 90, 96, 101)
R46-48: Chain 1, turn. Starting in second st from hook, sc in FLO. (61, 67, 73, 78)(84, 90, 96, 101)
R49: INCREASE ROW (63, 69, 75, 80)(86, 92, 98, 103)
R50-52: Chain 1, turn. Starting in second st from hook, sc in FLO. (63, 69, 75, 80)(86, 92, 98, 103)
R53: INCREASE ROW (65, 71, 77, 82)(88, 94, 100, 105)
R54-56: Chain 1, turn. Starting in second st from hook, sc in FLO. (65, 71, 77, 82)(88, 94, 100, 105)
R57: INCREASE ROW (67, 73, 79, 84)(90, 96, 102, 107)
R58-60: Chain 1, turn. Starting in second st from hook, sc in FLO. (67, 73, 79, 84)(90, 96, 102, 107)
R61: INCREASE ROW (69, 75, 81, 86)(92, 98, 104, 109)
R62-64: Chain 1, turn. Starting in second st from hook, sc in FLO. (69, 75, 81, 86)(92, 98, 104, 109)
R65: INCREASE ROW (71, 77, 83, 88)(94, 100, 106, 111)
R66-72: Chain 1, turn. Starting in second st from hook, sc in FLO. (71, 77, 83, 88)(94, 100, 106, 111)
Fasten off and leave long end for sewing.
Fold each sleeve in half lengthwise and whip stitch sides together. Whip stitch tops of of sleeves to arm holes. We will now add a delicate sleeve edging.
Watch this video below to see me demonstrating: how to single crochet in the front loops only (FLO), how to whip stitch the sleeve edges together, and how to whip stitch the sleeve to the arm hole!
- Sleeve Edging
We will now be picking up stitches along the opening of the sleeve and working in rounds.
Using 6 mm hook,
Round 1: Starting at stitch near the seam, pick up 45 slip stitches (51, 57, 62)(68, 74, 80, 85). To do so, make a slip knot. Insert your crochet hook into both loops of a stitch near the seam. Add the slip knot and pull through. Yarn over and chain 1. Insert your hook into both loops of the next st, yarn over, pull through the work and loop on hook, creating a slip stitch. Keep repeating this process to pick up 45 slip stitches around opening. (45, 51, 57, 62)(68, 74, 80, 85).
Round 2: Slip stitch in back loops only around. (45, 51, 57, 62)(68, 74, 80, 85).
Fasten off and weave in ends.
- Collar
We will now be picking up stitches along the length of the first front panel, across the back panel, and down the length of the other front panel to create a beautiful collar.
Using 6 mm hook,
Row 1: Starting in bottom left corner, pick up slip stitches around. To do so, make a slip knot. Insert your crochet hook the bottom left corner, add the slip knot, and pull through. Yarn over and chain 1. Insert your hook into an adjacent space, yarn over, pull through the work and loop on hook, creating a slip stitch. Keep repeating this process to pick up stitches along the collar. {For the Size Small, I picked up approximately 145 + 31 + 145 sts = 321 sts (# of front panel rows + gap between front panels along back panel + # of front panel rows). Medium = 321 sts, Large = 325 sts, XL = 325 sts, 2XL = 331 sts, 3XL = 331 sts, 4 XL = 335 sts, and 5XL = 335 sts)}
Row 2: Chain 1, turn. Slip stitch in FLO across.
Row 3-17: Repeat R2.
Fasten off and weave in ends.
- POCKETS (make 2)
Using 4 mm hook, chain 26.
Row 1: Starting in second chain from hook, sc across. (25)
Row 2: Chain 1, turn. Starting in second st from hook, sc in front loops only. (25)
R3-17: Repeat Row 2.
R18: Chain 1, turn. Slip stitch in FLO. (25)
R19-21: Repeat R18.
Fasten off and leave long end for sewing.
You can increase the size of the pockets for the larger sizes – place your pockets on your front panels to see how they look proportionally and adjust as necessary (add more stitches to the initial chains to increase the width of the pocket and add more rows to increase the length of the pocket).
Place one pocket on each front panel and use running stitch to attach both sides and bottom into place. For my size small, I placed the pocket approximately 3.75″ from the bottom edge and 3.25″ from the side edge/collar.
*************************
The Rosewood Cardigan is such a sophisticated and versatile cardigan with its delicate stitches, beautiful drape, and gorgeous collar. It looks so chic when you cuff the sleeves and roll them up a bit!
I love the length of this cardigan as you can wear it over jeans, leggings, dresses, any outfit you want!
Coboo feels so soft against the skin and is the perfect yarn for this lightweight cardigan. It is a great option for those who are allergic to wool or who live in warmer climates since it is made of cotton and bamboo. A stylish cardigan like this can be worn year-round and brought on your travels as well! For those who work in offices with chilly air conditioning, you can whip up this cardigan and sport a handmade garment to work too!
I reached out to my readers to give some ideas on what to name this beautiful cardigan! Two readers mentioned “Rosewood” and I love how romantic and rustic it sounds – it provides a wonderful contrast to the city names of “Uptown, Midtown, and Downtown”, my knitted cardigans! It also gives a subtle nod to the colour of the cardigan, and there are some places in my hometown that are named Rosewood. What a perfect name! The Rosewood Cardigan is the crocheted version of the Uptown Cardigan, which uses the same lovely Coboo Yarn. To view the knitted version, please click HERE!
I thought that this design could be a fun Crochet-Along (CAL) project that we could work on together! I know some of you have been looking for the perfect crochet cardigan, and others want to attempt their very first garment. The Rosewood Cardigan is beginner-friendly since it uses only basic stitches such as single crochets and slip stitches. You can join the Rosewood Crochet-Along Facebook group HERE which will begin on Monday, October 14th. Purchase the convenient kit HERE on the Lion Brand Yarn website to get all your yarn ready! I hope you love this sophisticated cardigan and get a lot of wear out of it – you will be so proud wearing such a beautiful garment that you made with your own hands!
{This post is sponsored by Lion Brand Yarn! I’ve loved working with their yarn throughout the years and I’m thrilled that I get to collaborate with them every month!}
This pattern is an original pattern by Stephanie Lau of All About Ami. Please do not claim this pattern as your own. If you wish to share this pattern, you may link to this pattern but please do not reprint it on your site. You may keep a copy for your own personal use but please DO NOT sell the pattern or distribute it.
You may sell products made from this pattern but please clearly credit the design to me, Stephanie Lau of All About Ami, and provide a link to my blog www.AllAboutAmi.com. Permission is NOT granted for mass production or factory manufacturing of any kind. Thank you for being respectful and for your understanding!