***You can purchase an AD-FREE PDF of this pattern on Etsy HERE! This beautifully formatted PDF includes the step-by-step pictures and is a total of 9 pages including the cover page! It is important that you follow along with my STEP-BY-STEP BLOG POST HERE to see more detailed photos and the step-by-step making of this cardigan! The Lion Brand Yarn kit HERE includes the pattern and all the gorgeous Truboo yarn needed to make this cape!
The stunning Dusk Cape is a statement piece with its beautiful ridged texture and gorgeous drape! This cape features tapered shoulders, a delicate ribbed collar and ribbed arm openings. You will love working with soft Truboo yarn that is silky to the touch with a lovely sheen. The Dusk Cape is the perfect layering piece over all your outfits!
Materials:
- Truboo Yarn– level 3 DK lightweight yarn (see below for yardage) – 100% rayon from bamboo; I used the colour “Silver” – purchase the convenient KIT HERE that contains all the yarn you need!
- 2.75, 3.5 and 6 mm crochet hooks
- Yarn needle
- Lock ring stitch markers
Gauge: 22 sts and 17.5 rows = 4” (in alternating rows of half double crochet and slip stitch in BLO)
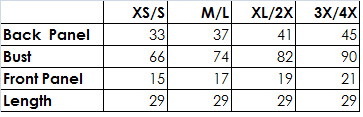
Final Measurements (in inches):
Approximate Yardage/Number of Skeins Required:
Extra Small/Small: 9 skeins, ~850 grams/2050 yds
Medium/Large: 10 skeins, ~960 grams/2310 yds
XL/2XL: 11 skeins, ~1065 grams/2570 yds
3X/4X: 12 skeins, ~1170 grams/2825 yds
Notes:
- One back panel and two front panels are crocheted from the bottom up, starting with the ribbing.
- The ribbing is crocheted in turned rows using the half double crochet slip stitch back loop only (HDC-SL-BLO). Each turned row increases the length of the ribbing, which equates to the width of the panels. The height of the ribbing is approximately 1.5”, and approximately 10 rows = 2.5”.
- After achieving the desired length, slip stitches are picked up along the ribbing to begin building up the height of the panels.
- The front and back panels are crocheted using alternating rows of half double crochets and slip stitches in the BLO. The slip stitch rows provide a ridged texture to this garment. Try to work loosely when crocheting the slip stitch rows, otherwise they can get too tight.
- I like to use a stitch marker to indicate where the first slip stitch of the row was worked so that you know where to work your last half double crochet on the subsequent row.
- The panels are shaped with decreases along the sides towards the top to provide some shaping for the shoulders/arm openings. The decreases are stacked closely together to create a ruched/cinched effect.
- The front and back panels are seamed together using the whip stitch at the top (shoulders) and along the sides, leaving a hole for the arm openings.
- Stitches are picked up along the collar and arm openings and a delicate ribbing is worked.
Sizing Notes:
- This cape is loose, relaxed and slouchy. Keep in mind that the Truboo will stretch with repeated wear and gravity as well. 4 sizes are provided in this pattern, with each size differing by 4” in the back panel.
- If you would like a more fitted look, you can size down, and if you want a more oversized look, you can size up.
- I am 5’6 and wearing the size XS/S for reference. If you would like the cape to be smaller, decrease the rows of ribbing and the number of stitches you pick up for the panels (you can adjust by any number since the shoulder shaping decreases are worked towards either the end or beginning of the rows and is unaffected by the beginning number). If you would like the cape to be wider, increase the rows of ribbing and the number of stitches you pick up for the panels.
- If you would like the cape to be longer, increase the number of rows for the back and front panels. If you would like the cape to be shorter, decrease the number of rows for the back and front panels. You can decrease the number of rows by any amount; just remember to decrease/increase by the same number for the front and back panels. The decreases are worked over 22 rows (11 decrease rows with slip stitch rows in between) or 5”, so keep that in mind when choosing your length (e.g. if you want your final length to be 25”, work the pattern until you have reached 20” (25” – 5”) and then begin the decrease portion).
- This pattern is written for the following sizes (I would recommend highlighting or circling the numbers for your size throughout the pattern): XS/S, M/L, XL/2X, 3X/4X.
Decrease Rows Notes:
- For the left front panel (when you are looking at the cape), the decreases will be towards the end of the row. This is the DECREASE ROW for the left front panel: {Chain 1, turn. Hdc in first st and in each st across until 9 sts remain. *Hdc dec*, rep 4 times. Hdc in last st.} Each decrease row reduces the stitch count by 4 stitches.
- For the right front panel, the decreases will be worked towards the beginning of the row. This is the DECREASE ROW for the right front panel: {Chain 1, turn. Hdc in first st. *Hdc dec*, rep 4 times. Hdc in each st across.} Each decrease row reduces the stitch count by 4 stitches.
- For the back panel, we will be decreasing on either end to mirror the decreases of the front panels. This is the DECREASE ROW for the back panel: {Chain 1, turn. Hdc in first st. *Hdc dec*, rep 4 times. Hdc in each st across until 9 sts remain. *Hdc dec*, rep 4 times. Hdc in last st.}. Each decrease row reduces the stitch count by 8 stitches. • All the decrease rows are always worked on the hdc rows/right side of the project (i.e. never the slip stitch rows). Each front panel and back panel has 11 decrease rows in total.
Abbreviations:
- HDC-SL-BLO (half double crochet – slip stitch – back loop only): YO (yarn over), insert your hook into back loop of next st. Yarn over, pull up a loop, pull same loop just created directly through remaining 2 loops.
- Hdc dec (half double crochet decrease): Yarn over, insert crochet hook into next stitch. Yarn over and pull up a loop (3 sts on hook). Yarn over and insert crochet hook into next st. YO and pull up a loop (5 sts left). Yarn over one last time and pull through all remaining loops on hook.
***Please reference my detailed step-by-step blog post HERE to see pictures of the back and front panels, decreases, collar ribbing and sleeve ribbing. If you would like to see a video demonstration of the stitches used in the Dusk Cape, please scroll to the end of the pattern and view the video!
PATTERN
- Back Panel
We will begin with the ribbing.
Using 2.75 mm hook,
Chain 11
Row 1: Starting in second st from hook, hdc across. (10)
Row 2: Chain 1, turn. Starting in second st from hook, HDC-SL-BLO across. (10)
Row 3 – onwards: Keep repeating Row 2 until desired length is achieved.
Final length for different sizes should be: XS/S = 33” (~132rows), M/L = 37” (~148 rows), XL/2X = 41” (~164 rows), 3X/4X = 45” (~180 rows).
Ribbing is now complete – do not cut the yarn! We will now pick up slip stitches across the length of the ribbing and begin building up the body of the panel.
Using 3.5 mm hook,
Row 1: Chain 1 (does not count as a stitch in the final count) and pick up 182 (204, 226, 248) stitches across the top edge of the ribbing. To do so, insert your crochet hook into next space. Yarn over, pull through the work and loop on the hook, creating a slip stitch. Keep repeating this process. (Tip: Use stitch markers to divide the ribbing into 2, 4, or 6 chunks so you know how many stitches you should have in approximately each chunk.) If you find it too difficult to pick up the exact number of stitches, you can also crochet the body of the panel separately and whip stitch the ribbing to the panel at the end.
R2: Chain 1, turn. Starting in second st from hook, slip stitch in each st across. (182, 204, 226, 248)
R3: (right side): Chain 1, turn. Starting in second st from hook, hdc across. (182, 204, 226, 248)
R4: (wrong side): Chain 1, turn. Starting in second st from hook, slip stitch in back loops only across. (182, 204, 226, 248)
We will now continue repeating R3 and R4 to build up the body of the panel before we begin the decrease portion (decrease the number of rows if you want your panels to be shorter).
R5-104: Repeat R3-R4.
We will now begin the decrease portion of the panel. Each decrease row decreases the stitch count by 8 stitches, and we will work 11 decrease rows. Each right side row (odd number) will be a decrease row for the rest of the panel.
R105: WORK DECREASE ROW. (174, 196, 218, 240)
R106: Chain 1, turn. Starting in second st from hook, slip stitch in back loops only across. (174, 196, 218, 240)
R107: WORK DECREASE ROW. (166, 188, 210, 232)
R108: Chain 1, turn. Starting in second st from hook, slip stitch in back loops only across. (166, 188, 210, 232)
R109: WORK DECREASE ROW. (158, 180, 202, 224)
R110: Chain 1, turn. Starting in second st from hook, slip stitch in back loops only across. (158, 180, 202, 224)
R111: WORK DECREASE ROW. (150, 172, 194, 216)
R112: Chain 1, turn. Starting in second st from hook, slip stitch in back loops only across. (150, 172, 194, 216)
R113: WORK DECREASE ROW. (142, 164, 186, 208)
R114: Chain 1, turn. Starting in second st from hook, slip stitch in back loops only across. (142, 164, 186, 208)
R115: WORK DECREASE ROW. (134, 156, 178, 200)
R116: Chain 1, turn. Starting in second st from hook, slip stitch in back loops only across. (134, 156, 178, 200)
R117: WORK DECREASE ROW. (126, 148, 170, 192)
R118: Chain 1, turn. Starting in second st from hook, slip stitch in back loops only across. (126, 148, 170, 192)
R119: WORK DECREASE ROW. (118, 140, 162, 184)
R120: Chain 1, turn. Starting in second st from hook, slip stitch in back loops only across. (118, 140, 162, 184)
R121: WORK DECREASE ROW. (110, 132, 154, 176)
R122: Chain 1, turn. Starting in second st from hook, slip stitch in back loops only across. (110, 132, 154, 176)
R123: WORK DECREASE ROW. (102, 124, 146, 168)
R124: Chain 1, turn. Starting in second st from hook, slip stitch in back loops only across. (102, 124, 146, 168)
R125: WORK DECREASE ROW. (94, 116, 138, 160)
Fasten off and leave long end for sewing.
- Left and Right Front Panels
We will begin with the ribbing.
Using 2.75 mm hook,
Chain 11
Row 1: Starting in second st from hook, HDC-SL-BLO across. (10)
Row 2: Chain 1, turn. Starting in second st from hook, HDC-SL-BLO across. (10)
Row 3 – onwards: Keep repeating Row 2 until desired length is achieved.
Final length for different sizes should be: XS/S = 15” (~60 rows), M/L = 17” (~68 rows), XL-2X = 19” (~76 rows), 3X-4X = 21” (~84 rows).
Ribbing is now complete – do not cut the yarn! We will now pick up slip stitches across the length of the ribbing and begin building up the body of the panel.
Using 3.5 mm hook,
Row 1: Chain 1 (does not count as a stitch in the final count) and pick up 82 (93, 104, 115) stitches across the top edge of the ribbing. To do so, insert your crochet hook into next space. Yarn over, pull through the work and loop on the hook, creating a slip stitch. Keep repeating this process. (Tip: Use stitch markers to divide the ribbing into 2, 4, or 6 chunks so you know how many stitches you should have in approximately each chunk.) If you find it too difficult to pick up the exact number of stitches, you can also crochet the body of the panel separately and whip stitch the ribbing to the panel at the end.
R2: Chain 1, turn. Starting in second st from hook, slip stitch in each st across. (82, 93, 104, 115)
R3: (right side): Chain 1, turn. Starting in second st from hook, hdc across. (82, 93, 104, 115)
R4: (wrong side): Chain 1, turn. Starting in second st from hook, slip stitch in back loops only across. (82, 93, 104, 115)
We will now continue repeating R3 and R4 to build up the body of the panel before we begin the decrease portion (decrease the number of rows if you want your panels to be shorter).
R5-104: Repeat R3-R4.
We will now begin the decrease portion of the panel. Please note the differences in the decrease rows between the Left and Right front panels. Each decrease row decreases the stitch count by 4 stitches, and we will work 11 decrease rows. Each right side row (odd number) will be a decrease row.
R105: WORK DECREASE ROW. (78, 89, 100, 111)
R106: Chain 1, turn. Starting in second st from hook, slip stitch in back loops only across. (78, 89, 100, 111)
R107: WORK DECREASE ROW. (74, 85, 96, 107)
R108: Chain 1, turn. Starting in second st from hook, slip stitch in back loops only across. (74, 85, 96, 107)
R109: WORK DECREASE ROW. (70, 81, 92, 103)
R110: Chain 1, turn. Starting in second st from hook, slip stitch in back loops only across. (70, 81, 92, 103)
R111: WORK DECREASE ROW. (66, 77, 88, 99)
R112: Chain 1, turn. Starting in second st from hook, slip stitch in back loops only across. (66, 77, 88, 99)
R113: WORK DECREASE ROW. (62, 73, 84, 95)
R114: Chain 1, turn. Starting in second st from hook, slip stitch in back loops only across. (62, 73, 84, 95)
R115: WORK DECREASE ROW. (58, 69, 80, 91)
R116: Chain 1, turn. Starting in second st from hook, slip stitch in back loops only across. (58, 69, 80, 91)
R117: WORK DECREASE ROW. (54, 65, 76, 87)
R118: Chain 1, turn. Starting in second st from hook, slip stitch in back loops only across. (54, 65, 76, 87)
R119: WORK DECREASE ROW. (50, 61, 72, 83)
R120: Chain 1, turn. Starting in second st from hook, slip stitch in back loops only across. (50, 61, 72, 83)
R121: WORK DECREASE ROW. (46, 57, 68, 79)
R122: Chain 1, turn. Starting in second st from hook, slip stitch in back loops only across. (46, 57, 68, 79)
R123: WORK DECREASE ROW. (42, 53, 64, 75)
R124: Chain 1, turn. Starting in second st from hook, slip stitch in back loops only across. (42, 53, 64, 75)
R125: WORK DECREASE ROW. (38, 49, 60, 71)
Fasten off and leave long end for sewing.
- Assembly:
Place the front panels onto the back panel, ensuring that the decreases line up accordingly (there should be an 18 stitch gap in the middle of the back panel). Use stitch markers to help hold the pieces in place if desired. Whip stitch tops of front panels to back panel (go through both front and back loops of flat section at top, and line up the slip stitch ridges for the slanted decrease section to make it easier to attach). Whenever using the whip stitch, seam the wrong sides together so that the seam is less visible on the right side. Whip stitch the sides of the front panels to the back panel, making sure to leave an arm hole of your desired size (I left a 9.5” gap). Use the slip stitch ridges as a reference point when seaming the panels together to ensure they are lining up correctly.
- Collar Ribbing:
We will now be picking up stitches along the length of the first front panel, across the back panel, and down the length of the other front panel to create a beautiful collar.
Using 6 mm hook (you can use a smaller hook for the first round if you find it too tight),
Row 1: Starting in bottom left corner, pick up slip stitches around. To do so, make a slip knot. Insert your crochet hook the bottom left corner, add the slip knot, and pull through. Yarn over and chain 1. Insert your hook into an adjacent space, yarn over, pull through the work and loop on hook, creating a slip stitch. Keep repeating this process to pick up stitches along the collar. Try to pick up 2 slip stitches for every two rows (1 hdc row and 1 slip stitch row of panels). Approximate number of stitches picked up should be: Bottom ribbing stitches (10 + 10) + Number of rows (125 + 125) + 18 stitch gap = 288 stitches.
Row 2: Chain 1, turn. Slip stitch in FLO across.
Row 3-7: Repeat R2.
Fasten off and weave in ends.
- Arm Opening Edge:
We will now be picking up stitches around the arm opening to create a delicate ribbing.
Using 6 mm hook (you can use a smaller hook for the first round if you find it too tight),
Round 1: Starting in bottom of arm opening, pick up slip stitches around arm hole. To do so, make a slip knot. Insert your crochet hook into the bottom of arm opening, add the slip knot, and pull through. Yarn over and chain 1. Insert your hook into an adjacent space, yarn over, pull through the work and loop on hook, creating a slip stitch. Keep repeating this process to pick up stitches around the arm hole.
Round 2: Slip stitch in back loops only (keep working in a continuous spiral/continuous rounds).
Round 3: Repeat R2.
Fasten off and weave in ends.
If you would like a VIDEO DEMONSTRATION of the stitches used in the Dusk Cape, please watch this video below. I demonstrate how to crochet: the HDC-SL-BLO, slip stitches in the back loop only, half double crochets, and the half double crochet decrease!
****************************
How chic and stylish is this Dusk Cape? I love how you can throw it over any outfit as it is such a beautiful layering piece!
The drape of Truboo yarn is absolutely stunning as you can see how the material cascades downwards and hangs. It is lightweight and cool to the touch so that you do not overheat when wearing this cape.
I love including designs details such as the dainty ribbing, gentle tapering at the shoulders, and subtle ruching at the arm openings. The half double crochet decreases form such a beautiful and unique design!
I hope you enjoy crocheting your own Dusk Capes and building up your handmade wardrobes! It is so rewarding being able to wear your own clothes that you made, and a garment like this is so versatile since you can wear it over all your outfits in the warm weather. You can find the convenient Lion Brand Yarn kit HERE and if you are interested in the knit version, please check out the free knit pattern HERE! Happy crocheting, everyone, and thank you for your support!

{This post is sponsored by Lion Brand Yarn! I’ve loved working with their yarn throughout the years and I’m thrilled that I get to collaborate with them every month!}
This pattern is an original pattern by Stephanie Lau of All About Ami. Please do not claim this pattern as your own. If you wish to share this pattern, you may link to this pattern but please do not reprint it on your site. You may keep a copy for your own personal use but please DO NOT sell the pattern or distribute it.
You may sell products made from this pattern but please clearly credit the design to me, Stephanie Lau of All About Ami, and provide a link to my blog www.AllAboutAmi.com. Permission is NOT granted for mass production or factory manufacturing of any kind. Thank you for being respectful and for your understanding!