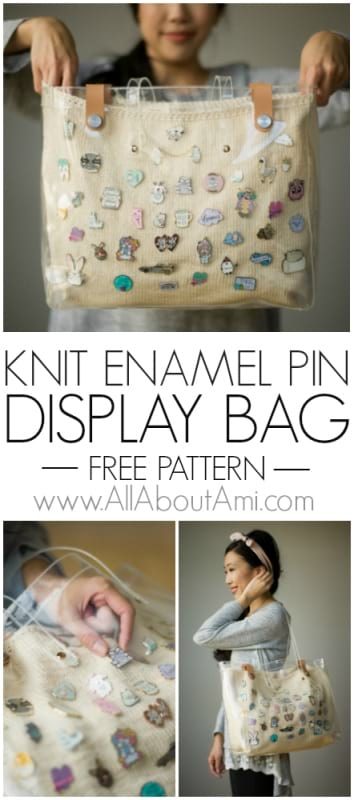
Over the past while I have been eagerly collecting some small items that have greatly risen in popularity: enamel pins. Hard enamel pins are high quality and scratch-resistant, and they are a wonderful way to customize jackets, backpacks, hats, and bags. Many independent designers create their own enamel pins (I will introduce you to many of my favorites later on in this blog post) and you can show off your love of tv shows, movies, hobbies, or books with the many enamel pins available. As I began collecting them, I thought of various ways of how I could display my growing collection. I saw display boards and hanging canvas banners, but I preferred something portable that I could take around to show others my pin collection. However, I heard stories of people losing their pins in transit on the airplane or just out and about if their pins were displayed on project bags. One morning, I woke up with a brilliant idea of how to display my enamel pins by knitting a bag with special modifications! Read on to see how I designed my one-of-a-kind Knit Enamel Pin Display Bag!
I used one of my favorite yarns, 24/7 Cotton by Lion Brand Yarn which is a worsted weight mercerized cotton with great durability and a beautiful sheen. I used the colourway “Ecru” which you may recognize as the same beautiful cream shade that I used for my crocheted Star Stitch Purse HERE! To begin, I knitted a flat rectangle worked in turned rows using stockinette stitch (alternating rows of knit and purl). You can see that it is rolling quite a bit due to the inherent nature of stockinette to curl. This rectangle forms the base/bottom of my bag.
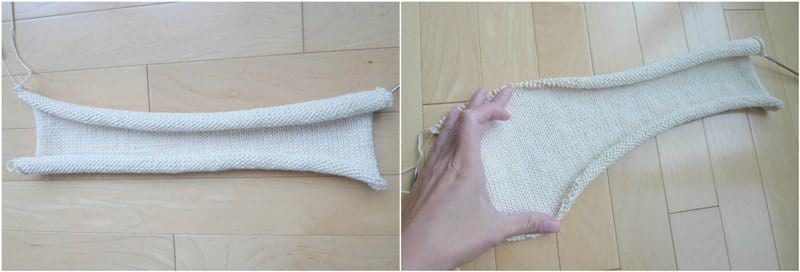
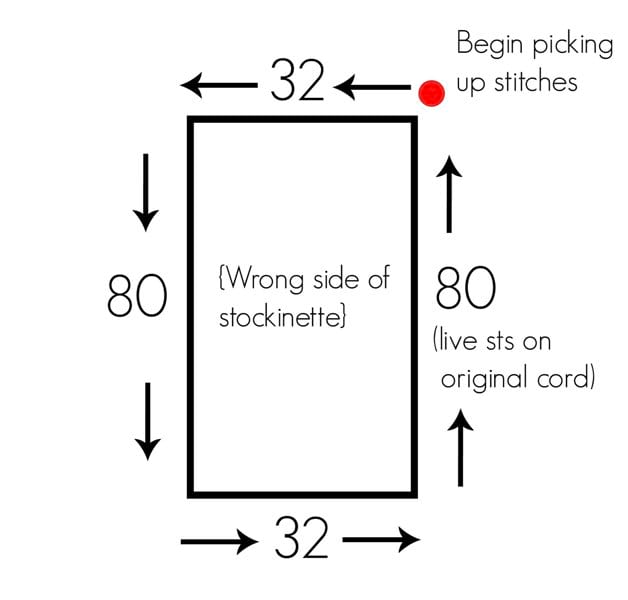
When I was happy with the size of my rectangle, I did not cast off the stitches. Instead, I began picking up stitches around the entire perimeter of the rectangle with a longer cord, and when I reached the length that was still on the original cord, I simply knit these live stitches onto my long cord. Once all the stitches were on my long cord, I could then begin knitting the body of the bag!
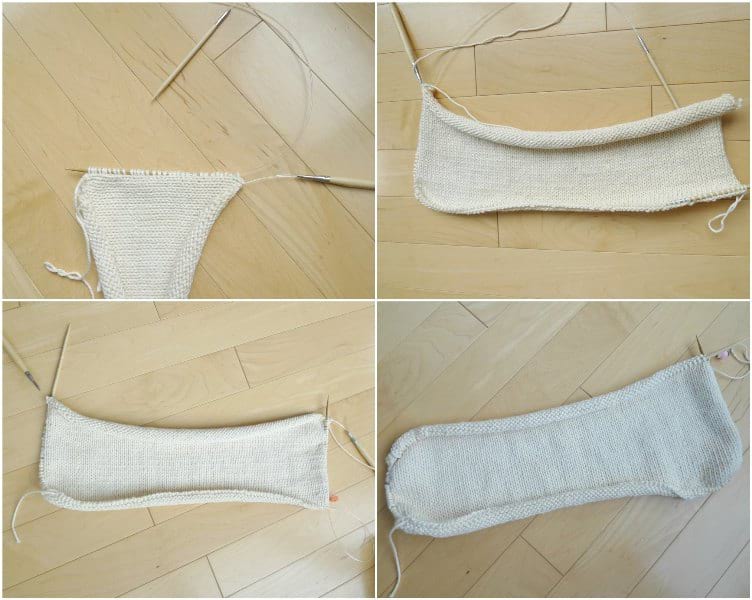
To knit the body of the bag, I worked in continuous rounds. Working knit stitches in continuous rounds results in the stockinette stitch! This part was a breeze to go through since knitting stockinette in the round is one of my favorite, most relaxing stitches of all time . I worked on these rounds in the car and while watching television! As you can see in the pictures below, I used point protectors whenever I was not knitting this bag as the stitches would fly off the cord if I did not put a stopper on each end as I fully maximized the cord with stitches!
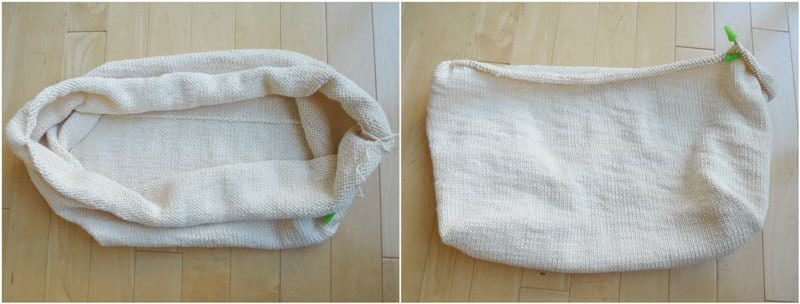
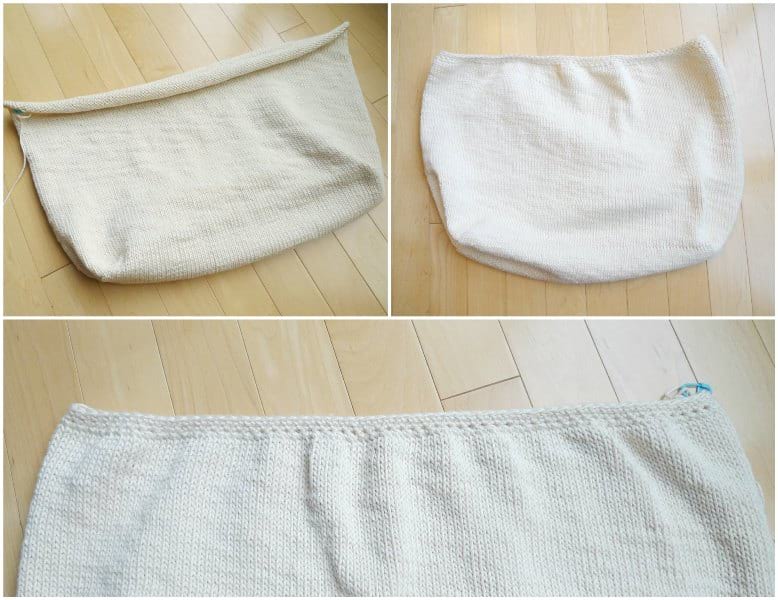
Once I was happy with the height of my bag, I casted off the stitches. However, you can see in the picture below that the top of the bag was curling and rolling downwards immensely. To remedy this, I added a beautiful crochet edging along the top that decreased the number of stitches. I was so happy when the top part stopped rolling downwards! The crochet edging adds a decorative touch and also gives the bag an almost ruched look towards the top as you can see in the pictures below.
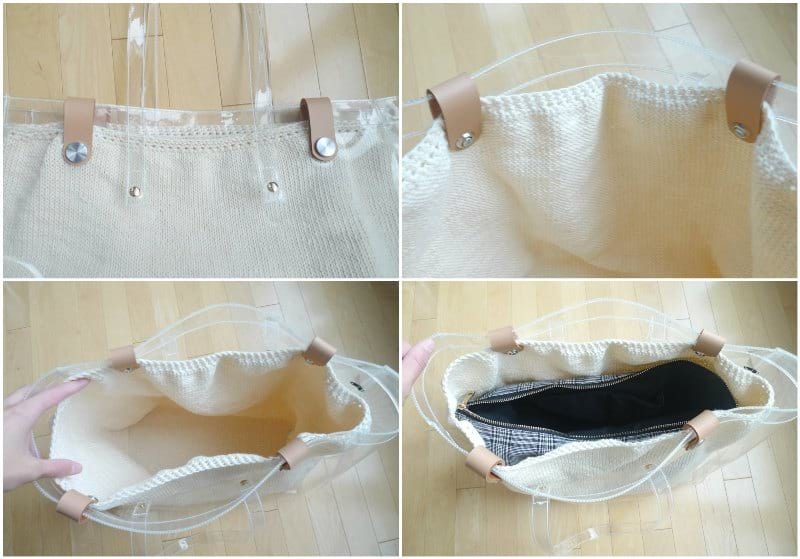
Clear plastic bags have been very popular as I had seen various versions in stores around the mall. My idea for my enamel pin display bag was to find a clear bag of an appropriate size and then knit an inner lining for it! That way, I could display my pins on the knit bag, but the pins would be protected within the clear bag and still be visible! Even if the pins were to somehow fall off the knitted bag, they would fall safely into the clear bag- brilliant, right? We scoured the internet and stores in the mall for appropriate bags, and I found this perfect one at Forever 21! This tote bag is a roomy size, and it even came with this black and white inner zipper pouch to hold your items. Thus, once I found this clear bag, I sized my knitted bag to fit perfectly inside!
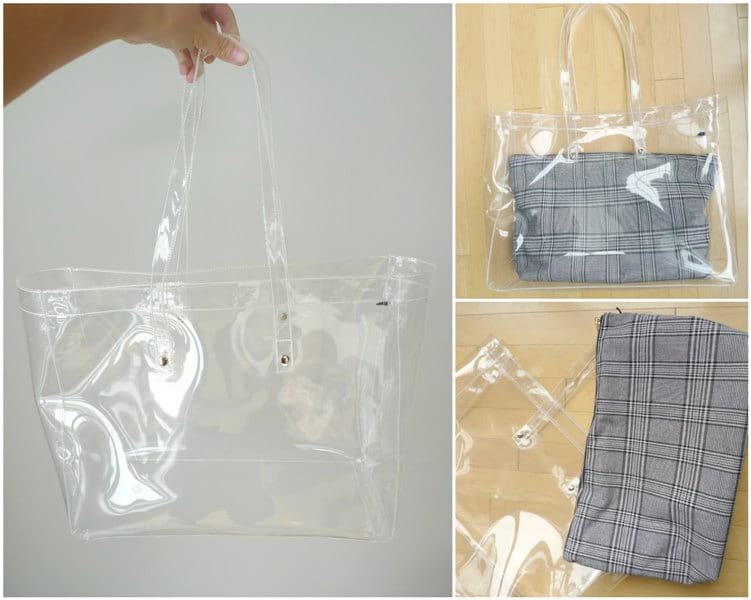
Ryan modified the plastic bag by creating two circles on either side (the arrows show where he added them since they are difficult to see).
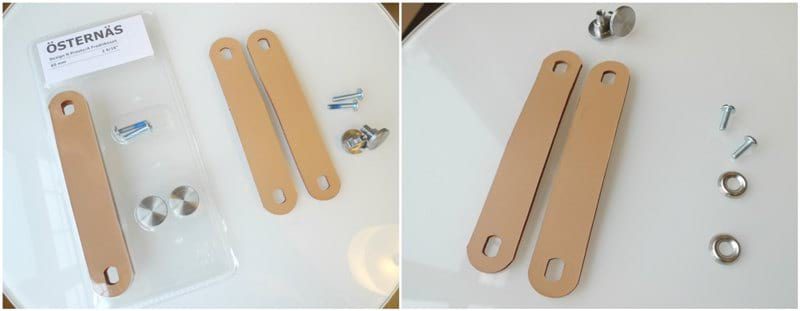
We found these beautiful Osternas leather handles from IKEA and found appropriate washers and screws that would not jut out too much.
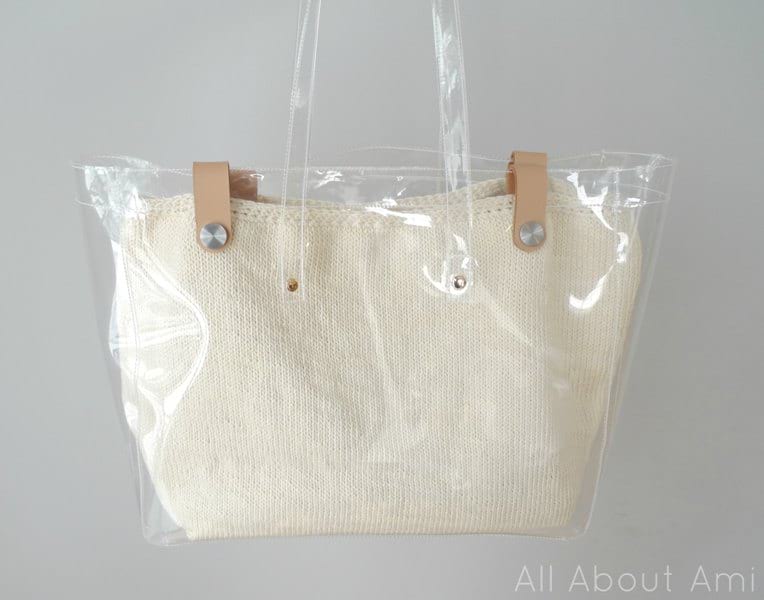
I placed my knitted bag into the clear bag, and Ryan secured it into place with the leather handles, screws, and washers. This way, the knitted bag does not slump down and remains securely in place.
Here are some various angles of my bag! The inner zipper pouch is very handy since it protects my hands and purse contents from the backings of the enamel pins.
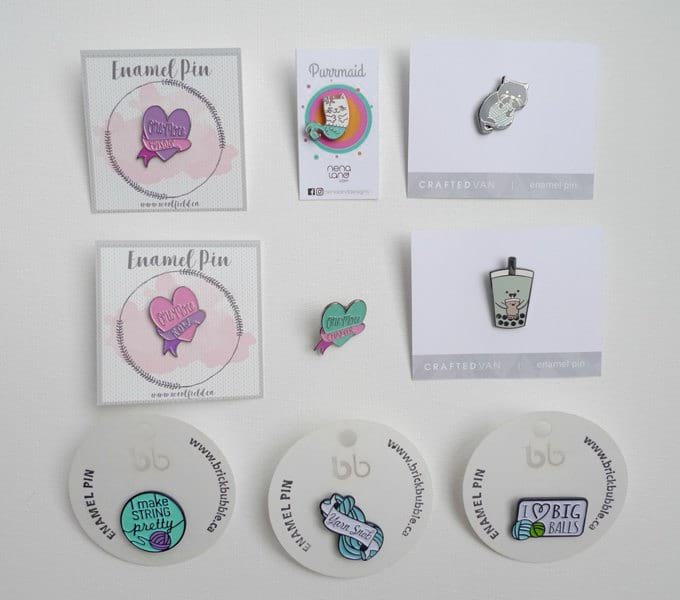
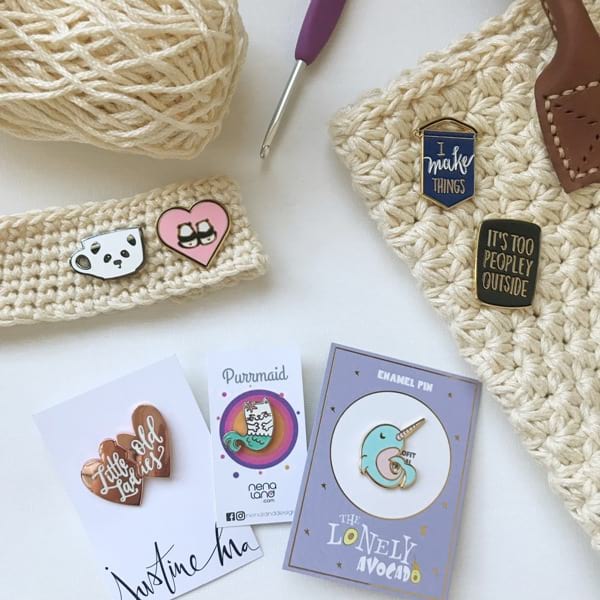
After completing my purse came the exciting part: adding all my enamel pins! Let me walk you through some of the designs that I collected from designers both locally and worldwide! The “One More Row/Episode/Chapter” pins were some of the very first that I got, and they were gifted to me by Nicole from Woolfield Studio in Calgary! Diane of Brickbubble gifted me the yarn-related pins on the bottom (“I Make String Pretty”, “Yarn Snob” and “I Heart Big Balls”). The Kitty Eating Yarn and Bubble Tea pins are by CraftedVan in Vancouver, and I got the Purrmaid pin from a local artist named Nenaland in Edmonton!
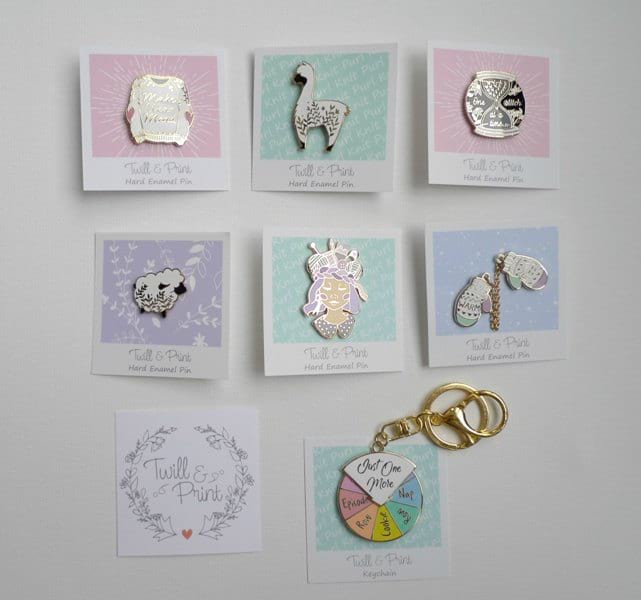
One of my favorite pin designers is Tiffany of Twill & Print in Montreal! She creates absolutely beautiful, high quality pins for yarn/knit/crochet lovers. Below you can see her Make Wear Mend Sweater, Alpaca, One Stitch at a Time, Sheep, Crafty Queen, Warm & Fuzzy Mittens, and the Just One More keychain. Check out all her designs in her Etsy shop HERE!
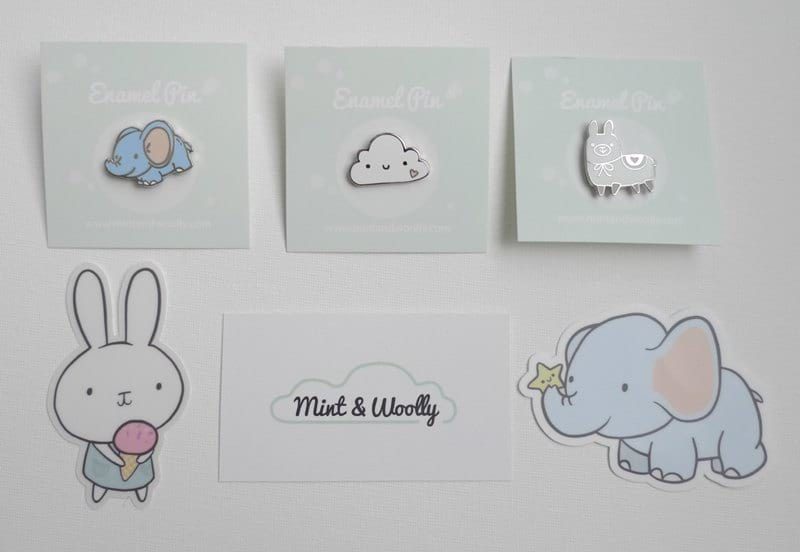
Marissa of Mint & Woolly has been a friend of mine for several years now (formerly of Momomints), and she has created three of her own enamel pin designs: Elephant, Cloud and Llama– aren’t they so adorable and whimsical? Check them out in her Etsy shop HERE!
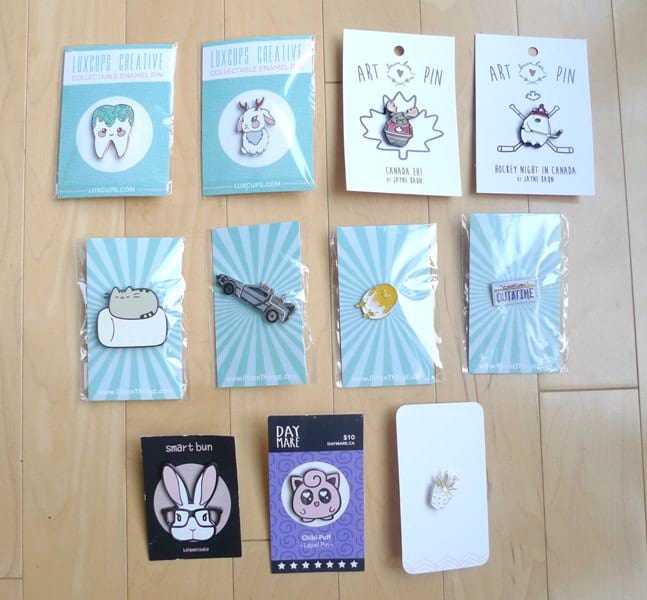
At the end of September (literally the day after I finished knitting and finalizing my Enamel Pin Display Bag), we went to the Edmonton Expo! It was such a blast finding and collecting enamel pins, knowing that they could be displayed on my brand new handmade bag. I purchased these ones below from Luxcups Creative, Baunbon, Kalematsuba, and Daymare! The middle row (Pusheen, Back to the Future pins and Gudetama) are all from Pinz’n’Thingz.
One of my other favorite enamel pins artists is Heidi of The Clever Clove! Her designs have such beautiful pastel colors, and many are yarn-related as well! How fun is the Yarn Lovers Club pin and the knitting and crocheting cats? Check out here Etsy shop HERE!

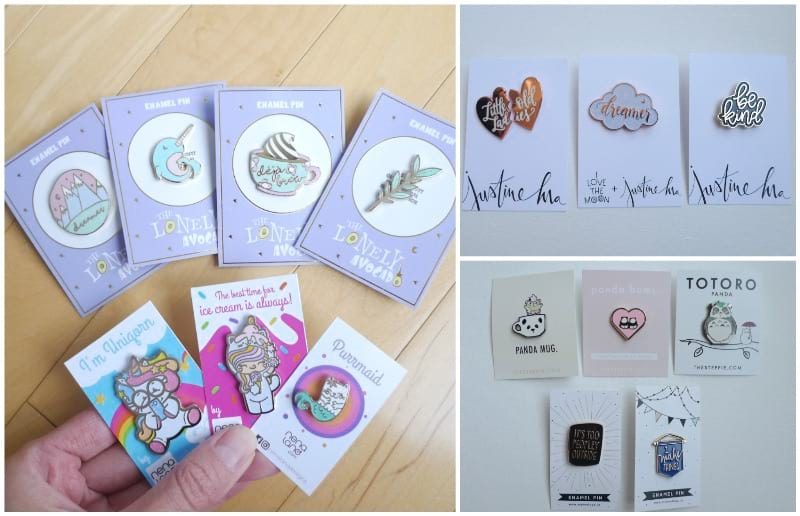
Here are the last group of pins that I collected (some arrived after we took final shots of the bag so you won’t be able to spot them in the final pics- we are also collecting some for a fun giveaway in the future!). On the left, we have some beautiful gold-plated whimsical pins (Dreamer, Narwhal, Deja Brew, and Minimalist Plant) by the Lonely Avocado in Calgary- they have the most secure backings ever as they require you to twist them into place! Nenaland also released some new pins including the Unicorn Selfie and Ice Cream Cat Girl in addition to her Purrmaid as I showed you before. The beautifully hand lettered pins in the top right corner (Little Old Ladies, Dreamer and Be Kind) are by a local calligrapher and designer named Justine Ma! The Panda Mug, Panda Bums and Totoro Panda pins in the bottom right are by the Steppie, and the “It’s Too Peopley Outside” and “I Make Things” pins are by Makeology out of Ontario- love their maker pins!
And now for the final reveal…this is what my bag looks like with my enamel pin collection! Isn’t it so cute?
![]()
*****************************
Here is the free pattern for my Knit Enamel Pin Display Bag:
![]()
Materials:
- 24/7 Cotton by Lion Brand Yarn (worsted weight level 4) in “Ecru”, 3 skeins or ~ 260 g
- Clover Takumi interchangeable needles 36″ and 48″ cord, 4 mm needles
- Clover Amour 3.5 mm hook
- Clover Small Point Protectors
- Periea Handbag Organizer/Liner Large (optional)
Modifications:
- Clear plastic bag (similar HERE)- I purchased mine from Forever 21 (13″ tall, 17″ wide, 5.5″ deep). Please scroll towards the bottom of the post for more clear bag/backpack suggestions!
- Osternas Leather Handles from IKEA
Notes:
- Bottom of bag is worked flat in turned rows using stockinette stitch (alternating knit and purl rows).
- Stitches are picked up along rectangle created using longer cord.
- Body of bag is worked in continuous rounds using knit stitch.
- To reduce stockinette curling and to add a decorative edging, three crochet rounds are added at the end.
We will begin with the base of the bag working in turned rows.
Using 4 mm needles and 36″ cord,
Cast on 80 sts (I used long tail cast-on),
R1: Purl all stitches. (80 sts)
R2: Knit all stitches. (80 sts)
R3-42: Repeat R1-2.
Do not cast off as we will be incorporating the live stitches into the body of the bag for the next part.
Resultant rectangle is 14″ long and 5.5″ wide.
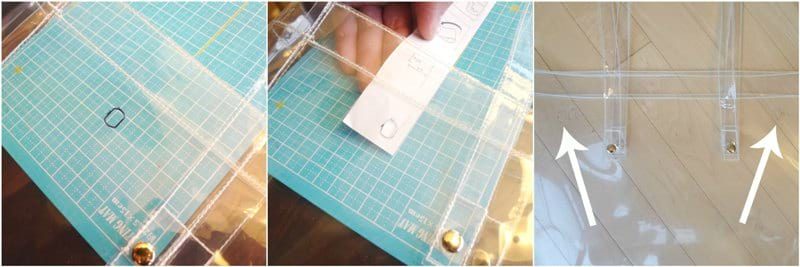
Using 48″ cord and 4 mm needles, pick up stitches along rectangle. Pick up every stitch along length and pick up approximately every 3 out of 4 stitches along the width. See diagram below for visual.
We will now begin working the body of the bag in continuous rounds.
R1: Knit all stitches. (224 sts)
R2-86: Repeat R1.
Cast off stitches.
We will now work the decorative crochet edging of the bag.
Using 3.5 mm crochet hook,
R1: *Sc decrease* around. (112 sts)
R2: Sc around. (112 sts)
R3: Sc around. (112 sts)
Fasten off and weave in ends.
Finished dimensions: ~16.5″ wide, 12″ tall, 35″ circumference
My modifications: Cut two holes on either side of clear bag. Place knitted bag inside clear bag. Secure knitted bag into place by attaching leather handles through clear tote bag and knitted bag.
***CROCHET ENAMEL PIN BAG PATTERN
I have received requests for a crochet version of this bag! I worked up a swatch and did some calculations to write out this pattern below- keep in mind that I have not completed this entire bag but am basing it on my swatch and what I would do if I were to make a crochet version. You can also check out my crochet Star Stitch Purse pattern HERE as it would be a lovely backdrop for enamel pins as well (as written, the Star Stitch Purse is too thick for enamel pins since two strands of yarn are held together. However, you could adapt the pattern and only hold one strand of yarn so it would be less thick)!
Materials:
- 24/7 Cotton by Lion Brand Yarn (worsted weight level 4) in “Ecru”, 4 skeins
- Clover Amour 4 mm hook
- Clover Bent Tip Tapestry Needle
- Periea Handbag Organizer/Liner Large (optional)
Notes:
- This bag is crocheted in a large tube so that single crochets are worked in continuous rounds.
- The bottom/base of the bag is seamed and folded in a special way to give it a sturdy and flat base.
Gauge: 16.5 sts = 4″, 5 rows = 1″
Using 4 mm hook, chain 144 sts. Leave a long initial tail of about 50″ (we will use this to seam the bottom shut later on). Being careful not to twist the chains, slip stitch to first chain to form a ring.
R1: Chain 1, Sc in same stitch. Sc around. Do not slip stitch or join at the end of the round (we will work in continuous rounds so that there is no seam). (144 sts)
R2: Sc around. (144 sts)
R3-73: Repeat R2.
If desired, a decorative edge at the top can be added (e.g. Reverse single crochet edge).
Fasten off and weave in end.
Approximate finished dimensions of tube: 35″ circumference, 14.5″ tall
How to form the flat base (taken from Star Stitch Purse instructions- please reference the blog post HERE for the step-by-step pictures):
- Flip bag inside-out and whip stitch the bottom shut using the long initial end you left.
- Flatten the bag sideways and pinch the corners to form a triangle.
- Seam 3″/7.6 cm down from top.
- Seam the triangle down towards the midline onto the bottom of the bag.
Approximate finished dimensions of bag: 16.5″ wide, 35″ circumference, 12″ tall
Add bag handles (leather or crochet)- see how to crochet your own sturdy bag handles with my tutorial HERE!
******************
I absolutely adore my handmade Knit Enamel Pin Display Bag! It is such a thrill seeing my original design idea brought to life!
![]()
My enamel pins are displayed so beautifully on this bag and show my wide variety of interests. The knitted cream stockinette stitches provide such a lovely neutral backdrop for my colourful pins!
![]()
The clear plastic tote provides such a wonderful protective surface for my knitted bag and pins. I can easily wipe it clean if it gets dirty, and I love having that extra barrier so that my pins won’t get scratched or get lost when I am out and about! I think the leather handles we added help elevate the bag and give it a classy and luxurious touch.
![]()
It is so fun adding pins to my bag and rearranging them! Since the knitted bag is secured into place, I simply slip my hand between the clear bag and the knit bag to place my pin and secure it with the backing. This side is pretty full…but I have an ENTIRE OTHER SIDE of the bag I can fill *hahaha*. However, I am being cautious to not overweigh the bag with too many pins as I do not know how strong the plastic straps are! I will be using this bag as a project bag so I will be carrying my smaller WIP’s in it!
![]()
***UPDATE: I have been informed that this type of bag with a clear display is called an “Itabag” and is popular in Japan! An itabag’s purpose is to display items, so there is usually a large display window to keep the items safe, clean and away from thieves. I have searched Amazon and gathered these Itabags shown below! I personally love the look of knitted or crocheted stitches as the backdrop, so you could crochet or knit a flat panel and insert it into the display window. I love how the bag I designed is a 360 degree window all around the bag as I can display my pins around the entire bag! If you only have a few pins, you can also check out this small Itabag cosmetic pouch HERE as it would be a wonderful way to hold your hooks, needles and notions while also displaying your pins! See if you like any of the bags on Amazon below:
I hope you enjoyed reading about my Knit Enamel Pin Display Bag! If you are interested in making your own, you could try and find a clear bag and knit or crochet an interior lining like I did! Or, you could use my pattern and knit your own bag and add leather straps (you can find them in local craft stores or on Amazon HERE) and add an inner handbag organizer HERE (I own this Periea one and recommend it). I love looking at my bag and seeing all the beautifully-designed pins that I have collected from friends and talented artists locally and around the world. It is such an empowering feeling knowing that you created something from an idea and that no one else in the world owns this exact same bag with the exact same collection of pins! If you are an enamel pin collector, I’d love to hear what some of your favorite designers and shops are and how you display your pins! If you don’t collect enamel pins, I think they make special little gifts or stocking stuffers for friends and families! You can subscribe to my e-mail newsletter HERE to keep up-to-date with my work and follow along with me on Instagram HERE! Happy pin collecting, everyone!
Note: Thank you to Lion Brand Yarn for providing the yarn for this project! This post contains Etsy affiliate links!