Note: This blog post contains affiliate links (Amazon, Michaels & Etsy), meaning at no additional cost to you, I will earn a commission if you click through and make a purchase.
Recently I have become captivated by a new hobby: making journals! I used to scrapbook as a teenager, and this new hobby has reignited my love for the paper crafts. I never thought it was possible to make such beautiful books and journals from scratch! I fell down the rabbit hole of watching junk journal videos including how to make your own journal, decorate the page spreads and what to include in them – there are so many possibilities! According to “Artjournalist“, a junk journal can be defined as “A book which is often made through found and recycled materials to be used as a way to collect and record memories, thoughts, ideas, and inspiration.”
I love how you can combine different materials and include items such as photos and ephemera (memorabilia that was originally expected to have a short one time use like movie tickets, train passes, etc). I’ve always loved saving items like those, and junk journals are a great way to use and store them! I also think it would be neat to keep a junk journal as fiber artists to help us document our projects: you could include the yarn label, a snippet of the yarn, hook size, finished photos and journal why you chose this project, who it was for and any new techniques you may have learned along the way. Journals are a great way to reflect and document special moments, memories and the everyday activities and musings of our lives!
Johanna Clough has been a huge inspiration to me as I have thoroughly enjoyed watching all her junk journaling videos, from how to make a journal out of a boxed package, simple binding for beginners, and how she decorates her pages. I highly recommend you check out her videos on YouTube. Below is the”Making a Journal for Beginners” video that kick-started my desire to create my own journal:
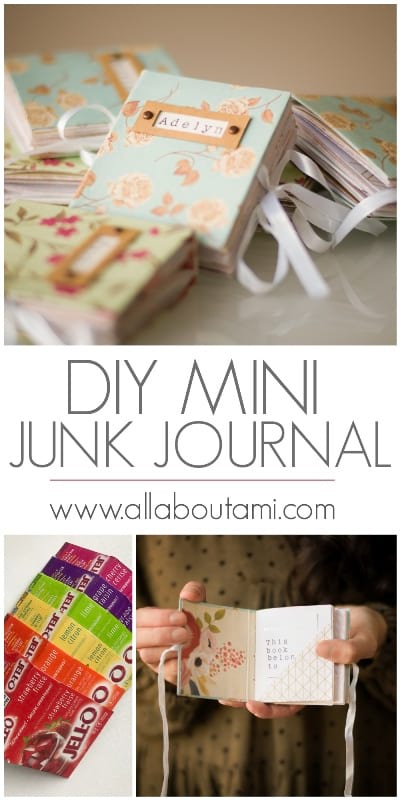
I followed all her steps carefully to create my own journals. Since we had just recently made my “Layered Finger Jello” for my youngest daughter’s birthday, I had plenty of jello boxes (the recipe uses 6 boxes of jello). I thought it would be so adorable to use these jello boxes as the covers for some mini journals, and we decided to make some as gifts for the special little girls in our lives! When I was younger, I absolutely loved mini books like these!
Below you can see a process video showing the making of our mini journals using the jello boxes that I posted on TikTok:
@allaboutami Reply to @jencreates2 These little keepsake journals are so much fun to make ❤️📔 ##junkjournal ##bookbinding ##minijournal ##upcycledart ##journalinspo
♬ CRAFT – OFEKNIV
Here is a summary of the steps as shown in the videos:
(1) Choose your cover – take any box that has a spine and trim the edges down so you have the dimensions that you want. These little journals ended up being 8.25″ tall and 2.8″ wide using the jello box as the cover.
(2) Glue the box onto scrapbook paper of your choice using white glue (I used Elmo’s school glue), making sure you leave enough of an edge so that you can glue and fold the edges down.
(3) Trim the corners and fold the edges down. Glue them into place.
(4) Choose a scrapbook paper for the inner cover, cut them to size (3 separate pieces) and glue them down. If you would like to add ribbon closure, you can use super glue and tape to secure the ribbon onto the inner cover before you add the scrapbook paper.
(5) Make your signatures: a signature is a bundle of folded paper that you will bind into your cover. For these mini albums, we made two signatures, each with about 4-5 sheets of folded paper (so 8-10 pages). Be sure to measure them so that your signatures will fit inside the cover. You can choose a certain color palette to fit with your theme if you want a cohesive look – for example, we used mostly light pink, gold and white pages for our signatures.
(6) Bind the signatures into the cover. I bought a handy bookbinding kit on Amazon that I love – it includes the awl, waxed cord, binder clips, bone folders and needles. Poke three holes into the spine for each signature. Poke three holes into the signature (make sure the three holes of the journal cover and signatures are the same measurement). Using waxed cord and a needle, bind each signature into the cover. Watch Johanna Clough’s very helpful “Easy Binding Tutorial for Beginners” video HERE!
(7) Decorate the pages by adding tuck spots, pockets, envelopes, etc. It is so fun personalizing these books and making them interactive! You can check out Johanna’s video called “Journal Page Pocket Ideas” for some inspiration! You can add mini binder clips, paper clips and sticker pages as a gift to help the recipient decorate the pages. Below you can see some of the page spreads we included in our mini junk journal.
I have tried to gather most of the supplies we used into my Amazon shop HERE with this list called “Journal Supplies“! Here are some pointers:
- You can look for scrapbook paper pads at Michaels (I love this Fantasy Floral one HERE as I am using this paper for my own journal) and Dollarama – in fact, the paper designs that we used for the Mini Journals are actually from Dollarama!
- I would also highly recommend getting a paper cutter and glue tape (sometimes you can find glue tape at the dollar store) as this will greatly facilitate the process. Double-sided tape is also VERY handy to have and use since you can carefully position it where you want (including very thin sections when you want to precisely glue tuck spots and other items to the pages).
- I have LOVED my Pegz letter stamps that I ordered through Amazon – you can connect and snap the letters together not only on the sides but on the top and bottom as well! This makes personalizing the journals so much fun. We used these stamps to stamp the names of each girl (and then added bronze brads for a rustic look) and also for the text on the pages such as “This book belongs to” and “My Family“.
- We bought various paper items at Dollarama that included lined and dotted paper which we used as inserts for the mini journals. You can also find paper doilies from the dollar store as they add a very elegant and decorative touch. The pack we got comes with doilies of various sizes, and you can cut and use them as pockets and tuck spots as well!
- We also purchased different envelopes and tags with gold hardware at Michaels which make fun inserts as well!
- Michaels has some great sticker packs HERE as we got some “Animals” and “Floral” packs (1473 pc and 821 pc) on sale for only $6 at the time. If you are gifting the journals, it is nice to include some sticker sheets attached with paperclips so the children can use them to decorate the pages.
- Washi tape is a wonderful way to add some fun color to your pages and to also add pockets and flip pages. We mostly used this washi tape HERE from Michaels from their “Fantasy Floral” collection (matches with the paper pack that I bought too). I was quite impressed with Michaels’ selection of washi tapes as they have tubes that include many different designs, and they are very affordable when you use the coupon too!
- These journals are such a great way to display photos! We have a Fujifilm Instax printer which can print out any photo from your phone – we printed off family photos of each girl as well as a photo of their siblings to include in their journals.
- Johanna Clough offers some digital printables in her Little Bindy Etsy shop HERE to decorate your own journals. I have purchased her vintage linen printable as you can resize the images and print them to fit your own dimensions. When you cut them out and glue them into your journals, they resemble actual linens and are such a pretty way to decorate your journals – Johanna offers so many options HERE! She also offers beautiful digital fold-outs, ephemera and collage sheets!
These journals can be used as gratitude journals or special keepsakes to help remember what your child’s writing and drawings looked like at this point in time (if you are gifting them to a child). They are fun to make together as the children can choose their own paper for the covers and the pages within. I hope the children love putting special treasures, secrets and items that are dear to them in the envelopes and tuck spots, and that they will cherish these journals for years to come! Ryan and I had so much fun making these mini journals together, and it is amazing being able to upcycle these boxes and turn them into something so beautiful!
I am in the process of creating my own junk journal using a cake box, and I am having so much fun! I plan to include some of the handmade cards the girls have made for me, areas for little drawings and notes they give to me, and possibly include pages from old newspapers and crochet and knit magazines. I have experimented with sewing on paper (love the look of thread and stitches on the pages, and it is a great way to attach pockets to pages) and I have been researching tea and coffee dye paper to give that vintage look. You can even make your own paper too – ahh there are so many possibilities! I will be using my own junk journal to record daily reflections, favorite quotes and verses, family activities that we have enjoyed together, favorite books and tv shows, and just daily musings. I hope this inspires you to create your own journals as well since they make wonderful gifts and are a great way for you to reflect and document your stage in life!