***You can purchase an INEXPENSIVE AD-FREE PDF of the Criss-Cross Headwrap pattern on Etsy HERE and on LoveCrochet HERE! This beautifully formatted PDF includes all the step-by-step assembly pictures and pattern, and is a total of 4 pages including the cover page!
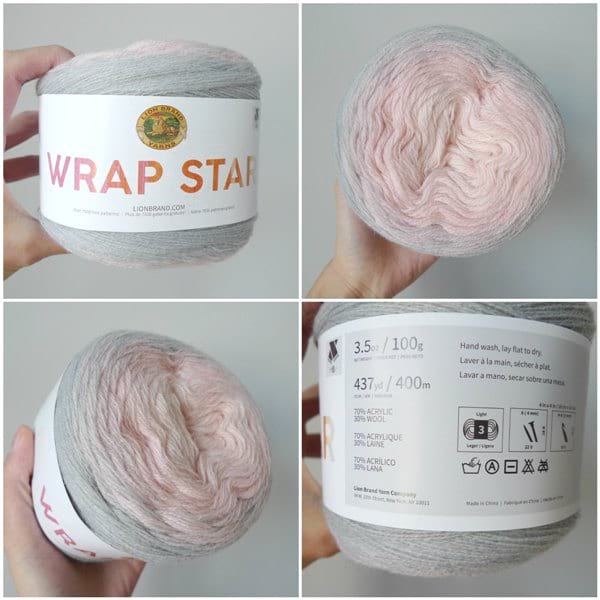
I love trying out new yarns, and I am very thankful that I got to preview some brand new yarns during the Lion Brand Yarn Blogger Bash in New York City in January 2018! I distinctly remember a moment on the first day when we were doing a tour of the offices shortly after we met the other bloggers in person (there was lots of squealing and hugging). We were huddled near a wall and were being shown some beautiful new yarns that we could examine and pass around. Jess of Make and Do Crew smiled warmly as she passed me this gorgeous pink and grey yarn called “Wrap Star” and commented how it was definitely an “All About Ami” colourway. I couldn’t help but smile and was so touched that she (and many of you) are so familiar with my favourite colours and what colour palettes I love to work with. I was very excited to get my hands on this Wrap Star yarn later on and play with it at home since it is very unique! It is a lightweight (level 3) yarn and is a generous size with 100 g/400 m. It is 70% acylic/30% wool, and is actually comprised of 4 thin strands of yarn. Each Wrap Star is a beautiful blend of colours, and this colourway entitled “Queen” is a lovely gradient of pink and grey. In total, 12 different colourways of Wrap Star are available (fun fact: each colourway is named after a female rapper)!
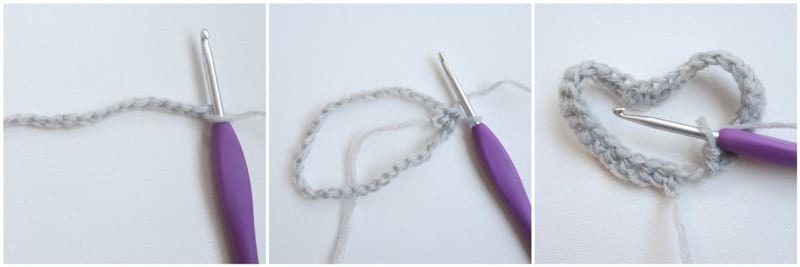
I thought that this lovely lightweight yarn would make a stunning headband/headwrap! To begin, I worked some chain stitches with my 4 mm Clover Amour hook. Next, I slip stitched to the first chain to form a ring, being careful not to twist the chain. Then, I immediately began working half double crochets in the round.
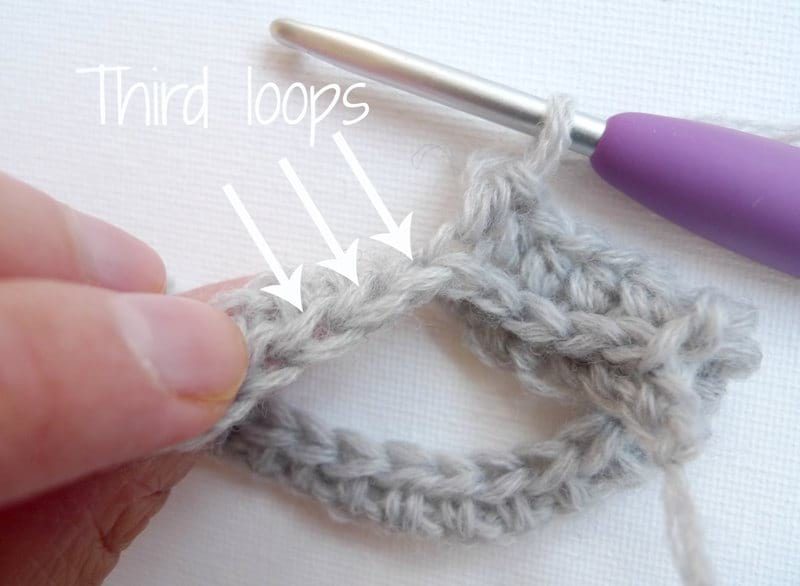
When you work half double crochets, there are 3 loops that are formed: a front loop, back loop, and third loop. We want to preserve the front and back loops so that they show outwards, giving a knitted stockinette look. Thus, we do not work in the front or back loops- instead, from now on, we work in the third loops.
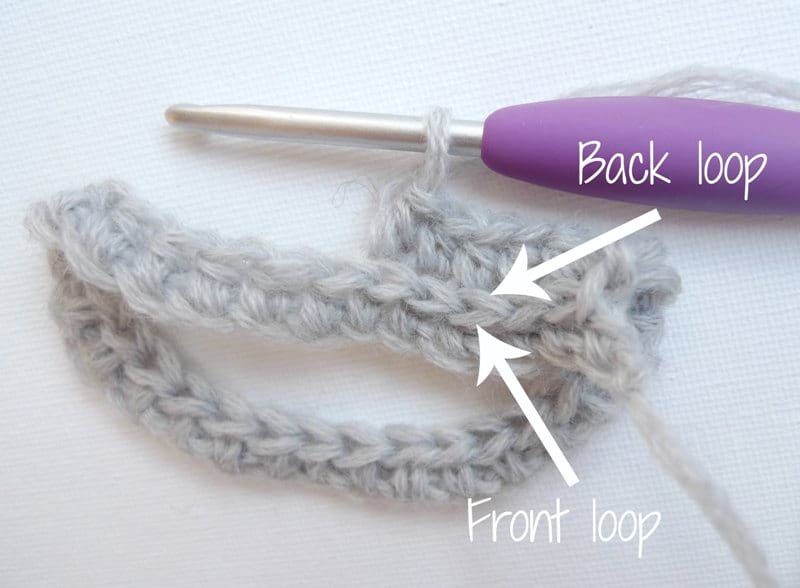
The third loops are the loops BEHIND the back loops as indicated by the arrows. When you work half double crochets in the third loops, it leaves the front and back loops untouched.
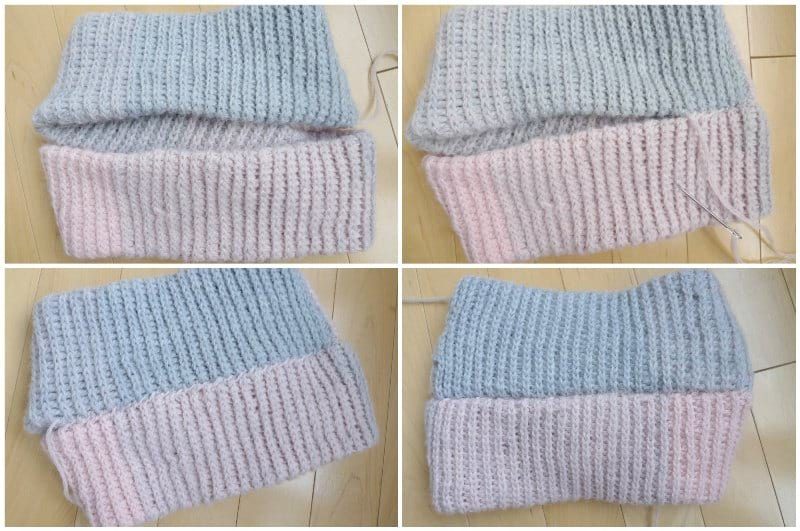
I kept working half double crochets in the third loops in continuous rounds (no need to join the rounds so that there is no seam) until my desired length was achieved. Isn’t the colour gradient beautiful as the grey blends into the pink? I formed an X by crossing one end of the tube over the other.
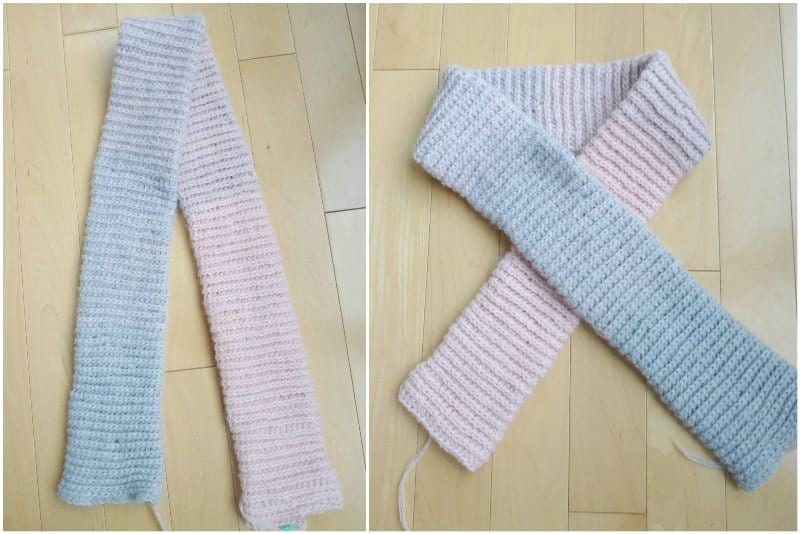
Next, I folded the ends of the tube inwards so that they were facing each other. Using a yarn needle and yarn end, I then whip stitched the open ends together.
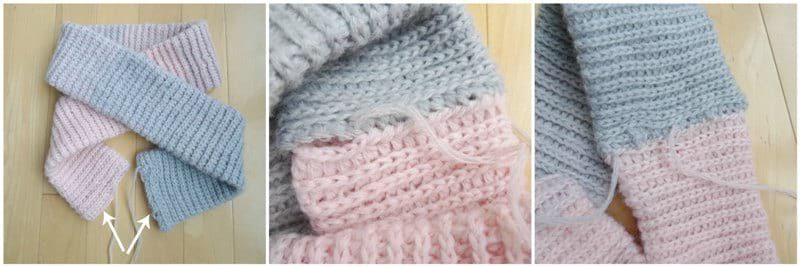
Rather than keeping the seam in the middle, I rotated it towards the side so that it is less visible. The great part about this design is that you can actually rotate the tube to display whichever colour gradient you would like shown more prominently in the front (e.g. more pink, more grey, or more pink/grey blend).
After I was happy with the placement of my colours (and with the seam being on the side), I used a yarn needle and some yarn to tack down the overlapped sides into place as indicated by the arrows. I whip stitched a couple of stitches to secure the overlap so that the tube could not shift anymore.
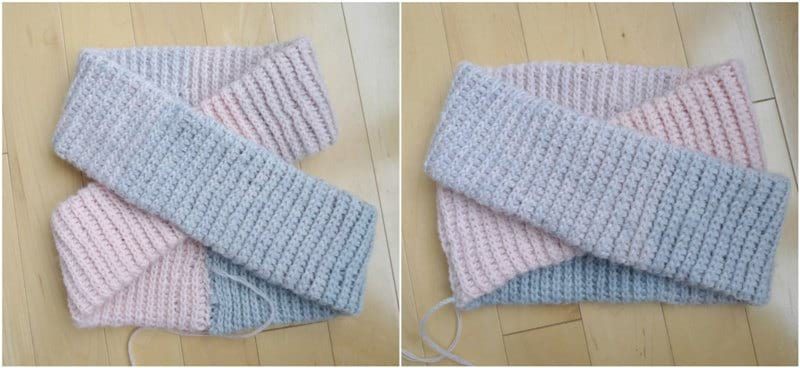
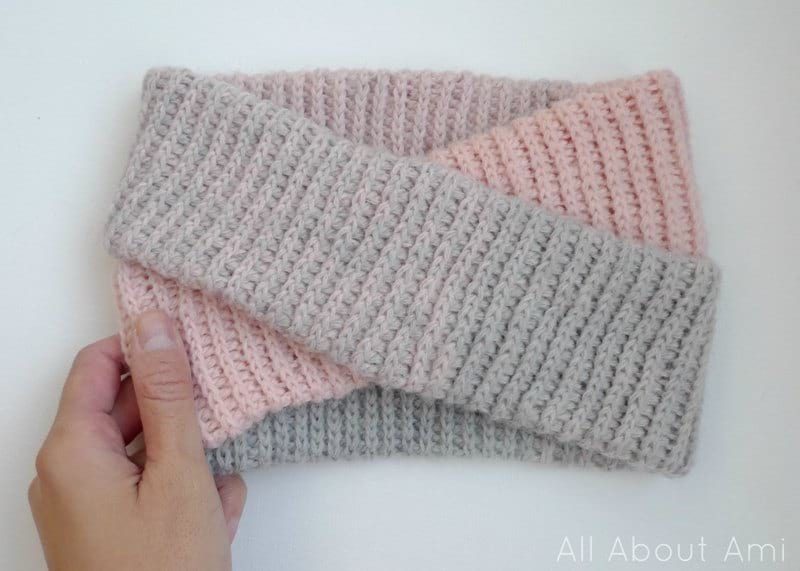
I then folded my headwrap inside out and used a yarn needle and yarn to whip stitch the opening in the back shut. The last picture shows the headwrap right-side out again as the whip stitching is less visible.
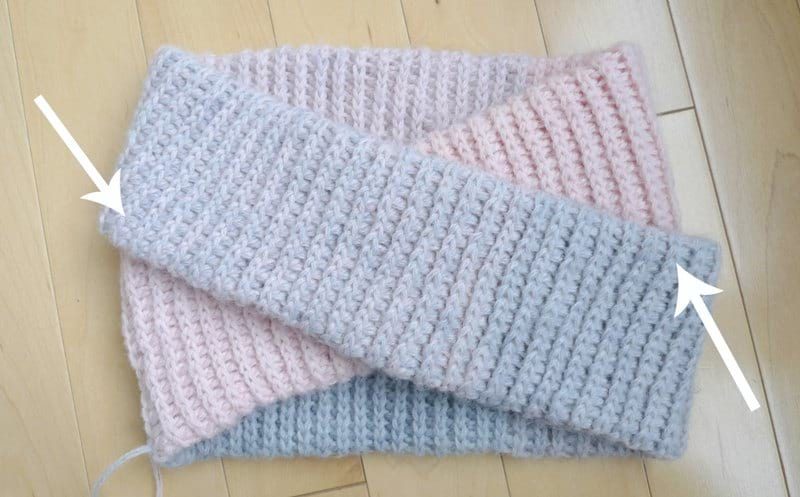
You could keep your Criss-Cross Headwrap like this if desired! It has a beautiful shape and the stockinette-inspired stitches look so elegant!
If you would like to cinch the middle of your headwrap together, there are two options: first, you can chain 40 and use that series of chains to wrap around the middle of the headwrap. Tie knots in the back and weave in the ends.
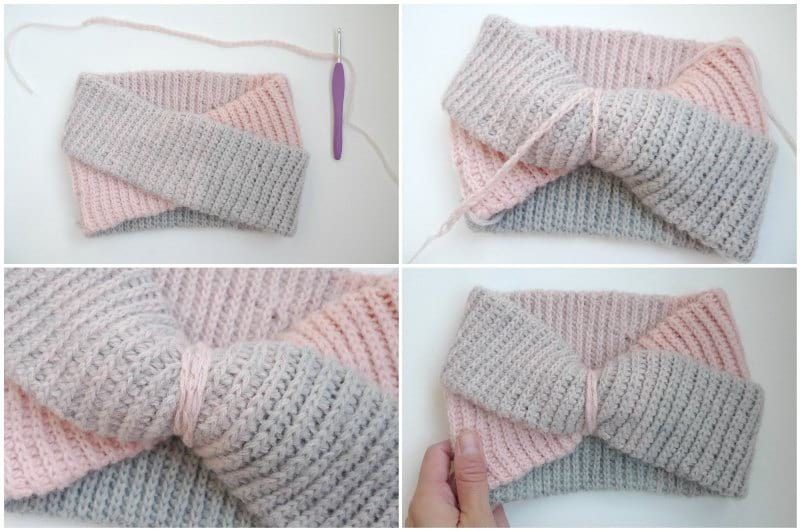
The second option has a folded centre and is very chic! Here are the step-by-step instructions below:
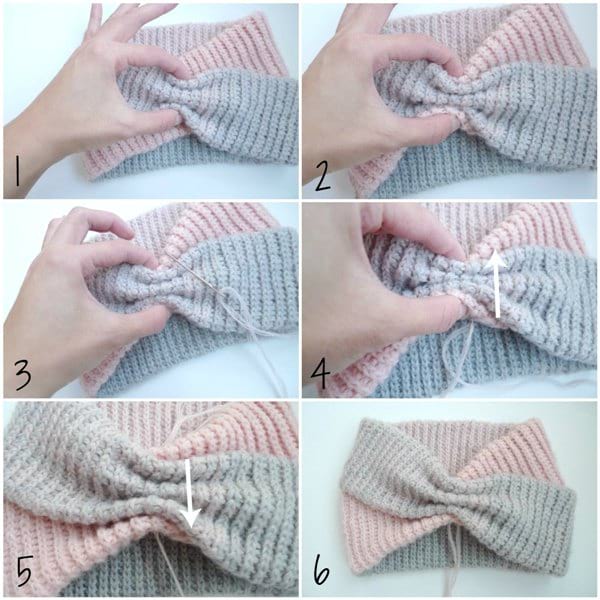
- Pinch the top layer of the headwrap so that there are 3 folds (the grey part in the picture).
- Add the bottom layer (pink section) to the folds.
- Thread your yarn needle with yarn.
- Move your yarn needle upwards through all the folds.
- Move your yarn needle downwards through all the folds.
- Repeat 4 and 5 several times to secure the folds into place. Tie several knots tightly using beginning and end of yarn at the bottom of the folds.
********************
Here is the free pattern for my “Criss-Cross Headwrap”!
{Don’t forget you can purchase an INEXPENSIVE AD-FREE PDF of the Criss-Cross Headwrap pattern that contains all the above step-by-step pictures in a concise document on Etsy HERE and on Craftsy HERE!}
![]()
Materials:
- 4 mm Clover Amour crochet hook
- Wrap Star (lightweight level 3 yarn) in the colorway “Queen” – 1 cake or 65 grams needed; 12 different colour options available HERE
- Yarn needle (bent tip helpful)
- Lock ring stitch marker
Notes:
- Gauge: 24 sts and 11 rounds = 4”
- A long tube is crocheted and folded in a certain way to create this design.
- To increase the height of the headband, increase the number of initial chains. To decrease the height of the headband, decrease the number of initial chains.
- To increase the width of the headband, increase the number of rows. To decrease the width of the headband, decrease the number of rows.
Pattern:
Chain 35. Join with slip stitch to first chain, being careful not to twist the chain.
Round 1: Hdc around. (35 hdc).
Round 2: Hdc in third loops around. (35 hdc)
Round 3-110: Repeat Round 2.
Fasten off and weave in end.
Resultant tube: 3″/7.6 cm wide, 38″/96.5 cm long
Assembly:
- PLEASE use diagrams above as reference!
- Form an X by crossing one end of tube over the other end of the tube.
- Fold ends inwards towards the middle so that they are facing each other.
- Whip stitch open ends together.
- Rotate tube so that the colours you prefer are showing at the top.
- If desired, rotate seam so that it is on the side rather than the bottom middle to make it less visible.
- Using yarn needle and yarn, tag sides down so that they do not rotate: sew a few whip stitches to secure the overlaps.
- Flip headwrap inside-out and whip stitch the back shut (whip stitch top tube to bottom tube).
- Flip right-side out.
- You can wear the Criss-Cross Headwrap like this!
- If you would like to cinch the headwrap in the centre, there are two options:
- Option 1: Chain 40 and fasten off. Wrap the chains around the centre of the headwrap and tie knots to secure it into place. Weave in ends.
- Option 2: Pinch top tube so that there are 3 folds. Add bottom tube to top and bottom of the pinch. Secure the folds by moving yarn needle with yarn upwards through the folds, then downwards. Repeat 2-3 times. Tie knots at the bottom using beginning and ending strands of yarn.
Final dimensions of Criss-Cross Headwrap: 6.5″/16.5 cm tall, 9.5″/24 cm wide, 19″/48 cm around
![]()
**************************
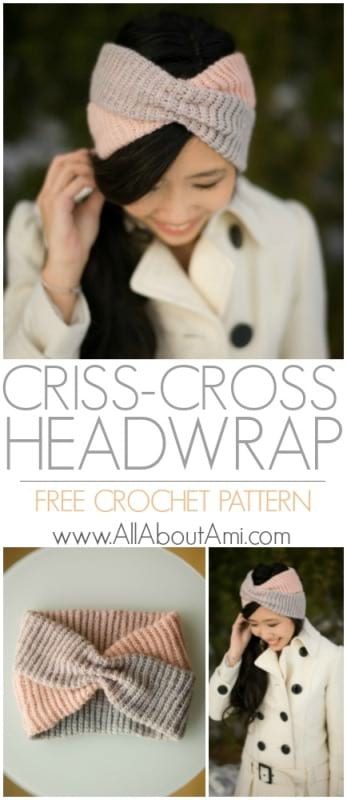
Isn’t my Criss-Cross Headwrap so pretty? I love the chic design with the cross-over and cinched centre!
![]()
As you can imagine, it is very warm since it is comprised of two layers with its tubular design (the 30% wool content helps as well)! The gradient of the Wrap Star Yarn is so beautiful and very fun to work up as you see the colours blend from one to another.
![]()
This is what the other side looks like- as you can see, the seam is visible here. The back is also neat with the pink ontop and the grey on the bottom!
![]()
I hope you enjoyed reading about this stylish Criss-Cross Headwrap that is very on trend, chic and warm! I personally love wearing headbands/headwraps during the wintertime as they look beautiful with your hair down or up (looks super cute with a topknot or updo). Projects that use only one skein of yarn are always fantastic, and these headwraps would make amazing gifts! Let me know if you will be giving this project a try- you can subscribe to my e-mail newsletter HERE to stay up to date with my work and designs! Happy crocheting, everyone!
Note: Thank you to Lion Brand Yarn for providing the yarn for this project!