Note: This is Part 1 of the step-by-step photo tutorial of the Camellia Tote Bag. We will learn how to crochet the ovular base, half double crochet side panels and accent panels!
- The free crochet pattern with exact written numbers and row/round counts can be found HERE.
- The beautifully-formatted, inexpensive PDF containing the written-out pattern and all the step-by-step pictures (total of 13 pages) can be found on Etsy HERE , Ravelry HERE and on LoveCrafts HERE!
- The convenient Lion Brand Yarn KIT containing all the required 24/7 Cotton Yarn can be found HERE.
- Part 2 of the step-by-step tutorial explaining how to crochet the strap panels, strap edging and detailing and interior pocket can be found HERE.
- Join our Camellia Tote Bag Crochet-Along on Facebook HERE!
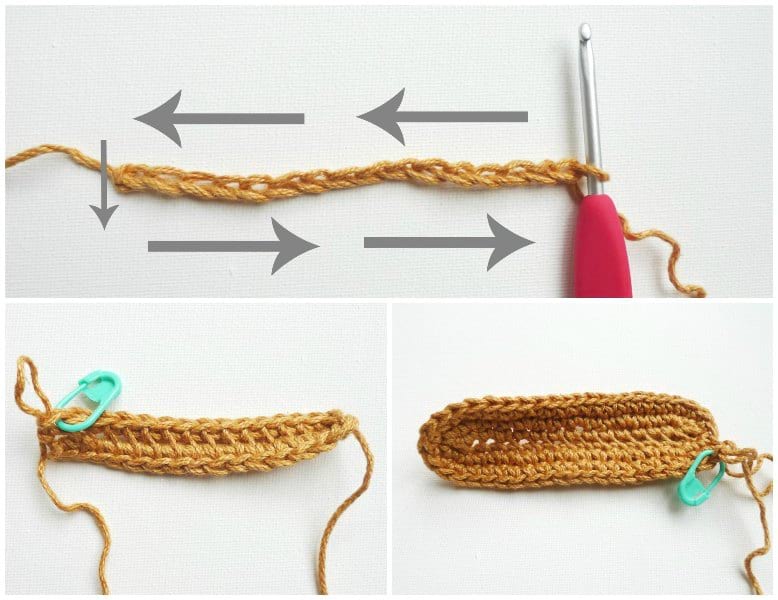
To begin the ovular base of the Camellia Tote Bag, we will be using the technique of crocheting around a foundation chain to create an oval using a 3.5 mm hook. This involves single crocheting first down the back loops of the chain, turning, and then single crocheting down the front loops of the chain. Please see my detailed step-by-step tutorial on how to do this HERE if you would like further explanation.
We will be working in continuous rounds (NOT joining or closing each round with a slip stitch so it’s a continuous spiral) to expand the oval. This part of the design took a lot of trial and error as I had to strategically place the increases so the oval would expand outwards correctly. The picture showing all the stitch markers shows where I wanted to place the increases, so I had to take very meticulous notes! I would DEFINITELY recommend using a stitch marker to mark the end of each round so that you do not accidentally lose your place. Take careful note of where you are working the increases in each round and make sure you have the correct number of final stitches at the end of each round!
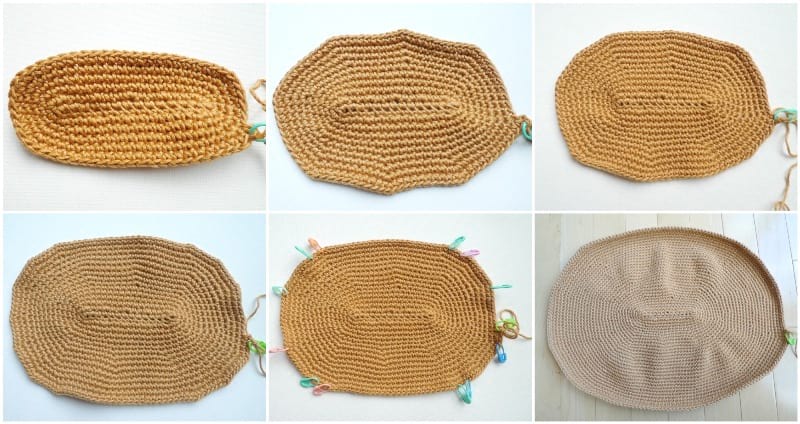
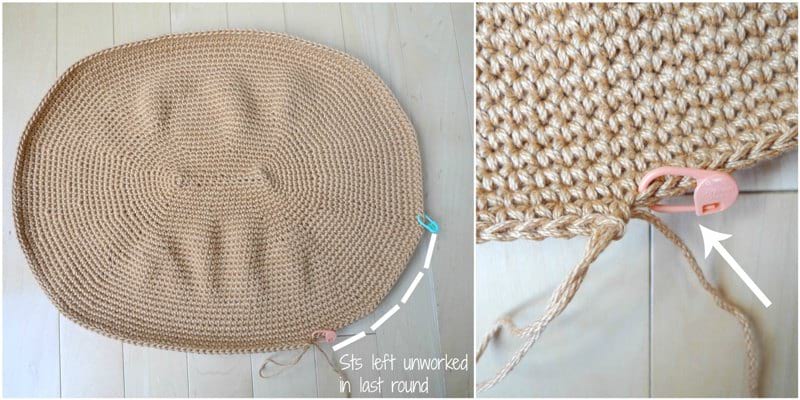
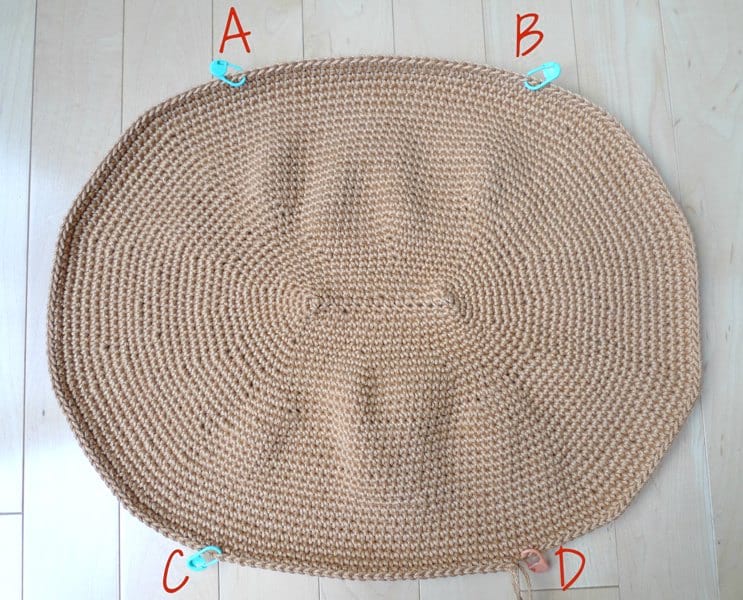
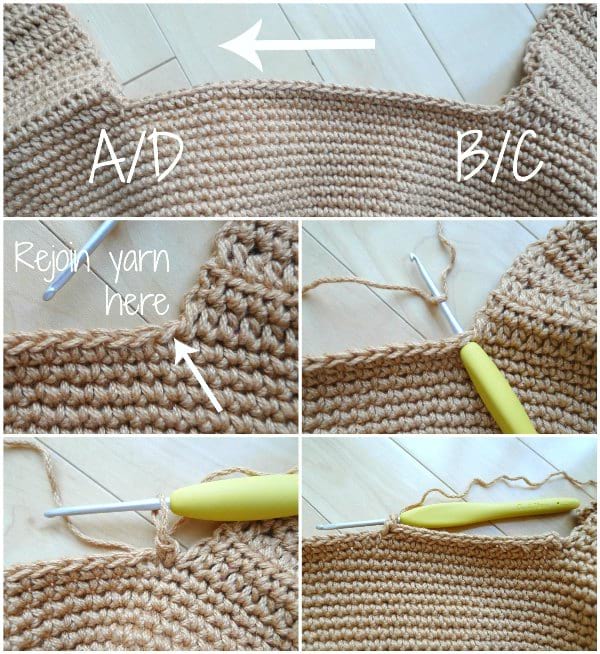
For the last round, you will NOT be completing the entire round. We will single crochet 171 stitches but leave the rest of the 31 stitches unworked (as indicated by the white lines in the picture below). We are stopping here and leaving those stitches unworked because this is where we will begin crocheting the Half Double Crochet Side Panel later on. Place a stitch marker in the stitch right next to the last stitch you just completed (as indicated by the peach stitch marker) – this point will be point D as shown in the diagram later on. Note that the green stitch marker indicated the end of that round, but you can remove that green stitch marker since we will be dividing up the base into different sections next.
It is now time to divide up the ovular base you just completed into 4 different sections! In total, there are 202 stitches. You will be dividing up the ovular base into two Half Double Crochet Side Panels and two Accent Panels. Since you have placed your first stitch marker at D, you can count around the base and place the other stitch markers B, A, and C. Note that each stitch marker is composed of 1 stitch, so 70 + 70 + 29 + 29 + 1 + 1 + 1 + 1 = 202. Also note that the stitches at the stitch markers A, B, C and D will be used in BOTH the Half Double Crochet Side Panels and Accent Panels.
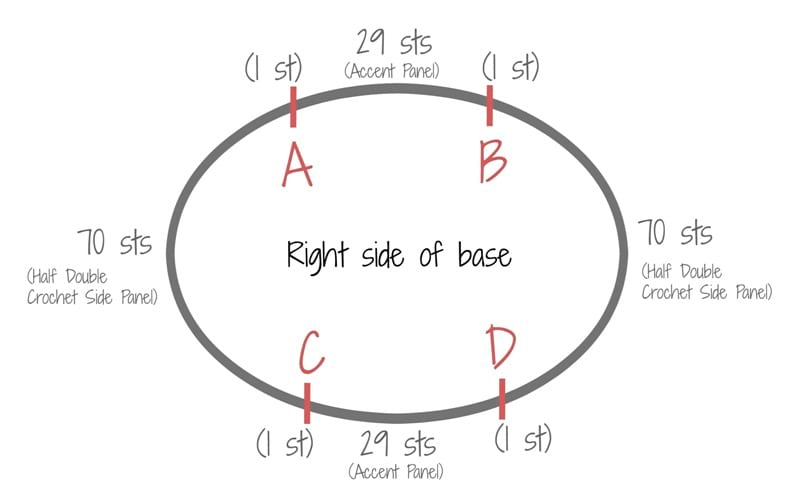
Here is the breakdown of how many stitches are in each panel:
– Half Double Crochet Side Panels = 72 stitches (70 + 1 + 1)
– Accent Panels = 31 stitches (29 + 1 + 1)
Here is a picture showing what the ovular base looks like once the stitch markers A, B, C and D have been placed.
Now it is time to crochet the first Half Double Crochet Side Panel. Starting from D and using a 2 mm hook, work half double crochets across all the way to B (you should have 72 half double crochets since it is 70 + 1 + 1 including the stitch markers). You will now be working in turned rows, so once you reach the end at B, you will turn your work and continue crocheting row by row. After 33 rows, you are done your first Half Double Crochet Panel! If you do not have a 2 mm hook, you can use a similar small hook and keep crocheting until you have reached 9.75”/25 cm in height. Ensure you crochet an odd number of rows so that your yarn ends off on the far left side of the Half Double Crochet Side Panel.
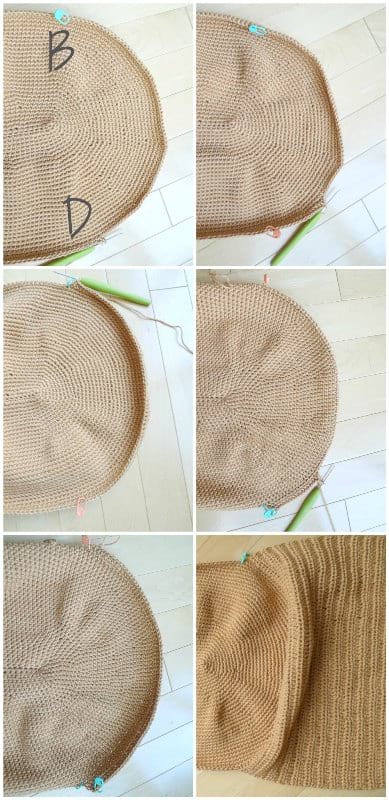
Next, it is time to crochet the second Half Double Crochet Side Panel on the other side. You will need to rejoin your yarn at A. To do so, make a slip knot. Insert your crochet hook into stitch A. Add the slip knot, pull through and chain 2. Insert your hook into the same stitch and work 1 hdc (the chain 2 does not count as a stitch). Work half double crochets all the way across to C and once again build up your rows so that the height matches the other side.
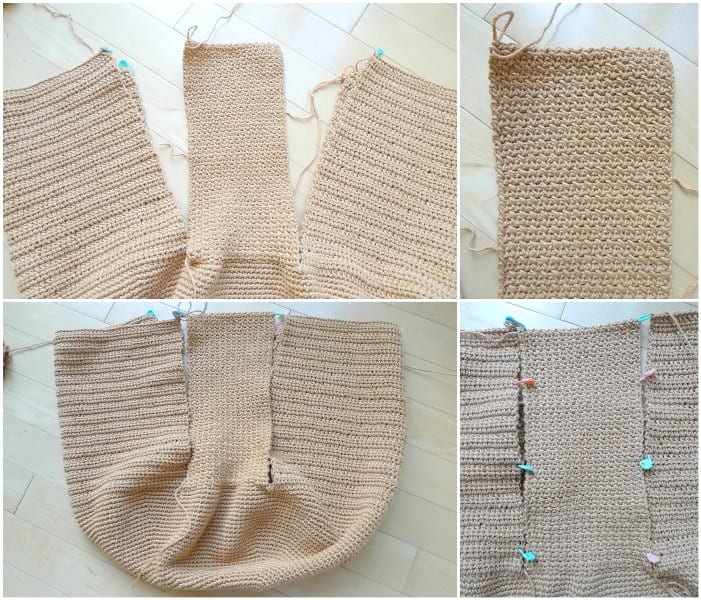
Both Half Double Crochet Side Panels have now been completed! Next, we will work on the Accent Panels that are crocheted between the Half Double Crochet Side Panels. Note that the right/correct side of the ovular base should be on the bottom/outside of the bag while the wrong side of the ovular base should be on the inside of the bag – you can reference my blog post called “The Right Side of Amigurumi” if you want to see the difference between the right and wrong side of pieces when working in rounds.
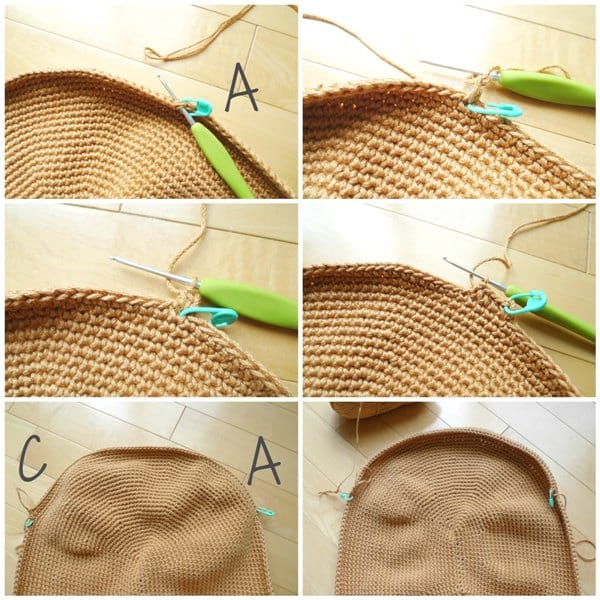
Rejoin the yarn at B and crochet towards A using a 2.75 mm hook. Once again, note that A and B are included in the stitch count of the Accent Panels and were also included in the stitch count of the Half Double Crochet Side Panels. In total, the stitch count of the Accent Panel is 29 + 1 + 1 = 31. You can choose any stitch you would like to work with as long as it uses 31 stitches. I would recommend choosing a denser stitch so that your items do not fall through any holes of the bag. I have chosen the “Single Crochet Columns” stitch for my Accent Panel, which involves single crochet stitches interspersed with chain 1’s. At first it may seem similar to the granite stitch, but the single crochet stitches are actually stacked upon each other row by row while the chain 1 spaces are also stacked upon each other. Thus, you will work a single crochet, chain 1, work a single crochet, chain 1 and repeat this across the entire row.
Note where the last stitch is worked: where you also worked a stitch for the Half Double Crochet Side Panel. The last stitch will be a single crochet. Then you turn your work and continue crocheting this stitch pattern across in turned rows. Remember that the single crochets are worked ontop of the single crochets from the previous row and the chain 1 spaces should be stacked upon the chain 1 spaces of the previous row.

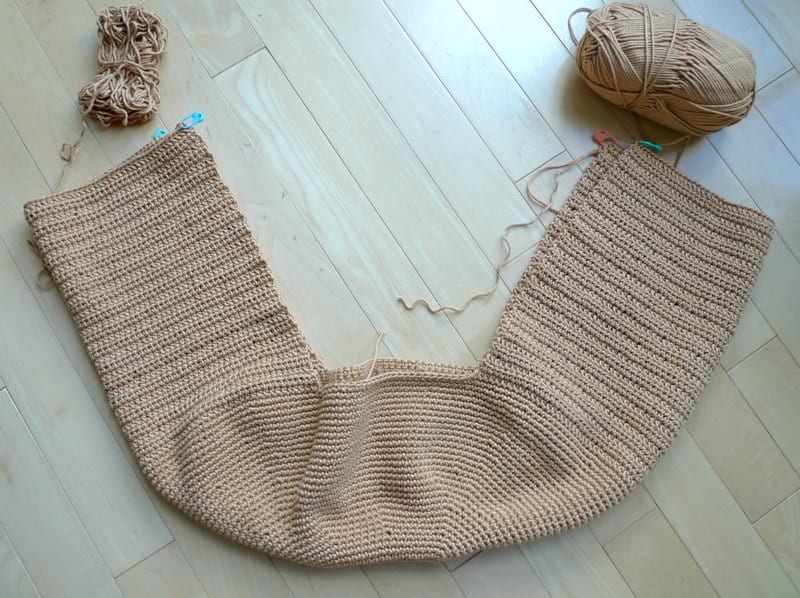
Once the height of the Accent Panel matches the height of the Half Double Crochet Side Panels, you are done, and you can begin seaming these panels together! You can use stitch markers to help bring the panels close together and make the seaming easier.
I used the whip stitch to seam the Accent Panel to the Half Double Crochet Side Panels. When whip stitching, I like to flip the piece inside out so that the wrong sides are facing me (on the outsides) while the right sides are facing each other on the insides. This gives a cleaner look when you flip the piece rightside out at the end after the whipstitching is complete!
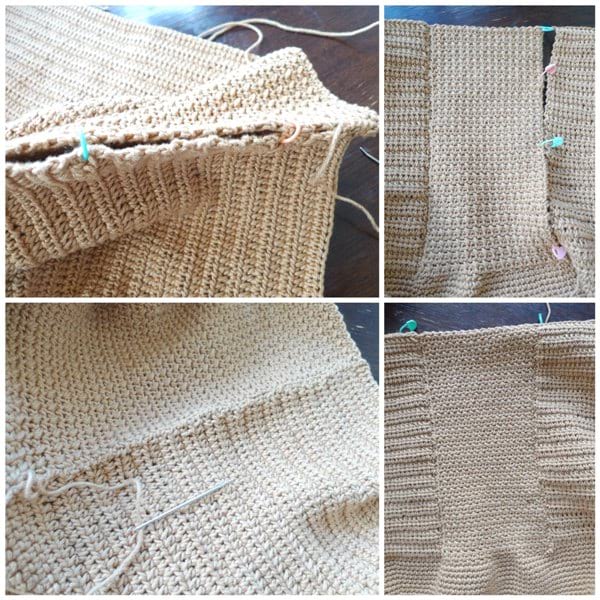
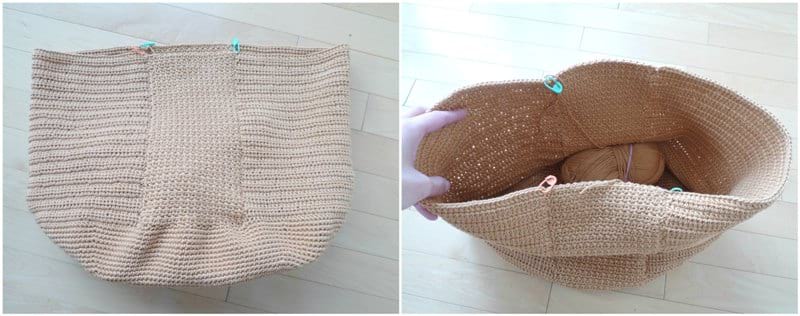
Repeat the exact same process on the other side so that both Accent panels are complete and seamed to the Half Double Crochet Side Panels! You should now have a bag that looks like this so far – it can actually start storing items, like the working yarn haha!
To see how to crochet the straps and interior pocket, check out Part 2 of the step-by-step tutorial HERE! The full free written pattern with all the numbers and counts can be found HERE!
Note: Watch this video below to see how this project can be segmented into 4 sections (Ovular Base, Half Double Crochet Side Panels, Accent Panels & Straps and Interior Pocket) with a detailed verbal explanation of each part. These videos were recorded for the Camellia Tote Bag Crochet-Along: