***You can purchase an INEXPENSIVE AD-FREE PDF of this pattern on Etsy HERE and on LoveCrafts HERE – this beautifully formatted PDF includes the step-by-step Bobble Trellis Stitch tutorial and is a total of 8 pages including the cover page! This pattern is also available in the “Crochet Cowls & Scarves PATTERN BUNDLE” which includes over 20 beautiful designs at a discounted price – check out the bundle HERE! The Lion Brand Kit HERE includes the pattern and all the luxurious Superwash Merino Yarn you need (choose your own color – 29 different shades available)!
***The full free written-out pattern can be found in this blog post after the step-by-step tutorial!
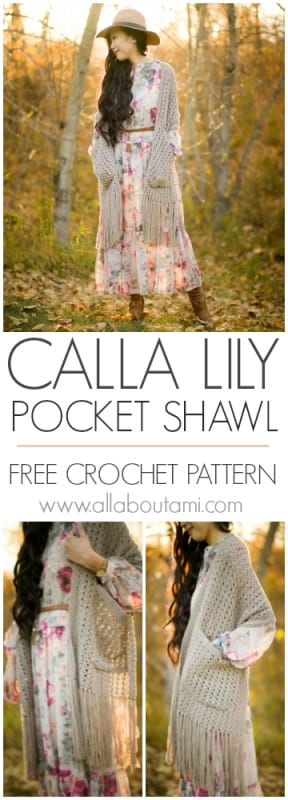
I have always loved adding pockets to my projects as I adore having someplace cozy to rest my hands and of course extra space to store items! I have added pockets to my crochet and knit cardigans and most recently to my popular Willow Scarf that uses super bulky level 6 yarn. Over the Spring and Summer, pocket scarves became very popular as I saw so many different versions pop up! I LOVE scarves and shawls, so I knew I wanted to hop on this trend and design my own using my own style and personal aesthetic!
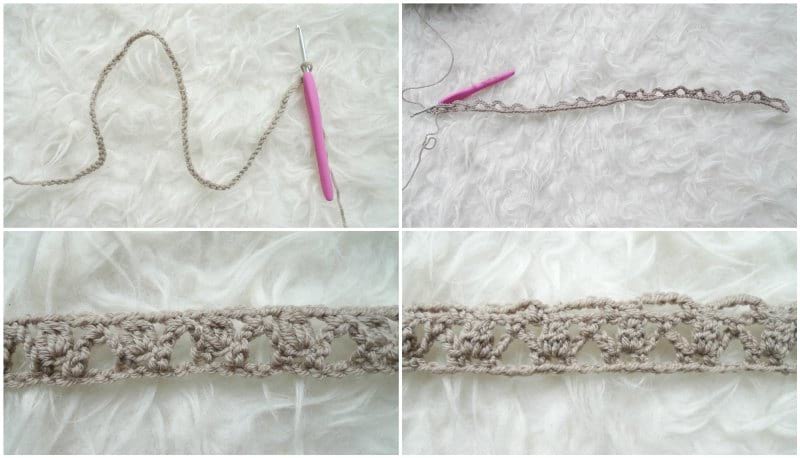
I knew exactly what stitch I wanted to use: the Bobble Trellis Stitch that I used for my Calla Lily Cardigan! It is an elegant and romantic stitch that is worked over a 2 row repeat. I have a full detailed step-by-step tutorial and video showing you how to work this stitch HERE. I love how it is not too dense as it is light and airy. I used Superwash Merino (level 3 lightweight) from the LB Collection in this beautiful neutral called “Hemp” and my 3.75 mm Clover Amour hook for this project.
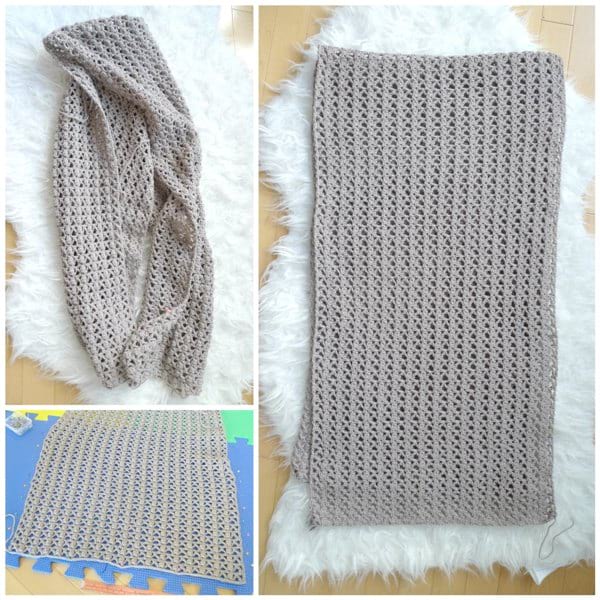
Once you get the hang of the two row repeat, this project will work up quickly as there is no increasing or decreasing. You are creating a large rectangle for your shawl! You can increase the number of starting chains if you want your shawl to be wider, and you can add more rows if you want your shawl to be longer (I am 5’6 for reference). After I was happy with my length, I blocked my rectangle using my trusty steamer (I love using this one HERE from Amazon) to help define the stitches more.
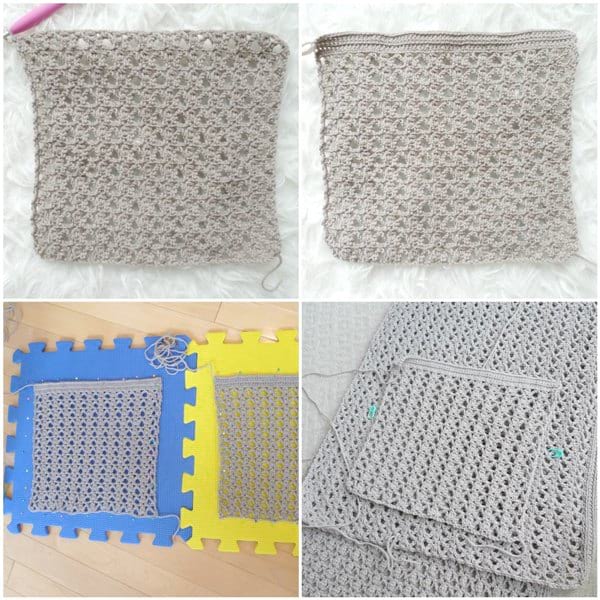
After blocking the shawl, I crocheted the delicate collar ribbing by working single crochets in the front loops only! You can add more rows if you want your collar to be wider. As a reminder, the front loops are the loops that are closest to you when you are crocheting.
Next, it was time for the pockets! I used the same bobble trellis stitch and added some ribbing towards the top. I blocked these pockets and then used the whip stitch to sew the pockets onto the shawl. I tried my best to line up the bobbles of the pockets and shawl so that the pockets blended in!
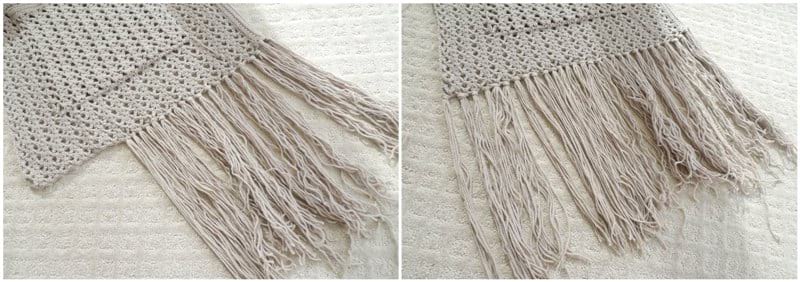
I knew I wanted to add fringe to my pocket shawl! I always try to get uniform strand lengths by wrapping the yarn around a large book and cutting at the bottom. I wanted to create bundles of fringe, so I gathered four strands of yarn and folded them in half. I used a crochet hook to insert my hook into a space along the bottom and pulled the folded loop of strands though. I then pulled the tips of the strands through the loop and repeated this process along the bottom edge, ensuring there was enough space between each bundle of fringe (we do not want to space them too closely together, otherwise the bottom will bulge).
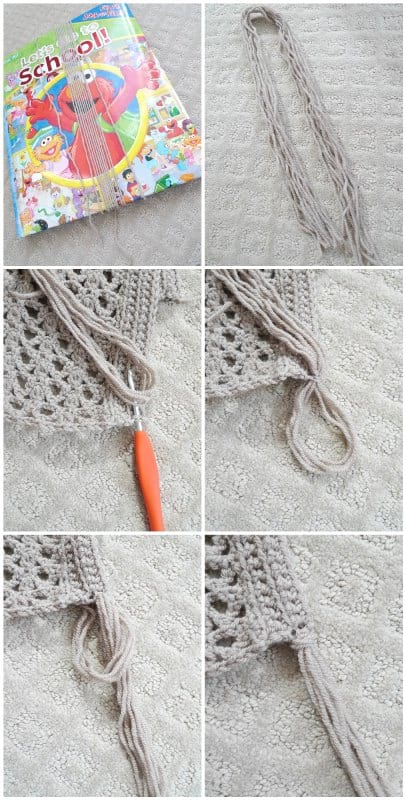
I aimed for 30 bundles of fringe on each side, blocked the fringe with the steamer to straighten them, and then trimmed them to my desired length.
**************************************
Here is the free crochet pattern for the Calla Lily Pocket Shawl:
Crochet this romantic shawl using the elegant bobble trellis stitch! The cozy pockets and luxurious fringe will make this shawl your new favorite using superwash merino yarn!
Materials:
- LB Collection Superwash Merino – level 3 DK lightweight yarn (4 skeins without fringe (400 g/1225 yds), 5 skeins with fringe (445 g/1360 yds); I used the colour “Hemp”; purchase the convenient kit HERE
- Clover Amour 3.75 mm crochet hook
- Yarn needle
- Lock ring stitch markers
- Beautural steamer for blocking
Gauge: 4.5 arcs/bobble sets and 11 rows = 4″/10 cm
Finished Dimensions: 16″/41 cm wide, 69″/175 cm long (without fringe)
Notes:
- A long rectangle is created using the bobble trellis stitch, which is built up using a 2-row repeat.
- Beautiful edging is added around the collar by working single crochets in the front loops only.
- Two pockets are crocheted using the same bobble trellis stitch and sewn onto the shawl.
- The initial chain length must be a multiple of 5 + 2 (e.g. 100 + 2 = 102 chains, 145 + 2 = 147 chains)
- To make the shawl wider, increase the number of initial chains. To make the scarf more narrow, decrease the number of initial chains.
- To make the shawl longer, increase the number of rows. To make the shawl shorter, decrease the number of rows. I am 5’6 for reference.
- Please reference this detailed Bobble Trellis Stitch blog post HERE to see step-by-step photos as well as a video!
- Block the shawl and pockets to help define the stitches more. I use this steamer HERE!
- You can choose which side you want to be the “right” and “wrong” side of your pocket shawl. I chose the smoother side to be the front/right side of my pocket shawl, so I sewed the pockets onto this side.
Special stitches:
Bobble
1. Yarn Over (YO), insert hook in next stitch, YO, pull up a loop, YO, pull through two loops.
2. (YO, insert hook in same stitch, YO, pull up a loop, YO, pull through two loops) two times.
3. YO, and draw through all 4 loops on hook.
Please watch this video below to see how to crochet the Bobble Trellis Stitch:
PATTERN:
*Shawl:
Chain 92.
Row 1: Starting in 2nd chain from hook, Sc 2. *Ch 5, Skip 2, Sc 1. Ch 1, Skip 1, Sc 1.*, rep until 4 sts remain. Chain 5, Skip 2, Sc 2. (18 arcs)
Row 2: Chain 4, turn work. *Sc 1 in 3rd chain of Chain 5. Chain 2, Work bobble in Chain 1, Ch 2.* rep until you reach last Chain 5 space. Sc 1 in 3rd chain of last Chain 5 space. Ch 2, Skip 1 sc from row below, Dc in last st.
Row 3: Chain 1, turn. Sc 2 (from dc below and 1 chain stitch). *Ch 5, Skip 3. Sc 1 (st to the right of the bobble from row below), Chain 1, Skip 1 (the bobble from row below), Sc 1 (st to the left of the bobble from row below)*, rep until there are no more bobbles from row below. Chain 5. Sc 2 in 2nd and 3rd chain from Ch 4.
Row 4-182: Repeat Rows 2 and 3. (End off with the Row 2 pattern.)
Do not fasten off as we will be working on the collar edging.
Block Shawl to help define stitches.
Collar Edging:
Working along the length of the shawl,
R1: Pick up single crochet stitches along the length of the shawl. To do so, insert your crochet hook into an adjacent space, yarn over, and pull up a loop. Yarn over and pull through both loops. Keep repeating this process along the collar. I picked up approximately 275 stitches for my collar.
R2: Chain 1, turn. Single crochet in front loops only.
R3-5: Repeat Row 2. Fasten off and leave long end to incorporate into fringe.
*Pockets (make 2)
Chain 57.
Row 1: Starting in 2nd chain from hook, Sc 2. *Ch 5, Skip 2, Sc 1. Ch 1, Skip 1, Sc 1.*, rep until 4 sts remain. Chain 5, Skip 2, Sc 2. (11 arcs)
Row 2: Chain 4, turn work. *Sc 1 in 3rd chain of Chain 5. Chain 2, Work bobble in Chain 1, Ch 2.* rep until you reach last Chain 5 space. Sc 1 in 3rd chain of last Chain 5 space. Ch 2, Skip 1 sc from row below, Dc in last st.
Row 3: Chain 1, turn. Sc 2 (from dc below and 1 chain stitch). *Ch 5, Skip 3. Sc 1 (st to the right of the bobble from row below), Chain 1, Skip 1 (the bobble from row below), Sc 1 (st to the left of the bobble from row below)*, rep until there are no more bobbles from row below. Chain 5. Sc 2 in 2nd and 3rd chain from Ch 4.
Row 4-26: Repeat Rows 2 and 3. (End off with the Row 2 pattern.)
Row 27: Chain 1, turn. Single crochet across in FLO.
Rows 28-30: Repeat Row 27.
Fasten off and leave long end for sewing.
Position pockets onto shawl – I placed mine 3.5″/9 cm from the bottom and 3.5″/9 cm away from the side with the collar edging. Try to line up the bobbles of the pocket with the bobbles of the scarf so that the pocket blends in well. Using whip stitch, seam the pockets onto the shawl.
Adding Fringe:
Cut 240 strands of yarn, each 24” long (120 strands for each side). I like to wrap the yarn around a large book and cut at the bottom to get uniform strands of yarn. We will be aiming for 30 bundles of fringe on each side of the pocket shawl, with each bundle consisting of 4 strands.
Gather 4 strands of yarn. Fold the strands in half. Insert a crochet hook into a space at the bottom, from wrong side to right side. Pull folded loop of strands through. Pull tips of the strands through the loop. Pull tightly and repeat this process across the bottom edge, ensuring there is enough space between each bundle of fringe (we do not want to space them too closely together, otherwise the bottom will bulge). Repeat the process for both sides, aiming for 30 bundles of fringe on each side. Block fringe with steamer and trim as necessary.
***************************
I am so in love with this romantic and elegant pocket shawl! It is definitely one of my favourite scarves that I’ve ever designed as I love the combination of the this yarn, color, stitch, cozy pockets and luxurious fringe!
Since this Calla Lily Pocket Shawl uses lightweight level 3 yarn, you could definitely wear this shawl indoors when the air conditioning is a little cool and you want some extra warmth. It does not add too much bulk or weight and does not feel heavy at all!
I enjoyed styling this handmade shawl with my long floral dress and skinny brown belt, slouchy boots, and wool camel hat. This shawl can complement any outfit, from dresses and jeans to leggings and tunics. When you choose a neutral color like the one I used, it is so versatile! You could wear it casually or dress it up for a formal event like a wedding!
The Calla Lily Pocket Shawl would make such a beautiful gift for your loved ones! Pocket shawls are practical and functional as they provide warmth and comfort, and they are such a gorgeous addition to any outfit. I love wearing my shawl around the house and sticking my hands into the cozy pockets!
Enjoy crocheting your own pocket shawls! I hope you like this elegant design as much as I do, and I cannot wait to see what colors you use! You can find the convenient Lion Brand Yarn kit HERE that includes all the luxurious Superwash Merino you will need (choose your own color – 29 different shades available) as well as a copy of this pattern. If you live in a warmer climate, you can try using Truboo, Coboo, or Cotton Bamboo yarn (all lightweight level 3) too as I think these yarns would work up beautifully in this design! The easy-to-print and save PDF can be found in my Etsy store HERE and includes all the process photos and step-by-step Bobble Trellis Stitch instructions (total of 8 pages).
If you are looking for some other scarf ideas where you can add pockets, check out my Willow Scarf (super bulky level 6), Two-Tone Scarf Wrap (worsted level 4), Rustic Canyon Scarf (worsted level 4), Puff Stitch Scarf (worsted level 4), and Long Double Crochet Cowl (super bulky level 6) as they are all worked flat and you could easily add pockets to them! All of these scarf and cowl designs can be found in this “Crochet Cowls & Scarves PATTERN BUNDLE” in my Etsy store (over 20 designs at a discounted price)! Happy crocheting, everyone!
{This post is sponsored by Lion Brand Yarn! I’ve loved working with their yarn throughout the years and I’m thrilled that I get to collaborate with them every month!}
This pattern is an original pattern by Stephanie Lau of All About Ami. Please do not claim this pattern as your own. If you wish to share this pattern, you may link to this pattern but please do not reprint it on your site. You may keep a copy for your own personal use but please DO NOT sell the pattern or distribute it.
You may sell products made from this pattern but please clearly credit the design to me, Stephanie Lau of All About Ami, and provide a link to my blog www.AllAboutAmi.com. Permission is NOT granted for mass production or factory manufacturing of any kind. Thank you for being respectful and for your understanding!