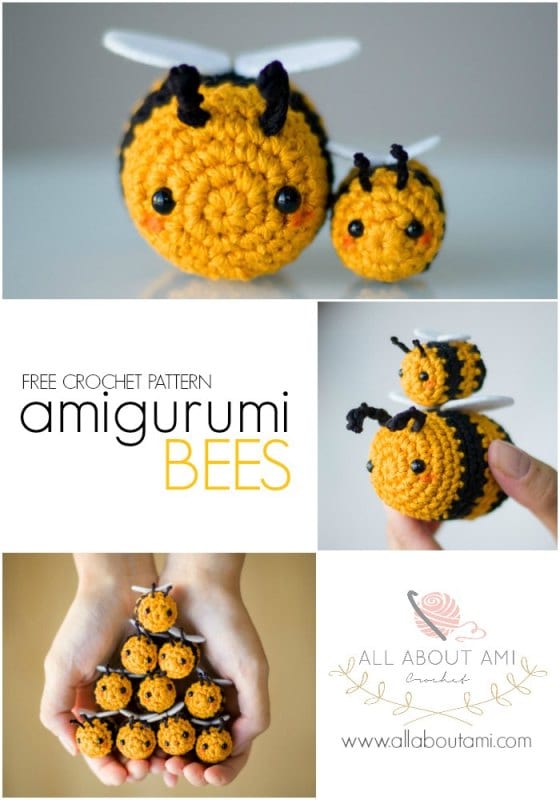
***The Amigurumi Bees Crochet Pattern is available as a PDF in my Etsy shop HERE and on LoveCrochet HERE! It contains all the step-by-step pictures and is a total of 5 pages including the cover page! Scroll down for the free pattern below!
As avid crafters and crocheters, we love adding touches of crochet to different aspects of our lives, and I’m sure many of you can relate! Now that we are parents, we have more opportunities to brainstorm ideas for our girls and special occasions such as their birthdays, Christmas, and Valentine’s Day. Last year was Myla’s first year of preschool, and we made these “Crochet Letter Cards” that I blogged about HERE: we crocheted the first letter of each child’s name and glued it onto a card that they could keep and potentially frame! This year, we returned from a 2 week vacation in Maui and brainstormed what we should do for Valentine’s Day which was less than a week away. Ryan and I bounced ideas off each other and Ryan came across a cute bee image that said, “Will you Bee My Valentine?” since there are always so many pun-related cards (remember my “Wool You Be My Valentine?” cards?). We decided to crochet tiny bees for Myla’s classmates and we started to design and work on them right away!
![]()
I happened to have some 24/7 Cotton by Lion Brand Yarn in my stash and it was perfect since I had black and yellow (I used this same colour for my Star Stitch Pouches), and I had always wanted to try crocheting amigurumi with this yarn! This yarn is wonderful because it is 100% mercerized cotton- it does not pill easily, it has a lustrous sheen to it, and there are many colours available. All these aspects would make it a wonderful yarn for amigurumi with beautiful stitch definition! I used my Clover Amour 2.00 mm hook to get nice and tight stitches with no holes or gaps!

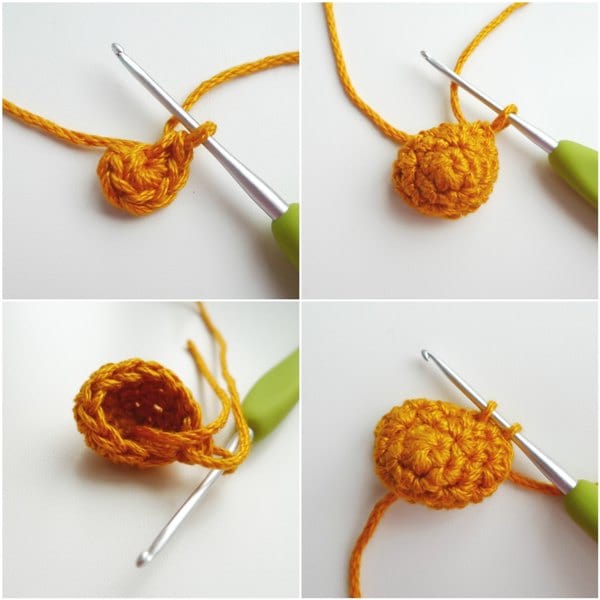
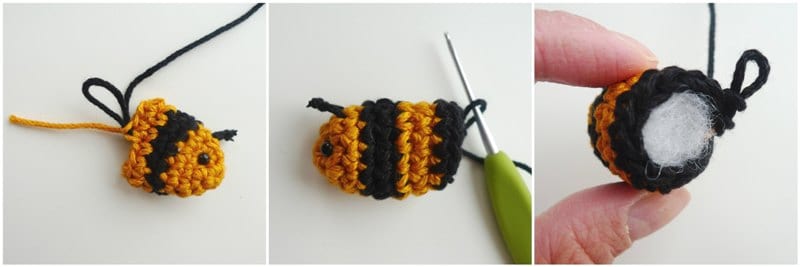
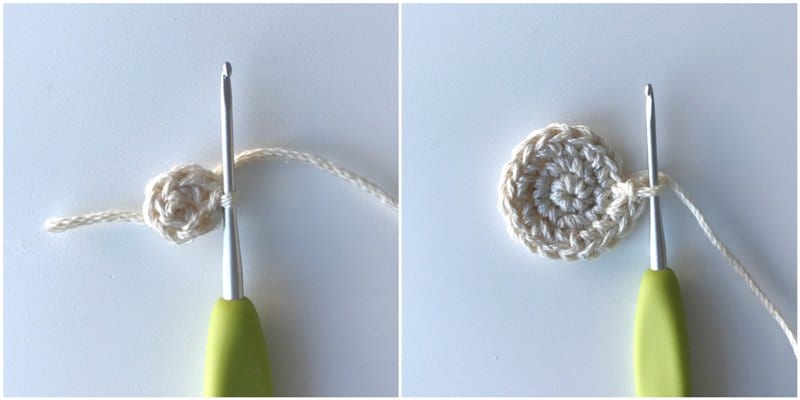
To begin, I crocheted a magic circle and then increased over the next couple of rounds.
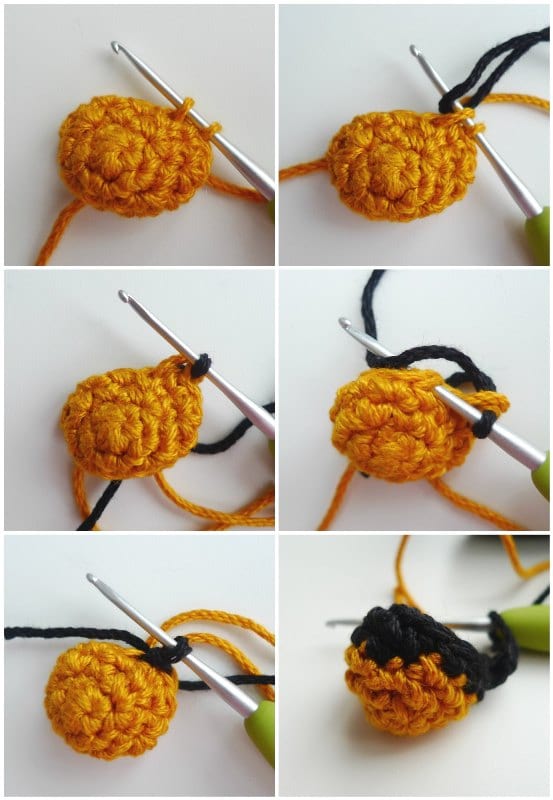
When it was time to do the colour change, I used the following technique so that it wasn’t such a sharp and noticeable change in colour. When I was about to finish off the final yellow stitch of the round (when there are two loops left on the hook), I yarned over with the black yarn and pulled through both loops. Then, I worked a slip stitch into the next stitch, rather than a typical single crochet. From there, I continued on with single crochets. This slip stitch makes the colour change less steep! It’s also important to note that I did not cut the yarn when switching colours: I simply dropped the yarn and picked it back up when I needed it later on. I love not needing to cut the yarn or weave in ends!
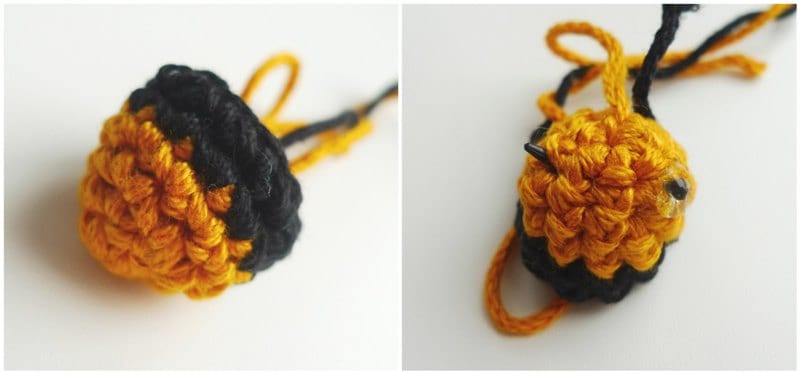
After working the black rounds, we inserted 4 mm safety eyes, the tiniest size we’ve ever used! These particular safety eyes did not come with washers (the backings), so we used hot glue to secure them in place. Note that the picture on the right is the INSIDE of the head, so the bee is inside-out (you can see the hot glue on the right eye). If you are making this for a baby or young child, safety eyes can pose as a choking hazard, so you could opt to embroider the eyes with black yarn or felt!
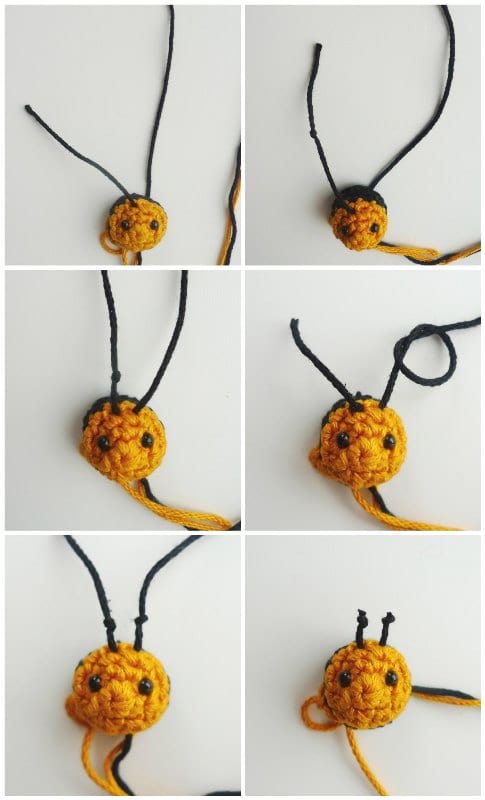
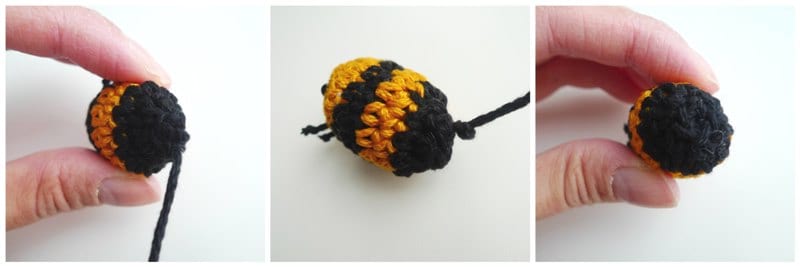
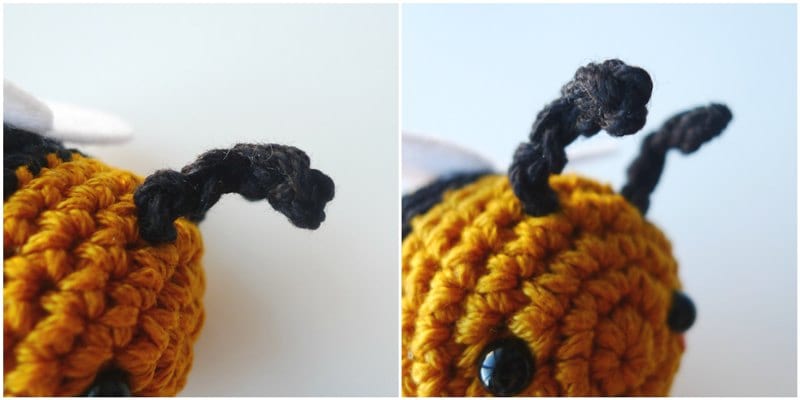
Next, it was time to make the antennae! Ryan inserted a long strand of yarn towards the top of the head between Rounds 3 and 4. He tied a knot on the left side and then brought the right side of the strand between Rounds 3 and 4 on the other side. He then pulled the right side so that the left knot was touching the head. Next, he pulled the left side and positioned the antennae so that the knots were equidistant from the head. He then trimmed the strands of yarn so that the knots were at the top of the antennae!
After making the antennae, I crocheted more yellow rounds and then cut off the yellow yarn. I worked some more black rounds and then stuffed the bee.
I then closed up the bee, tied a knot, and hid that knot within the bee!
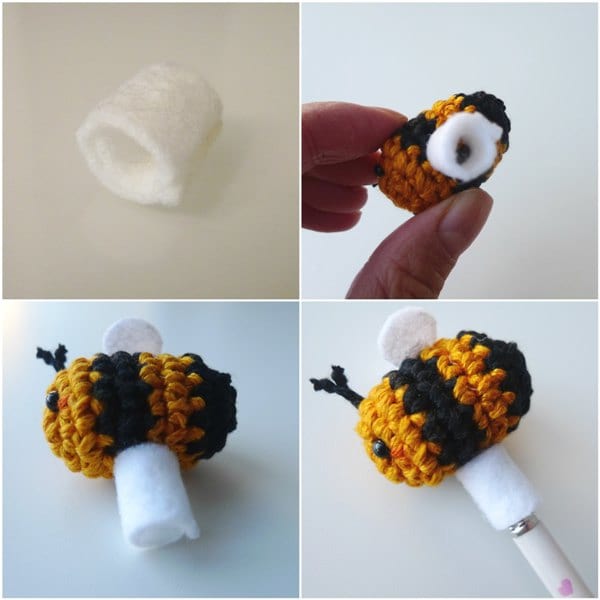
For the wings, Ryan used white felt and cut out the below shapes!
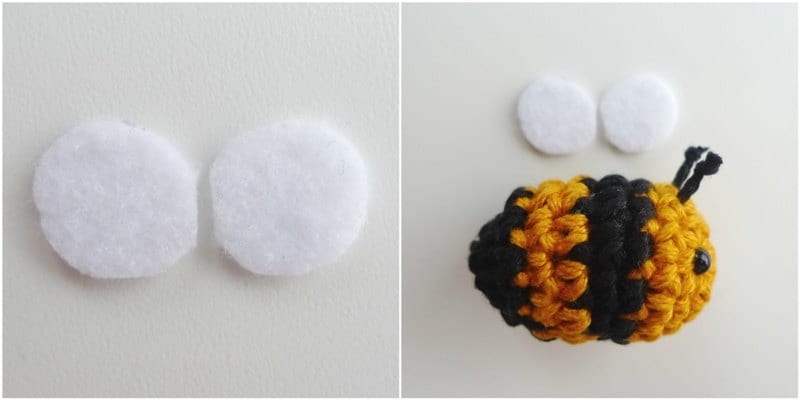
He then glued the wings onto the back of the bee so that they were slightly tilting upwards towards the sides.
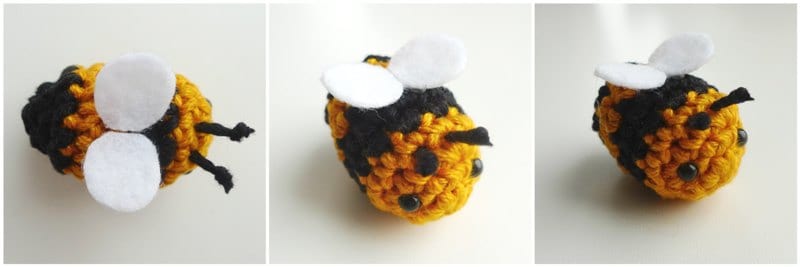
Ryan then used a pink sharpie to add blushing cheeks to our little bee! Blushing pink cheeks are always such an adorable touch for amigurumi!
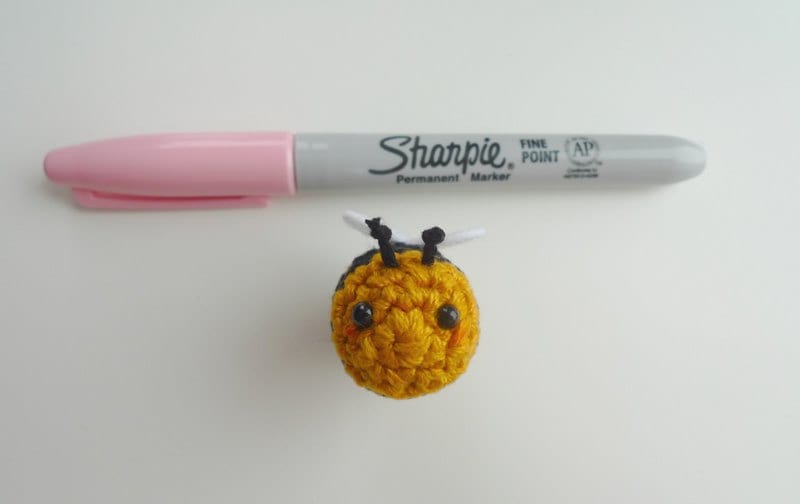
Here are some different views of our finished bee!
![]()
Each bee took approximately 20-30 mins to make! The crocheting part was fast, but the extra details such as the antennae, eyes, wings, and cheeks took a little more time! There are 9 children in Myla’s class, and we wanted to make one for Brielle as well: in total, we made 10 bees! We finished them all in two evenings!
![]()
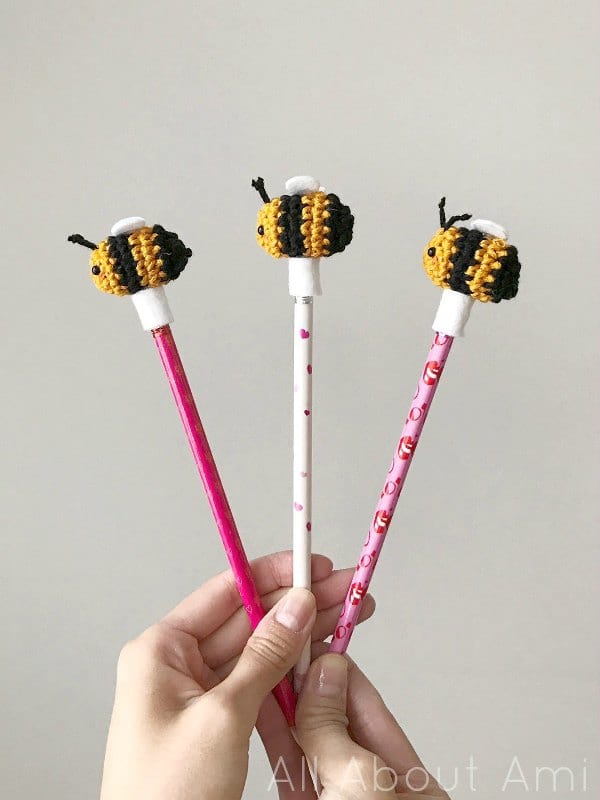
We thought it would be fun to make these little bees into pencil toppers! Ryan rolled a rectangular piece of felt around a pencil and glued the ends. He then glued the top of the felt to the bottom of the bee and we inserted the pencil into this felt tube!
The girls had so much fun holding the pencils to make the bees fly and buzz around! These bees certainly add a touch of cuteness and whimsy when the children need to use their pencils at home or at school!
Check out this short video we filmed showing two bees flying around- we thought the “Flight of the Bumblebees” song was only fitting!
Ryan made these little tags and wrote, “Will you BEE my Valentine?” I love the little heart and bee he drew on each label!
![]()
We knew that some people might want to make a larger amigurumi bee as well, so we decided to design a Queen Bee using the same materials! We constructed the antennae of the Queen Bee differently. I did a series of 20 chain stitches with long ends on each side. Ryan positioned the chain stitches so that the ends were sticking outwards about 3 stitches apart (note that the flat yellow piece in the collage below is depicting the bee’s head). He threaded one end onto a yarn needle and curved the first two stitches onto the next two stitches. He inserted the needle into the 4th chain from the top and then reinserted it back in and out of this folded tip to help keep it in place. He then weaved the yarn needle in and out of the chain stitches going downwards. Once he reached the bottom, he brought the yarn end through the head. Ryan repeated the same process with the other side of the yarn strand to create the second antenna. Once both strands were inside the head, he tied them into a knot.
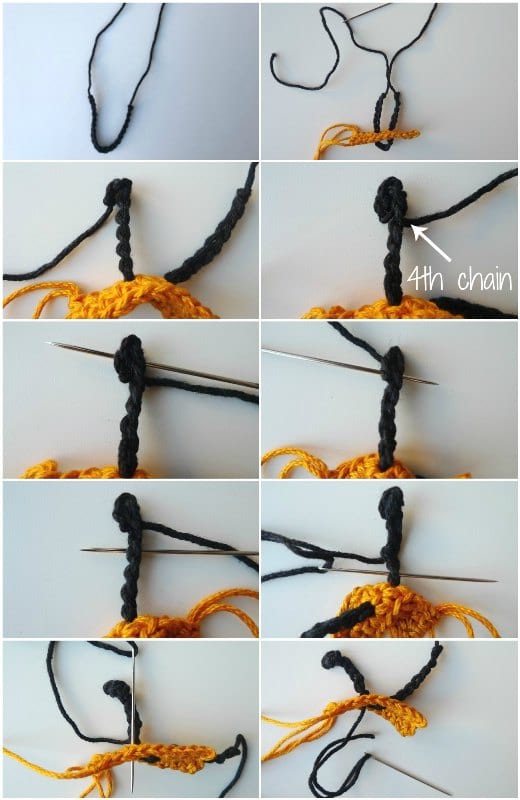
Here is a close-up of the Queen Bee’s antennae!
Here are some different angles of the Queen Bee! I love her plump and round shape!
![]()
I know some crocheters prefer not to use felt and glue with their amigurumi: thus, I figured out the sizing to make crocheted wings as well! If you opt for crocheted wings, you can use white/beige yarn and sew the wings onto the backs of the bees! This is a good option if you are making the bees for very young children who might try and rip parts off the bees, or if you want to use these bees as a part of a mobile!
As you can see, the colour changes appear more gradual on the underside compared to the usual more noticeable changes in colour. I like this technique since you do not have to cut or rejoin the yarn when changing colours!
********************************
Here is the free pattern for my Amigurumi Bees:
![]()
***You can purchase an INEXPENSIVE AD-FREE PDF of this pattern on Etsy HERE and on Craftsy HERE! This beautifully formatted PDF includes the step-by-step pictures and is a total of 5 pages including the cover page!
Materials:
- Lightweight or medium yarn, level 3 or 4 in Yellow and Black (I used Lion Brand yarn’s 24/7 Cotton in “Goldenrod” and “”Black” – also available through the Lion Brand site HERE). Small bees require 1 g of yellow and 1 g of black. Queen Bee requires approximately 6 g of yellow and 6 g of black. White yarn needed if wings are crocheted.
- 2 mm Clover Amour crochet hook
- Yarn needle (bent tip helpful for attaching amigurumi parts- see HERE)
- fiberfill
- 4 mm and 6 mm safety eyes
- White felt
- glue gun
- Clover lock ring stitch markers
- pink sharpie (for cheeks)
Note:
- I worked in continuous rounds (vs. joined rounds) so that there is no visible seam.
- For a cleaner colour change, when working last stitch in old colour: work as if typical single crochet until two stitches are left on the hook (i.e. insert hook into stitch, yarn over, pull up a loop). Use new colour to yarn over and pull through both loops. Work slip stitch in next stitch using new colour. Then continue crocheting single crochets as normal with new colour.
- When working colour changes, do not cut the yarn. Simply drop the colour you are not using and pick it back up when you need it again during subsequent rows.
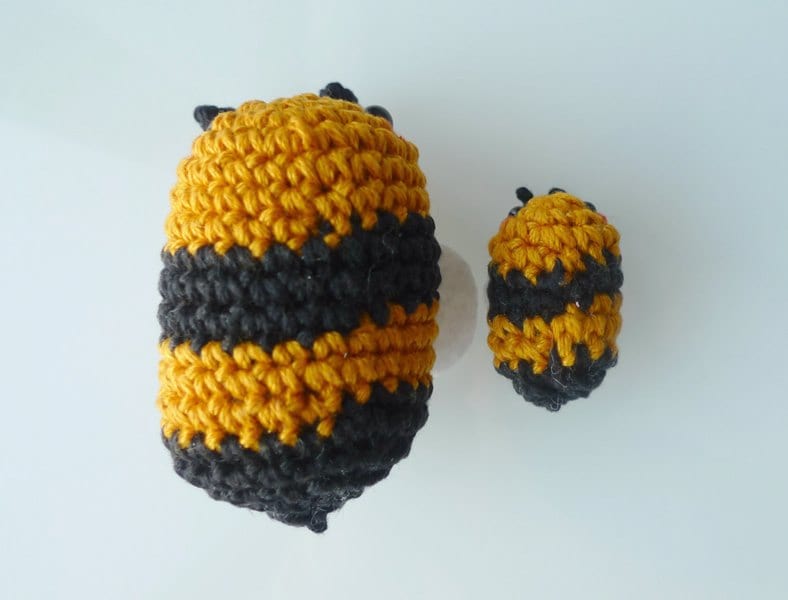
Finished Dimensions:
- Small bees: 1.5″/3.8 cm long, 3″/7.6 cm circumference, 0.75″/1.9 cm across
- Queen Bee: 2.75″/7 cm long, 5.25″/13.3 cm circumference, 1.5″/3.81 cm across
***Small Bee:
![]()
Using yellow yarn,
Round 1: 6 sc in Magic Ring. (6 sts)
R2: *Sc 2, Inc*, rep 2 times. (8 sts)
R3: *Sc 1, Inc*, rep 4 times. (12 sts)
R4: Sc 12
Switch to black yarn,
R5: Sc 12
R6: Sc 12
Position colour change towards bottom of bee. Insert 4 mm safety eyes between Rounds 2 and 3 towards the upper part of the initial magic circle. Use hot glue to glue posts of safety eyes into place if safety eyes do not have washers at the back.
Add antennae:
- Insert long strand of yarn towards top of bee between Round 3 and 4. Tie a knot on the left side. Bring right side of strand between Rounds 3 and 4 on the other side. Pull right side so that the left knot is touching the head. Pull left side and position antennae so that the knots are equidistant from the head. Trim strands so that the knots are at the top of the antennae.
Switch to yellow yarn,
R7: Sc 12
R8: Sc 12
Switch to black yarn. Cut yellow yarn.
R9: Sc 12
Stuff bee.
R10: *Dec*, rep 6 times. (6 sts).
Sl st to next st. Sl st to back loops of next two stitches. Fasten off, tie knot and hide end through resulting circle.
Using pink sharpie, add blushing cheeks underneath the eyes.
Wings (make 2):
- Cut circles out of white felt. Glue inner edges onto back of bee with sides tilting upwards slightly.
- Crochet version: Using white yarn, 6 sc in Magic Ring. Sl st to next stitch. Fasten off and leave long end for sewing. Sew onto bee’s back.
Pencil topper: Cut rectangle out of white felt. Roll into tube around pencil and use hot glue on ends to secure in place. Glue top of tube onto bottom of bee.
***Queen Bee:
![]()
Antennae:
Using black yarn,
Leaving long initial tail, Chain 20. Fasten off and leave long end for attaching.
Body:
Using yellow yarn,
Round 1: 6 sc in Magic Ring. (6 sts)
R2: *Inc*, rep 6 times. (12 sts)
R3: *Sc 1, Inc*, rep 6 times. (18 sts)
R4: *Sc 2, Inc*, rep 6 times. (24 sts)
R5-7: Sc 24
Switch to black yarn,
R8-10: Sc 24
Position colour change towards bottom of bee. Insert 6 mm safety eyes between Rounds 3 and 4 towards the upper part of the initial magic circle.
Add antennae:
- Thread ends of antennae through top of head so that ends are sticking outwards about 3 stitches apart.
- Fold tip of antennae so that the first two chains over the next two chains.
- Using tapestry needle, weave yarn end through 4th chain.
- Weave yarn end back through folded tip and back out to secure its shape.
- Weave yarn end down through center of chains.
- When the bottom of the antenna has been reached, weave yarn end through head so that it is inside the body.
- Repeat the same process with the other antennae.
- Once both yarn ends are inside the body, tie them in a knot to secure them in place.
Switch to yellow yarn,
R11-13: Sc 24
Switch to black yarn and cut yellow yarn.
R14-15: Sc 24
R16: *Sc 2, dec*, rep 6 times. (18 sts)
R17: *Sc 1, dec*, rep 6 times. (12 sts).
Stuff bee.
R18: *Dec 1*, rep 6 times. (6 sts).
Sl st to next st. Sl st to back loops of next two stitches. Fasten off, tie knot and hide end through resulting circle. Pinch bottom of bee to shape stitches into stinger!
Using pink sharpie, add blushing cheeks underneath the eyes.
Wings (make 2):
- Cut circles out of white felt. Glue inner edges onto back of bee.
- Crochet version: Using white yarn,
- Round 1: 6 sc in Magic Ring.
- Round 2: *Inc*, rep 6 times (12 sts).
- Round 3: *Sc 1, Inc*, rep 6 times (18 sts).
- Sl st to next st. Fasten off and leave long end for sewing.
*****************************
These amigurumi bees are sooo incredibly adorable!
![]()
They are such a quick and fun project, perfect for beginners! In addition to being pencil toppers, they would also be adorable keychains, and if you add a loop, you could hang them from your rear-view mirror so that they are swinging and buzzing around when you’re driving!
![]()
Each small bee requires only 1 g of yellow yarn and 1 g of black yarn. Since each skein of 24/7 Cotton contains 100 g, you could technically make 100 little bees with just 1 skein of yellow and 1 skein of black!
![]()
The Queen Bee is so adorably round!
![]()
They make such an adorable set! I love their round faces and blushing cheeks, and it almost looks like the initial magic circles are their cute mouths!
![]()
24/7 Cotton is perfect for amigurumi- just look at the beautiful stitch definition and the vibrant colours!
![]()
When you stack the tiny bee ontop of the Queen Bee, they look like Tsum Tsum’s!
![]()
I hope you’ll try making some bees for yourself- it will be a fun project, particularly for the Spring! If you’ve always wanted to try crocheting amigurumi, this is a fun project! There are no limbs you need to attach, and the increases and decreases are very basic with no complex shaping!
![]()
The children all loved the bees and I hope they will have fun playing with them! I frequently call Myla and Brie my “honeybees”, so these sweet bees are a fitting gift for them! My sister Ashley is already requesting that I make one for her car, and I’m tempted to make one to hang on my backpack! Follow along with my work on social media here Facebook, Twitter (@AllAboutAmi) and Instagram (@AllAboutAmi)! You can follow me on Pinterest too and pin the below collage to your boards! Happy bee-making, friends!
{This post is sponsored by Lion Brand Yarn! I’ve loved working with their yarn throughout the years and I’m thrilled that I get to collaborate with them every month!}
This pattern is an original pattern by Stephanie Lau of All About Ami. Please do not claim this pattern as your own. If you wish to share this pattern, you may link to this pattern but please do not reprint it on your site. You may keep a copy for your own personal use but please DO NOT sell the pattern or distribute it.
You may sell products made from this pattern but please clearly credit the design to me, Stephanie Lau of All About Ami, and provide a link to my blog www.AllAboutAmi.com. Permission is NOT granted for mass production or factory manufacturing of any kind. Thank you for being respectful and for your understanding!