***You can purchase an INEXPENSIVE AD-FREE PDF of this pattern on Etsy HERE and on LoveCrochet HERE! This beautifully formatted PDF includes all the step-by-step pictures, the stitch tutorials, and the full pattern! It is a total of 5 pages including the cover page! You can also purchase a kit HERE on the Lion Brand Yarn website that includes the pattern and all the yarn needed to make this blanket!
I first learned how to crochet from books when I was 10 years old, and I remember embarking on several beautiful crochet afghan projects but never actually finishing any of them. Instead, I ended up working on smaller and quicker projects such as purses and stuffed animals. Now as an adult, I’m thankful that I’ve been able to actually complete and even design several blankets (e.g. Granny Square Baby Blanket, Bold & Bright Chevron Baby Blanket). Blankets are large projects to undertake as they require much more time, but there is such a sense of accomplishment when you complete one, and they serve a very practical function as well! My Chunky Braided Cabled Blanket that I designed last year has been very popular, and I love seeing people empowered to make intricate cables! I used a jumbo level 7 yarn to design that piece, and this year I wanted to crochet another throw blanket, this time using the ever popular Wool-Ease Thick & Quick by Lion Brand Yarn. This super bulky (level 6) wool blend yarn is widely available and comes in so many colours (see my blog post about it HERE). It is easily washable and the ends can be felted together due to its wool content (see my “How to Felt Yarn Ends Together” tutorial HERE)- this is vital when making large projects since you need to add so many balls of yarn! By felting the yarn ends, you do not need to tie knots or weave in any more ends! For my blanket, I used the beautiful neutral colourway called “Fisherman“!
![]()
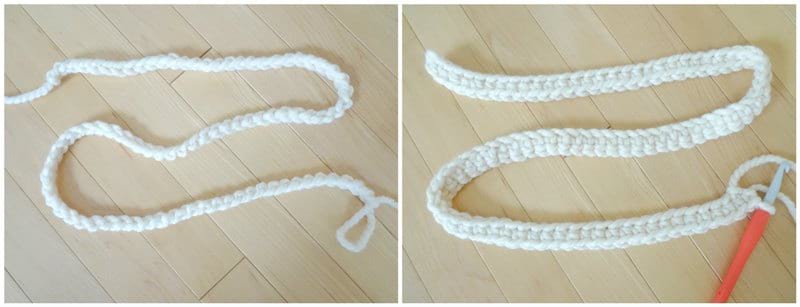
To begin, I chained 87 stitches with my 9 mm Clover Amour hook. You need to start with a multiple of 12 (e.g. 84, 96, 108, 120) and add 3. This helps keep the bobbles staggered as you’ll see later on. After chaining 87, I worked a row of single crochets and then it was time to begin the cross double crochet section.
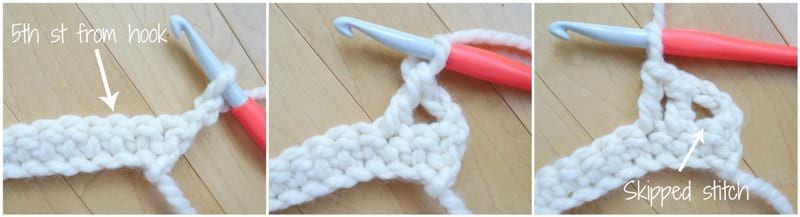
Starting from the 5th chain from the hook, I worked one double crochet. Then, I worked a second double crochet in the next stitch. You’ll notice that there is a skipped stitch as shown in the picture below.
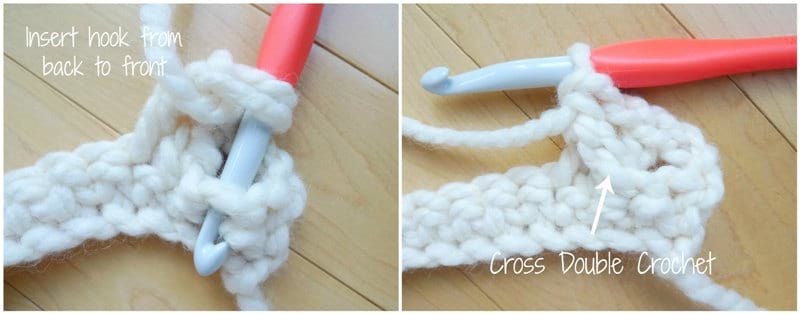
Inserting my hook from the back to the front, I worked a double crochet in that skipped stitch. This creates a double crochet that crosses over the two previous double crochets.
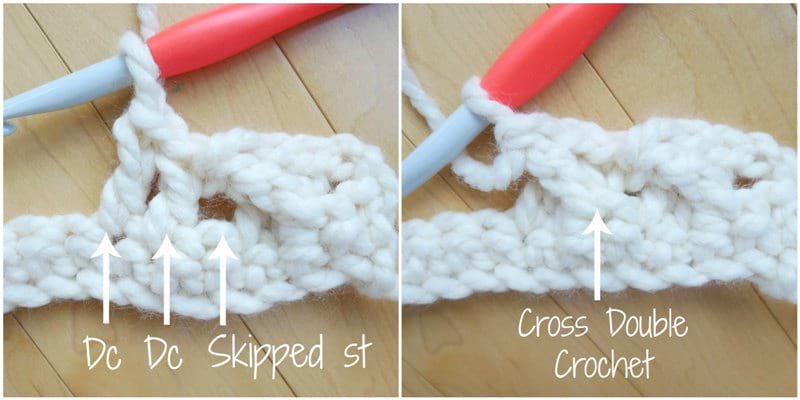
You repeat this pattern across the row: skip one stitch, work two double crochets, and then work a cross double crochet in that skipped stitch.
After each row of cross double crochets, you work a row of single crochets in the front loops only (odd rows). As a reminder, the front loops are the loops that are closer to you!
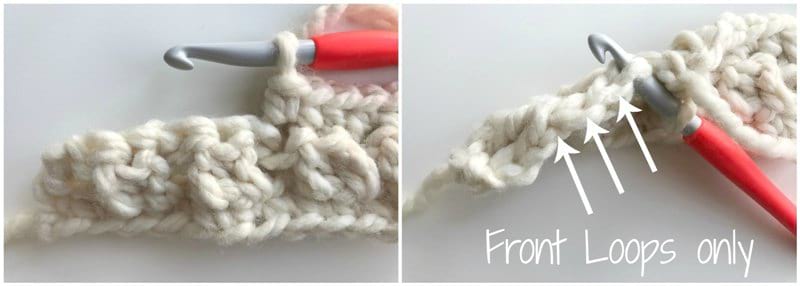
By leaving the back loops unworked, they create beautiful lines that help to frame the cross double crochets and bobble stitches later on.
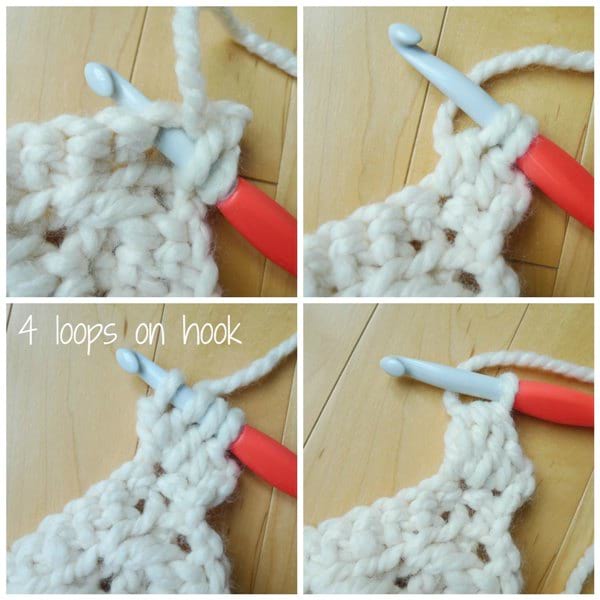
Next, I will describe how to work the bobble stitch in this pattern. You work them as though you are making a double crochet: you yarn over, insert your hook in the indicated stitch, yarn over, pull up a loop, yarn over, and pull up two loops. Instead of completing the double crochet, you yarn over and insert your hook in that same stitch and keep forming “almost complete” double crochets until there are 4 loops on the hook. Then, you yarn over and pull through all the loops on the hook. You can read how to do the bobble stitch in the written pattern below and also see it in action with my video tutorial below!
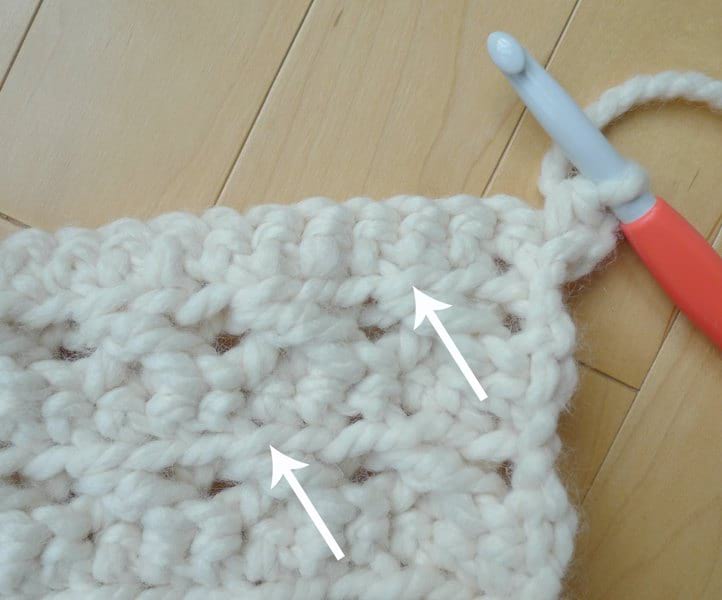
The bobble stitches are interspersed between single crochets. You’ll notice that sometimes the bobbles get pushed back, but you can push them forward with your fingers to make them more prominent and pronounced. You could also create slightly larger bobbles by crocheting until there are 5 loops left on the hook before yarning over and pulling through- this of course will use up more yarn though!
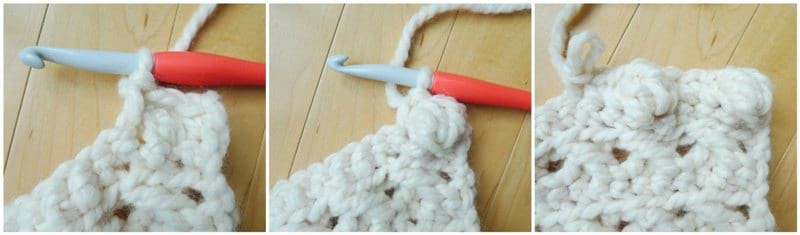
One row of bobble stitches are complete!
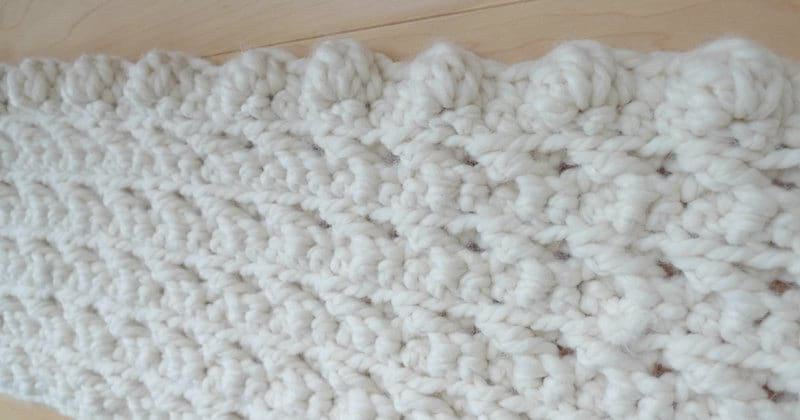
The next row of bobble stitches are staggered from the previous bobble row! Below you can see that I completed 5 Cross Double Crochet Sections and 4 Bobble Sections! It was then time to crochet the border!

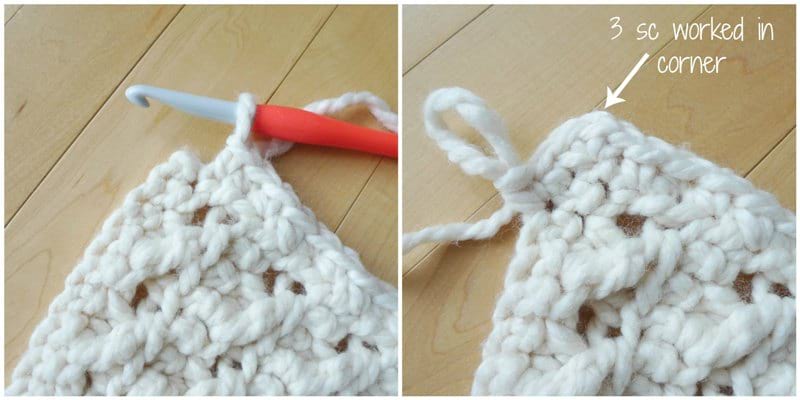
I worked single crochets around, making sure to work 3 single crochets in the corner.
For Rounds 2 and 3 of the border, I single crocheted in the back loops only to once again create these beautiful lines and frames!

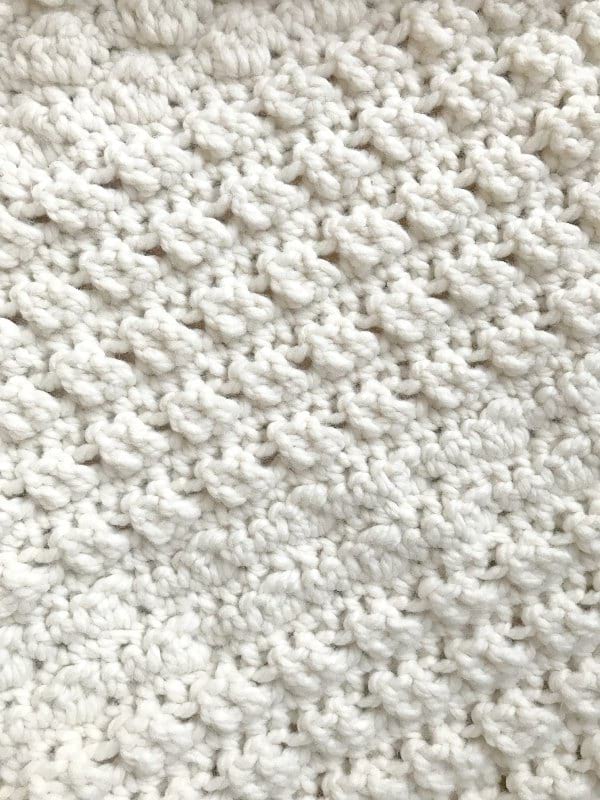
I wanted to show you the back side of the blanket as well since it is also very pretty and textured!
Here is a video I made demonstrating the Cross Double Crochet, single crocheting in the front loops only, and the Bobble Stitch!
This blanket was fun to make, and crocheting the different stitches helped vary the process and segment it into concrete sections!
![]()
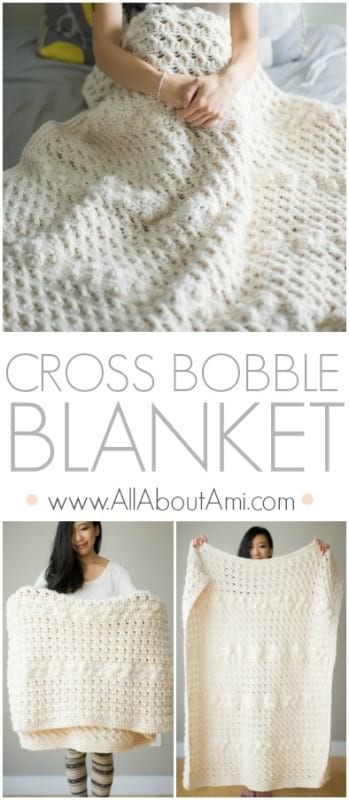
I was delighted when my Cross Bobble Blanket was complete, 10 skeins of yarn later!
![]()
****************
Here is the free pattern for my Cross Bobble Blanket!
***You can purchase an INEXPENSIVE AD-FREE PDF of this pattern on Etsy HERE and on Craftsy HERE! This beautifully formatted PDF includes the stitch tutorial, step-by-step pictures and pattern, and is a total of 5 pages including the cover page!
![]()
Materials:
- 9 mm Clover Amour Hook
- Wool-Ease Thick & Quick in “Fisherman” by Lion Brand Yarn (Super bulky, level 6): 10 skeins or 1700 g required – on the Lion Brand Yarn site HERE
The Cross Bobble Blanket is also available as a kit on the Lion Brand Yarn site HERE and it includes the pattern and all the required yarn!
Special stitches:
Bobble:
1. Yarn Over (YO), insert hook in next stitch, YO, pull up a loop, YO, pull through two loops.
2. (YO, insert hook in same stitch, YO, pull up a loop, YO, pull through two loops) two times.
3. YO, and draw through all 4 loops on hook.
Cross Double Crochet:
Skip 1 stitch. Dc 2. Inserting hook from back to front, work dc in skipped stitch.
Notes:
- This blanket consists of rows of: cross double crochets, bobbles, and single crochets in the front loops only.
- Each row of cross double crochets and bobbles (even rows) is followed by a row of single crochets in the front loops only (odd rows).
- The blanket is sectioned into five cross double crochet sections (consisting of five cross double crochets rows with single crochet rows in between) and 4 bobble sections (consisting of 2 bobble rows with single crochet rows in between).
- For the border, 3 rows of single crochet are added (last 2 rows are in the back loops only).
- The bobbles within the two bobble rows are staggered, so they are not stacked directly ontop of each other.
- Beginning chain is a multiple of 12 + 3. Thus, to increase your beginning chain, choose a multiple of 12 (e.g. 96, 120, 132) and then add 3.
- Turning chain/initial chains count as 1 stitch (1 dc).
Gauge: 8 dc and 4 rows = 4″
Chain 87.
Row 1: Starting from 2nd chain from hook, Sc across. (86 sts)
Cross Double Crochet Section 1
Row 2: Chain 2, turn. Starting from 5th st from hook, Dc. Dc in next st. Work dc in skipped st by inserting hook from back to front. *Sk 1, Dc, Dc, work Dc in skipped st*, rep till end. Dc in last st.
Row 3: Chain 1, turn. Sc in FLO across. (86 sts)
Row 4-11: Repeat Rows 2-3.
Bobble Section 1
R12: Chain 1, turn. Sc. *Bobble, Sc 3*, rep across. Sc in last st.
R13: Chain 1, turn. Sc in FLO across. (86 sts).
R14: Chain 1, turn. *Sc 3, Bobble*, rep across. Sc 2 in last two sts.
R15: Chain 1, turn. Sc in FLO across. (86 sts)
Cross Double Crochet Section 2
Row 16-25 : Repeat Rows 2-3
Bobble Section 2
R26: Chain 1, turn. Sc. *Bobble, Sc 3*, rep across. Sc in last st.
R27: Chain 1, turn. Sc in FLO across. (86 sts).
R28: Chain 1, turn. *Sc 3, Bobble*, rep across. Sc 2 in last two sts.
R29: Chain 1, turn. Sc in FLO across. (86 sts)
Cross Double Crochet Section 3
Row 30-39 : Repeat Rows 2-3
Bobble Section 3
R40: Chain 1, turn. Sc. *Bobble, Sc 3*, rep across. Sc in last st.
R41: Chain 1, turn. Sc in FLO across. (86 sts).
R42: Chain 1, turn. *Sc 3, Bobble*, rep across. Sc 2 in last two sts.
R43: Chain 1, turn. Sc in FLO across. (86 sts)
Cross Double Crochet Section 4
Row 44-53 : Repeat Rows 2-3
Bobble Section 4
R54: Chain 1, turn. Sc. *Bobble, Sc 3*, rep across. Sc in last st.
R55: Chain 1, turn. Sc in FLO across. (86 sts).
R56: Chain 1, turn. *Sc 3, Bobble*, rep across. Sc 2 in last two sts.
R57: Chain 1, turn. Sc in FLO across. (86 sts)
Cross Double Crochet Section 5
Row 58-67 : Repeat Rows 2-3
Border:
Row 1: Sc around perimeter of blanket, working 3 sc in each corner st. Sl st to first sc.
Row 2: Chain 1, Sc in back loops only. Sl st to first sc.
Row 3: Chain 1, Sc in back loops only. Fasten off and weave in end.
Finished Dimensions: 43″/109 cm x 47″/119 cm
*************************************
I love the gorgeous and varied texture of this Cross Bobble Blanket!
![]()
It’s fun learning and incorporating new stitches into my designs, and I love how the Cross Double Crochet and Bobble Stitch add such dimension with the raised effects!
![]()
Throw blankets are such a practical item to have around the home, and I love how they drape across your lap when you are working on them! They help keep you warm and cozy during the maker process!
![]()
I hope you’ve enjoyed reading about this classic and luxurious throw blanket, and that I’ve inspired you to try some new crochet stitches as well! You can create such gorgeous texture with crochet stitches, and it’s fun to vary them up! Keep up to date with all my newest designs and blog posts with my newsletter HERE! You can also follow along with me on social media here: Facebook page, Twitter (@AllAboutAmi) or Instagram (@AllAboutAmi). Let’s keep warm this fall and winter under our snuggly handmade crochet blankets!
![]()
{This post is sponsored by Lion Brand Yarn! I’ve loved working with their yarn throughout the years and I’m thrilled that I get to collaborate with them every month!}
This pattern is an original pattern by Stephanie Lau of All About Ami. Please do not claim this pattern as your own. If you wish to share this pattern, you may link to this pattern but please do not reprint it on your site. You may keep a copy for your own personal use but please DO NOT sell the pattern or distribute it.
You may sell products made from this pattern but please clearly credit the design to me, Stephanie Lau of All About Ami, and provide a link to my blog www.AllAboutAmi.com. Permission is NOT granted for mass production or factory manufacturing of any kind. Thank you for being respectful and for your understanding!