***You can purchase an INEXPENSIVE AD-FREE PDF of this pattern on Etsy HERE and on LoveCrochet HERE! This beautifully formatted PDF includes the step-by-step pictures and is a total of 6 pages including the cover page!
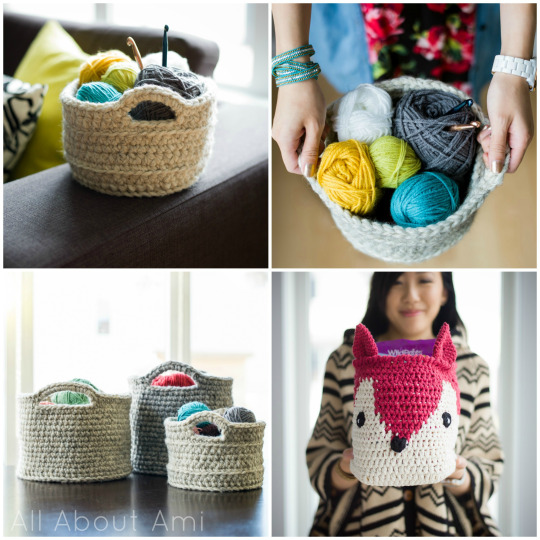
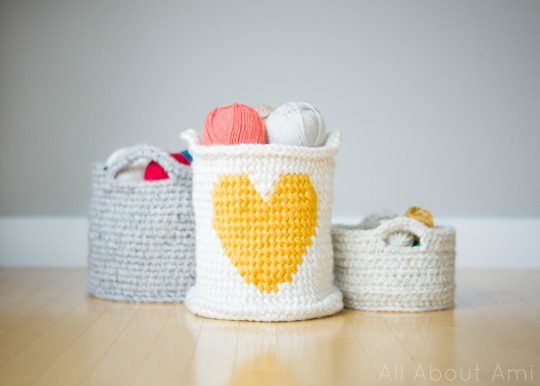
I’ve loved crocheting baskets over the years and they are so functional as I continue to use them to this day to store yarn balls, toys, and baby hats/socks/mittens. You may remember the Chunky Crocheted Baskets I made (see HERE and HERE) as well as the Fox Basket I made for a baby shower gift!
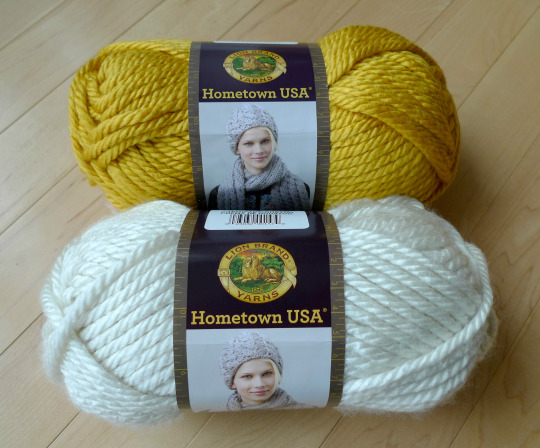
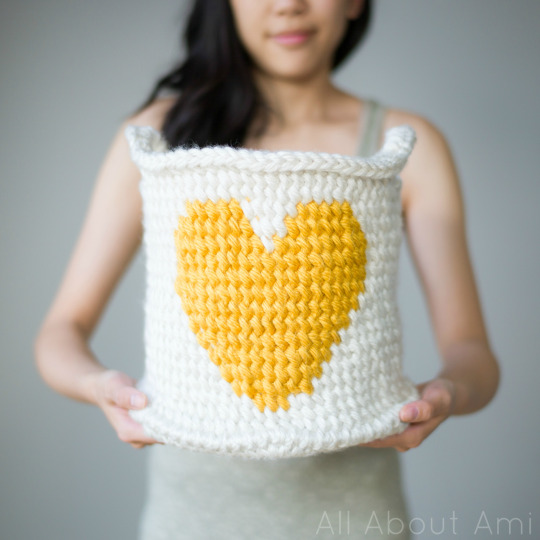
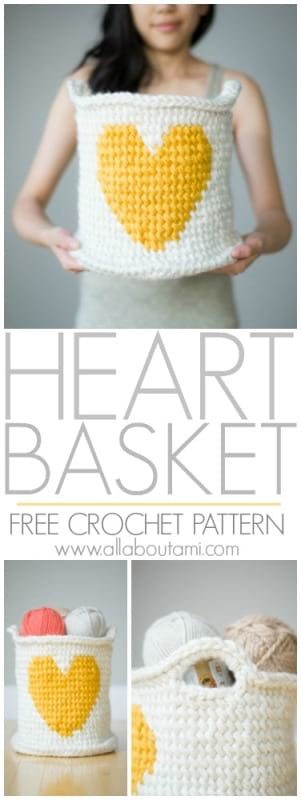
I keep a running list of design ideas that I hope to tackle one day, and one such item on this list was a basket with a heart on it! I thought it would be so cute for a nursery and very pretty to have as storage. I wanted to use super bulky yarn just like my previous baskets, and I loved the colour options available in Lion Brand Yarn’s Hometown USA as well as its beautiful sheen. I was aiming for a beautiful gold heart, and when I saw this “Madison Mustard”, I knew it was the perfect choice! I opted also for “Houston Cream” for the main colour of my basket!
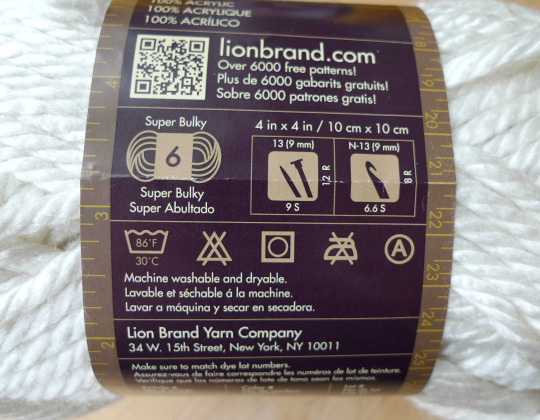
Hometown USA is a 100% acrylic super bulky (level 6) yarn, and as you can see on the package, a 9 mm hook is recommended.
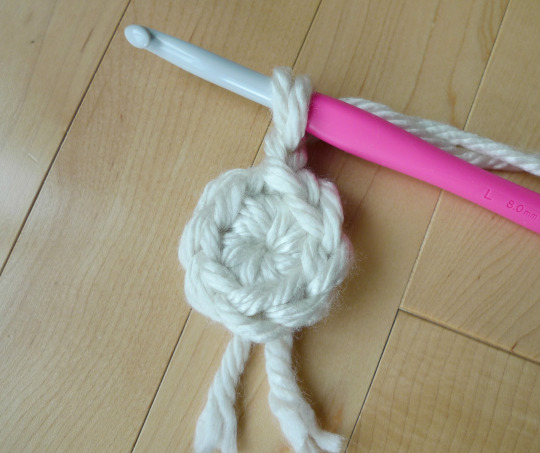
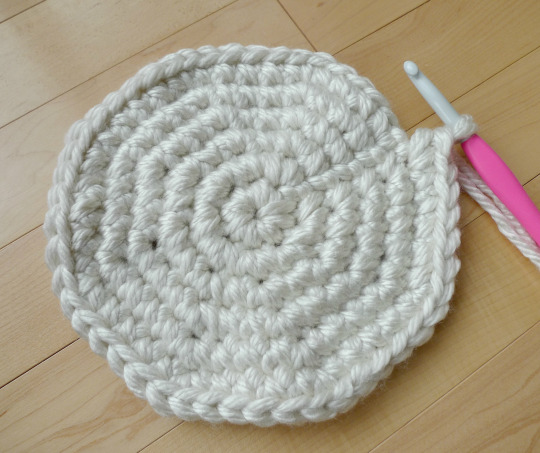
Since we want this basket to be very stiff and firm so that it will keep its shape, I used an 8 mm Clover Amour hook while holding TWO STRANDS of Hometown USA together! This is how I crocheted my previous baskets as well. I started off with a Magic Circle (see tutorial HERE) so that there is no initial hole or gap.
Then I continued increasing to get a flat circle that was expanding outwards.
To get a clean and straight seam, I slip stitched to the first single crochet of each round and NOT the chain 1 to close up the round.
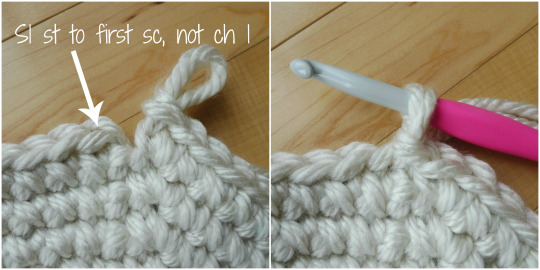
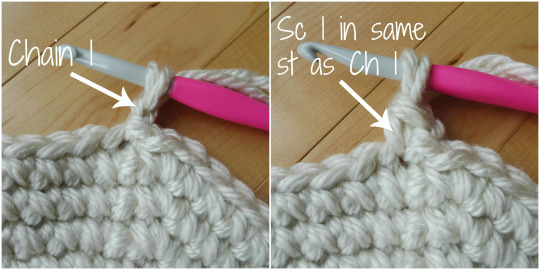
Then I chained 1 and then did my first single crochet in the SAME STITCH as the Chain 1.
Now the plot thickens…from here on in, I went through FOUR FAILED ATTEMPTS before achieving the look I was going for. I will walk you through my design and thought process so you can see how the final product came to be!
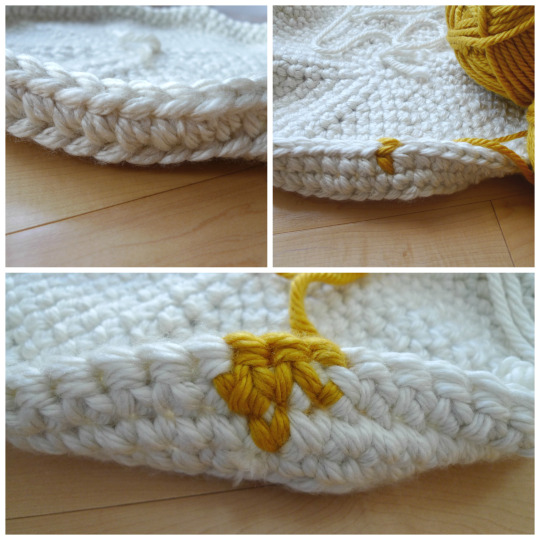
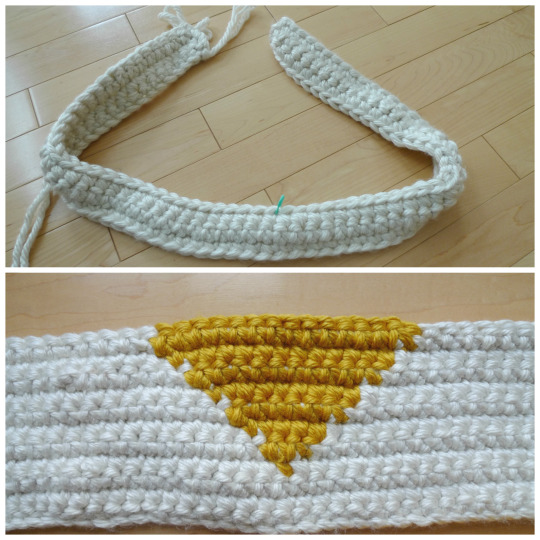
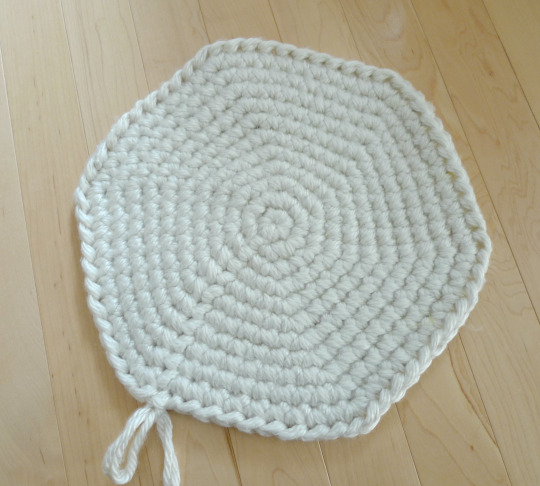
Failed Attempt #1: Once I was done my base, I single crocheted in the back loops only for the next round so that there would be a nice edge/rim on the bottom. I ended up scrapping this part as you’ll see later on. I began adding my yellow yarn for the heart and was not happy with how it was looking. Typically when working basic stitches in rounds, the stitches do not line up as they are slightly staggered round by round. This is visible in my Fox Basket as the image is slightly skewed, and even below you can see that the very bottom yellow stitch is not lining up nicely under the middle stitch of the next round. I actually kept going for a while and the heart was looking very misshapen- I should’ve taken a picture of it farther along, but I quickly frogged it as I couldn’t bear the sight of it anymore!
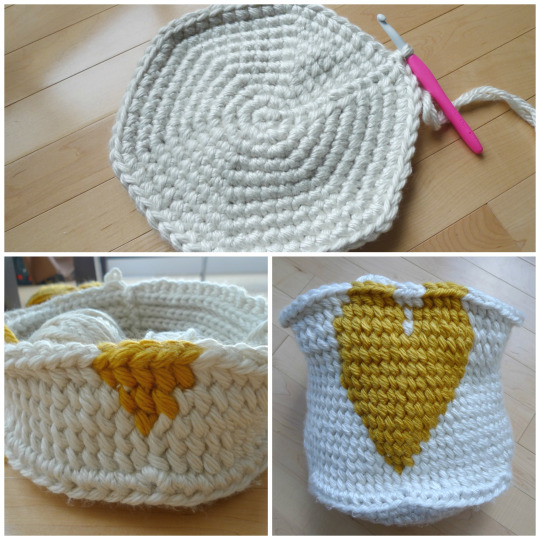
Failed Attempt #2: Ryan and I then had the idea to work the base of the basket separately from the body. This way, the body could be worked in turned rows which would give the heart a cleaner look since the stitches would line up better. However, I wasn’t too keen on the fact that I would have to do lots of attaching (sewing the base to the body and the ends of the base together) later on. I carried the strands along with me during colour changes, and it was actually looking pretty good. I posted a photo of my progress on social media talking about tapestry crochet, and a Facebook commenter actually attached a beautiful heart cup cozy that she had made! The stitches were perfectly lined up, and the heart looked gorgeous! I curiously asked her how she achieved this in rounds, and she mentioned using front post stitches as she had followed a pattern by Lakeside Loops! With such a brilliant idea, I quickly frogged attempt #2!
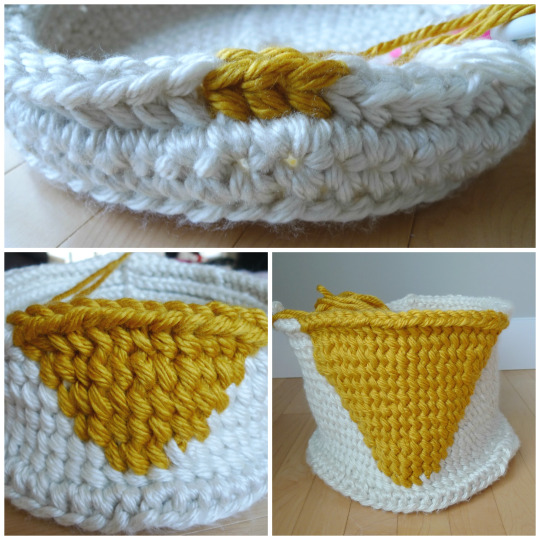
Failed Attempt #3: I excitedly began working front post single crochets and was delighted that the stitches were lining up perfectly! I followed this heart graph I found online HERE from Crochet Kitten but my final heart turned out way too skinny and long, as if the heart had been stretched lengthwise! I realized this happened because the pixels in the graph were perfect squares whereas my front post single crochet stitches were longer “rectangles” compared to squares! We realized that we would have to design our own heart graph to accommodate for these stitches that we were using!
Failed Attempt #4: Ryan made a number of different heart graphs, and we tried one that would be wider as I wanted a fuller heart compared to the previous attempt. I went pretty far with this design and as you can see, the heart was VERY full. However, I was running out of the white yarn and the heart looked like it was overwhelming the basket- I knew that I would have to make the basket bigger overall if I used this heart design but I didn’t want to run out of yarn! This project is already a yarn eater as it is since we’re crocheting while holding two strands at the same time!
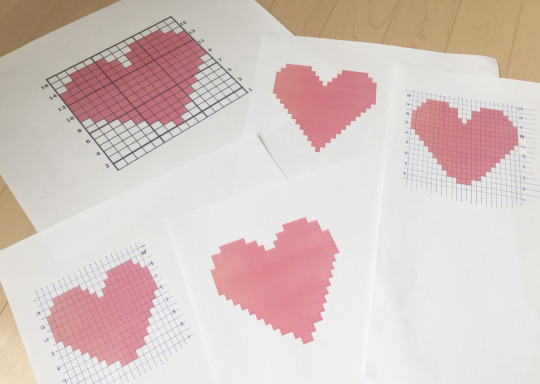
Thus, it was back to the drawing board to redesign a smaller but still fuller heart! Here are a bunch of different heart shapes that we tried!
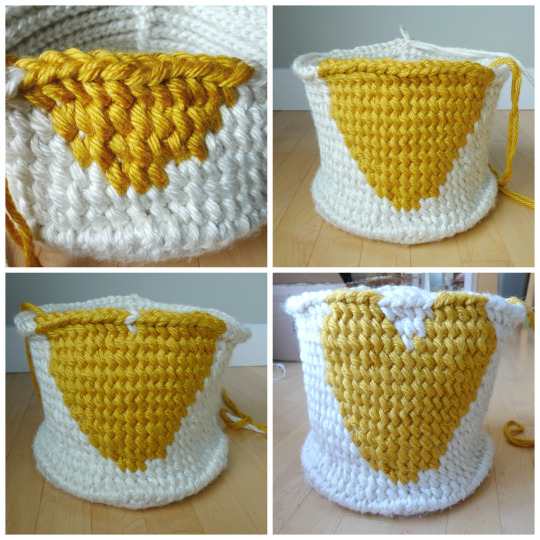
Successful Attempt: One of these heart graphs ended up being the perfect fit! Once I was happy with the size of my base, it was time to do my front post single crochets!
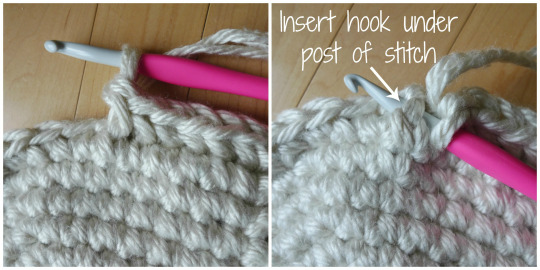
To work a front post single crochet, you insert your crochet hook under the post of the next stitch (instead of the front and/or back loops where you would typically insert your hook). You then work your single crochet as normal.
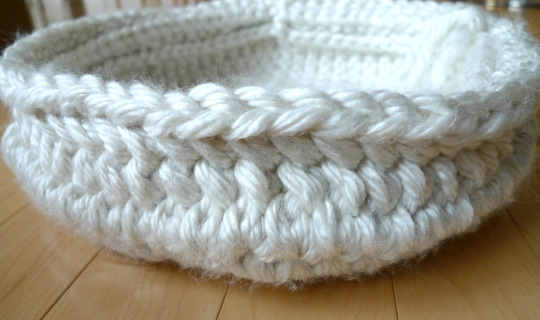
You’ll notice that in both of the previous attempts (the skinny heart and huge heart), the bottom bulges out compared to the rest of the body. When working front post single crochets, it causes the piece to shrink inwards a bit. I did not want this shrinkage to be extremely pronounced, so I decided not to do that rim (made by crocheting in the back loops only for one round). Aren’t these front post single crochets looking lovely? They stack so nicely ontop of each other, and it’s such an interesting looking stitch!
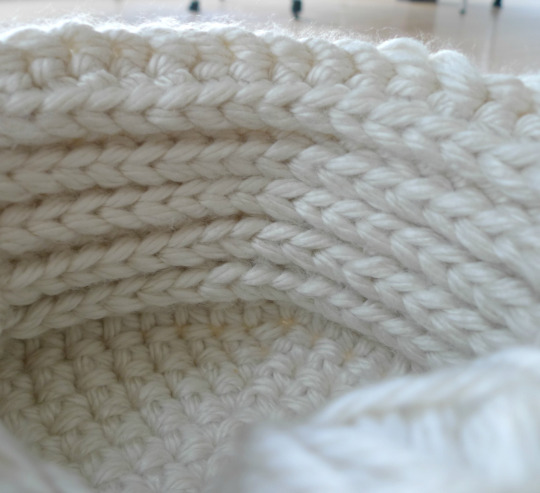
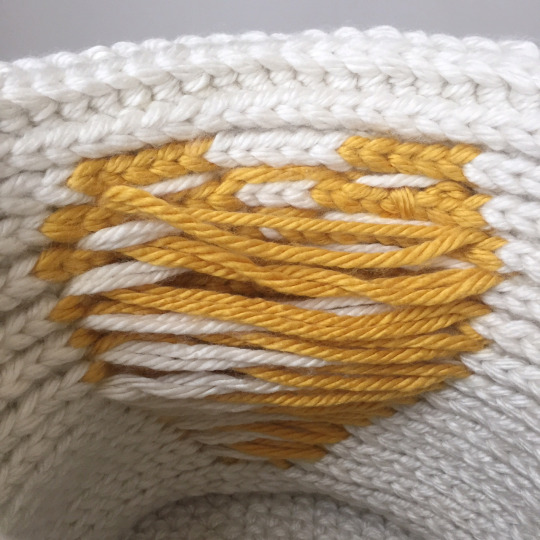
In case you’re curious, this is what the inside of the basket looks like when you’re working front post single crochets!
When switching colours, you work up until the point when you are about to finish the last stitch of the first colour. At this point, you will have two stitches on your hook. Switch to the new colour for the final yarnover. Then you pull through the two stitches already on the hook with your new colour, and voila- you are ready to begin working stitches in your new colour! I let the unworked colour float behind and picked it back up when I needed it! You can check out this video HERE to see how to change colours and let the unworked yarn float behind (starting at the 4:00 min mark).
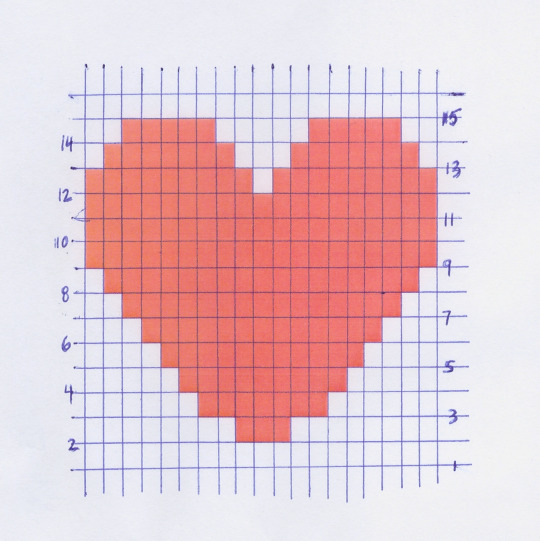
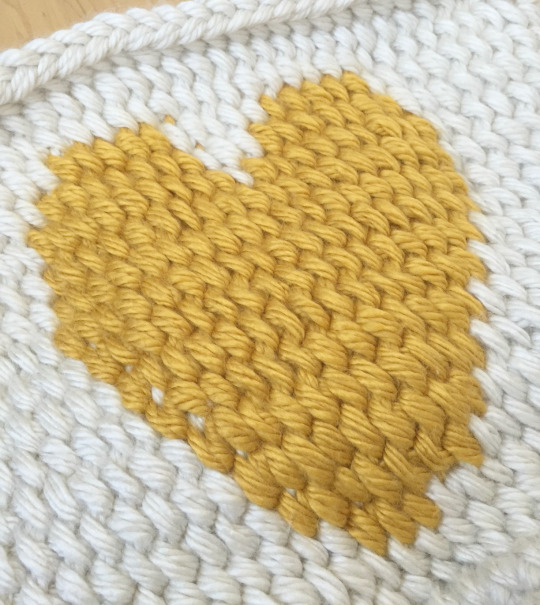
This is the final heart graph that Ryan made that ended up being the perfect shape and size! You’ll notice that it’s a softer heart as the edges are not as sharp (e.g. the bottom tip is comprised of 3 stitches vs. just 1 stitch).
It was fun translating this heart graph onto my basket and seeing the heart develop! I loved how it was looking- not too big, not too small, and not too skinny!
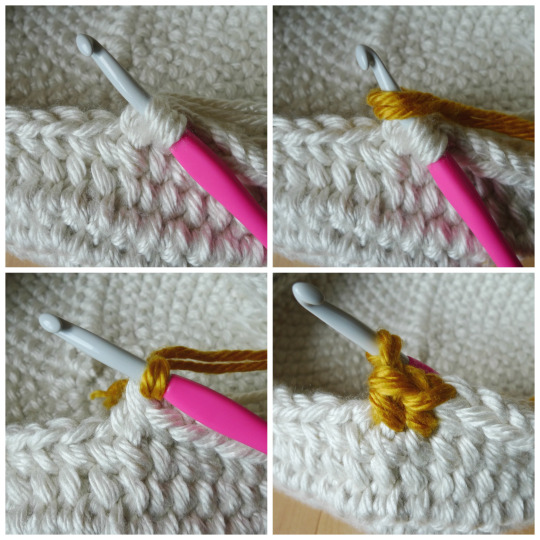
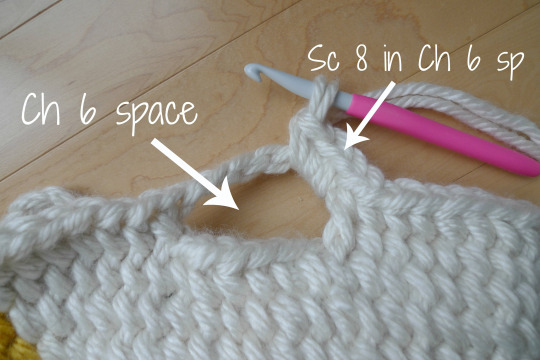
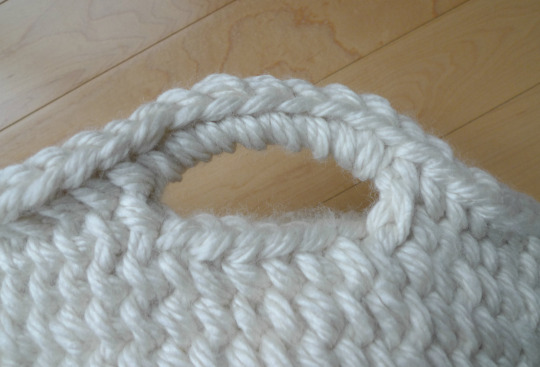
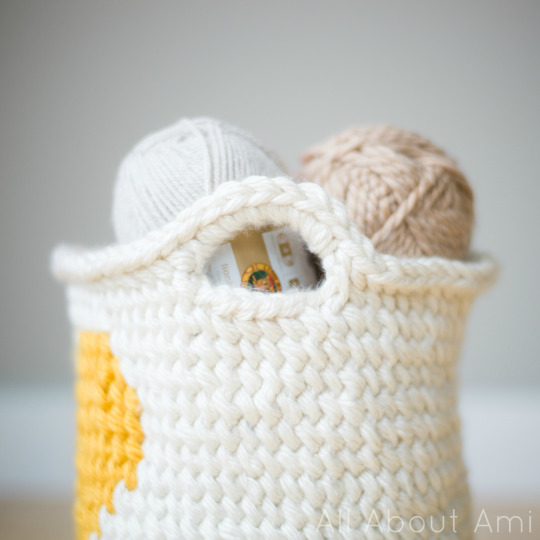
When the heart was complete, it was time to make the handles and finish up the basket! I made a Ch 6 space by chaining 6 and skipping 6 stitches. In the next round, I then single crocheted 8 in that Chain 6 space. I crocheted in the actual SPACE and not in the stitches themselves.
Here is the completed handle!
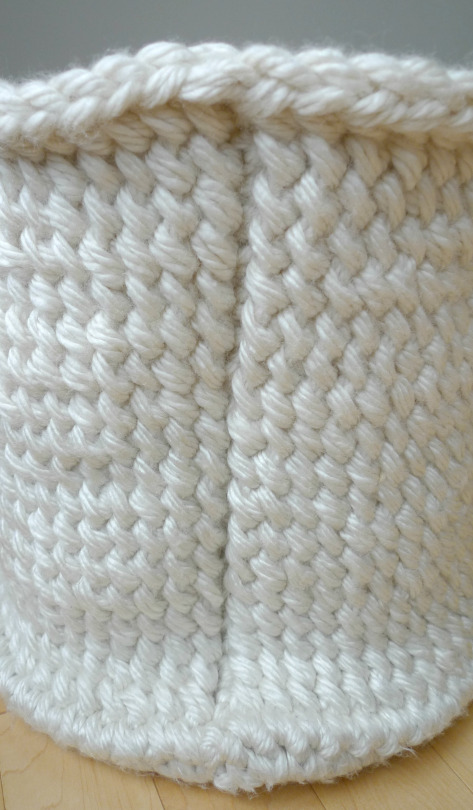
This is what the seam of the basket looks like: isn’t it nice and straight?
Here is the inside of the basket and the other side of the heart! I decided to let the unused colour float across instead of carrying the unworked colour across the round and enclosing it along the back of the work (like when you are working over yarn tails). This whole time I thought I was doing tapestry crochet, but I just discovered that by letting the unworked colour float across, this is actually called Fair Isle Crochet. If I had crocheted along with both colours, switching them when needed (with no floats), this would be Tapestry Crochet. Crochet Ever After has a very informative video that describes the differences in these colour changes HERE!
By not crocheting over the unworked colour, this gives the front a crisper and cleaner look (vs. the “muddier” look of tapestry crochet since the unworked colour might peek out) and this does not give the heart extra bulk (because then we would be working with 4 strands of yarn instead of two). This meant that my gauge and tension was consistent throughout the basket. An alternative would be to hold the yellow and white yarn throughout the whole project to keep even tension, switching when needed, but this would suck up A LOT of yarn and once again give a muddier look. The Fox Basket I crocheted used the Tapestry Crochet technique, and you can see that it has a muddier look as the image is not as crisp and defined.
I asked my readers on social media what they would do with all the floats behind the heart if they were worried about items catching on them, and they came up with some great solutions:
- Crochet a yellow heart or create a felt or fabric patch to sew over these floats (or also create a pocket).
- Make a fabric liner and sew it inside the basket.
- To prevent long floats of unworked yarn strands, you can twist the floats (unworked yarn) around the working yarn every 3-4 stitches to help catch/tack the floats down behind the work. I learned about this technique after completing this basket, but I would definitely do this if I made the project again. You can see a video example of this HERE!
********************************
Now without further ado, here is the free pattern for my “Crochet Heart Basket”:
Materials:
- 8 mm Clover Amour Jumbo Hook
- Super bulky yarn (level 6)- I used 6 skeins of Lion Brand Yarn’s Hometown USA in “Houston Cream” (Main colour) and 1 skein of Lion Brand Yarn’s Hometown USA in “Madison Mustard” (Contrast colour). Each skein of Hometown USA is 81 yards. Since you need to hold two strands of yarn together for this project, you could either buy two skeins of your contrast colour (the gold) or purchase one skein and divide it into two separate balls to work with!
Notes:
- This basket is worked in joined rounds.
- Always slip stitch to the first sc or fpsc of the round, not the Chain 1.
- After doing your chain 1 at the beginning of the round, work your first stitch in the same stitch where you did your slip stitch and Chain 1.
- The base of the basket is worked in normal single crochets while the body of the basket is worked in front post single crochets. ***Special thanks to Kimberley of Lakeside Loops as it was through her Linden Coffee Cozies where I first saw the idea of using front post single crochets for nicely stacked stitches in a round!
- When switching colours, finish the last stitch with the new colour (in the final yarnover)
- I did not carry the two colours at the same time since I wanted a crisper image and I did not want the heart to be too bulky. Instead, I let the unworked yarn strands float across and picked them back up when needed.
- When letting the strands float, be careful to not pull too tightly and to leave enough slack otherwise the basket will pucker strangely as there will not be enough give.
- To prevent long floats of unworked yarn strands, you can twist the floats (unworked yarn) around the working yarn every 3-4 stitches to help catch/tack the floats down behind the work. I learned about this technique after completing this basket, but I would definitely do this if I made the project again. You can see a video example of this HERE!
Special stitches:
- Front post single crochet (Fpsc): Insert hook behind post of stitch (insert hook from front to back of stitch), YO, pull up a loop, YO, pull through 2 loops.
Round 1: 6 sc in Magic Ring. Sl st to first sc (6 sts).
R2: Ch 1. *Inc*, rep 6 times. Sl st to first sc (12 sts).
R3: Ch 1. *Sc 1, Inc*, rep 6 times. Sl st to first sc (18 sts).
R4: Ch 1, *Sc 2, Inc*, rep 6 times. Sl st to first sc (24 sts).
R5: Ch 1. *Sc 3, Inc*, rep 6 times. St st to first sc (30 sts).
R6: Ch 1, *Sc 4, Inc*, rep 6 times. Sl st to first sc (36 sts).
R7: Ch 1, *Sc 5, Inc*, rep 6 times. Sl st to first sc (42 sts).
R8: Ch 1. *Sc 6, Inc*, rep 6 times. Sl st to first sc (48 sts).
R9: Ch 1. *Sc 7, Inc*, rep 6 times. Sl st to first sc (54 sts).
R10: Ch 1, *Sc 8, Inc*, rep 6 times. Sl st to first sc (60 sts).
R11: Ch 1. *Sc 9, Inc*, rep 6 times. Sl st to first sc (66 sts).
R12: Ch 1. Sc around. Sl st to first sc (66 sts).
From Rounds 13-28, all stitches will be worked as Front Post Single Crochets (not including slip stitches and Chain 1′s to end and begin the rounds of course).
R13-14: Ch 1. Fpsc 66. Sl st to first fpsc (66 sts).
We will now begin the colour changes!
R15: Ch 1. Work 31 fpsc in White, 3 fpsc in Yellow, 32 fpsc in White. Sl st to first fpsc (66 sts).
R16: Ch 1. Work 29 fpsc in White, 7 fpsc in Yellow, 30 fpsc in White. Sl st to first fpsc (66 sts).
R17: Ch 1. Work 28 fpsc in White 9 fpsc in Yellow, 29 fpsc in White. Sl st to first fpsc (66 sts).
R18: Ch 1. Work 27 fpsc in White, 11 fpsc in Yellow, 28 fpsc in White. Sl st to first fpsc (66 sts).
R19: Ch 1. Work 26 fpsc in White, 13 fpsc in Yellow, 27 fpsc in White. Sl st to first fpsc (66 sts).
R20: Ch 1. Work 25 fpsc in White, 15 fpsc in Yellow, 26 fpsc in White. Sl st to first fpsc (66 sts).
R21: Ch 1. Work 24 fpsc in White, 17 fpsc in Yellow, 25 fpsc in White. Sl st to first fpsc (66 sts).
R22-24: Ch 1. Work 23 fpsc in White 19 fpsc in Yellow, 24 fpsc in White. Sl st to first fpsc (66 sts).
R25: Ch 1. Work 23 fpsc in White, 9 fpsc in Yellow, 1 fpsc in White, 9 fpsc in Yellow, 24 fpsc in White. Sl st to first fpsc (66 sts).
R26: Ch 1. Work 24 fpsc in White, 7 fpsc in Yellow, 3 fpsc in White, 7 fpsc in Yellow, 25 fpsc in White. Sl st to first fpsc (66 sts).
R27: Ch 1. Work 25 fpsc in White, 5 fpsc in Yellow, 5 fpsc in White, 5 fpsc in Yellow, 26 fpsc in White. Sl st to first fpsc (66 sts).
The yellow heart is now complete. Tie off the yellow yarn. From now on, we will only be working with the white yarn.
R28: Ch 1. Fpsc 66. Sl st to first fpsc (66 sts).
Now we will begin making the handles!
R29: Fpsc 13, Ch 6, Sk 6, Fpsc 27, Ch 6, Sk 6, Fpsc 14 (66 sts).
R30: Fpsc 13, Sc 8 in Chain 6 space, Fpsc 27, Sc 8 in Chain 6 space, Fpsc 14 (68 sts).
Fasten off and weave in ends.
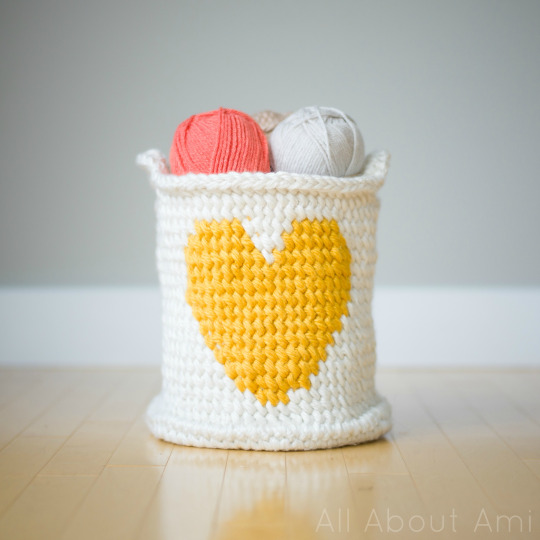
Finished dimensions: 11″/28 cm in height, 11″/28 cm diameter, 31″/79 cm circumference
****************************
I am delighted with how my basket turned out and am glad that I persevered through all the failed attempts to finally achieve the look I was going for! It was sad every time I had to frog the basket, but I knew we could do it!
My crochet journey has been a constant learning process, and I’m thankful that I discovered this beautiful look of stacked front post single crochets and learned the difference between tapestry, intarsia, and Fair Isle Crochet!
Baskets are so functional and handy to have around the house as they are great storage options! They also serve as a form of decor since they give a modern yet rustic touch. I love having crocheted pieces displayed in my home! I think this basket would look so cute in a nursery, and you could play around with different heart colours to match the theme!
I hope you’ve enjoyed reading about the making of this Heart Basket! Please share your photos with me on my blog and social media here: Facebook page, Twitter (@AllAboutAmi) or Instagram (@AllAboutAmi)I! Don’t forget that I’ve also opened an Etsy store HERE and a Craftsy store HERE to sell concise PDF versions of my patterns! Enjoy this first week of Summer, and happy crocheting!
{This post is sponsored by Lion Brand Yarn! I’ve loved working with their yarn throughout the years and I’m thrilled that I get to collaborate with them every month!}
This pattern is an original pattern by Stephanie Lau of All About Ami. Please do not claim this pattern as your own. If you wish to share this pattern, you may link to this pattern but please do not reprint it on your site. You may keep a copy for your own personal use but please DO NOT sell the pattern or distribute it.
You may sell products made from this pattern but please clearly credit the design to me, Stephanie Lau of All About Ami, and provide a link to my blog www.AllAboutAmi.com. Permission is NOT granted for mass production or factory manufacturing of any kind. Thank you for being respectful and for your understanding!
Amazon Affiliate Link: