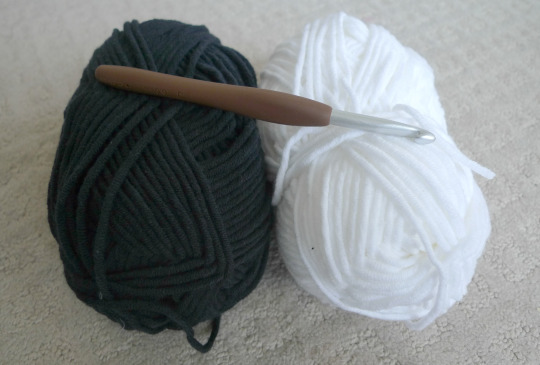
After crocheting the “Black & White Zigzag Beanie” that I blogged about HERE following Kat Goldin’s free pattern, I wanted to try making another black and white beanie! This time, however, I wanted to use thicker yarn and have simple black and white stripes. I used one of my favourite yarns, Loops & Threads Ring Spun which I previously used to make my “Easy Ribbed Pom Pom Beanie”. It is a very soft yarn that has a wonderful bounce to it, and it does not pill. It’s also a thicker yarn (bulky, level 5) compared to the worsted weight yarn I used for the zigzag beanie, so I used a 6 mm crochet hook!
Since I was creating this pattern on my own, I used this handy chart for reference that shows how to properly size crochet hats HERE. I think using this method is very helpful since you can use whatever yarn or crochet hook you want, and people crochet with different tensions. Instead of having a standard pattern for all the different sizes, you work with the hat circumference and hat height. I’ll explain more below!
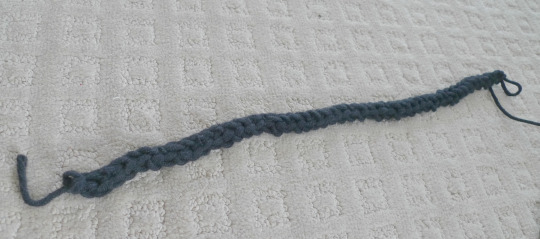
I wanted to make a beanie for a 6-9 month old, so I looked up what measurements I needed in the chart. The hat circumference should be about 15 inches, so I made a series of foundation single crochets measuring this length. As I mentioned in my previous post, using foundation single or double crochets is a wonderful and revolutionary technique as you work the chain stitches and Round 1 all at the same time! No more trying to insert your crochet hook into the chain stitches or frogging your work when you end up with the incorrect length. This method is especially useful since we need to determine the length as we go. It also results in a much stretchier edge which is important for hats as the traditional chained edge can be very restrictive. Read more about the foundation single crochet HERE and see it in action!
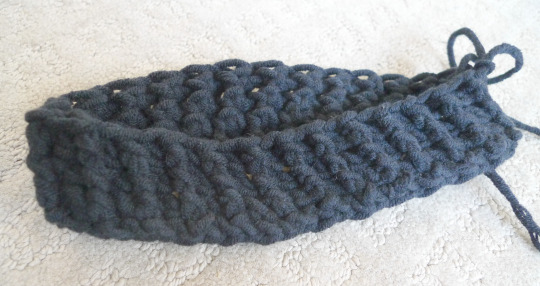
I then joined my work with a slip stitch and continued working in rounds to create a ribbed band. I did this by alternating front post single crochets with back post single crochets. I worked with single crochets since this yarn is so thick and I wanted the stitches to be smaller with more of the black and white contrast. If you are working with thinner yarn, you can always work with double crochets to get a stretchier hat that works up more quickly!
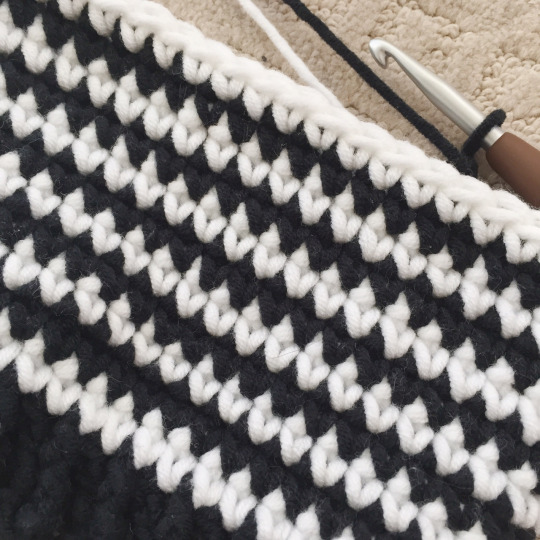
After crocheting the ribbed band, I simply worked round by round with single crochets, alternating between black and white. It’s important to note that you do not need to cut the yarn after each round as that would be extremely annoying! You simply leave both colours attached and pick up the one you need at the beginning of each round!
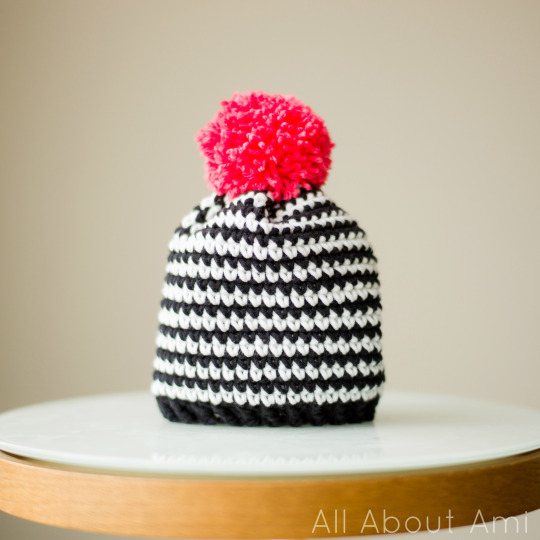
After crocheting to my desired length (6.25-6.5 inches according to the chart for a 6-9 month old), I seamed up my beanie- you can either use this method that I used in my “Cabled Slouchy Beanie” HERE or the star method HERE. I also did a couple extra rounds to help account for the gathering at the top (i.e. closer to 6.5-6.75 inches). I then used my Clover Pom Pom Maker to make a bright fuscia pom pom to add a pop of colour to my black and white beanie! See my review of this helpful tool HERE in case if you’ve never heard of it!
***************************************
Here is the official pattern for my “Simple Black & White Beanie”!
Materials:
- 6 mm crochet hook (although any hook size can be used)
- Black and white yarn (I used “Loops & Threads Ring Spun”)
- Contrasting colourful yarn (for pom pom)
Special notes:
- Do not count the Chain 1 as a stitch.
- Always Chain 1 and do 1 sc into the first stitch.
- Slip Stitch to the first sc (not the Chain 1) to close off the round.
- Do not cut the yarn when switching between black and white- simply keep them both attached and switch to the one needed at the beginning of each round
- When you need to change colours, switch during the slip stitch to close off the round.
- Adjust sizing as needed following THIS CHART HERE!
- You can increase the ribbed band as needed for larger hats.
- You can use any stitch you want (e.g. double crochet, half double crochet) depending on how big you want each stitch, how quickly you want it to work up, and how stretchy you want your beanie!
Ribbed Band:
R1: Foundation single crochet to desired length (in my case, 46). Join with slip stitch and begin working in rounds.
R2-3: Chain 1, *Front post single crochet, Back post single crochet* around. Join with slip stitch.
Black & White Body:
R4: Using white yarn, Chain 1, Sc around.
R5: Using black yarn, Chain 1, Sc around.
Repeat Rounds 4-5 until desired height of hat is achieved (in my case, 20 total rounds of black and white single crochets).
Fasten off hat using this method HERE or HERE. Also sew up gap in the ribbed band when we slip stitched to close off Round 1 and began working Round 2. Add a colourful pom pom ontop and you are done!
***************************************
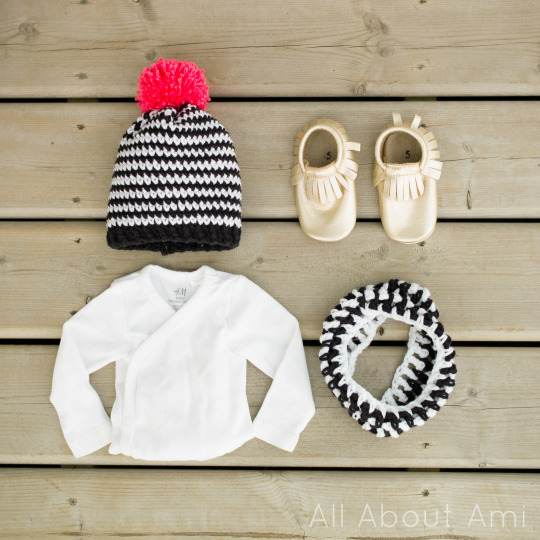
I made this black and white beanie with a pink pom pom as a gift for my cousin’s shower! I also quickly whipped up a matching “Chunky Double Crochet Cowl” by using the same yarn and crochet hook and chaining 60 in the beginning and doing 7 rounds (read the post HERE to see how to make this cowl). I also gifted my cousin with an H&M organic cotton bodysuit and some gorgeous Minimoc Narwhal moccasins!
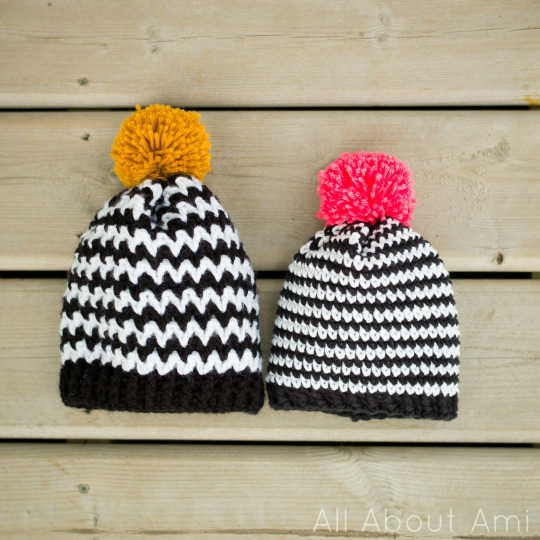
As you can see, this hat is very easy to make and very simple to adapt using different yarns and crochet hooks. The result is a very modern and striking effect with the alternating black and white rounds, and each stitch really stands out! It’s wonderful that the simple black and white base can be made for guys and girls and people of any age, and their favourite colour can be used for the pom pom! Don’t forget to check out the “Black & White Zigzag Beanie” that I recently made using Kat Goldin’s free pattern too if you want to try out a different pattern but want the same modern look!
I know I’ll be revisiting this design once fall and winter roll around again! I just love gifting handmade beanies to babies, so I always plan ahead and size them so that they’ll fit them in the upcoming fall and winter season 🙂 I hope you enjoyed reading this blog post and that it gave you some ideas on how to construct a simple beanie! As always, happy crocheting!