***You can purchase an INEXPENSIVE AD-FREE PDF of this pattern on Etsy HERE! This beautifully formatted PDF includes ALL the step-by-step photos and graphics and is a total of 11 pages including the cover page! The pattern can also be found in the All About Ami Amigurumi Pattern BUNDLE HERE!
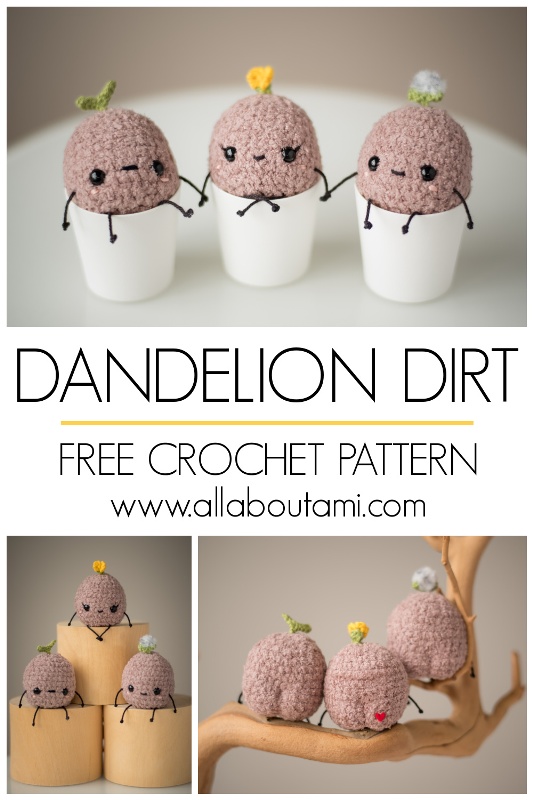
Pattern Description: Crochet this adorable trio of dirt clumps representing the life cycle of a dandelion, with sprouting leaves, flowers and fluffy dandelions! Their stringy arms and legs and shaped bottoms are sure to bring a smile to your face!
Materials:
- Chenille Appeal Yarn (medium level 4 yarn) in “Stucco”, 4 g/11.4 yds per amigurumi
- Bonbons (fine/sport level 2 yarn) in Black (smile, arms and legs), Yellow (flower) and Green (leaves, sprouts); small amount of each (2 g, 0.7 yds)
- Go For Faux Yarn (super bulky level 6 yarn) in “Chinchilla” – any fluffy yarn to simulate the dandelion fluff; one strand needed
- 2.75 mm Clover Amour hook (for dirt body) and 2.00 mm hook (for leaf sprout and flower)
- 7.5 mm safety eyes
- Pink embroidery floss
- Lock ring stitch markers
- Fiberfill
- Superglue (to glue hands and feet)
- Small pots (optional – we purchased the “FEJKA” pots from IKEA); 2”/5 cm in height, 6.7”/17 cm in circumference at widest point
- Red felt (optional) for heart on bottom
Notes:
- Please check out my blog posts entitled “Amigurumi for Beginners“, “How to Read Amigurumi Patterns“, “The Invisible Decrease“, “How to Crochet Around a Foundation Chain” and “The Right Side of Amigurumi” for helpful tips and techniques that you can use when crocheting this amigurumi.
- Work in continuous rounds so there is no visible seam (do not slip stitch after each round).
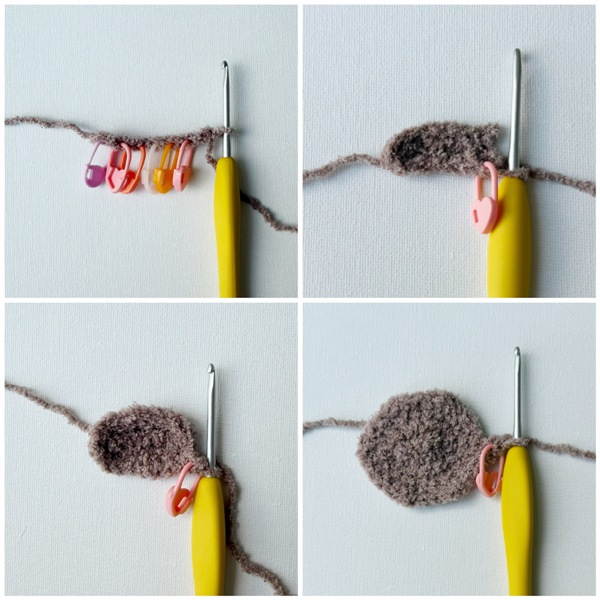
- We begin by crocheting around a foundation chain, working single crochets first in the front and back loops of the foundation chains, turning, and then working single crochets in the back bumps of the foundation chain. If you are finding it difficult to locate the back bumps, you can place 6 stitch markers in the 6 back bumps of the foundation chain to make them easier to find in Round 1.
- The dirt consists of 16 rounds.
- The arms and legs are composed of two yarn strands with each strand making up one arm and one leg diagonally.
- For the arms, each yarn end is tied into two knots to become the hand. For the legs, each yarn is tied into three knots to become the foot. Superglue is added to the hands and feet so the knots do not become undone.
- The bottoms are shaped by threading a yarn strand through the bottom and back of the dirt and pulling tight. The shaped bottoms enable them to sit!
- The leaf, flower and dandelion are crocheted and then sewed onto the tops of the dirt amigurumi.
- You can vary the expression of the amigurumi by adding a smile or eyelashes.
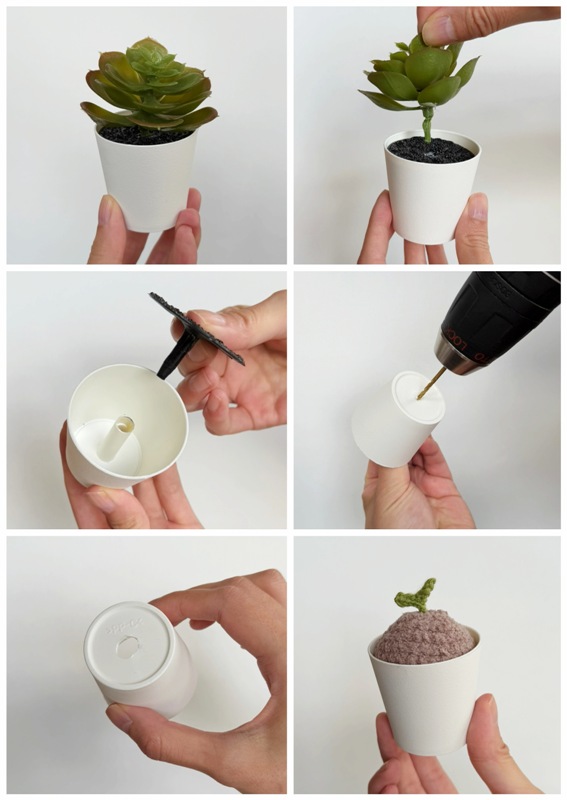
- If you would like to insert your dandelion dirt into a pot, we used the “FEJKA” pots from IKEA. We removed the artificial plant and dirt from the pot and used a drill to remove the inner tube.
- Video tutorials are available on my YouTube channel for the Shaped Bottom HERE and the Arms & Legs HERE!
- You can vary the size of the Dandelion Dirt Clumps by substituting different yarn thicknesses and using different crochet hook sizes!
Abbreviations & Stitches:
- Inc (increase) = Work 2 sc in the next stitch. [1 stitch becomes 2 stitches.]
- Dec (I use the invisible decrease): Insert hook into front loops of the next two stitches. Yarn over and draw through first two loops. Yarn over and draw through remaining two loops.
- Sc: single crochet
- Sl st: slip stitch
- Rep: repeat
- Sts: stitches
PATTERN
Dirt Body:
Chain 7 (this is the foundation chain).
R1: Starting from second chain from hook, Sc 6 in both front and back loops of foundation chain (leave back bumps untouched). Turn the chain, sc 6 in back bumps of foundation chain [we are making an oval by crocheting around the chain]. (12 sts)
[TIP: Place 6 stitch markers in the 6 back bumps of the foundation chain to make them easier to locate!]
R2: *Sc 1, Inc*, rep 6 times. (18 sts)
R3: *Sc 2, Inc*, rep 6 times. (24 sts)
R4: *Sc 3, Inc*, rep 6 times. (30 sts)
R5-11: Sc 30. (30 sts)
[Place a stitch marker between Rounds 9 and 10 to help mark where you will place the safety eyes.]
R12: *Sc 3, Dec*, rep 6 times. (24 sts)
R13: *Sc 2, Dec*, rep 6 times. (18 sts)
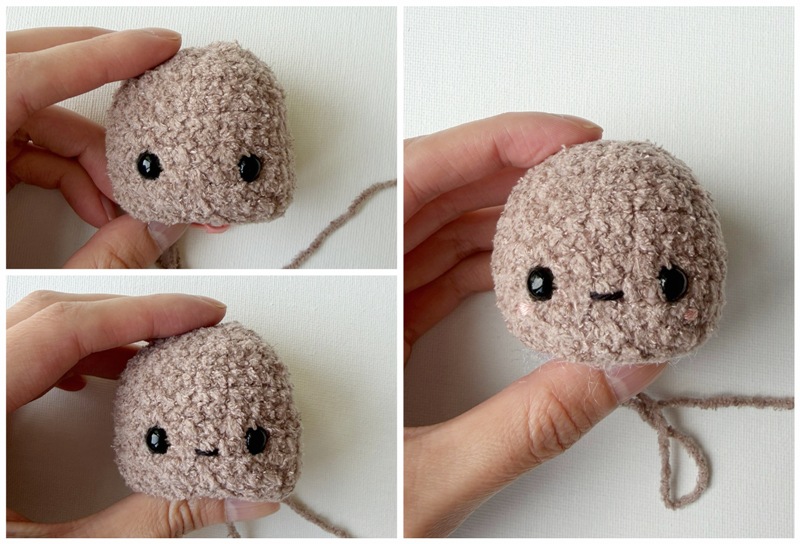
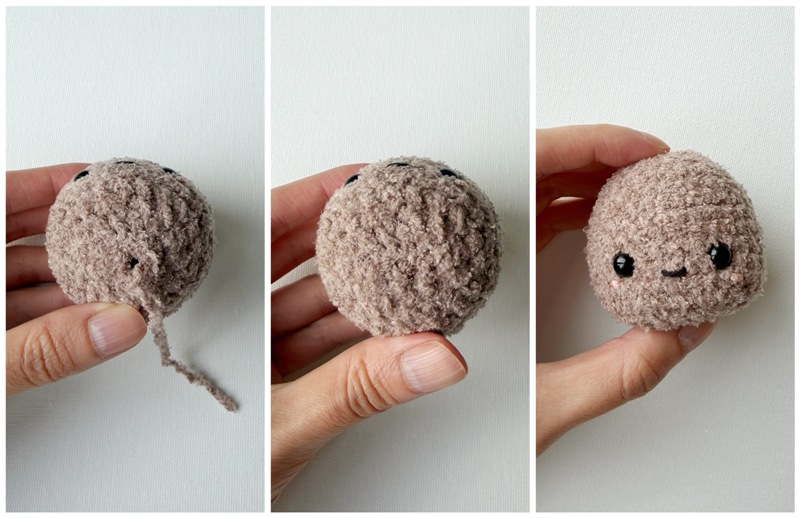
Place safety eyes between Rounds 9 and 10, about 5 stitches apart (use the stitch marker you placed as a guide). If doing the eyelash variation, insert black yarn diagonally above the safety eye, ending where the eye hole is, before snapping in the washer. Tie the ends and snap in the washer.
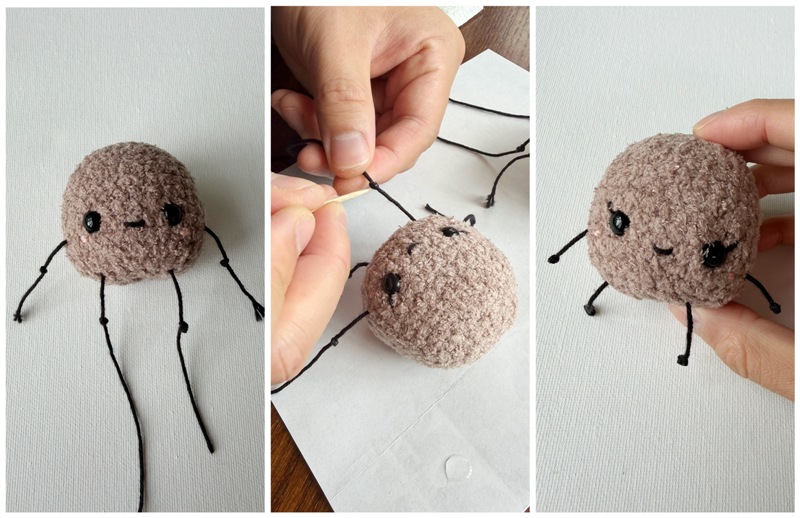
Eyelash variation
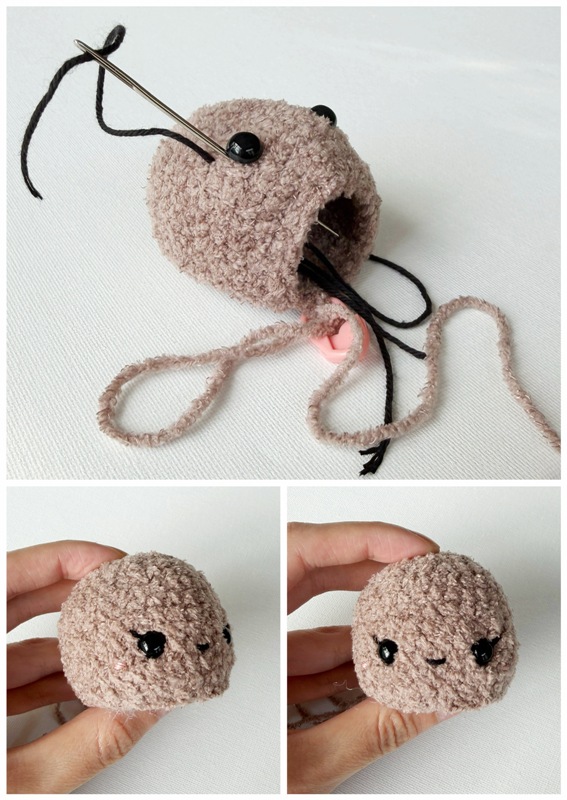
Embroider the mouth using black yarn between the eyes, about two stitches across (you can pass the yarn across either once or twice).
Embroider the cheeks using pink embroidery floss underneath the eyes between Rounds 10 and 11 (pass the embroidery floss twice).
Stuff body.
R14: *Sc 1, Dec*, rep 6 times. (12 sts)
R15: Sc 12. (12 sts)
Finish stuffing.
R16: *Dec*, rep 6 times. (6 sts)
Fasten off working yarn, then thread yarn tail through front loops of last remaining 6 stitches. Pull tight and hide end.
Arms & Legs:
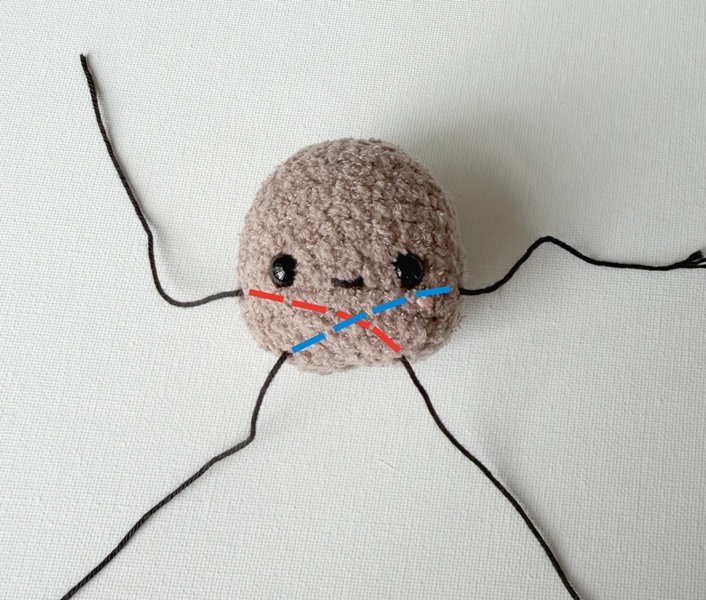
Cut two 8”/20 cm strands of black yarn. Thread the yarn strand through a yarn needle and enter the body straight below one eye between Rounds 13 and 14. Exit the body diagonally between Rounds 10 and 11, about 3 stitches away from the opposite eye. Repeat with second yarn strand on other side.
Tie double knots for hands and triple knots for feet. When tying the knots, choose the arm and leg length that you like, trying to keep it symmetrical for both sides. Our arms and legs were approximately 0.75”/1.9 cm from the knots to the body. Do not trim the ends yet.
Use a toothpick to apply superglue to the knots of the hands and feet (use the long strands to help stabilize the knots when applying the glue). Once the glue has dried, you can cut the ends close to the knots.
**See these steps in action HERE in the video tutorial!
Fun Tip: When you pull one arm, the opposite leg becomes shorter! Have fun playing with the arm and leg lengths!
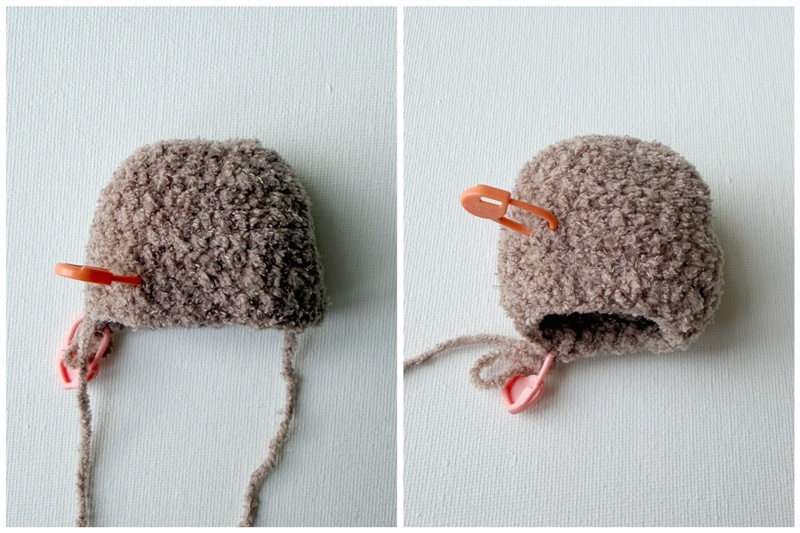
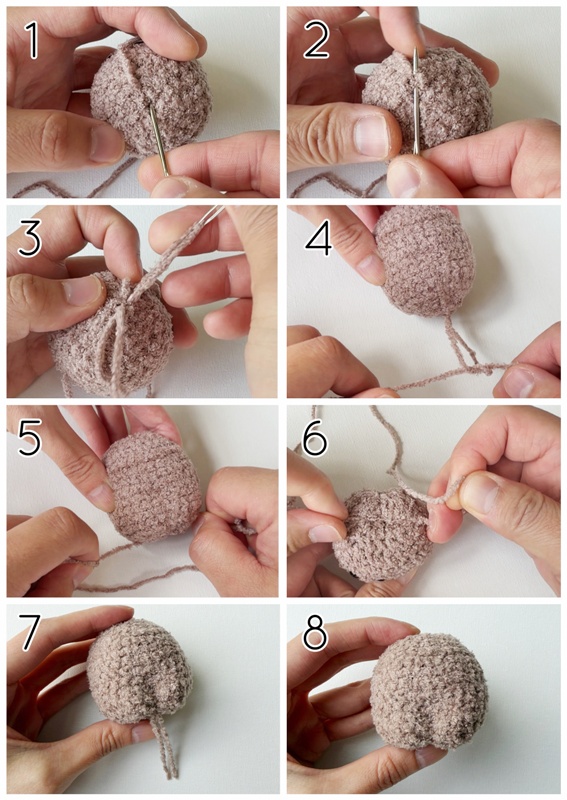
Shaped Bottom:
Cut a 10”/25.4 cm strand of the brown body yarn and thread through a yarn needle. Insert needle through bottom (near Round 15 a bit closer to the face) up towards the back of the body between Rounds 9 and 10. Ensure the entry and exit points of the needle are centered between the eyes for symmetry.
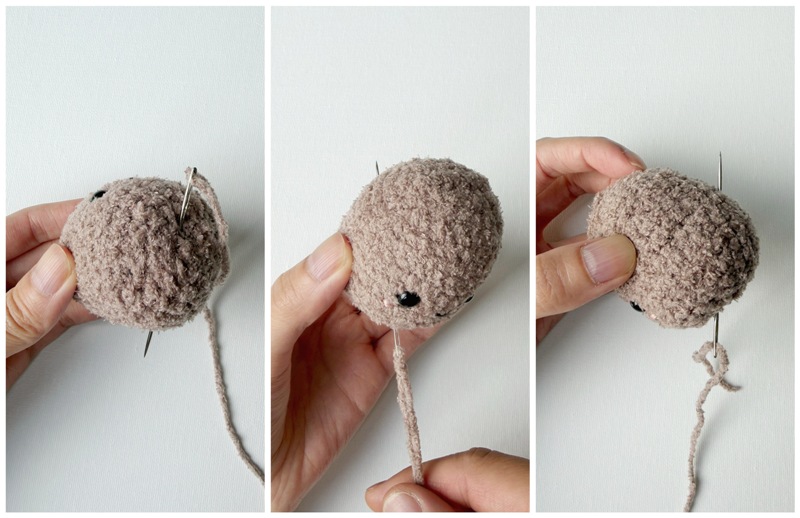
- Thread the needle through a stitch near the initial entry point at the bottom, but not the same initial stitch.
- Go into and out of the body.
- Pull through.
- Tie a single knot using yarn ends.
- Pull hard to shape bottom.
- Tie three knots in total.
- Cut yarn ends shorter.
- Hide ends.
Optional: Cut a small heart out of red felt and attach to shaped bottom using fabric glue. Alternatively, you can embroider a red heart.
*** See these steps in action HERE in the video tutorial!
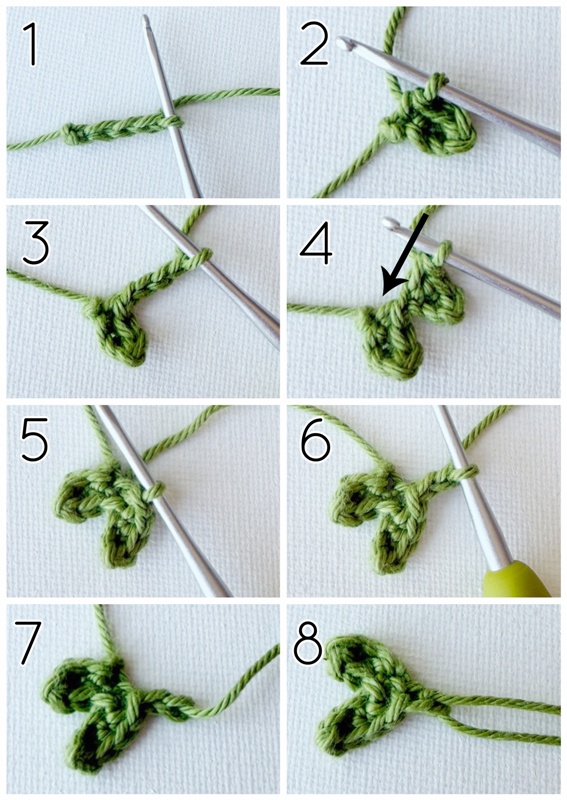
(1) Sprout:
Using 2 mm hook and green yarn,
- Leave long initial end (4”/10 cm) and chain 4.
- Starting in second chain from hook, single crochet 3 down back loops.
- Chain 4.
- Starting in second chain from hook, single crochet 3 down back loops. [Arrow indicating where to work slip stitch in next step.]
- Slip stitch to base of first leaf.
- Chain 2.
- Fasten off and leave long final tail (4”/10 cm).
- Weave initial end down chains.
Use two ends to tie sprout onto head of dirt body. Insert one end through top of head and out, and insert other end through top of head and out. Tie a few knots behind the sprout, cut ends and weave in.
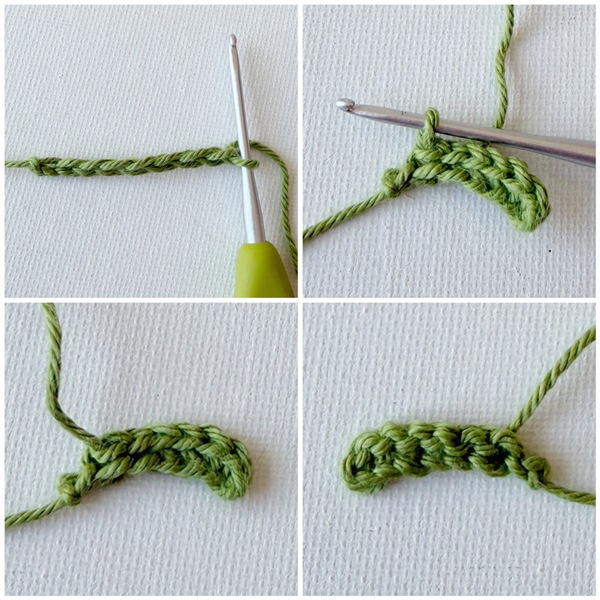
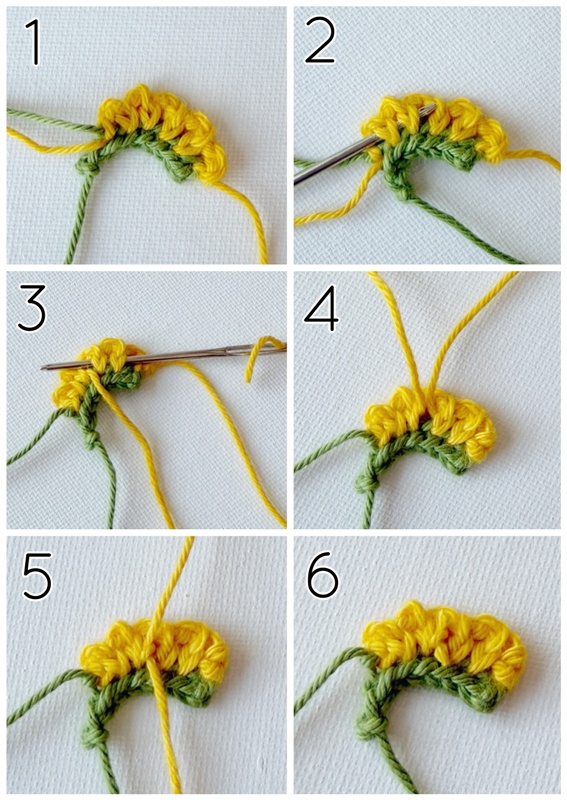
(2) Flower:
Using 2 mm hook and green yarn,
Leave long initial end (6”/15 cm) and Chain 8.
Row 1: Starting in second chain from hook, slip stitch 6 in back bumps. Leave last chain unworked (this last chain will be the base of the flower).
Fasten off, leaving long final end (6”/15 cm). Flip piece (initial and final ends should be on the right side).
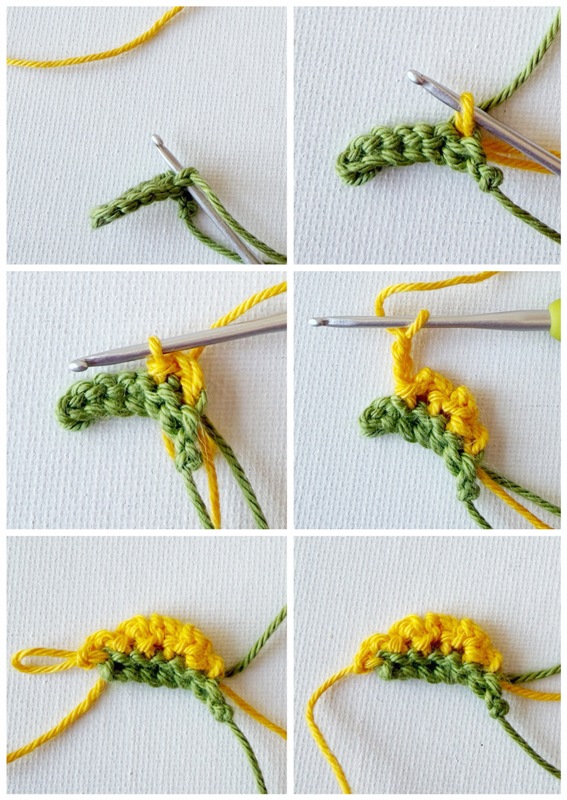
Leaving long initial end (4”/10 cm), rejoin yellow yarn on right side where first slip stitch of Row 1 is located (beside the unworked chain).
To rejoin the yarn, make a slip knot using the yellow yarn. Insert your hook through the slip stitch, add the yellow slip knot, and pull through.
Row 2: Chain 2, slip stitch to next st. *Chain 3, slip stitch to next st*, rep across. [5 petals created. The petal made up of 2 chains will be the inner part of the flower.]
Fasten off, leaving long final end (4”/10 cm).
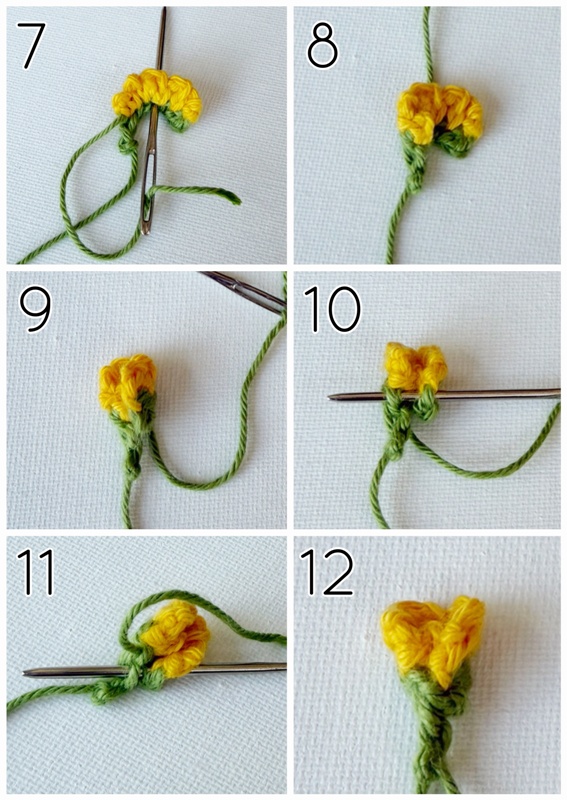
- Flip over the piece so unworked chain and two green ends and initial yellow end are on the left side, while the final yellow end is on the right side.
- Move initial yellow end through yellow stitches of petals into center of flower.
- Move final yellow end through yellow stitches of petals into center of flower.
- Both ends have been moved to the center of the flower.
- Tie yellow ends together into two knots.
- Snip ends.
- Move final green yarn end into middle of green part.
- Pull to curve the flower inwards (the 2 chain petal should start off on the left side and then be pulled inwards).
- Roll petals around inner part.
- Move needle through base of green to seam together.
- Whip stitch to close the flower and keep the petals in place.
- Flower is complete.
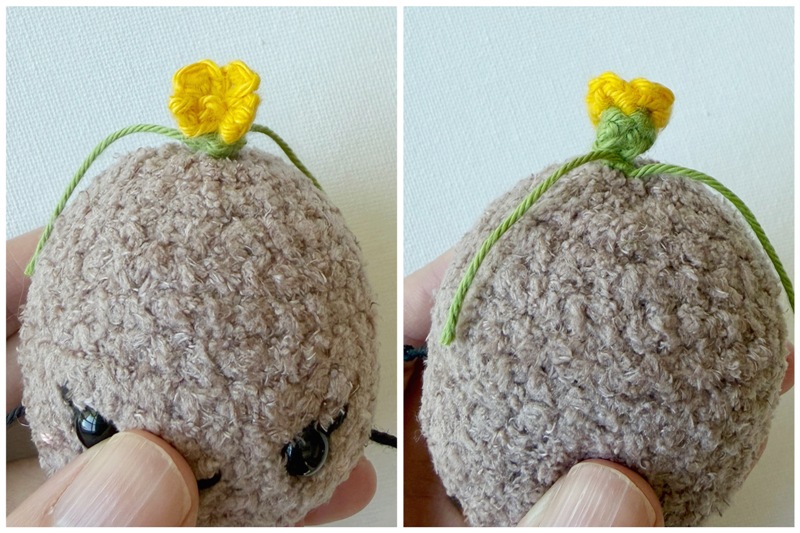
Position flower on top of head: splay flower petals opening towards front. Use the green ends to insert the flower into the head in opposite directions, then tie knots, cut the ends and weave in.
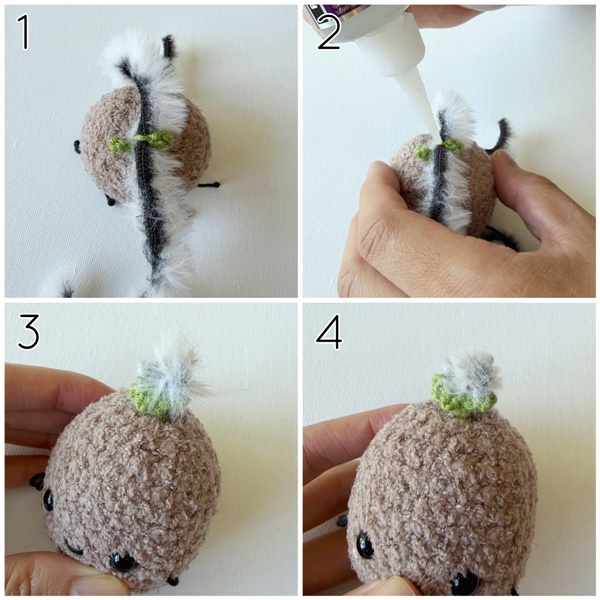
(3) Fluffy Dandelion:
Follow the instructions to make a sprout and attach on top of head.
Cut a 5”/12.7 cm strand of fluffy yarn.
- Thread yarn strand through a needle and thread through the middle of the leaves.
- Dab glue onto middle of green sprout where the fluffy yarn strand is going through.
- Tie a knot (the glue should hold this knot in place) and cut the ends.
- Use a needle to tease out the fluffy parts and brush the fluff towards the top. Trim the fluff into the shape of a ball to simulate the fluffy dandelion!
Optional: Insert your dandelion dirt into a pot. We used the “FEJKA” pots from IKEA which are artificial potted plants (comes in single or 3 pack).
We removed the artificial plant and soil. The pot had a raised inner tube that we removed with a drill. We worked our way up from a small drill to increasingly larger drills to completely remove the inner tube.
*******************************
We hope you enjoy crocheting your own little dirt clumps! Ryan and I originally made the one with the sprout two years ago on a whim while I was designing the No-Sew Baby Bear. He has sat on my desk and on my pegboard for the last couple of years, and I have been meaning to type up the pattern. We thought it would be so cute to make this a series, and we came up with the idea to have the dirt clumps represent the life cycle of a dandelion!
We have named them Dilly, Dally and Dandy! Dandelions are symbols of hope, resilience and perseverance since dandelions can grow and bloom in even the harshest conditions! Even though they are weeds, they can still be lovable!
The dirt sprouts can perfectly fit in the white pots, and it is so fun popping them out (see this video HERE)! They may look like ordinary little plants when they’re tucked into their pots as shown below, but we know what surprise lies beneath!
It was fun adding all the little details to the Dandelion Dirt, such as the shaped bottoms! This allows them to sit flat so you can pose them anywhere you want, from your book shelf or desk to piano or kitchen counter. They would make adorable travel buddies as well since they are so small and portable, and you could pose them at various landmarks!
We wanted to try and take some photos of the Dandelion Dirt in nature! We searched for a field of dandelions and snapped this photo of Dandy with his real-life counterparts – doesn’t the photo look magical?
Enjoy crocheting your own little dirt clumps, everyone – they work up quickly since they are only 16 rounds! You can use the hashtag #dandeliondirt when you post on social media! We had a lot of fun crocheting this whimsical little amigurumi and we cannot wait to see your versions!
Thank you to Lion Brand Yarn for providing the yarn for this project! This pattern is an original pattern by Stephanie Lau of All About Ami. Please do not claim this pattern as your own. If you wish to share this pattern, you may link to this pattern but please do not reprint it on your site. You may keep a copy for your own personal use but please DO NOT sell the pattern or distribute it.
You may sell products made from this pattern but please clearly credit the design to me, Stephanie Lau of All About Ami, and provide a link to my blog www.AllAboutAmi.com. Permission is NOT granted for mass production or factory manufacturing of any kind. Thank you for being respectful and for your understanding!