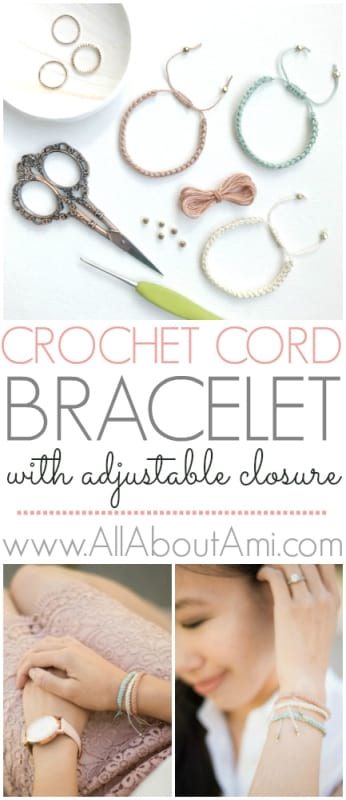
Ever since I was a little girl, I’ve loved making my own bracelets using embroidery floss. I would spend hours upon hours poring through my macrame friendship bracelet book and trying out all different styles and colour combinations. I have very fond memories of gifting these bracelets to my friends and all of us wearing them proudly during recess! Now as an adult, I have been making elastic beaded bracelets and recently crochet cord bracelets for myself! I love layering bracelets, particularly during these warm days filled with sunshine when I’m sporting summer dresses, t-shirts and tank tops! These Crochet Cord Bracelets are very dainty, and I have added adjustable closure so that I can easily tighten them around my wrist without having to tie knots or ask someone for help! Read on to see how I make my pretty little bracelets!
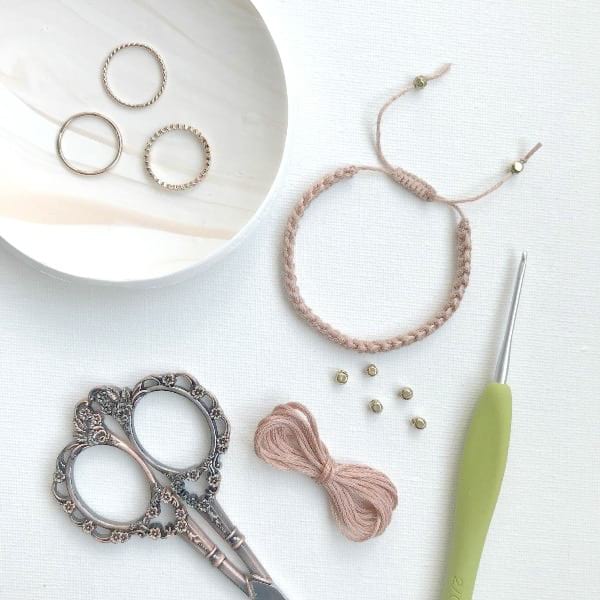
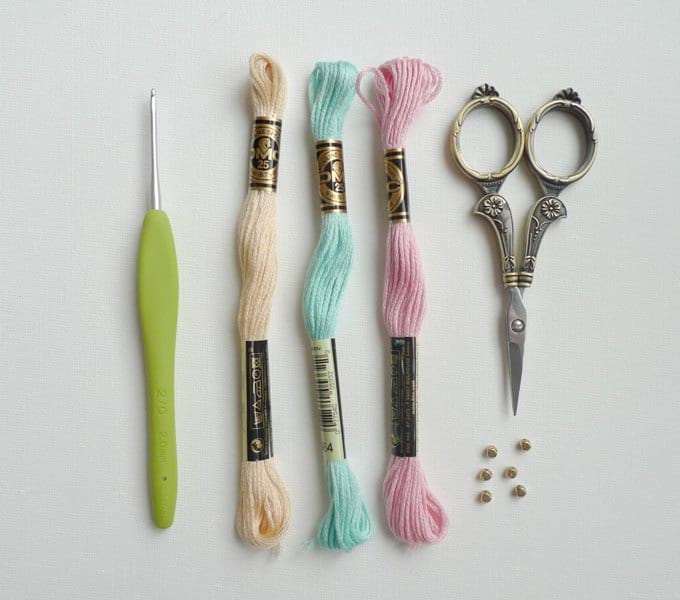
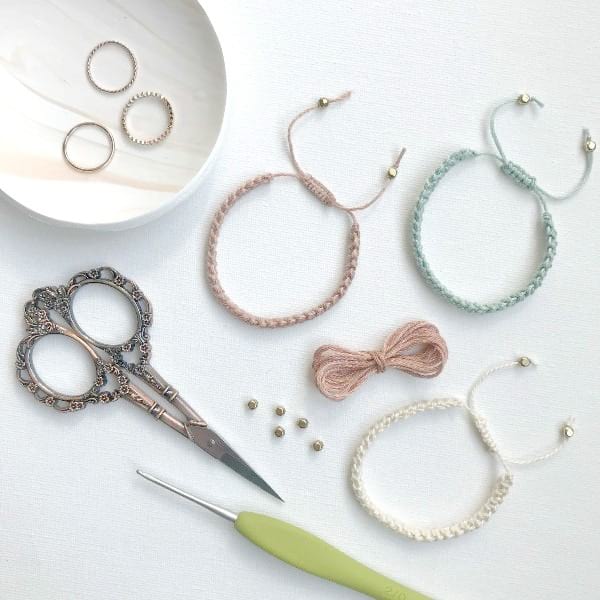
To make these bracelets you will need: DMC embroidery floss, a Clover Amour 2 mm crochet hook, a pair of scissors, beads (optional) and some glue.
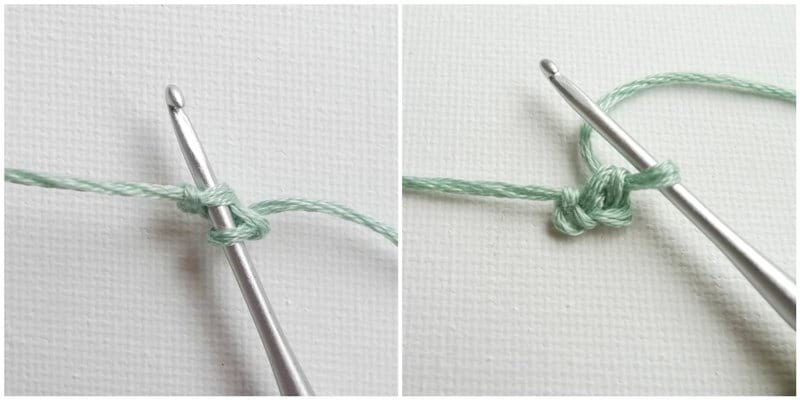
To begin, leave 16 cm/6.3″ for an initial end (we will be using this end for the closure later on), make a slip knot, and insert your crochet hook. Chain 2. Next, work one single crochet in the back loop of the first chain you made.
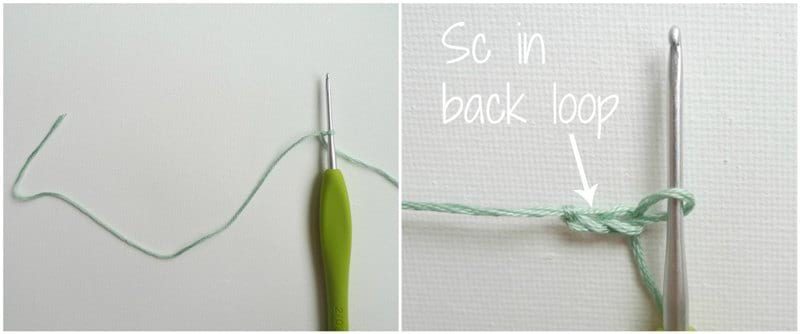
I have inserted my hook into the back loop of the first chain and then worked a single crochet.
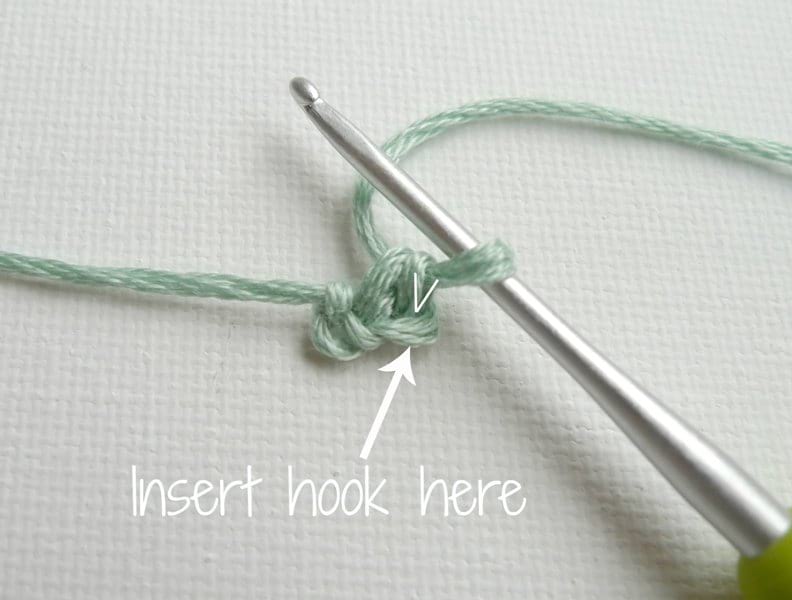
You will notice that the single crochet stitch you have just created makes a “V” formed by the back and front loops. This V points like an arrow towards two loops. You will insert your crochet hook into these two loops and work another single crochet.
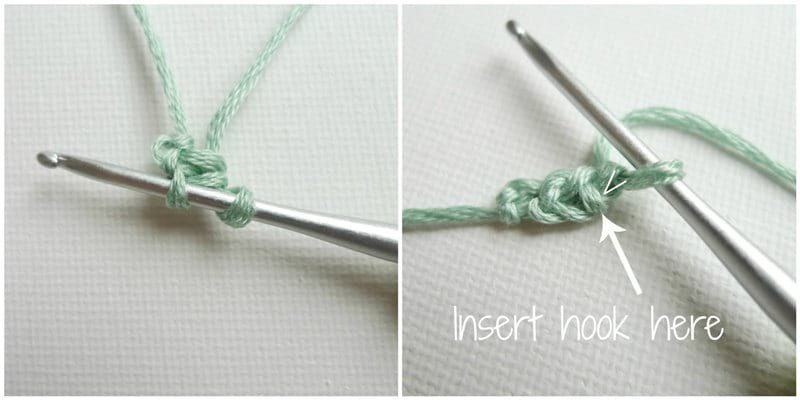
You keep repeating this process to form a crochet cord. You look for the V, insert your hook into the two loops that the V is pointing towards, and then work a single crochet. Try your best not to work too tightly as this will make it challenging to insert your hook into the two loops! As you continue working single crochets in this manner, you will find a rhythm and discover what tension to use!
I learned how to crochet a cord through Planet June‘s very informative tutorial below! Watch all of this in action here:
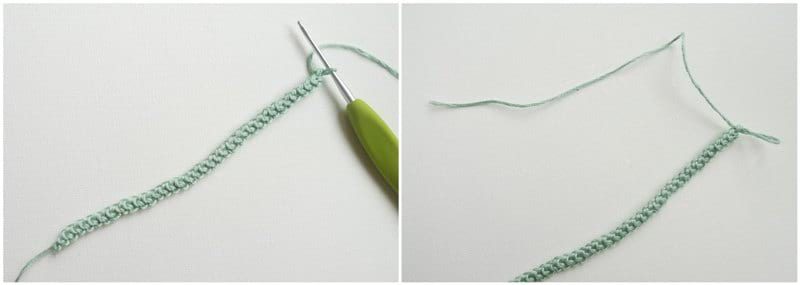
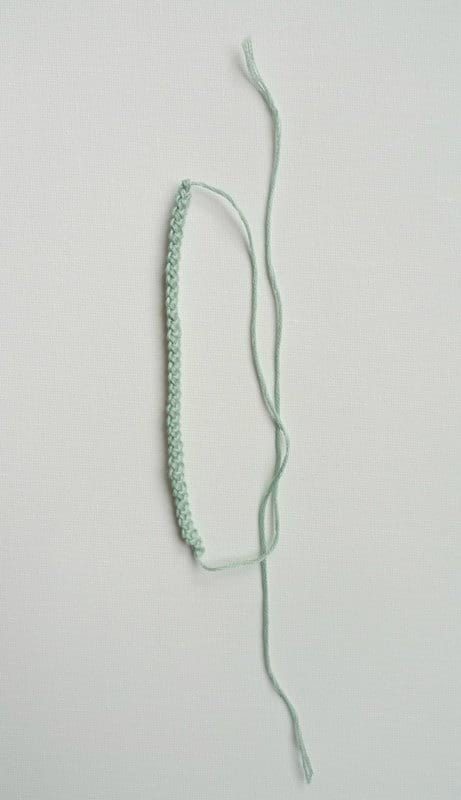
Keep crocheting your cord until the desired length- my cord measured about 13 cm/5.1″. Leaving a final end of 16 cm/6.3″, snip the yarn, remove your crochet hook, and pull through the loop.
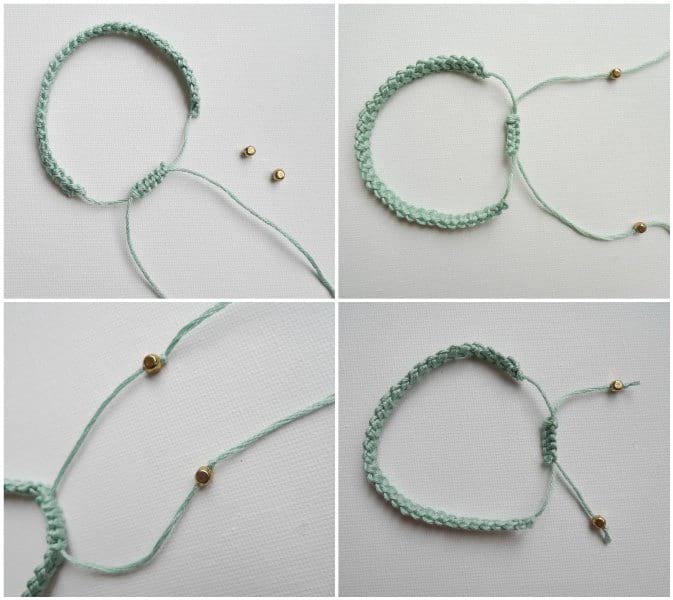
If you want, you could start wearing your bracelet by tying the ends into a knot around your wrist! However, if you would like to learn how to make adjustable macrame closure, keep reading on! Position your bracelet as shown below with the cord running up and down (vertical) with the two ends running parallel to the cord bracelet: one pointing upwards and one pointing downwards.
Next, you will be making a series of square knots, a special macrame technique that will allow the bracelet to be adjustable: these square knots will serve as an anchor so that the ends of the bracelet can slide through them (known as sliding knot clasp). In the pictures below, I have used a contrast colour (the white) to help them stand out from the main colour green. For my actual bracelets, I use the same main colour for the macrame closure. I cut a 50 cm/20″ strand of embroidery floss and place it underneath the bracelet ends. Then, I begin working a series of square knots.
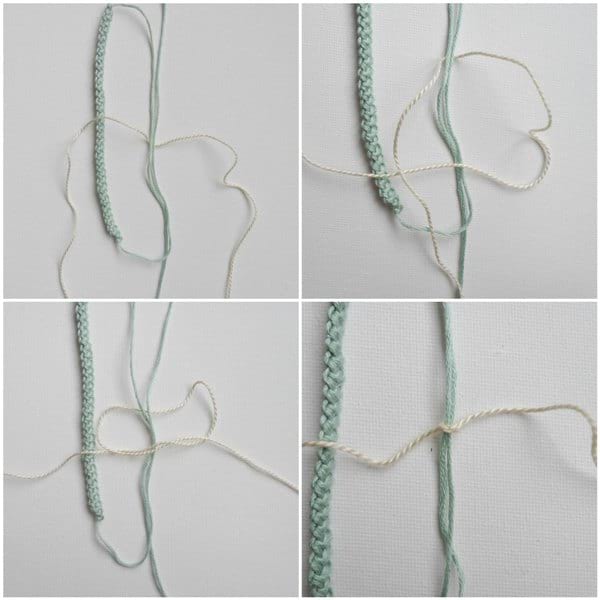
Please watch this video by Curly Made below to see how to make square knots in action! You can also follow this detailed step-by-step tutorial HERE if you want to see a series of pictures!
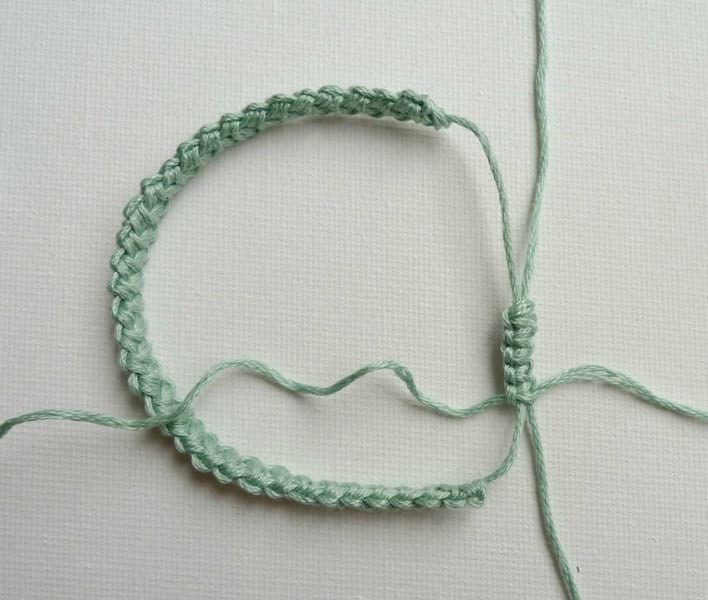
You can try on your bracelet and pull the ends to see how many square knots you want for your closure. If you create too many square knots, the bracelet may not be able to tighten firmly around your wrist as the bracelet may end up being too large. My macrame closure measured about 1.3 cm/0.5″.
When I am happy with my macrame closure, I tie the macrame ends into two tight knots (basic overhand knots) and add some glue with a toothpick onto these two tight knots to secure them in place. After the glue has dried, I then snip the ends of the macrame closure. I leave the initial ends of the crochet cord bracelet and DO NOT snip them!
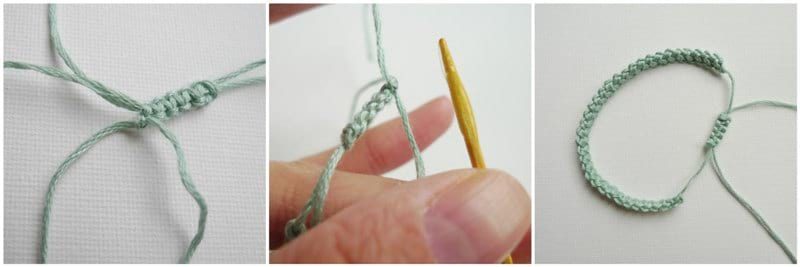
As an added decorative touch, I string a gold bead onto each end of the crochet cord bracelet. Then I tie a knot and snip the ends so that the gold beads do not slide off! When my bracelet is pulled tight, I have about 5 cm/2″ of embroidery floss dangling down!
**************************************************************
Crochet Cord Bracelet with Adjustable Closure Tutorial
Materials:
Crochet Cord Portion:
Leaving 16 cm/6.3″ initial end, make a slip knot, and insert crochet hook. Chain 2. Next, work one single crochet in the back loop of the first chain you made.
Notice the V created by the single crochet stitch you have just created. This V points towards two loops. Insert hook into these two loops and work another single crochet. Keep crocheting cord in this manner until desired length (mine measured 13 cm/5.1″). Learn how to crochet a crochet cord with this helpful video HERE! Leave final end of 16 cm/6.3″, snip embroidery floss and pull through loop.
Macrame Adjustable Closure:
Cut strand of 50 cm/20.1″ of embroidery floss. Make square knots following this video HERE or this step-by-step picture tutorial HERE. Create square knots to desired length- mine measured 1.3 cm/0.5″. Tie ends into two basic overhand knots and add glue to secure in place. Once glue is dry, snip ends.
Adding beads:
Thread gold bead onto each end of crochet cord bracelet. Tie knots to prevent beads from sliding off. Snip ends to desired length (once pulled tight, my ends were 5 cm/2″ long).
*************************************************************
These bracelets are quick to work up and have such a minimalist and chic look! Choose your favourite colour or make a bunch to match with your different outfits!
![]()
These bracelets look so cute with the ends dangling down! I love adjustable closures since these bracelets can fit a wide variety of wrists and you can easily put on and tighten these bracelets yourself without having to ask for help!
![]()
These dainty bracelets look gorgeous stacked with other bracelets too! In the picture below, I am wearing my Crochet Cord Bracelet along with another beaded bracelet I made using grey and pink beads! The white Howlite bracelet is by Cinder & Sage, and my favourite Blush Pink Rose Gold watch is by Berg & Betts (made from upcycled leather)!
![]()
These Crochet Cord Bracelets are the perfect project for Spring and Summer, and they are a fun activity to do with a group of friends or with your children! They make sweet and special gifts for friends, loved ones and teachers, and they are quick to work up! If you love crocheting and have wanted to try making your own jewelry, give these Crochet Cord Bracelets with Adjustable Closure a try! Pin the below image to your Pinterest boards to remind yourselves of this quick and fun project! You never know when you’ll need to whip up a small and sweet present! Tag #crochetcordbracelet so we can see all your beauties on social media! Lastly, don’t forget to sign up for my newsletter HERE so you can keep up to date with all my new projects and designs! Happy bracelet making!