***You can purchase an INEXPENSIVE AD-FREE PDF of this pattern on Etsy HERE and on LoveCrochet HERE! This beautifully formatted PDF includes the step-by-step tutorial on how to work braided cables (from “Braided Cabled Blanket tutorial“) and the full pattern for both the “Braided Cabled Cowl” AND “Braided Cabled Slouchy Beanie“! It is a total of 11 pages including the cover page. This pattern is also available in the “Crochet Cowls & Scarves PATTERN BUNDLE” which includes over 20 beautiful designs at a discounted price – check out the bundle HERE! You can also purchase a kit HERE on the Lion Brand Yarn website that includes the pattern and all the yarn needed to make the cowl and beanie!
When I learned how to crochet braided cables and designed my Chunky Braided Cabled Blanket, I had no idea how well-loved that pattern would become! It’s such a thrill whenever I see a finished braided cabled blanket as they always look so luxurious and elegant with the intertwined stitches. I wanted to try designing a wearable item with this braided cable design, and I had always wanted to try making a cabled cowl!
![]()
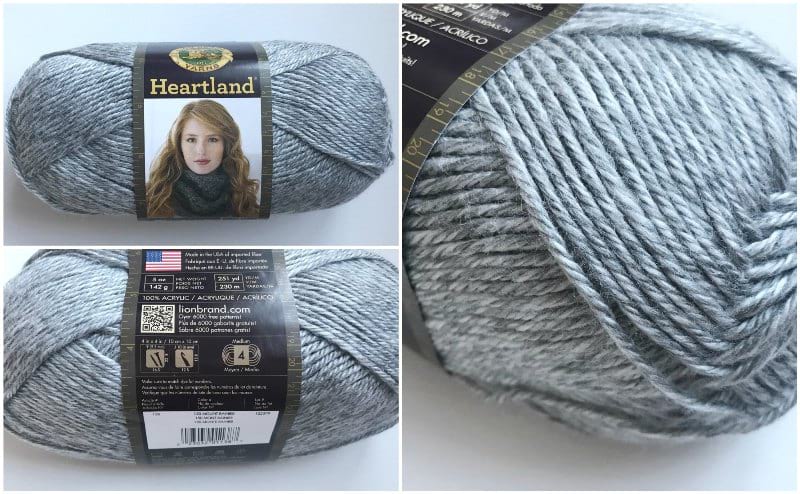
I decided to use one of my favourite acrylic yarns for this project, Lion Brand Yarn’s Heartland yarn! For those who have been following my blog for a while, you know that I have used this yarn throughout many of my projects, including the Granite Cape and my Cabled Slouchy Beanies. I love the colours available, the softness of this yarn, and how it drapes so beautifully. For this cowl, you will need approximately 3 skeins of Heartland, and I used the colourway “Mount Rainier” described as a “Medium and light gray blend“.
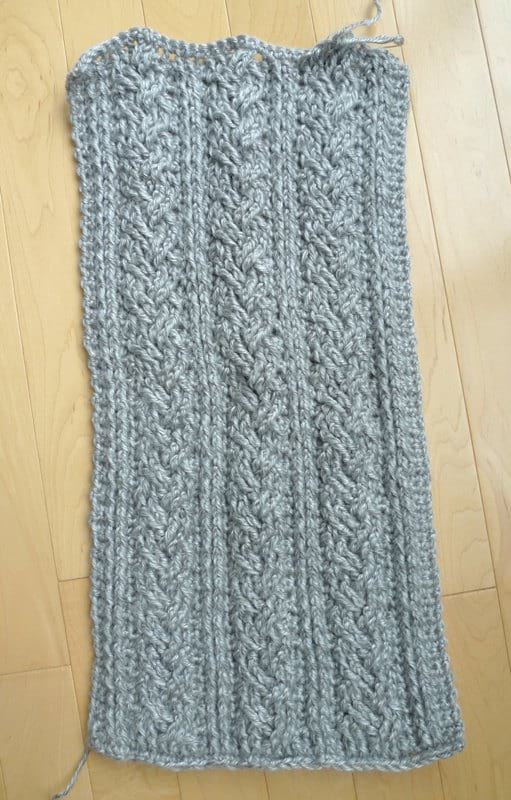
Rather than making a short cowl with simply one row of cables or having the cables run vertically up towards the neck, I wanted to design a long cowl that could be looped twice with the cables running horizontally across the neck. Thus, I modified my Chunky Braided Cabled Blanket design to get the width and spacing that I wanted. Please visit my “Chunky Braided Cabled Blanket” pattern to see a step-by-step tutorial on how to work braided cables as I explain it in detail over there!
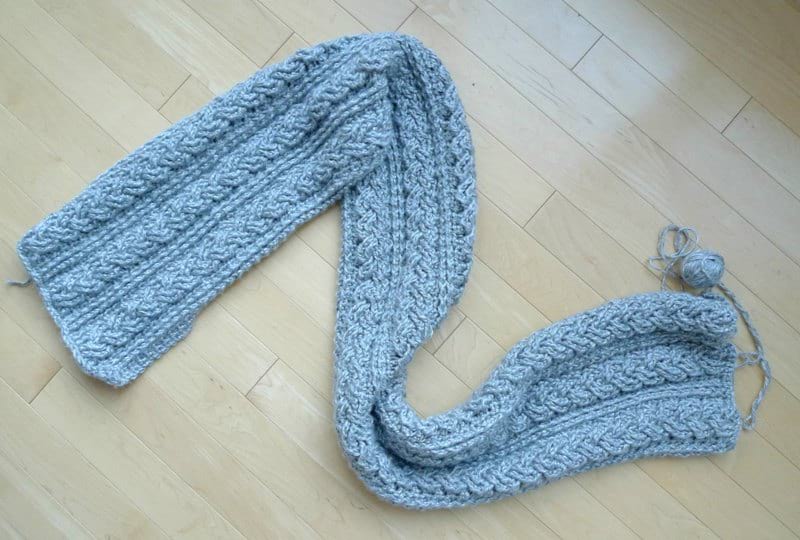
Approximately three skeins or 420 grams/742 yds later, I was happy with my length! You could always adjust the length to your liking by increasing or decreasing the number of rows if you want your cowl to drape longer or wrap more tightly around your neck!
Once you get into the rhythm of this pattern, it is a great project to take on the go as you work away on the cables! I carried this work-in-progress with me in the car and around the house and was delighted to see the elegant braided cables build up!
![]()
For my last row, I worked a row of single crochets so that it would be easier to seam the ends together!
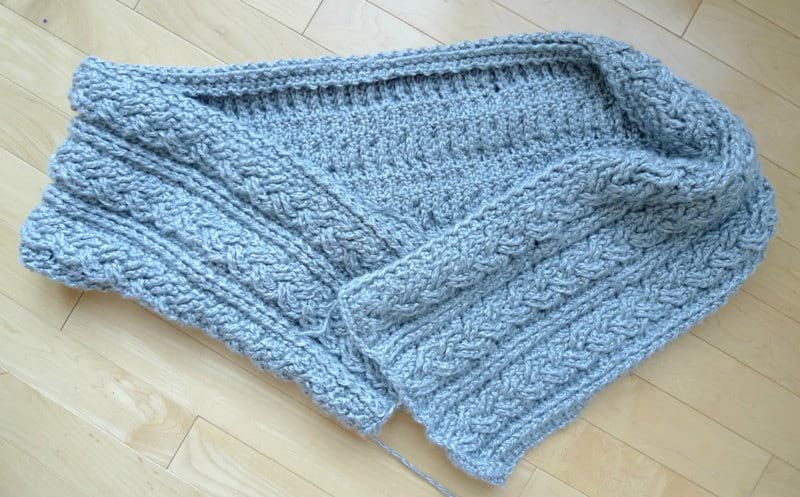
To seam up the cowl and make it circular, I simply whip stitched the ends together! Keep in mind that you could always leave this cabled scarf long and not circular by leaving the ends as is and not seaming them together. You could add fringe to both ends and fray the fringe for some added fullness!
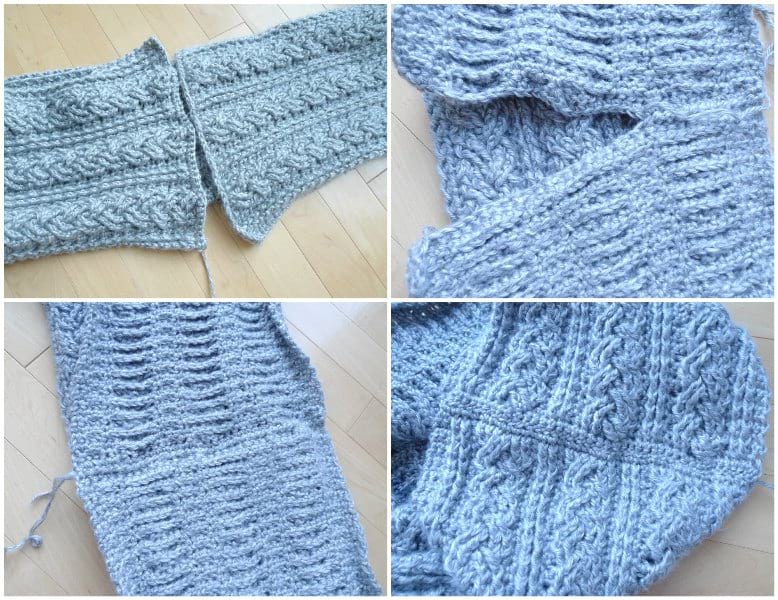
I was ecstatic to try on my beautifully intricate cowl!
![]()
**************************
Here is the free pattern for my Braided Cabled Cowl:
![]()
***You can purchase an INEXPENSIVE AD-FREE PDF of this pattern on Etsy HERE and on Craftsy HERE! This beautifully formatted PDF includes the step-by-step tutorial on how to work braided cables (from “Braided Cabled Blanket tutorial“) and the full pattern for both the “Braided Cabled Cowl” AND “Braided Cabled Slouchy Beanie“! It is a total of 11 pages including the cover page! You can also purchase a kit HERE on the Lion Brand Yarn website that includes the pattern and all the yarn needed to make the cowl and beanie!
Materials:
- Heartland yarn by Lion Brand Yarn in Mount Rainier (worsted, level 4): ~3 skeins required (~420 grams); on the Lion Brand site HERE
- 5.5 Clover Amour hook
- Clover lock ring stitch markers
- Yarn needle
Special stitches:
- Front Post Treble Crochet (Fptc): Yarn Over (YO) twice, insert hook behind post of stitch (insert hook from front to back). YO and pull up a loop, [YO and draw through 2 loops on hook] 3 times.
- Front Post Double Crochet (Fpdc): YO, insert hook behind post of stitch (insert hook from front to back of stitch), YO, pull up a loop, YO, (pull through 2 loops) twice.
Notes:
- All even rows are single crochet rows.
- All Fptc’s and Fpdc’s are worked in indicated stitches 2 rows below.
- To increase the width of this scarf with more cable cycles, ADD MULTIPLES OF 10 STITCHES.
- To increase the length of this scarf, add more rows.
- PLEASE reference my detailed step-by-step tutorial on how to work the braided cable in my post HERE!
- To see videos of the Braided cables, see Elizabeth Ham’s very helpful 3-part YouTube tutorial HERE!
Gauge: Using 5.5 mm hook, 14 dc and 7 rows = 4″
Row 1: Foundation single crochet 36. (36 sts)
Row 2 & all even rows: Ch 1, turn. Starting in second st from hook, sc in each st across.
R3: Ch 1, turn. Sc 2, Fpdc in next 2 sts 2 rows below, sc 1. *Fpdc in next 6 sts 2 rows below, sc 1, Fpdc in next 2 sts 2 rows below, sc 1*, rep 2 times. Fpdc in next 6 sts 2 rows below, sc 1, Fpdc 2 sts 2 rows below, sc 2.
R5: Ch 1, turn. Sc 2, Fpdc in next 2 post sts, sc 1. *Skip 2 post sts, Fptc in next 2 posts, working BEHIND post sts just made, Fptc in 2 skipped post sts. Fpdc in next 2 post sts, Sc 1, Fpdc in next 2 post sts, sc 1*, rep 2 times. Skip 2 post sts, Fptc in next 2 posts, working BEHIND post sts just made, Fptc in 2 skipped post sts. Fpdc in next 2 post sts, Sc 1, Fpdc in next 2 post sts, sc 2.
R7: Ch 1, turn. Sc 2, Fpdc in next 2 post sts, sc 1. *Fpdc in next 2 post sts. Skip 2 post sts, Fptc in next 2 post sts. Working IN FRONT of post sts just made, Fptc in 2 skipped post sts. Sc 1, Fpdc in next 2 post sts, Sc 1*, rep 2 times. Fpdc in next 2 post sts. Skip 2 post sts, Fptc in next 2 post sts. Working IN FRONT of post sts just made, Fptc in 2 skipped post sts. Sc 1, Fpdc in next 2 post sts, Sc 2.
Repeat Rows 4-7 until Row 218 or desired length.
R219 (or very last row): Sc 36 across (to make the stitches more visible and easy to seam together in next step).
Fasten off and leave long end for sewing. Seam both ends of scarf together to form cowl (i.e. Rows 1 and 218 together).
Finished Dimensions: 56″ long (before seamed up into circle), 9″ wide
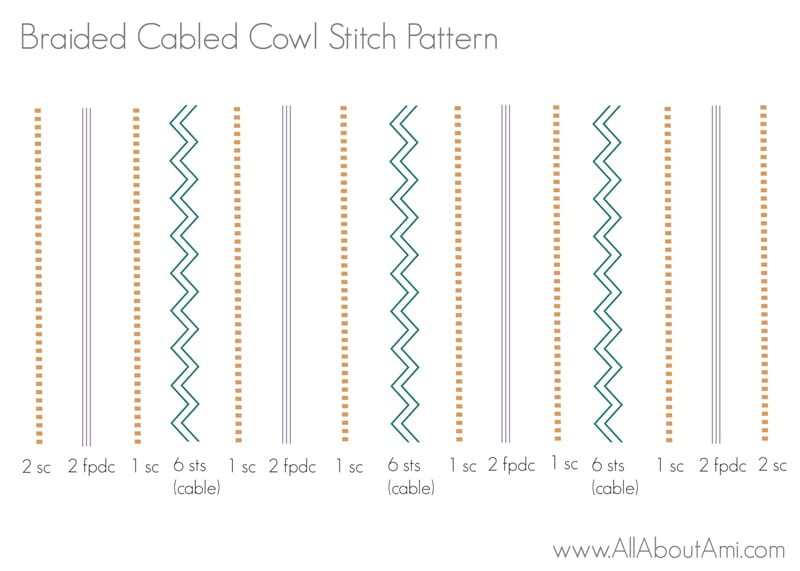
Please refer to this graphic below to visually see how the stitches are laid out! As you can see, there are 3 braided cables composed of 6 stitches. Each set of fpdc’s and braided cables is separated by 1 sc. There are 2 sc’s on each end of the cowl, and all the stitches add up to 36 stitches.
********************************
I love how the Braided Cabled Cowl can be looped twice around the neck! It is such a gorgeous way to stay warm this winter as it looks so chic with any outfit!
![]()
The stitches intertwine so beautifully with these braided cables!
![]()
This is what the Braided Cabled Cowl looks like when worn long! It looks very elegant and the intricate cables are displayed so beautifully! You can also see my ultraleather tag by BrickBubble that I like to add to all my finished items!
![]()
After finishing my Braided Cabled Cowl, I thought a matching Braided Cabled Slouchy Beanie would be so cute, so I decided to design one! You can find the free pattern and step-by-step tutorial HERE! You can also purchase the PDF on Etsy HERE and on Craftsy HERE as it contains both patterns for the Braided Cabled Cowl and Braided Cabled Slouchy Beanie (along with the braided cables tutorial)! This matching braided cabled set is gorgeous and uses a total of 4 skeins of yarn!
![]()
I hope you love this Braided Cabled Cowl as much as I do as I will be wearing it lots this winter! Don’t forget to sign-up for my newsletter HERE as you’ll be the first to know whenever I publish a new blog post! You can also follow me on Instagram, Facebook and Twitter! Happy cabling, everyone!
{This post is sponsored by Lion Brand Yarn! I’ve loved working with their yarn throughout the years and I’m thrilled that I get to collaborate with them every month!}
This pattern is an original pattern by Stephanie Lau of All About Ami. Please do not claim this pattern as your own. If you wish to share this pattern, you may link to this pattern but please do not reprint it on your site. You may keep a copy for your own personal use but please DO NOT sell the pattern or distribute it.
You may sell products made from this pattern but please clearly credit the design to me, Stephanie Lau of All About Ami, and provide a link to my blog www.AllAboutAmi.com. Permission is NOT granted for mass production or factory manufacturing of any kind. Thank you for being respectful and for your understanding!