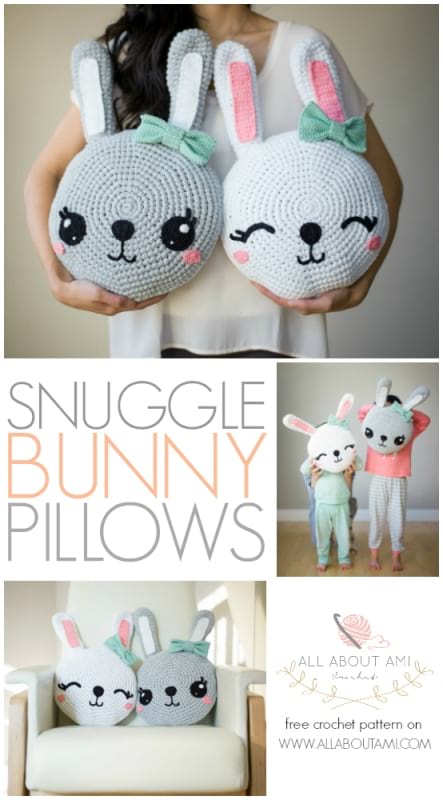
***This is the FREE PATTERN for my Snuggle Bunny Pillows! I highly recommend reading through my STEP-BY-STEP BLOG POST HERE to better understand this written pattern and to visually see how all the parts are created!
***You can purchase an INEXPENSIVE AD-FREE PDF of this pattern on Etsy HERE and on LoveCrochet HERE! This beautifully formatted PDF includes the step-by-step pictures and is a total of 7 pages including the cover page! Lion Brand has also put together a convenient kit to make these pillows HERE that includes all the yarn you need as well as a copy of the pattern!
The Snuggly Bunny Pillows are part amigurumi, part home decor, and they are the perfect size to cuddle! Their cute expressions will brighten up any room and add a whimsical touch to your décor!
![]()
Materials:
- Super bulky (level 6) t-shirt yarn: I used Lion Brand Yarn’s Fast-Track in ‘Chopper Grey” and “Airstream White” (on the Lion Brand site HERE)- 2 skeins needed for each cushion; purchase the Lion Brand Kit HERE!
- Grey bunny with OPEN eyes- Worsted weight (level 4) cotton yarn: I used Lion Brand Yarn’s 24/7 Cotton (on the Lion Brand site HERE)
- 27 g of mint (puffy bow)
- 20 g of white (ear lining and eyes)
- 13 g of black (eyes, nose, and mouth)
- 1 g of pink (cheeks)
- White bunny with CLOSED smiling eyes
- 27 g of mint (puffy bow)
- 15 g of pink (ear lining and cheeks)
- 6 g of black (eyes, nose, and mouth)
- 6.5 mm Clover Amour crochet hook and 2.00 mm Clover Amour crochet hook
- Yarn needle (bent tip helpful for attaching amigurumi parts- see HERE)
- fiberfill
- Clover lock ring stitch markers
Note:
- I worked in continuous rounds (vs. joined rounds) so that there is no visible seam unless otherwise stated.
- Leave long initial and final tails for all facial features so that they can be attached more easily.
Finished Dimensions:
- Diameter of face (with stuffing): 13.5″/34 cm
- Length from tip of ear to bottom of face: 21″/53 cm
Gauge: First four rounds is 3″/7.6 cm in diameter.
PATTERN:
HEAD (make 2)
Using 6.5 mm hook and Fast-Track yarn,
Round 1: 6 sc in Magic Ring. (6 sts)
R2: *Sc 1, Inc*, rep 3 times. (9 sts)
R3: *Inc*, rep 9 times. (18 sts)
R4: *Sc 2, Inc*, rep 6 times. (24 sts)
R5: *Sc 2, Inc*, rep 8 times. (32 sts)
R6: *Sc 3, Inc*, rep 8 times. (40 sts)
R7: *Sc 3, Inc*, rep 10 times. (50 sts)
R8: *Sc 9, Inc*, rep 5 times. (55 sts)
R9: *Sc 10, Inc*, rep 5 times (60 sts)
R10: *Sc 14, Inc*, rep 4 times. (64 sts)
R11: *Sc 7, Inc*, rep 8 times. (72 sts)
R12: *Sc 3, Inc*, rep 18 times. (90 sts)
R13: *Sc 8, Inc*, rep 10 times. (100 sts)
R14: *Sc 24, Inc*, rep 4 times. (104 sts)
R15: *Sc 12, Inc*, rep 8 times. (112 sts)
R16: Dc 1, Sc 111. Sl st to top of dc. (112 sts) {The dc helps to create more height for a cleaner finish when we need to close up the round.}
For one side of head, fasten off and cut end.
For other side of head, do not fasten off as we will be using this working yarn to seam the two sides together.
EYES
Using 2 mm hook and black yarn,
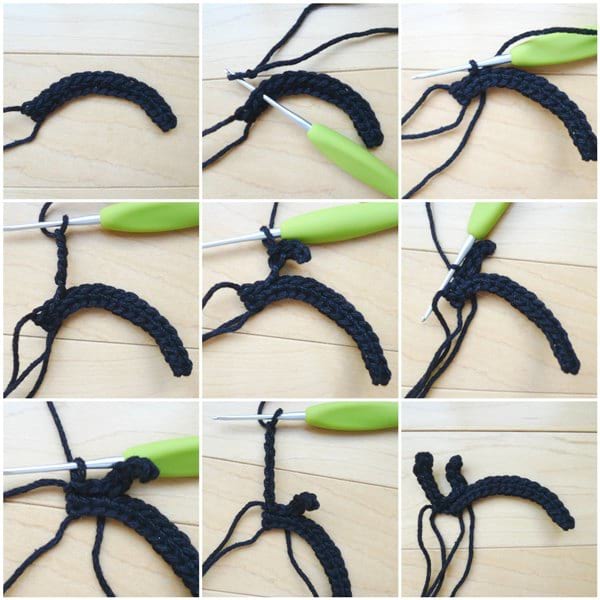
***OPEN variation (work in joined rounds):
R1: 6 sc in Magic Ring. Sl st to first sc. (6 sts)
R2: Chain 1. *Inc around*, rep 6 times. Sl st to first sc. (12 sts)
R3: Chain 1. *Sc 1, Inc*, rep 6 times. Sl st to first sc. (18 sts)
R4: Chain 1. *Sc 2, Inc*, rep 6 times. Sl st to first sc. (24 sts)
R5: Chain 1. *Sc 3, Inc*, rep 6 times. Sl st to first sc (30 sts)
We will now begin working the curved eyelashes.
Left eye: R6: Sc 11, Ch 6, Sl st 5 in back “bumps” of chain. Sc 2, Chain 5, Sl st 4 in back “bumps” of chain. Sc 17. Fasten off and leave long end for sewing.
Right eye: R6: Turn. Work in opposite direction. Sc 11, Ch 6, Sl st 5 in back “bumps” of chain. Sc 2, Chain 5, Sl st 4 in back “bumps” of chain. Sc 17. Fasten off and leave long end for sewing.
Adding white detailing to eyes: Make pupil by embroidering many lines, rotating each subsequent line to form a circle of diameter 1.5 cm. Position this circle near the eyelashes spanning across Rounds 2-5. Embroider a small white circle diagonally across Rounds 4-5 with a diameter of 0.5 cm.
Attach eyes so that they span across Rounds 8 – 13, about 5″ apart. Do not sew down eyelashes to give some dimension to the face.

***CLOSED SMILING variation:
Chain 17.
R1: Starting in second chain from hook, Sc 16. Fasten off and leave long end for sewing.
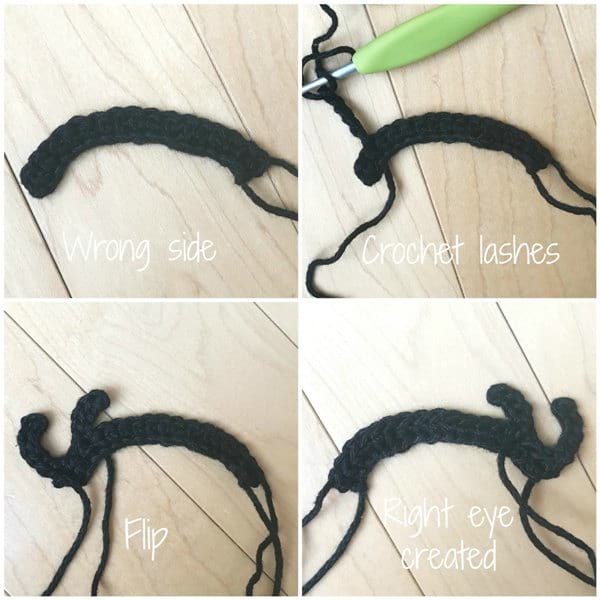
Left eye: Position row so that right side is facing you (yarn ends will be on the left side). Rejoin yarn in 3rd stitch from left (insert your hook into third stitch from left, add a slip knot, and pull it through).
We will now crochet the curved lashes,
Chain 5, Sl st 4 in back “bumps” of chain, slip stitch in same stitch where chains are originating from. Sl st 2 across to make it to the first stitch on the left. Chain 7, slip stitch 6 in back “bumps” of chain, slip stitch in same stitch where chains are originating from. Fasten off and leave long end for sewing.
Right eye: Position row so that wrong side is facing you (yarn ends will be on the right side). Rejoin yarn in 3rd stitch from left (insert your hook into third stitch from left, add a slip knot, and pull it through).
We will now crochet the curved lashes,
Chain 5, Sl st 4 in back “bumps” of chain, slip stitch in same stitch where chains are originating from. Sl st 2 across to make it to the first stitch on the left. Chain 7, slip stitch 6 in back “bumps” of chain, slip stitch in same stitch where chins are originating from. Fasten off and leave long end for sewing. FLIP this eye so that the lashes are on the right side.
Attach closed eyes so that they span across Rounds 7-11, about 4.25″ apart. Do not sew down eyelashes to give some dimension to the face.
NOSE/MOUTH
Using 2 mm hook and black yarn,
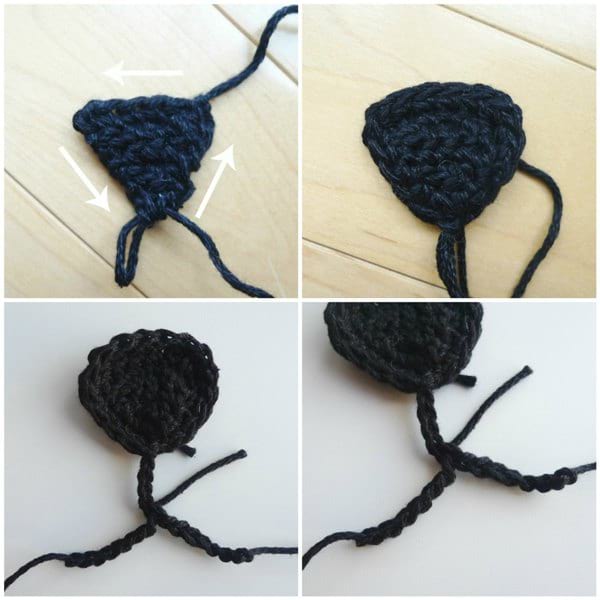
We will be forming a triangle for the nose and working in turned rows:
Chain 7.
Row 1: Starting in second chain from hook, Sc 6. (6 sts)
R2: Chain 1, turn. Starting in second st from hook, Dec, Sc 2, dec. (4 sts)
R3: Chain 1, turn. Starting in second st from hook, Sc 4. (4 sts)
R4: Chain 1, turn. Starting in second st from hook, *Dec*, rep 2 times. (2 sts)
R5: Chain 1, turn. Starting in second st from hook, Dec 1. (1 sts)
Now we will begin crocheting around the triangle to give it a nice edging by working in rounds.
Round 1: Chain 1, Sc 5 up the side of the triangle, Sc 6 across the top of the triangle, Sc 5 down the other side of the triangle. Slip st to Chain 1 to close the round (16 sts).
Round 2: Chain 1, starting in next st, Sc 16. Slip stitch to first chain 1. (16 sts)
Do not fasten off. Now we will begin crocheting the upturned smiling mouth!
Chain 12. Fasten off and leave long end for sewing. Rejoin yarn in 5th chain from the top (where nose is located). Chain 7. Fasten off and leave long end for sewing. Sew nose/mouth to face with top of nose starting at Round 3. Be sure the nose/mouth is positioned evenly between the eyes and sew the mouth so that the chains form two “u’s” or a “W” to form a smiling mouth.
CHEEKS (make 2)
Using 2 mm hook and pink yarn,
Chain 6 (this is the foundation chain).
Round 1: Starting from second chain from hook, Sc 5 in back loops of foundation chain. Turn and Sc 5 in front loops of the foundation chain [we are making an oval by crocheting around the chain]. (10 sts)
Round 2: Inc, Sc 3. *Inc*, rep 2 times. Sc 3, Inc. (14 sts)
Slip stitch to next st. Fasten off and leave long end for sewing. Sew onto face across Rounds 13-15 and diagonally below eyes.
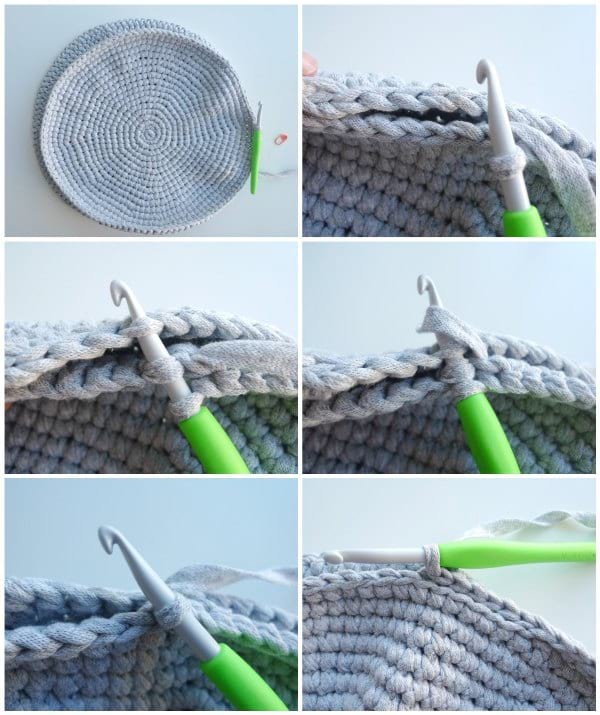
SEAMING TWO SIDES OF HEAD TOGETHER:
After all the features have been added, it is time to seam the two sides of the head together and stuff the head. We will slip stitch the front and the back sides of the head together for a beautiful and strong seam. Place both sides ontop of each other, with wrong sides touching each other on the inside (correct sides should be facing outwards). Position joins towards bottom of the face. When seaming the sides together, the side with the facial features should be facing you. Insert crochet hook into back loop of one side (with facial features) and front loop of other side. Yarn over and pull through all loops. Continue in this manner all the way around the circle working counter-clockwise, stuffing firmly as you go. Push stuffing firmly to all edges so that there are no dimples or dips in the face. Slip stitch to first slip stitch, fasten off and weave in end.
EARS (make 2)
Using 6.5 mm hook and Fast-Track yarn,
Round 1: 6 sc in Magic Ring. (6 sts)
R2: Inc around. (12 sts)
R3: *Sc 1, Inc*, rep 6 times. (18 sts)
R4-12: Sc 18
R13: *Sc 4, dec*, rep 3 times. (15 sts)
R14-22: Sc 15
R23: Sc 7 (leave rest of round unworked)
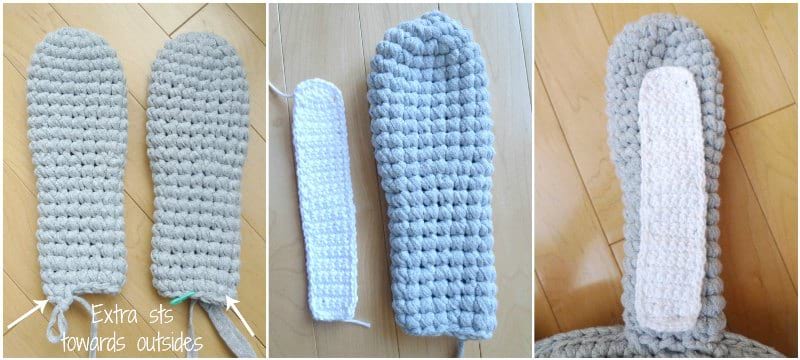
Fasten off and leave long end for sewing. Do not pinch or sew open end shut. Stuff gently. Position the ears so that the extra stitches from Round 23 are towards the outsides (this helps when attaching them onto a curved surface). Sew ear linings to ear (see pattern below). Sew ears ontop of bunny’s head so that the opening of the ear spans across the last rounds of both sides (Round 16) and the seam (this gives the ear more stability so that it can stand up straight and not flop downwards). The space between the ears should be about 4″/10 cm.
EAR LINING (make 2)
Using 2 mm hook and white/pink yarn,
Ch 7
R1: Turn. Starting from second chain from hook, Sc 6. (6 sts).
R2: Chain 1, turn. Starting from second st from hook, Sc 6. (6 sts).
R3-33: Repeat R2.
We will now begin forming the curve towards the top of the ear lining.
R34: Chain 1, turn. Starting from second st from hook, Sc 1. Hdc 1, Dc 2, Hdc 1, Sc 1. (6 sts).
R35: Repeat R34.
Now we will begin crocheting the border around the ear lining and working in a round.
Round 1: Ch 1, slip stitch around. Join with slip stitch to first slip stitch.
Fasten off and leave long end for sewing. Sew onto ear.
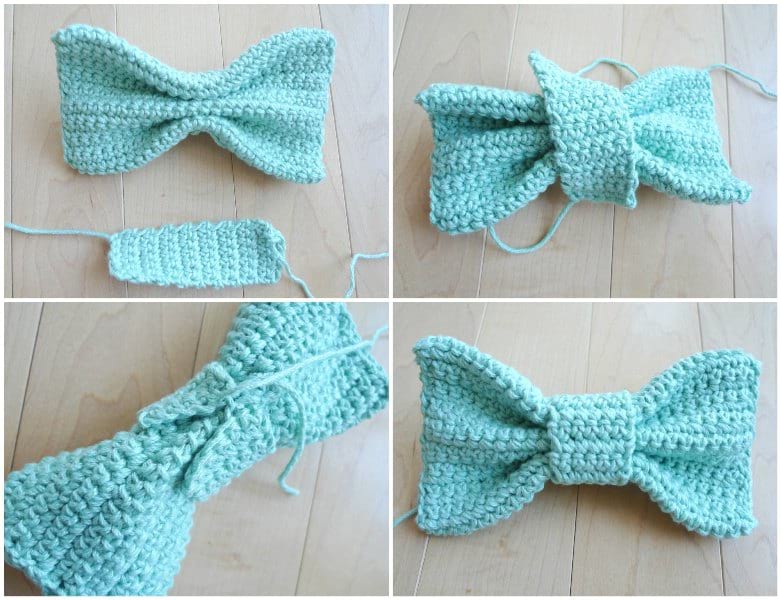
PUFFY BOW:
Using 2 mm hook and mint yarn,
Body of bow:
Chain 26
Row 1: Starting in second ch from hook, Sc 25. (25 sts).
Row 2: Chain 1, turn. Starting in second st from hook, Sc 25 (25 sts).
R3-35: Repeat Row 2.
Fasten off and leave long end for sewing. Fold rectangle in half so rows are horizontal. Whip stitch horizontal sides together. Flip rectangle inside out so that the cleaner seam is visible. Position seam towards back of bow. Slip stitch vertical edges together to close them up. For the right side, slip stitch from bottom to top. For the left side, slip stitch from the top to the bottom. Form creases in the bow by pinching the middle and run a yarn needle with yarn up through and down the middle to help keep the ruching in place.
Middle Knot:
Chain 7
Row 1: Starting in second ch from hook, Sc 6. (6 sts)
Row 2: Chain 1, turn. Starting in second st from hook, Sc 6. (6 sts).
R3-17: Repeat Row 2.
Fasten off and leave long end for sewing. Wrap middle knot around ruched center of body of bow. Whip stitch ends together. Use ends to tie bow onto one of the bunny’s ears (we tied it on the right side).
Sign up for my newsletter HERE to get new designs and patterns straight to your inbox! You can also follow me on my social media (Facebook, Twitter and Instagram) to stay up to date with my work too! Happy bunny making, and don’t forget to pin the below image to your Pinterest boards! Be sure to use the hashtag #snugglebunnypillow on social media so we can see your progress and all your adorable bunnies!
{This post is sponsored by Lion Brand Yarn! I’ve loved working with their yarn throughout the years and I’m thrilled that I get to collaborate with them every month!}
This pattern is an original pattern by Stephanie Lau of All About Ami. Please do not claim this pattern as your own. If you wish to share this pattern, you may link to this pattern but please do not reprint it on your site. You may keep a copy for your own personal use but please DO NOT sell the pattern or distribute it.
You may sell products made from this pattern but please clearly credit the design to me, Stephanie Lau of All About Ami, and provide a link to my blog www.AllAboutAmi.com. Permission is NOT granted for mass production or factory manufacturing of any kind. Thank you for being respectful and for your understanding!