I have been receiving some e-mails recently from people asking how to read amigurumi patterns. I always assumed it was straight forward enough, but I often forget what it was like when I first started crocheting. Trying to interpret patterns can seem like trying to understand a foreign language with all the symbols and abbreviations! And so, I thought I would take the time to explicitly and clearly describe how to read amigurumi crochet patterns as I find it very exciting that people are getting inspired to learn how to crochet after seeing my amigurumi. I want to make the learning process as easy as possible so everyone can make their own stuffies!
Please reference my “Amigurumi for Beginners” blog post to see videos on how to do the basic stitches as well as materials you will need to make your own amigurumi. Here is a chart showing common abbreviations that you will find in some of my crochet patterns (see more extensive list here):

Next, I will go through one of my patterns (e.g. Teddy Ornaments) and explain what the instructions mean, round by round.
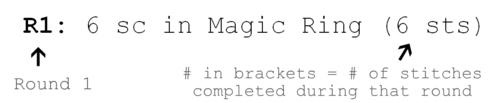
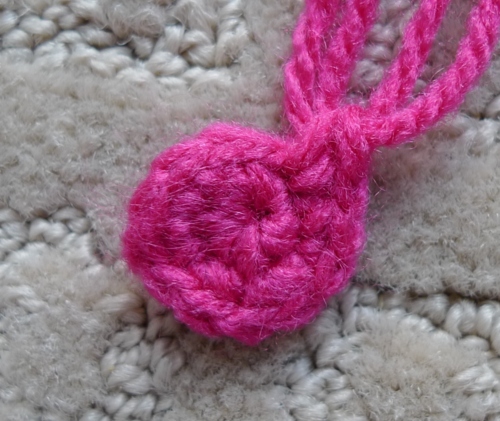
Translation: Work six single crochets in a magic ring. The “R” stands for “Round” because we are crocheting in the round in a continuous spiral (could also be denoted by “Rnd”). The “R” could also stand for “Row” (when working in rows, you usually turn your work at the end of each row and work back across the top of the previous row for a square or rectangle). The number in brackets at the end shows you how many stitches you should have completed during that round. I always count how many stitches I’ve completed to double-check my work compared to the pattern to ensure I haven’t skipped a stitch or accidentally done one too many. [Note: in my earlier patterns, Round 1 often looked like this: “R1: Ch 2, 6 sc in second ch from hook. (6 sts)”- this is interchangeable with the R1 above as I was not using the Magic Circle back then.] See how to do the Magic Circle here.
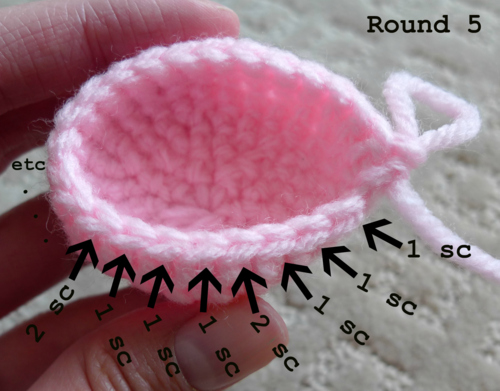
[Note: Please IGNORE the number of stitches in each round and the number of rounds in these photos as they are not accurate. I will be using the pictures for reference to show how many single crochets should be worked into each stitch.]
![]()
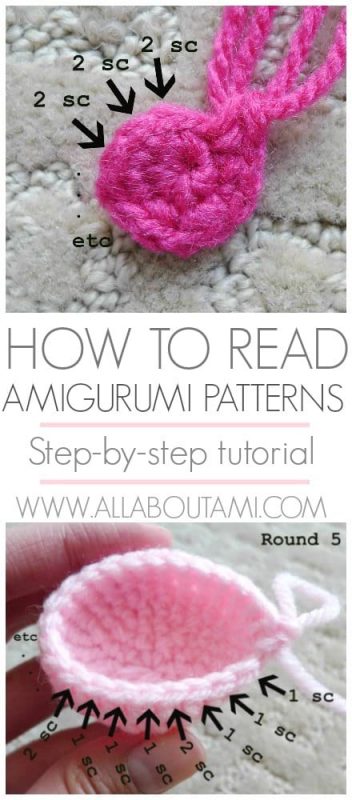
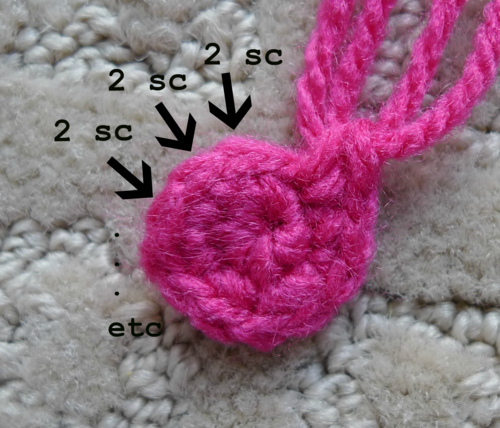
Translation: Work two single crochets in each single crochet around. Since you are crocheting two stitches in each stitch around, you are doubling the stitch count (from 6 to 12) so that your circle expands outwards. Patterns that say “inc in next st all round” mean the same thing.

Translation: Work one single crochet in the next stitch. Then work two single crochets in the following stitch. Repeat the pattern in asterisks 6 times.
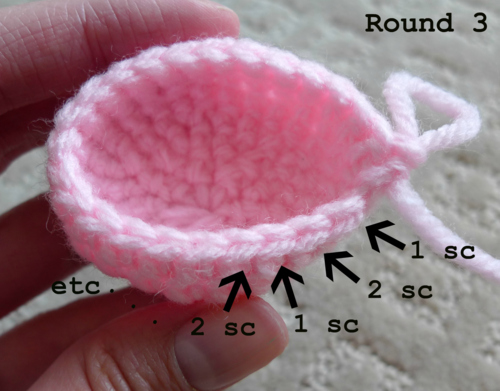

Translation: Work two single crochets in the next two stitches (one in each). Then work two single crochets in the following stitch. Repeat the pattern in asterisks 6 times.
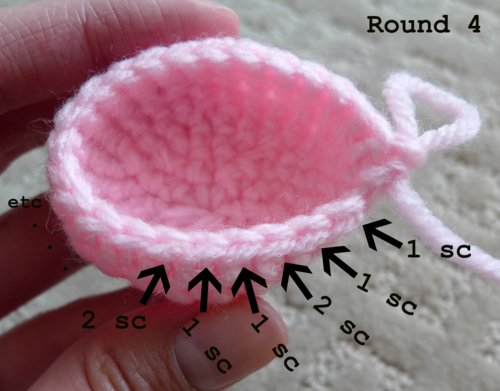

Translation: Work three single crochets in the next three stitches (one in each). Then work two single crochets in the following stitch. Repeat the pattern in asterisks 6 times.
You keep following this general pattern for the rest of the rounds as your ball expands outwards (e.g. Rows 6-8 in the Teddy Ornaments pattern), doing one single crochet in each stitch and then doing two single crochets in the next stitch every once in a while. Eventually, the ball will need to keep its shape for the middle part without expanding or decreasing, and it will look like this in the pattern:
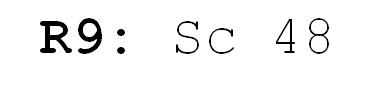
Translation: Work one single crochet in each stitch all around. As you can see, there is no increasing or decreasing and no asterisks.

You keep doing one single crochet in each stitch all around for a number of rounds (R9-20 in the Teddy Ornaments pattern), maintaining the same number of stitches in each round until it is time to decrease and close up our ball (in this case, 48 stitches).

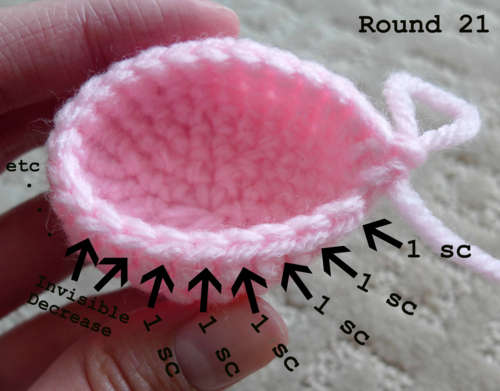
Translation: Work six single crochets in the next six stitches (one in each). Then decrease over the next two stitches. Repeat the pattern in asterisks 6 times. I highly recommend doing the “Invisible Decrease” to ensure that there are no holes or bumps in your amigurumi. Check out my blog post here to see how to do “The Invisible Decrease”.

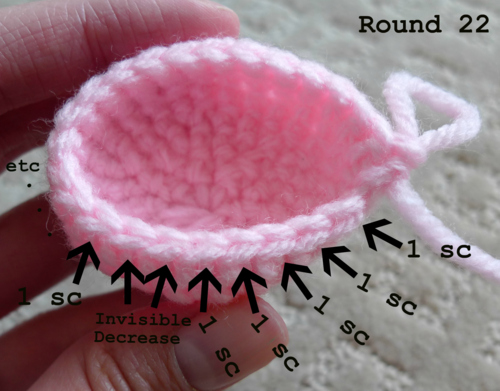
Translation: Work five single crochets in the next five stitches (one in each). Then decrease over the next two stitches. Repeat the pattern in asterisks 6 times.
You keep decreasing the number of stitches round by round by doing a number of single crochets, and then doing an invisible decrease every so often. Eventually, your ball will close up. Along the way, you will add safety eyes, perhaps embroider a nose or a mouth, and add stuffing.
I hope you found this blog post helpful! Please feel free to add any suggestions and tips, and do pass this post along to your friends who are just learning how to crochet or wanting to make amigurumi! I’ve linked this post to my “Amigurumi for Beginners” post here, and I’ve also updated it by adding some resources that can help you learn how to attach and sew your amigurumi parts together since I’ve received some questions about it. Don’t hesitate to e-mail me or leave a comment if you have any further questions. I’m so happy that people have been inspired to try my patterns after seeing my designs, and I hope that this will be a helpful resource for you all! Happy crocheting 🙂