***You can purchase an INEXPENSIVE AD-FREE PDF of this pattern on Etsy HERE. The printable PDF with step-by-step pictures has been condensed into a total of 4 pages including the cover page! Follow along with my blog post here to see step-by-step photos!
Crochet your own sweet and fuzzy Valentine Teddy! With his adorable red bowtie, this dapper bear is sure to steal your heart!
![]()
Note: I worked in continuous rounds (vs. joined rounds).
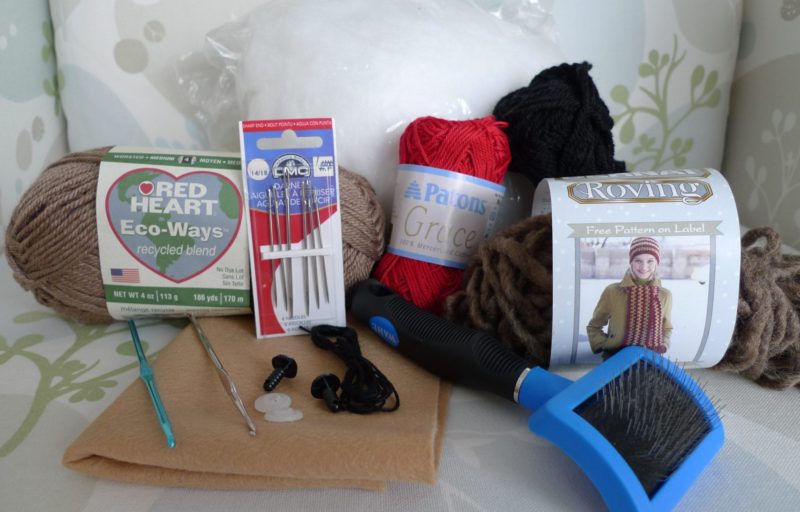
Materials:
- Two different shades of brown yarn, red yarn, and black yarn; the following are the exact brands I used: Dark brown: “Bernat Roving” yarn in “Bark”; Bulky (5), 80% acrylic/20% wool; Lighter brown: “Red Heart Eco-Ways recycled blend” yarn in “Mushroom”; Worsted, Medium (4), 70% acrylic/30% recycled polyester; Red: “Patons Grace” yarn; Light (3), 100% mercerized cotton; Any black yarn (for the nose)
- 2.00 mm Clover Amour crochet hook (used with lighter brown yarn and red yarn) and 3.50 mm crochet hook (used with dark brown yarn)
- Yarn needle (bent tip helpful for attaching amigurumi parts- see HERE)
- fiberfill
- Brown felt (for the nose and paws)
- 12 mm safety eyes
- Black embroidery floss (for the paws)
- Dog slicker brush
- Glue gun
PATTERN:
HEAD
Using dark brown yarn,
R1: 6 sc in Magic Ring. (6 sts)
R2: 2 sc in each sc around. (12 sts)
R3: *Sc 1, 2 sc in next sc*, rep 6 times. (18 sts)
R4: *Sc 2, 2 sc in next sc*, rep 6 times. (24 sts)
R5: *Sc 3, 2 sc in next sc*, rep 6 times (30 sts)
R6: *Sc 4, 2 sc in next sc*, rep 6 times (36 sts)
R7: *Sc 5, 2 sc in next sc*, rep 6 times (42 sts)
R8: *Sc 6, 2 sc in next sc*, rep 6 times (48 sts)
R9-15: Sc 48
R16: *Sc 6, dec 1*, rep 6 times (42 sts)
R17: *Sc 5, dec 1*, rep 6 times (36 sts)
R18: *Sc 4, dec 1*, rep 6 times (30 sts)
R19: *Sc 3, dec 1* rep 6 times (24 sts)
Using dog slicker brush, begin brushing the yarn (see Roxycraft’s tutorial on brushing technique). Place 12 mm safety eyes towards bottom half of head. Begin stuffing head.
R20: *Sc 2, dec 1*, rep 6 times. (18 sts)
R21: Sc 18
Continue stuffing head firmly.
R22: *Sc 1, dec 1*, rep 6 times. (12 sts)
R23: *Dec 1*, rep 6 times. (6 sts)
Fasten off and weave in end.
Brush bottom half of head using dog slicker brush.
EARS (make 2)
Using dark brown yarn,
R1: 6 sc in Magic Ring. (6 sts)
R2: 2 sc in each sc around. (12 sts)
R3: *Sc 1, 2 sc in next sc*, rep 6 times. (18 sts)
R4-7: Sc 18.
Fasten off and leave long end for sewing. Sew open end together. Brush yarn using dog slicker brush. Sew ontop of head.
BODY
R1: 6 sc in Magic Ring. (6 sts)
R2: 2 sc in each sc around. (12 sts)
R3: *Sc 1, 2 sc in next sc*, rep 6 times. (18 sts)
R4: *Sc 2, 2 sc in next sc*, rep 6 times. (24 sts)
R5-9: Sc 24
R10: *Sc 2, dec 1*, rep 6 times. (18 sts)
Stuff firmly.
R11: *Sc 1, dec 1*, rep 6 times. (12 sts)
R12: *Dec 1*, rep 6 times. (6 sts)
Fasten off and leave long end for sewing. Sew body to head.
ARMS (make 2)
Using light brown yarn,
R1: 6 sc in Magic Ring. (6 sts)
R2: 2 sc in each sc around. (12 sts)
R3-7: Sc 12
Stuff firmly.
R8: *Sc 2, dec 1*, rep 3 times (8 sts)
R9-10: Sc 8
Fasten off and leave long end for sewing. Attach to sides of body (at junction where head meets body).
LEGS (make 2)
Using light brown yarn,
R1: 6 sc in Magic Ring. (6 sts)
R2: 2 sc in each sc around. (12 sts)
R3: *Sc 1, 2 sc in next sc*, rep 6 times. (18 sts)
R4: *Sc 2, 2 sc in next sc*, rep 6 times. (24 sts)
R5-7: Sc 24
R8: *Sc 2, dec 1*, rep 6 times. (18 sts)
R9: *Sc 1, dec 1*, rep 6 times. (12 sts)
R10-15: Sc 12
Stuff firmly. Fasten off and leave long end for sewing. Attach to bottom of body.
TAIL
This tail is optional, but it gives the bear balance so that it sits better.
Using light brown yarn,
R1: 6 sc in Magic Ring. (6 sts)
R2: 2 sc in each sc around. (12 sts)
R3: Sc 12
Stuff firmly. Fasten off and leave long end for sewing. Try placing the tail in various positions at the bottom-back of the body to see which placement is best (to give balance).
BOWTIE:
The bowtie consists of 3 parts using red yarn: (1) Two triangular-shaped side pieces, (2) centre circle
(1) Triangular-shaped piece (make 2)
R1: 5 sc in Magic Ring. (5 sts)
R2: 2 sc in each sc around. (10 sts)
R3-4: Sc 10.
Fasten off and weave in end.
(2) Centre Circle
R1: 3 sc in Magic Ring. (3 sts) Leave long tail to attach to sides later.
R2: 2 sc in each sc around. (6 sts)
R3-5: Sc 6.
R6: *Dec 1*, rep 3 times (3 sts)
Fasten off and leave long end for attaching. Weave this end back through the circle. Weave original end (from R1) back through the circle as well. This should result in a circle with one end sticking out of each side. Pull ends tightly to give it a nice round shape. Using these ends, attach the centre circle to the two triangular-shaped side pieces. Then, attach the bowtie to the bear’s neck.
Adding details:
- Cut out circular piece of brown felt and sew nose onto felt with black yarn. Attach felt nose to face by sewing or using a glue gun.
- To give the “bear paw” effect, cut two oval pieces of brown felt. Glue gun or sew them onto the bottom of the feet. Use black embroidery floss to sew three black lines to “attach” the top portion of the felt to the foot. Do the same thing to the arms using two circular pieces of felt.
If you would like to make the 3-D heart that is pictured with the Valentine Teddy, please see Pepika’s free tutorial.
And now you have an adorable fuzzy teddy bear! If you have any questions or find any errors, feel free to contact me. I’ve made a “Patterns” page where I’ll be posting all my original designs, so keep checking that out 🙂 To see how some other people’s Valentine Teddies turned out, check out my “Crocher Corner” post here. Thanks and good luck!
![]()
This pattern is an original pattern by Stephanie Lau of All About Ami (February 2011). Please do not claim this pattern as your own. If you wish to share this pattern, you may link to this pattern but please do not reprint it on your site. You may keep a copy for your own personal use but please DO NOT sell the pattern or distribute it.
You may sell products made from this pattern but please clearly credit the design to me, Stephanie Lau of All About Ami, and provide a link to my blog www.AllAboutAmi.com. Permission is NOT granted for mass production or factory manufacturing of any kind. Thank you for being respectful and for your understanding!