**You can purchase an INEXPENSIVE AD-FREE PDF of this pattern on Etsy HERE or LoveCrochet HERE! This beautifully formatted PDF includes the step-by-step pictures and is a total of 9 pages including the cover page. This pattern is also available in the “Home Decor Crochet PATTERN BUNDLE” and the “Daisy Granny Square PATTERN BUNDLE“. Lion Brand Yarn has put together a convenient kit HERE that contains all the yarn you need to make this cozy blanket (choose any color combination you want)!
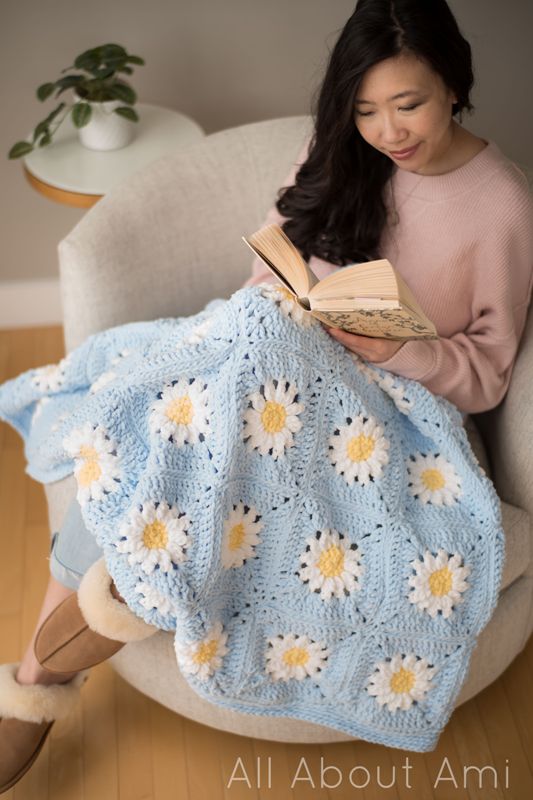
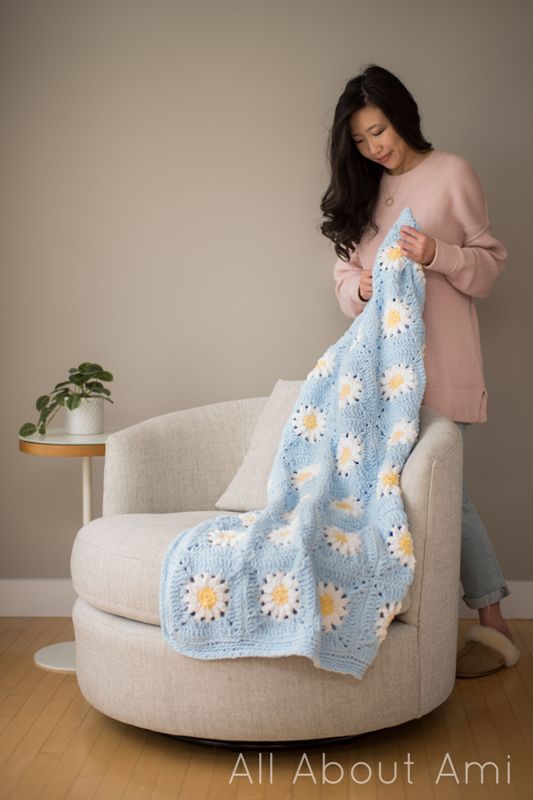
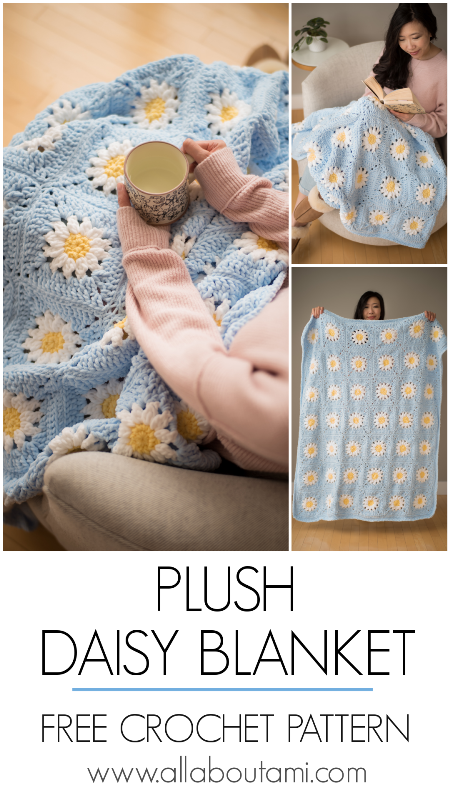
Pattern Description: Crochet this gorgeous daisy blanket using plush chenille yarn! This soft and textured blanket will brighten up your home and add a touch of nostalgia!
[Note that this is the same pattern as the “Cozy Days Daisy Blanket” using blanket yarn and different crochet hook sizes. The plush chenille yarn is a good alternative if you are allergic to wool or you want a soft and durable blanket yarn that will not fuzz up easily!]
Materials:
- 7 mm Clover Amour crochet hook (for the granny square) and 9 mm Clover Amour crochet hook (for the slip stitch border)
- Posh Twist Yarn (Bulky level 5) – convenient kit available HERE
- Color A: 780 g/909 yds (Blueberry Smoothie) – 4 skeins
- Color B: 294 g/343 yds (Whipped Cream – 2 skeins
- Color C: 168 g/196 yds (Lemon Meringue) – 1 skein
- Lock ring stitch markers
- Bent tip tapestry needle
- Steamer for blocking (optional)
Granny Square Yardage:
Each granny square uses:
- Color A (Blueberry Smoothie): 15 g/17.5 yds
- Color B (Whipped Cream): 7 g/7.4 yds
- Color C (Lemon Meringue): 4 g/5 yds
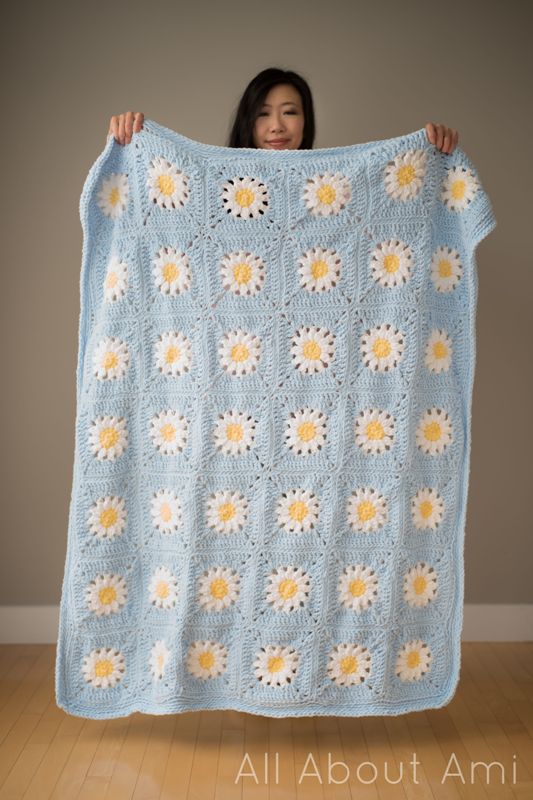
Final Dimensions:
- Width: 44.5″/114 cm, Height: 51.5″/131 cm
Gauge:
- Granny Square: 7”/18 cm x 7”/18 cm
Notes:
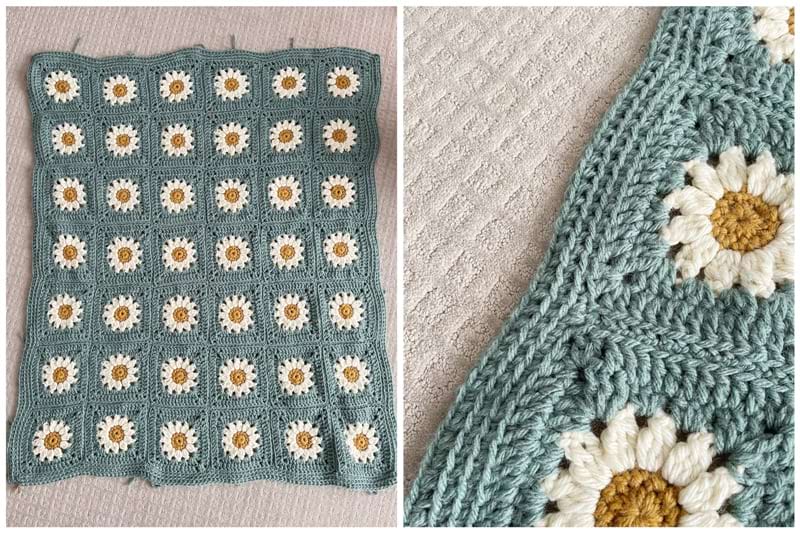
- This blanket is constructed of 42 granny squares that are seamed together.
- In case you would like to add more granny squares to your blanket, reference the Granny Square Yardage box above to see how much of each yarn color is needed for each square to see if you have enough yarn.
- Use the 7 mm crochet hook to crochet the granny squares. Use the 9 mm hook to crochet the slip stitch border.
- Three different shades of Posh Twist yarn are used to crochet the daisy granny square. Color A is the background frame color (“Blueberry Smoothie” in this pattern), Color B is the color of the petals (“Whipped Cream”) and Color C is the color of the daisy center (“Lemon Meringue”).
- I used approximately 23 g/27 yds of yarn to seam the squares together and 127 g/148 yds to crochet the border.
- The daisy granny square consists of 5 rounds: Rounds 1 and 2 are the center of the daisy (single crochet stitches), Round 3 consists of the petals (clusters), and Rounds 4 and 5 are the background frame (half double crochet and double crochet stitches).
- You can crochet over the yarn tails when switching yarn colors. I like to crochet over the yarn tails and also weave them in the opposite direction for added security.
- You can choose how you would like to seam your granny squares together. You can use a variety of slip stitch techniques (including the flat slip stitch seam) or the whip stitch, which I used for this blanket.
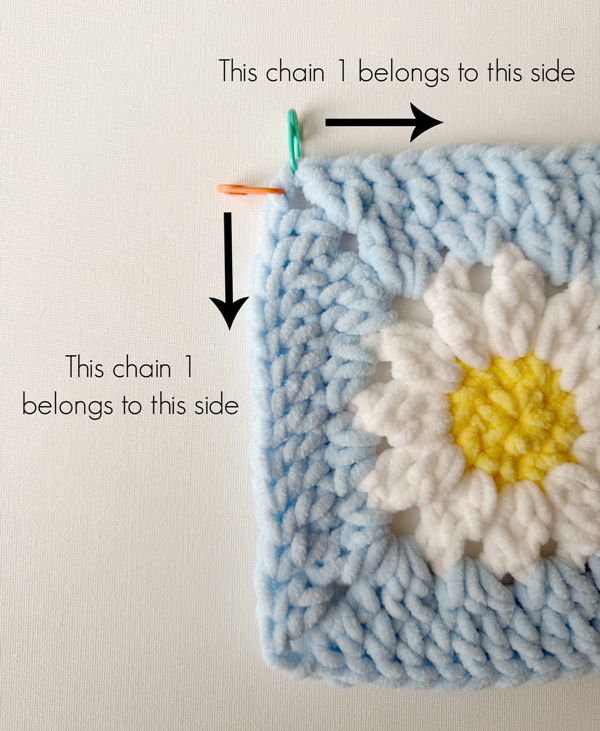
- When whip stitching the granny squares together, I split the chain 2’s in each corner: one chain 1 belongs to one side of the granny square while the other chain 1 belongs to the other side of the granny square.
- Once all 42 granny squares have been seamed together, it is time to work the border.
- The border is worked in joined rounds, and the right side of the blanket should be facing you when crocheting the border.
- The first round of the border consists of single crochet stitches in the back loop only using a 7 mm hook. This provides a frame for the granny squares. Next, a 9 mm hook is used to work the slip stitch rounds of the border to give a dense decorative edge. When working the slip stitches, crochet very loosely, otherwise the stitches will become too tight and the squares will bunch up together.
- If you do not want to do the slip stitch rounds for the border, you can continue working single crochet rounds.
- To make a baby version of this blanket using worsted level 4 yarn, please reference my “Baby Cozy Days Daisy Blanket” crochet pattern.
- Note that there are YouTube videos available demonstrating how to crochet the entire daisy granny square HERE and how to seam the squares together and crochet the border HERE!
Watch the video below to see some different color combinations of Posh Twist Yarn for the daisy granny square (you can also watch this video on YouTube HERE):
Abbreviations & Special Stitches:
- Magic Ring (MR): Make a loop. Hold yarn where ends cross. Insert hook into loop and pull up working yarn. Yarn over and work beginning chains. Work subsequent stitches in magic ring and then pull tight to close. See how to do the Magic Ring HERE.
- Beginning cluster: Ch 2, [YO, insert hook in st, YO, pull up a loop, YO, draw through 2 loops], rep 2 times in same st, YO, draw through 3 loops on hook.
- Cluster: [YO, insert hook in st, YO, draw up a loop, YO, draw through 2 loops on hook], rep 3 times in same st, YO, draw through 4 loops on hook.
- Extended single crochet: Insert hook through next stitch. Pull up a loop and extend the loop to desired height (elongate it to match the height of the rest of the stitches). YO, pull through both loops on hook.
PATTERN
Daisy Granny Square:
Using 7 mm hook,
With Color C (Lemon Meringue),
Round 1: 12 sc in Magic Ring. Sl st to first sc. (12 sts)
R2: Chain 1, sc in same st. Sc around. Sl st to first sc. Fasten off. (12 sts)
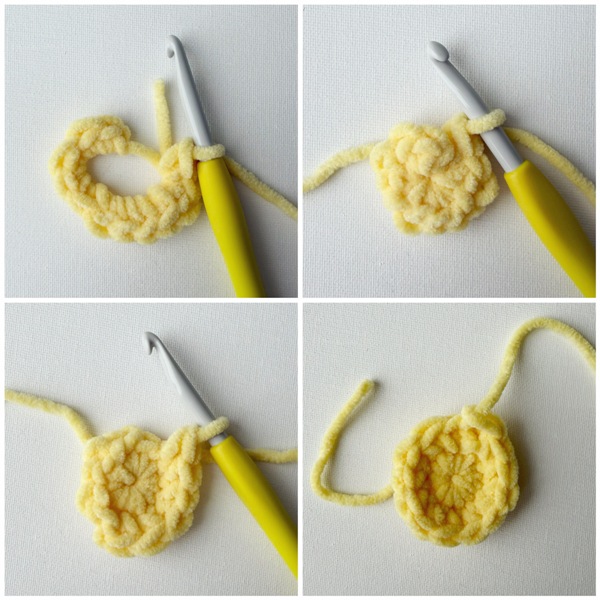
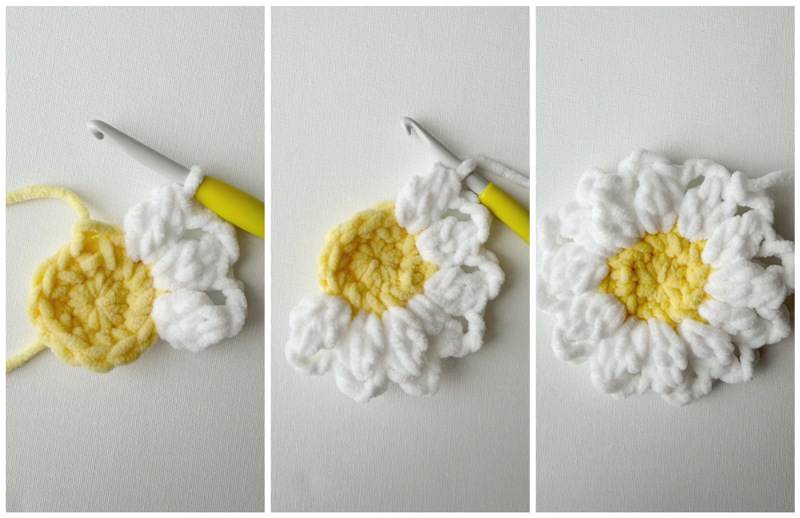
With Color B (Whipped Cream),
R3: Join with sl st in any sc. Work beginning cluster, chain 3. *Work cluster in next sc, chain 3* around. Slip stitch to top of beg cluster. Fasten off. (12 clusters and 12 ch-3 spaces)
With Color A (Blueberry Smoothie),
R4: Join with slip st in any ch-3 space. Chain 3 (counts as 1 dc), *2 dc, chain 2, 3 dc* in same space. Work 3 hdc in each of next 2 ch-3 spaces. [Work *3 dc, chain 2, 3 dc* in next ch-3 space. Work 3 hdc in each of next 2 ch-3 spaces.] Repeat everything between square brackets [ ] 2 more times. Slip stitch to top of chain 3. (48 sts and 4 ch-2 spaces).
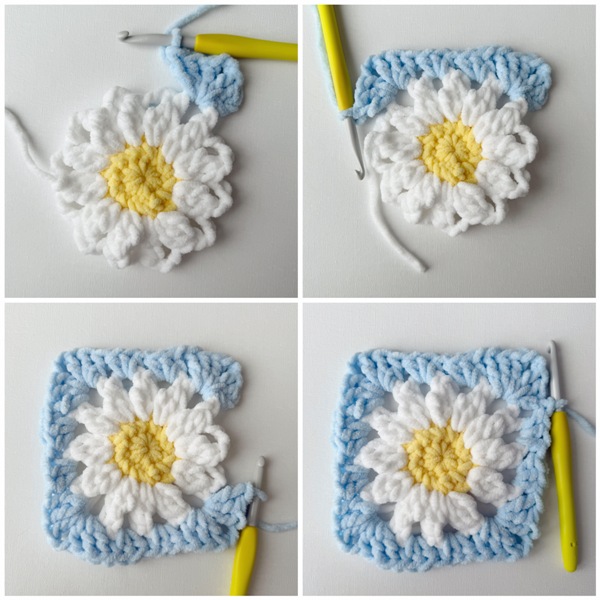
R5: Chain 3 (counts as 1 dc). Work 1 dc in next st. Skip next st, *2 dc, chain 2, 2 dc* in chain-2 space. [Skip next st, dc across until reach st before Ch 2 space (10 dc). Skip next st, *2 dc, chain 2, 2 dc* in ch-2 space.]. Repeat everything between square brackets [ ] 2 more times. Skip next st, dc 8. Slip st to top of chain 3. Fasten off. (56 sts and 4 ch-2 spaces).

Crochet 42 granny squares in total.
***WATCH THIS VIDEO HERE to see how to crochet the entire daisy granny square! The video demonstrates how to crochet all 5 rounds using a yarn called “Hue + Me” with an 8 mm hook. You can follow the same instructions using the Posh Twist Yarn with a 7 mm hook.
Seaming:
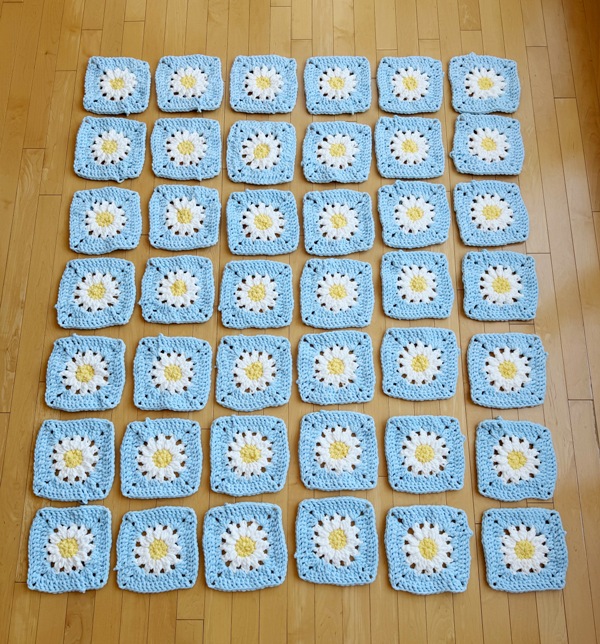
Arrange the 42 granny squares together in a rectangle as shown below (6 squares by 7 squares).
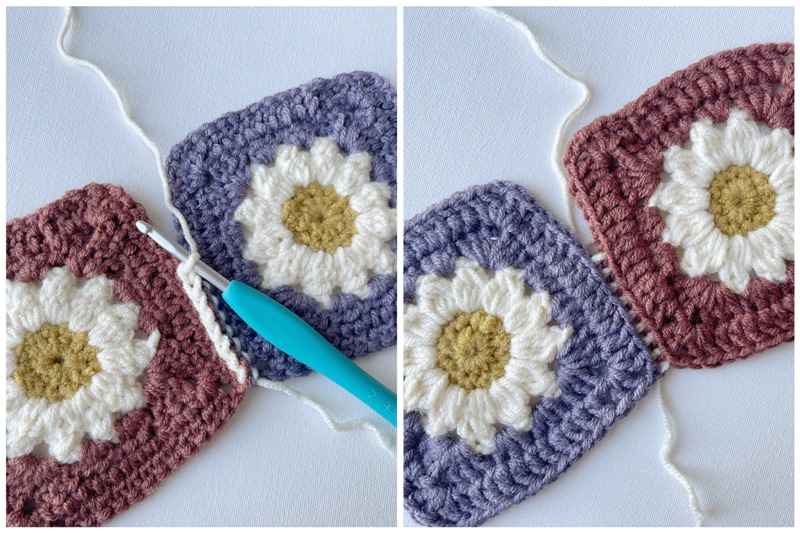
If you would like to slip stitch the granny squares together, you have three options (I used a contrast color in these next collages so you could see what the seam would look like):
(1) With the wrong side facing you, slip stitch the front loops of the granny squares together. This results in visible edges on the wrong side of the blanket. See collage below to see what the wrong side (left pic) and right side (right pic)of the blanket would look like.
(2) With the right side facing you, slip stitch the back loops of the granny squares together. This results in visible edges on the right side of the blanket.
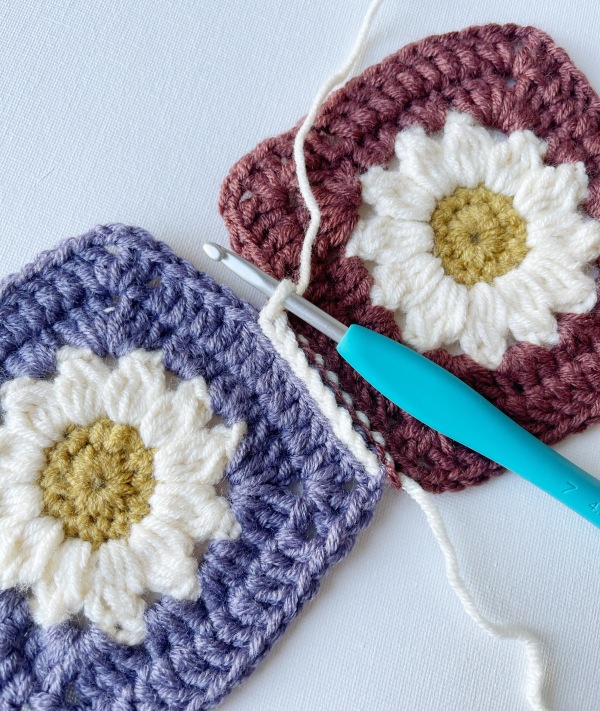
(3) With the right side facing you, work the flat slip stitch seam. Insert your hook into the back loop of one stitch of one granny square and the back loop of one stitch on the other granny square (insert hook from front to back). With the working yarn behind the granny squares, yarn over and pull through all the loops. See this in action HERE.
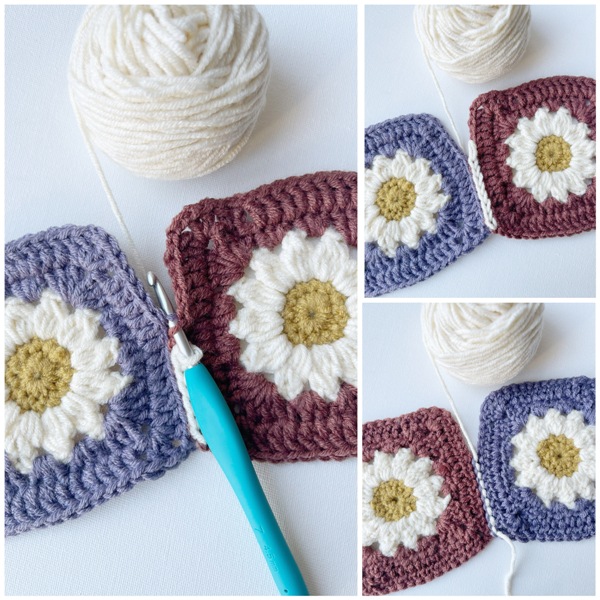
I chose not to have any visible edges on my blanket, so I whip stitched the granny squares together.
When whip stitching the granny squares together, I split the chain 2’s in each corner: one chain 1 belongs to one side and the other chin 1 belongs to the other side. I cut 85” (216 cm) strands of yarn and whip stitched all the granny squares vertically together first. Then I cut 80” (203 cm) strands for the horizontal seams.
When whip stitching, I had the wrong sides of the granny squares facing me so that there would be a cleaner seam on the right side. I also whip stitched the front loops together on the wrong side, therefore leaving the back loops untouched and visible on the right side (provides a nice frame for each granny square).
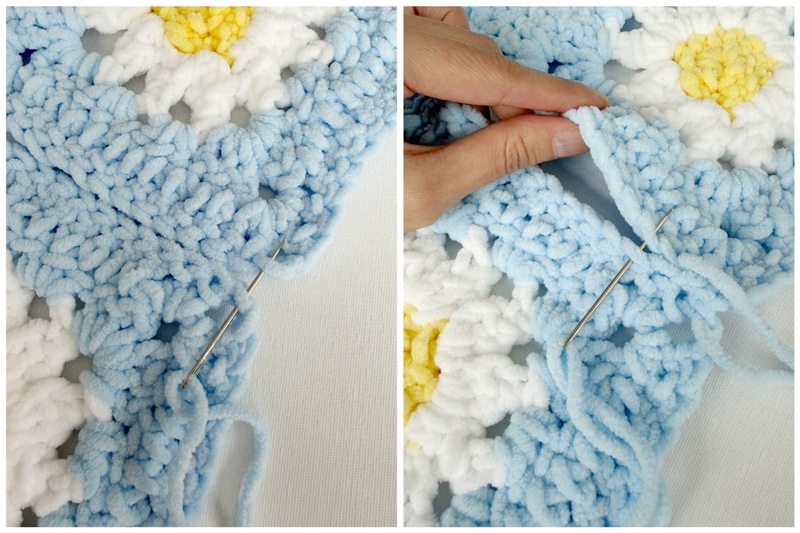
Once I was finished whip stitching, I tied each strand of yarn into a knot and left them hanging out. I then crocheted over these ends as I was crocheting the border and also weaved them in the opposite direction at the very end.
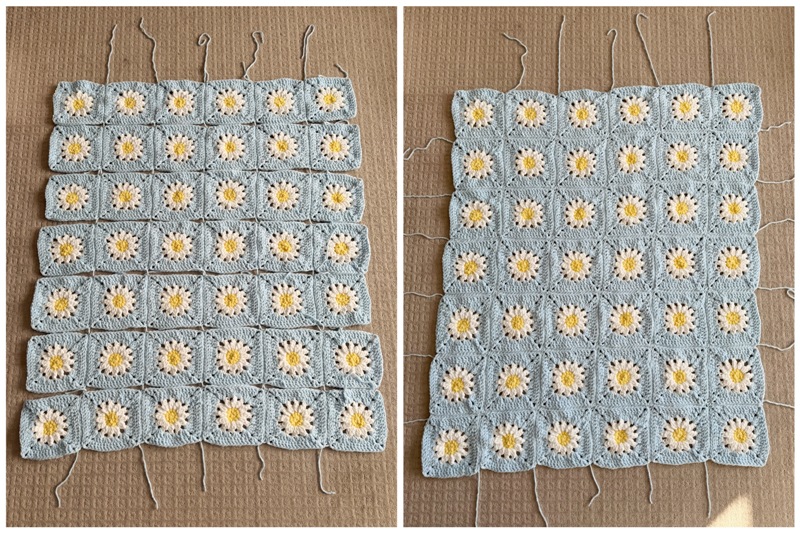
Once all the granny squares have been seamed together, it is time to crochet the border.
Border:
The border is worked in joined rounds with the right side of the blanket facing you.
Using 7 mm hook,
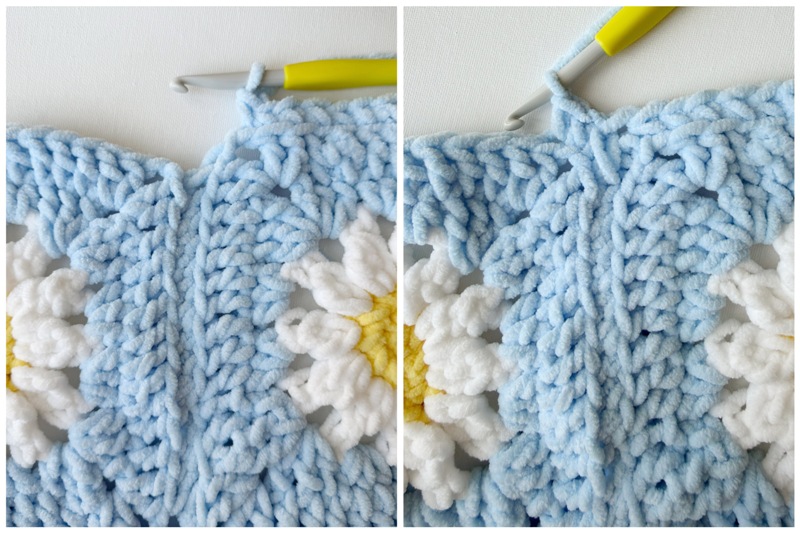
Round 1: Choose any corner that has the chain 2 space. Join yarn in back loop of left chain of chain 2 space as indicated by stitch marker in picture below. To do so, make a slip knot, insert the crochet hook into the indicated chain, add the slip knot and pull through. Chain 1, work single crochet in same stitch (chain 1 does not count as a stitch). Continue working single crochets in back loops only, leaving front loops untouched.

Work extended single crochets in areas between the granny squares to make the height of the stitches the same as the rest of the stitches (to help fill in the “dips” between the granny squares).
When approaching the chain-2 gaps in the corners, work this: *Sc in back loop of first chain. Chain 2, sc in back loop of second chain.* (this gives sharper corners).
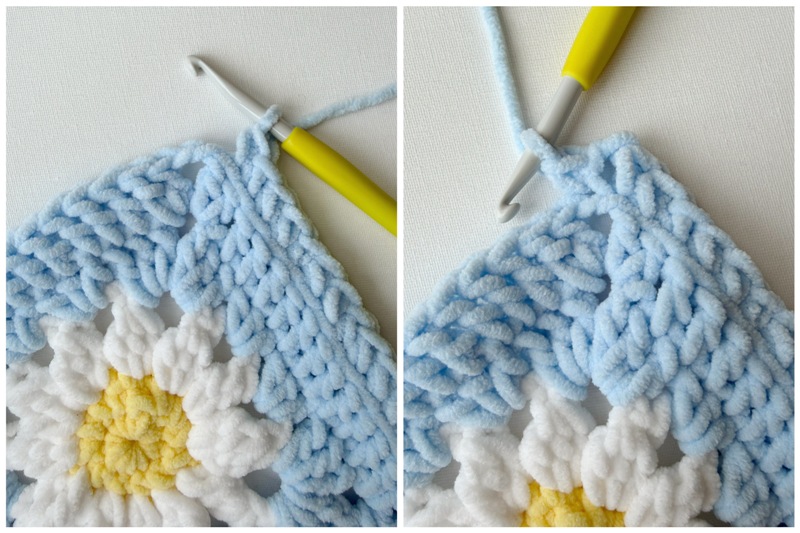
Continue working this pattern until last corner. Single crochet in back loop of remaining chain, chain 2 and slip stitch to first sc of round.
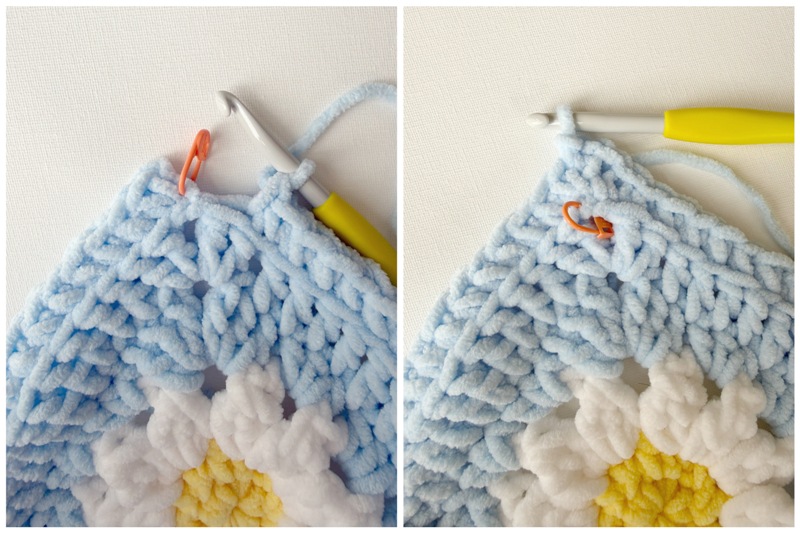
Switch to 9 mm and working very loosely,
Round 2: Chain 1, slip stitch in same stitch. Slip stitch in back loops across. When approaching ch 2 gap, chain 2 and skip 2 chains. Continue slip stitching in back loops of stitches across, working same pattern in each corner. When approaching last ch 2 space, chain 2 and skip 2 chains. Sl st to first st to close round.
Round 3: Repeat Round 2.
Round 4: Repeat Round 2, except chain 3 across the chain gap (still skip 2 chains).
Round 5: Repeat Round 4, except chain 3 across the chain gaps and skip 3 chains.
Watch THIS VIDEO HERE to see how to seam the granny squares together and crochet the border!
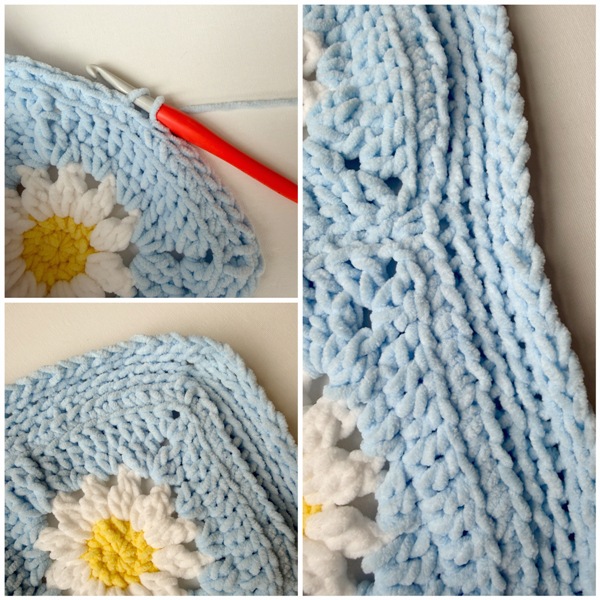
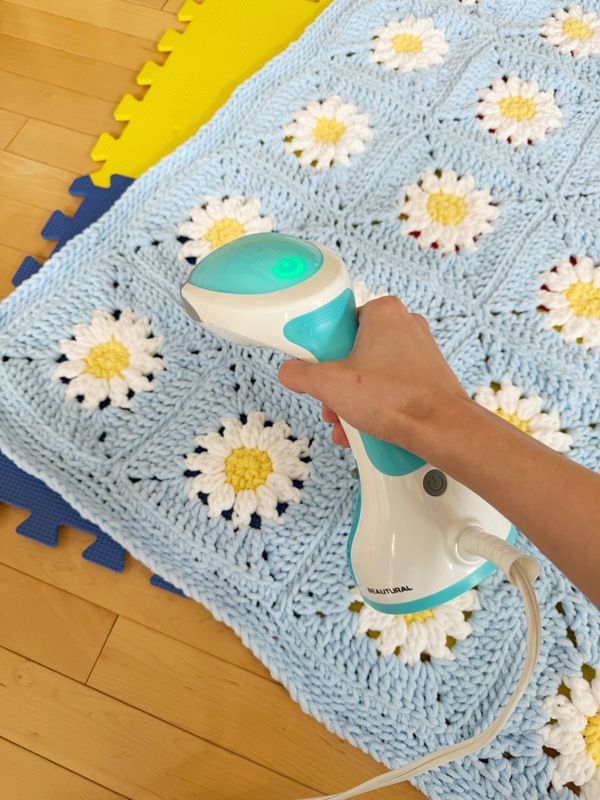
Fasten off and weave in ends. You can block your final blanket too!
Single Crochet Border alternative:
You can continue working single crochet rounds after Round 1 with a 7 mm hook. Continue working the corners as described in Round 1 and work as many rounds as you would like (the accompanying picture shows 3 rounds in total using another bulky level 5 yarn called Hue + Me).
**********************
When Lion Brand Yarn released their beautiful new “Posh Twist” yarn and sent me some samples, I immediately started crocheting daisy granny squares with it! I loved the texture of the granny squares and how they did not fuzz up easily. I was excited to make an entire blanket using these gorgeous daisy granny squares!
There were so many lovely pastel colors to choose from, but I ended up going with these soft white and yellow daisies against the light blue. When I shared some photos on social media, multiple people said they look like daisies floating in the clear blue sky!
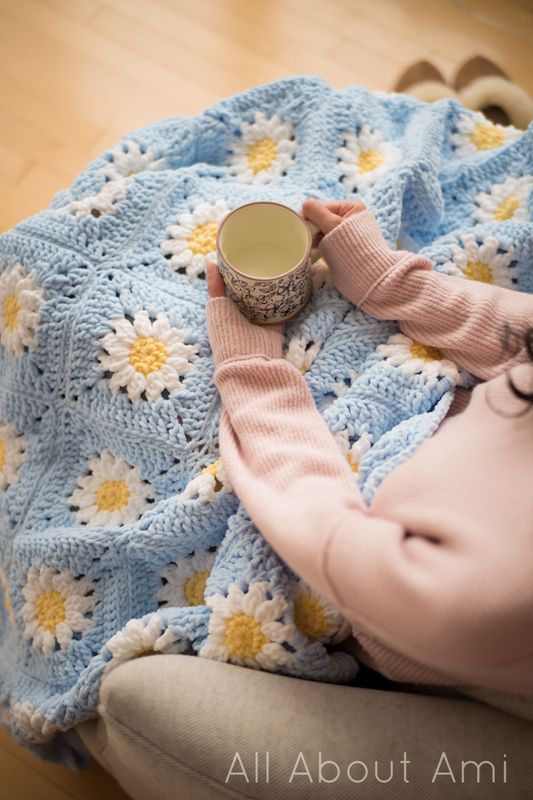
I have started using this beautiful throw blanket and it feels so soft against the skin. If you are allergic to wool or want a durable blanket to use around the house that will not fuzz up or shed, I highly recommend you give this yarn a try! It works up quickly since you are using large crochet hooks with bulky yarn!
I hope you enjoy choosing your color combos! I am tempted to make another daisy blanket using the light pink color called “Strawberry Shortcake” since it is my favorite shade – you might see some future posts about it on social media! Once again, you can find the Lion Brand Yarn kit HERE (includes the digital pattern and you can choose your own colors). Thank you so much for always being so supportive and encouraging of my daisy designs, everyone! I’m so happy that they have brought a lot of joy into your lives!
{This post is sponsored by Lion Brand Yarn! I’ve loved working with their yarn throughout the years and I’m thrilled that I get to collaborate with them every month!}
This pattern is an original pattern by Stephanie Lau of All About Ami. Please do not claim this pattern as your own. If you wish to share this pattern, you may link to this pattern but please do not reprint it on your site. You may keep a copy for your own personal use but please DO NOT sell the pattern or distribute it.
You may sell products made from this pattern but please clearly credit the design to me, Stephanie Lau of All About Ami, and provide a link to my blog www.AllAboutAmi.com. Permission is NOT granted for mass production or factory manufacturing of any kind. Thank you for being respectful and for your understanding!