***You can purchase an INEXPENSIVE AD-FREE PDF of this pattern on Etsy HERE and on LoveCrochet HERE! This beautifully formatted PDF includes the step-by-step pictures and is a total of 7 pages including the cover page! It is imperative that you follow along with my step-by-step blog post HERE to see more detailed photos and to read the story behind these dogs!
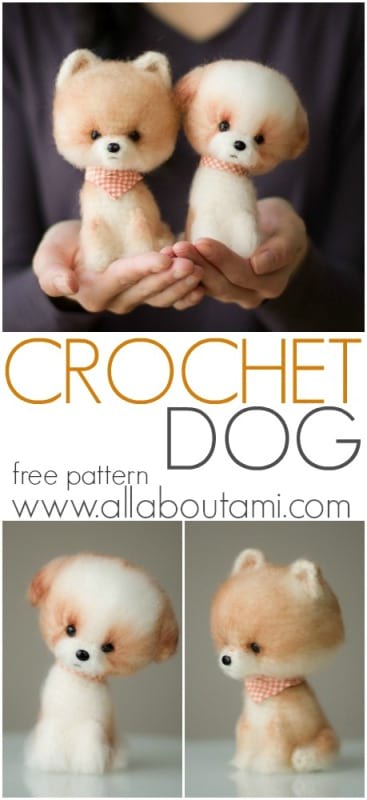
Crochet these exquisite and adorable Chinese New Year Dogs! The yarn is fuzzed up using a dog slicker brush to give an almost felted look, and colour is added with Sharpie markers!
![]()
Finished Dimensions: 5.5″/14 cm tall, 3.5″/9 cm wide
Materials
- Fuzzy white/beige yarn, worsted weight (level 4) – approximately 30 grams required; choose a yarn that can be agitated and fuzzed up with a dog slicker brush
- I used Lion Brand Yarn’s Vanna’s Complement in “Fisherman” (100% acrylic) for the pointy-eared shiba inu (note that this yarn has been discontinued- that is why we crocheted a second dog)
- I used New Basic 175 in “Cream” (75% acrylic, 25% wool) for the floppy-eared dog
- 2.75 mm Clover Amour Hook
- Yarn needle (bent tip helpful for attaching amigurumi parts- see HERE)
- fiberfill
- 7.5 mm or 9 mm safety eyes (for eyes – we used 7.5 mm); 8 x 6 mm oval safety eye for nose
- black embroidery floss
- dog slicker brush
- glue gun
- patterned fabric (for bandana scarf)
- beige & brown Sharpie markers (for adding some colour)
![]()
Important Notes & Tips (as shown in the video below):
- We crocheted two dogs: one with pointy ears and a smaller snout, and one with floppy ears and a larger snout.
- Brush at multiple angles to pull out the fibres.
- Edges need to be brushed out too.
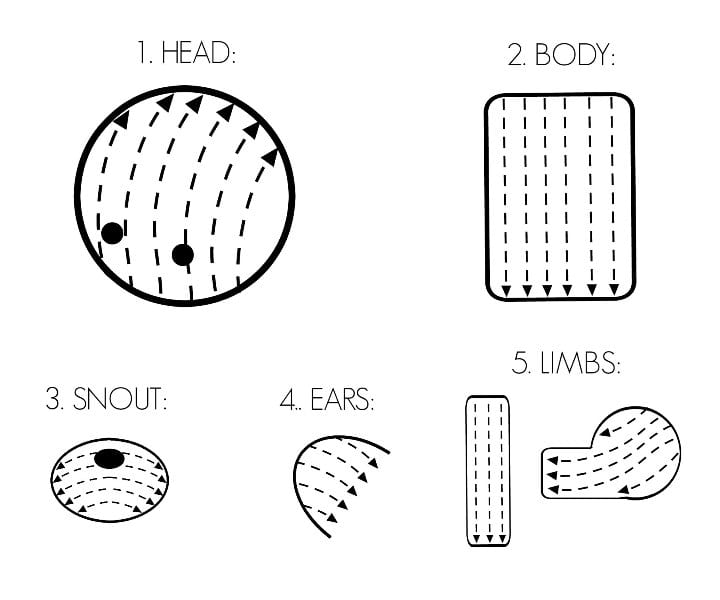
- After fibres have been brushed, comb fibers into the same direction for the final look (see graphic below showing direction of fur for each component)!
- Whenever brushing parts (particularly the limbs since they are so small), protect the working yarn or yarn end as you do not want it to tear or break.
- After tip of leg is brushed, brush out the other end.
- For limbs, after grooming hair in the same direction, trim excess fur (another area that may need trimming is the snout, but do this after the snout has been attached to the head).
- For head, determine position of safety eye. Widen space for the eye with a crochet hook to mark its position as you will be adding colour around this space (eye area).
- Add colour to the brushed fur only. Smooth out and blend the colour with the dog slicker brush
- Layer more color for greater saturation. A second darker colour can be added for greater depth and tone (always start with the lighter color first though).
- When colour around eye area is complete, place safety eye back in to check for symmetry.
- Note that it smells bad when you are adding colour with the Sharpie Markers (we recommend wearing a mask). This smell will go away after a day or two as the ink dries.
- Always brush out and add colour to the individual components BEFORE attaching them together.
- After attaching the limbs to the body and hiding the yarn ends, brush out the attachment areas to blend the fur together.
***VERY IMPORTANT: Work a test swatch (for example the first 6 rounds of the head) with your yarn, especially if you are not using the same yarn that we did. Some yarns may not fuzz up as nicely and may shed too much. We recommend choosing the same yarn that we used for the best result! Practice brushing the fibres to make sure the yarn can be fluffed up and the effect is to your liking. Practice adding colour with the Sharpie marker and smoothing it out before doing all these techniques on your actual dog!
The graphic below shows you the direction in which you should comb the fibers after the yarn has been fuzzed up with the dog slicker brush:
Order of attachment (after all components have been brushed out and coloured):
- Position eyes to head but do not secure them yet.
- Attach snout (after adding nose and mouth to snout) to head. We did not use the washer backing to secure the nose as it would have widened the snout. We secured the oval safety eye with hot glue. ***Attach snout as CLOSE to the eyes as possible for a cute puppy look.
- After snout has been attached, secure safety eyes into place with washer backings.
- Attach ears to head.
- Fill with fiberfill and close up the bottom of the head. Brush out bottom of the head.
- Fill body with fiberfill and attach to bottom of head.
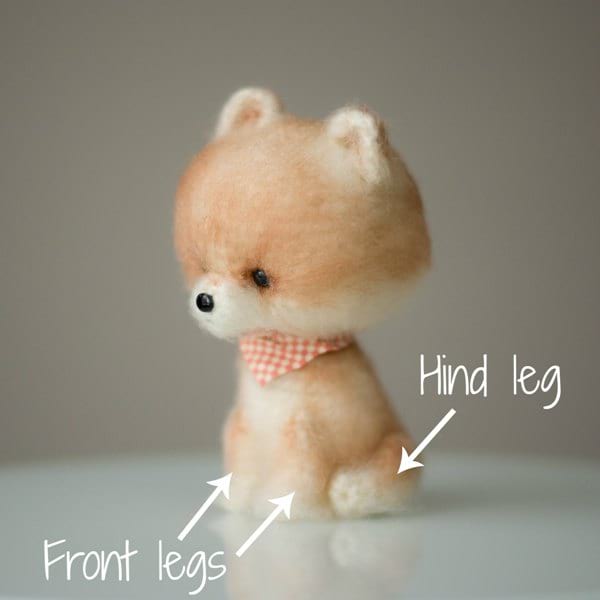
- Attach both front limbs (do not stuff with fiberfill) to front of body. Position front limbs just below the protrusion of the belly.
- Attach hind leg.
- Attach tail.
- Make bandana or collar and wrap around neck. Secure with hot glue gun.
![]()
SMALLER SNOUT
Chain 4 (this is the foundation chain)
R1: Starting from second chain from hook, Sc 3 in back loops of foundation chain. Turn and Sc 3 in front loops of the foundation chain [we are making an oval by crocheting around the chain]. (6 sts)
***To see a step-by-step tutorial on how to crochet around a foundation chain, please see HERE!
R2: Inc, Sc 1, Inc, Inc, Sc, Inc (10 sts)
R3: *Sc 3, Dec*, rep 2 times (8 sts)
Fasten off and leave long end for sewing. Agitate/fuzz up yarn using dog slicker brush. Attach oval safety eye (serves as nose) and embroider small smile underneath nose with embroidery floss. Secure oval safety eye with hot glue rather than plastic backing to prevent snout from protruding outwards too much.
LARGER SNOUT
Chain 5 (this is the foundation chain)
R1: Starting from second chain from hook, Sc 4 in back loops of foundation chain. Turn and Sc 4 in front loops of the foundation chain [we are making an oval by crocheting around the chain]. (8 sts)
***To see a step-by-step tutorial on how to crochet around a foundation chain, please see HERE!
R2: Inc, Sc 2, Inc, Inc, Sc 2, Inc (12 sts)
Fasten off and leave long end for sewing. Agitate/fuzz up yarn using dog slicker brush. Attach oval safety eye (serves as nose) and embroider small smile underneath nose with embroidery floss. Secure oval safety eye with hot glue rather than plastic backing to prevent snout from protruding outwards too much.
POINTY EARS (make 2)
Leaving long initial end and working in turned rows,
R1: Sc 3 in Magic Ring. (3 sts)
R2: Chain 1, turn. Starting in second chain from hook, Inc, Sc 1, Inc. (5 sts)
R3: Chain 1, turn. Starting in second chain from hook, sc 5
R4: Chain 1, turn. Starting in second chain from hook, Sc 2 (leave rest of stitches unworked). [This helps account for the curve of the dog’s head, making it easier to attach Row 4 of the ears to the head. Row 1 is the tip of the pointy ear.]
Agitate/fuzz up yarn using dog slicker brush. Add colour with Sharpie marker.
FLOPPY EARS (make 2)
Leaving long initial end, Chain 6 (this is the foundation chain)
R1: Starting from second chain from hook, Sc 5 in back loops of foundation chain. Turn and Sc 5 in front loops of the foundation chain [we are making an oval by crocheting around the chain]. (10 sts)
***To see a step-by-step tutorial on how to crochet around a foundation chain, please see HERE!
R2: Sc 3, *Hdc* x 4, Sc 3 (10 sts)
Fasten off. Move initial end up towards the final end by weaving through the stitches (later on, use both ends to attach ears to head).
Agitate/fuzz up yarn using dog slicker brush. Add colour with Sharpie marker.
HEAD
R1: 6 sc in Magic Ring (6 sts)
R2: Inc around (12 sts)
R3: *Sc 1, Inc*, rep 6 times (18 sts)
R4: *Sc 2, Inc*, rep 6 times (24 sts)
R5: *Sc 3, Inc*, rep 6 times (30 sts)
R6: *Sc 4, Inc*, rep 6 times (36 sts)
R7: *Sc 5, Inc*, rep 6 times (42 sts)
R8-15: Sc 42
R16: *Sc 5, dec 1*, rep 6 times (36 sts)
R17: *Sc 4, dec 1*, rep 6 times (30 sts)
R18: *Sc 3, dec 1*, rep 6 times (24 sts)
Agitate/fuzz up yarn using dog slicker brush. Determine position of safety eyes approximately between Rounds 14 and 15 about 5 stitches apart (do not fasten into place but insert eye to make a hole). Remove eye and use crochet hook to widen hole to indicate location. Add Sharpie marker colour to the area near the eye: first add lighter brown colour, brush it out, and then add darker brown colour for greater depth. Once you are happy with the colour near the eye area, place safety eyes back into holes but do not secure them yet (wait till the snout has been attached before snapping into place). Position snout underneath as close to the eyes as possible and attach to head. Attach ears to side of head. Stuff head.
R19: *Sc 2, dec 1*, rep 6 times (18 sts)
R20: *Sc 1, dec 1*, rep 6 times (12 sts)
Finish stuffing head.
R21: *Dec 1*, rep 6 times (6 sts)
Fasten off and weave in end.
BODY:
R1: 6 sc in Magic Ring (6 sts)
R2: Inc around (12 sts)
R3: *Sc 1, Inc*, rep 6 times (18 sts)
R4: *Sc 2, Inc*, rep 6 times (24 sts)
R5: Sc 24
R6: In back loops only, Sc 24.
R7-9: Sc 24.
We will now begin shaping the belly and bottom of the body.
R10: Sc 4, Dec, Dec, Sc 9, Inc, Inc, Sc 5. (24 sts)
R11: Sc 3, Dec, Dec, Sc 9, Inc, Inc, Sc 6. (24 sts)
R12-14: Sc 24
R15: *Sc 2, Dec*, rep 6 times. (18 sts)
For head looking straight, do two more rounds of Sc 18 and fasten off. For tilted head, we will shape the top of the neck- follow pattern below:
R16: Inc, Sc 6, Dec, Dec, Sc 6, Inc. (18 sts)
R17: Inc, Sc 5, Dec, Dec, Sc 7, Inc. (18 sts)
Fasten off and leave long end for sewing.
Agitate/fuzz up yarn using dog slicker brush. Add colour to desired areas. Attach body to bottom of head.
![]()
FRONT LEGS (make 2):
R1: 4 sc in Magic Ring.
R2-6: Sc 4.
Fasten off and leave long end for sewing.
Agitate/fuzz up yarn using dog slicker brush. Add colour if desired. Attach to front of body.
HIND LEG (make 1 – with this pose that we have designed, there is only one hind leg as the other leg would technically be tucked under the body):
R1: 4 sc in Magic Ring.
R2-3: Sc 4
R4: Inc, Inc, Sc 2. (6 sts)
R5: Sc 1, Inc, Inc, Sc 3. (8 sts)
R6: Sc 2, Inc, Inc, Sc 4. (10 sts)
Fasten off and leave long end for sewing.
Agitate/fuzz up yarn using dog slicker brush. Add colour if desired. Attach to back of body.
![]()
TAIL:
R1: 6 sc in Magic Ring.
R2-3: Sc 6
Fasten off and leave long end for sewing.
Agitate/fuzz up yarn using dog slicker brush. Add colour if desired. Attach to bottom back of body.
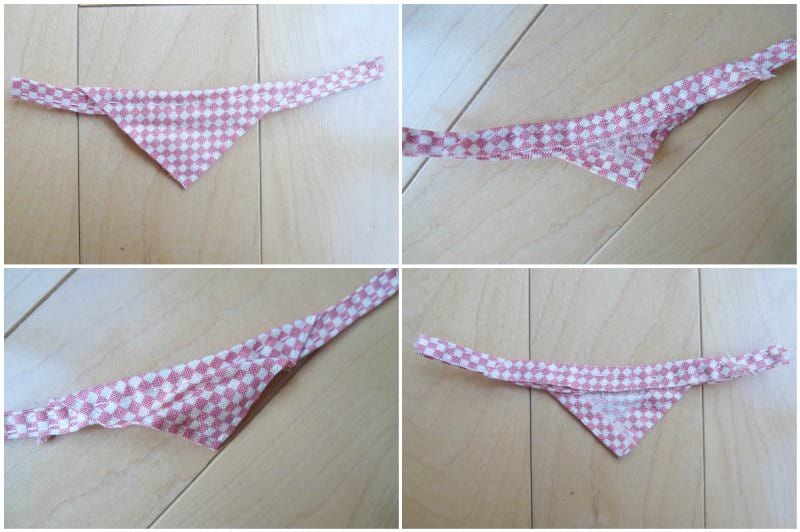
ACCESSORIES:
Cut patterned fabric using below dimensions (leave 0.5 cm seam allowance).
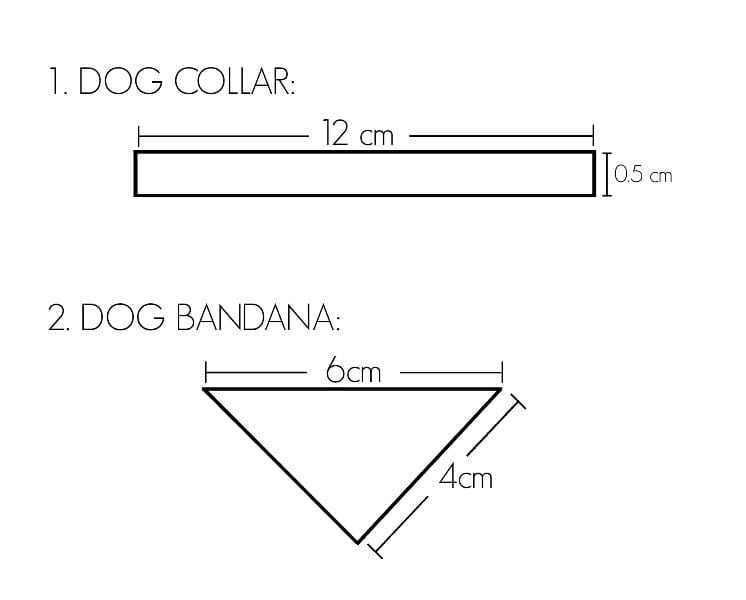
For dog collar, wrap around neck and glue into place.
For dog bandana, cut both dog collar and triangle pieces. Fold top of triangle piece over dog collar and sew into place. Scrunch front of fabric to achieve creased effect and secure with hot glue. Wrap bandana around dog’s neck and glue into place.
This pattern is an original pattern by Stephanie Lau of All About Ami (February 2018). Please do not claim this pattern as your own. If you wish to share this pattern, you may link to this pattern but please do not reprint it on your site. You may keep a copy for your own personal use but please DO NOT sell the pattern or distribute it.
You may sell products made from this pattern but please clearly credit the design to me, Stephanie Lau of All About Ami, and provide a link to my blog www.AllAboutAmi.com. Permission is NOT granted for mass production or factory manufacturing of any kind. Thank you for being respectful and for your understanding!