![]()
Make your own Cotton the sheep/lamb from “Oblivion Island”, Haruka’s brave, loyal and sweet cherished stuffie!
Materials:
- super bulky white fluffy yarn (I used “Loops & Threads Country Loom Baby” in “White”; medium beige yarn (I used “Bernat Handicrafter Cotton” in “Off White”); brown yarn (for eyes, nose and mouth); I used 1.5 skeins of the super bulky white fluffy yarn and 1.5 skeins of the medium beige yarn
- 3.5 mm Clover Amour crochet hook
- Yarn needle (bent tip helpful for attaching amigurumi parts- see HERE)
- fiberfill
- white felt (for tag)
- two wooden buttons (for eyes)
- brown, yellow, red, green and blue embroidery floss (for scar)
Note: I worked in continuous rounds (vs. joined rounds).
***PLEASE follow along with my step-by-step blog post HERE to better understand this written pattern and to visually see how to connect the parts with all my photos!
***IMPORTANT NOTE: There is technically a “right” and “wrong” side of crochet when working in the round. Read about this in my blog post HERE. When working with the beige yarn, ensure the right side is facing outwards. When working with the white fluffy yarn, ensure the wrong side is facing outwards as this is the fluffier side (read about this HERE).
FACE
Using beige yarn,
Chain 10
R1: Starting from second chain from hook, Sc 8 and 3 sc in next ch. Turn and Sc 8, 3 sc in next ch [we are making an oval by crocheting around the chain]. (22 sts)
***To see a step-by-step tutorial on how to crochet around a foundation chain, please see HERE!
R2: Sc 9, 2 sc in next sc, Sc 10, 2 sc in next sc, Sc 1 (24 sts)
R3: *Sc 5, 2 sc in next sc*, rep 4 times. (28 sts)
R4: *Sc 6, 2 sc in next sc*, rep 4 times (32 sts)
R5: *Sc 7, 2 sc in next sc*, rep 4 times (36 sts)
R6: *Sc 3, 2 sc in next sc*, rep 9 times (45 sts)
R7: *Sc 4, 2 sc in next sc*, rep 9 times (54 sts)
R8-9: Sc 54
R10: *Sc 8, 2 sc in next sc*, rep 6 times (60 sts)
R11: Sc 60
R12: *Sc 5, 2 sc in next sc*, rep 10 times (70 sts)
Fasten off.
HEAD
Using white fluffy yarn,
R1: Position beige face so that the ‘right’ side is facing you. Pick up 60 stitches between Rounds 10 and 11 of face working clockwise (this will ensure that the ‘wrong’ side or ‘fluffier’ side of the white yarn will be facing outwards). [Note: when following my step-by-step blog post HERE, I worked in the incorrect direction for the first round, so disregard the photos for this part.] To see the technique of picking up stitches, watch this video here.
R2: Front post single crochet 60. [See how to front post single crochet HERE.]
R3: *Sc 9, 2 sc in next sc*, rep 6 times (66 sts)
R4: *Sc 10, 2 sc in next sc*, rep 6 times (72 sts)
R5-8: Sc 72
R9: *Sc 10, dec 1*, rep 6 times (66 sts)
R10: *Sc 9, dec 1*, rep 6 times (60 sts)
R11: Sc 60
R12: *Sc 8, dec 1*, rep 6 times (54 sts)
R13: *Sc 7, dec 1*, rep 6 times (48 sts)
R14-15: Sc 48
R16: *Sc 6, dec 1*, rep 6 times (42 sts)
R17: Sc 42
Begin stuffing head. Sew on wooden eyes, nose and mouth with brown yarn. Top line of nose/mouth can be embroidered right ontop of initial series of chain stitches of beige face. Optional: Add cardboard piece to muzzle for more definition. Reference picture here.]
R18: *Sc 5, dec 1*, rep 6 times (36 sts)
R19: *Sc 4, dec 1*, rep 6 times (30 sts)
R20: *Sc 3, dec 1*, rep 6 times (24 sts)
R21: *Sc 2, dec 1*, rep 6 times (18 sts)
Finish stuffing head.
R22: *Sc 1, dec 1*, rep 6 times (12 sts)
Fasten off and weave in end. Note: if hole is still large (depending on the yarn you use), do R23: *Dec 1*, rep 6 times (6 sts) and then fasten off.
EARS (make 2)
R1: 7 sc in Magic Ring (7 sts)
R2: 2 sc in each sc around (14 sts)
R3: *Sc 6, 2 sc in next sc*, rep 2 times (16 sts)
R4-7: Sc 16
R8: *Sc 2, dec 1*, rep 4 times (12 sts)
R9: *Sc 4, dec 1*, rep 2 times (10 sts)
R10: *Sc 3, dec 1*, rep 2 times (8 sts)
R11: *Sc 2, dec 1*, rep 2 times (6 sts)
R12: Sc 6
Fasten off and leave long end for sewing. Sew onto head.
BODY
Using white fluffy yarn,
Chain 10
R1: Starting from second chain from hook, Sc 8 and 3 sc in next ch. Turn and Sc 8, 3 sc in next ch [we are making an oval by crocheting around the chain]. (22 sts)
R2: Sc 9, 2 sc in next sc, Sc 10, 2 sc in next sc, Sc 1 (24 sts)
R3: *Sc 2, 2 sc in next sc*, rep 8 times. (32 sts)
R4: *Sc 3, 2 sc in next sc*, rep 8 times (40 sts)
R5-12: Sc 40
R13: *Sc 6, dec 1*, rep 5 times (35 sts)
R14-18: Sc 35
Fasten off and leave long end for sewing. Embroider scar onto body using various colours of embroidery floss. Stuff body and attach to head.
LEGS (make 2)
R1: 6 sc in Magic Ring (6 sts)
R2: 2 sc in each sc around (12 sts)
R3: *Sc 1, 2 sc in next sc*, rep 6 times (18 sts)
R4: *Sc 2, 2 sc in next sc*, rep 6 times (24 sts)
R5: In back loops only, Sc 24.
R6-9: Sc 24
R10: *Sc 2, dec 1*, rep 6 times (18 sts)
R11-14: Sc 18
R15: *Sc 1, dec 1*, rep 3 times. Sc 9. (15 sts)
R16: *Sc 1, dec 1*, rep 2 times. Sc 9. (13 sts)
R17: Sc 1, dec 1, Sc 9 (12 sts)
R18: Sc 1, dec 1, Sc 8 (11 sts)
R19: *Sc 1, dec 1*, rep 3 times. Dec 1. (7 sts)
Fasten off and leave long end for sewing. Stuff and attach to body. Reference picture found in step-by-step blog post HERE. [Optional: Add circular piece of hard paper/cardboard before stuffing to make the bottom of the legs flat.]
ARMS (make 2)
R1: 4 sc in Magic Ring (4 sts)
R2: 2 sc in each sc around (8 sts)
R3: *Sc 1, 2 sc in next sc*, rep 4 times (12 sts)
R4: *Sc 2, 2 sc in next sc*, rep 4 times (16 sts)
R5: *Sc 3, 2 sc in next sc*, rep 4 times (20 sts)
R6: In back loops only, Sc 20.
R7-14: Sc 20
R15: *Sc 1, dec 1*, rep 4 times. Sc 8 (16 sts)
R16-17: Sc 16
Fasten off and leave long end for sewing. Stuff and attach to body. [Optional: Add circular piece of hard paper/cardboard before stuffing to make the bottom of the arms flat.]
TAIL
R1: 7 sc in Magic Ring (7 sts)
R2: 2 sc in each sc around (14 sts)
R3-6: Sc 14
Fasten off and leave long end for sewing. Sew onto body.
TAG
Cut rectangular piece of white felt. Sew middle of rectangle onto body. Fold piece and sew ends together. Embroider logo on tag connecting both sides together.
Now you’ve made your own life-size Cotton, a new fluffy friend who is so soft and perfect for hugs and snuggles!
![]()
As always, don’t forget to send me photos of your work as I LOVE to see how your projects turn out! Find me on Facebook, Twitter, and Instagram (@AllAboutAmi) or e-mail me (all_about_ami@hotmail.com) your pics!
Cotton from “Oblivion Island: Haruka and the Magic Mirror” is copyright of Production I.G. This pattern is copyright of Stephanie of All About Ami (April 2013). Please do not claim this pattern as your own. If you wish to share this pattern, you may link to this pattern but please do not reprint it on your site. You may keep a copy for your own personal use but please DO NOT sell the pattern or distribute it.
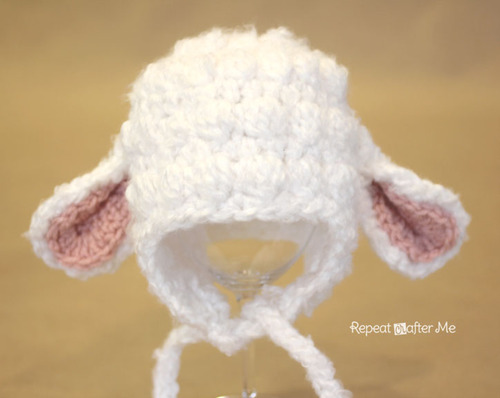
Additional note: The very talented Sarah of “Repeat Crafter Me” made this adorable lamb hat and has posted the pattern for free on her blog! We just so happened to use the exact same white fluffy yarn too (“Loops & Threads’ Country Baby Loom”), so you can use up your extra yarn to make this sweet project! You can check it out HERE! Now you can make Cotton AND a matching baby lamb hat 🙂